Vogons AWE64 Legacy Ultimate User manual

Revision 1.2.1. Released in September, 2021
Advanced Wave Effects
ISA 16-bit Sound Card
Ultimate
Retro Gaming Experience
Plug and Play

2
Table of Contents
1. Introduction ............................................................................................................................ 4
2. General Specifications ............................................................................................................. 6
3. System Requirements.............................................................................................................. 8
4. Examine Your Audio Card ........................................................................................................ 9
5. Installing the Card into PC...................................................................................................... 12
6. Installing Drivers and Software .............................................................................................. 13
Installing Drivers in Windows 95/98 ...................................................................................................13
Installing Audio Software from CD ......................................................................................................13
Installing MPU-401 ..............................................................................................................................15
Installing Software in DOS/Windows 3.1x (Classic Method) ..............................................................17
7. Installation and Initialization via UNISOUND Utility ............................................................... 18
8. Understanding the Software-Configurable Settings................................................................ 20
Input/Output (I/O) Addresses .............................................................................................................20
Interrupt Request (IRQ) Lines..............................................................................................................21
Direct Memory Access (DMA) Channels .............................................................................................21
9. Understanding the Environment Variables............................................................................. 22
SOUND Environment Variable.............................................................................................................22
BLASTER Environment Variable...........................................................................................................22
MIDI Environment Variable.................................................................................................................23
10. Understanding the Installation Program in Windows 3.1x ...................................................... 24
The AUTOEXEC.BAT File Settings.........................................................................................................24
The CONFIG.SYS File Settings ..............................................................................................................25
11. Rerouting CQM/OPL3 Port 388h (Classic Method).................................................................. 26
12. Switching Between HardMPU And Default Creative MPU-401................................................ 28
HardMPU .............................................................................................................................................28
AWE64 MPU-401.................................................................................................................................28

3
Work with MT32 Synthesizer ..............................................................................................................29
13. Using the S/PDIF Output........................................................................................................ 30
14. Using MIDI Daughterboards................................................................................................... 32
15.Resolving Conflicts ................................................................................................................ 33
Resolving Conflicts in Windows 95/98 ................................................................................................33
Resolving Conflicts in MS-DOS/Windows 3.1x....................................................................................33
How to test DRAM in DOS ...................................................................................................................33

4
1. Introduction
Welcome to the exciting world of Retro Sound!
We are proud to present you AWE64 Legacy –a modern incarnation of the iconic Creative Sound
Blaster®AWE64 Gold audio card!
AWE64 Legacy card takes the best features of the original AWE64 Gold and raises them up to an
unattainable high by the means of modern technologies. The main idea of the whole project was to
create an ultimate solution for retro gaming and listening synthesized music.
The card is built upon the original CT8920 processor and EMU8011 WaveROM from AWE64 Value for
100% compatibility with original drivers and software for the AWE64 series. To unveil a truly
potential of AWE64 the card is also packed with a maximum supported amount of RAM (28MB) for
loading soundfonts, a Wave Blaster connector, an S/PDIF digital output, and an AC'97 Audio
connector for PC's front panel. But this is just a beginning of its feature list. The two essential
elements of AWE64 Legacy are an integrated HardMPU Intelligent MIDI host controller and an
integrated genuine Yamaha OPL3 FM-synthesizer:
HardMPU is based on Atmega microcontroller and offers you "intelligent" mode support for
handling external MIDI-devices, such as Roland MT-32 or various daughterboards.
Yamaha YMF262 (also known as OPL3) gives you an alternative solution for FM-synthesis
addition th the built-in Creative CQM synthesizer.
Both of these components can be enabled of disabled manually using a set of DIP-switches on the
back side of the card. This gives you complete control over the music playback subsystem.
In addition, we have completely redesigned the analog audio section to achieve the highest possible
sound quality. This included replacing old electrolytic capacitors to modern tantalum and high quality
Japan aluminum caps, installing 2-channel amplifiers from Texas Instruments and replacing standard
3.5mm Line-Out jacks to stylish gold covered RCA connectors. All the components are assembled on a
matte black PCB with gold-plated pins and contacts, granting AWE64 Legacy a gorgeous look.
This audio card will help you achieve realistic acoustic reproduction through a wide range of digitized
sound samples and Creative 3D Stereo Enhancement technology. AWE64 Legacy is fully Sound Blaster
and also supports a full set of original Creative features:
Plug and Play ISA Specification version 1.0a compliance
Major MIDI standards such as General MIDI, Roland GS and MT-32

5
Compression algorithms such as A-law, Mu-law, CTADPCM, and IMA-ADPCM
Full duplex operation for simultaneous audio recording and playback
EMU8000 hardware wavetable synthesizer chip comprises a powerful and flexible E-mu sampling
synthesis system, and its effects processor is able to generate various effects (such as reverb and
chorus) and environments on MIDI output. EMU8000 is also supports E-Mu's SoundFont standard,
which allows you to build custom sound sets using your own samples stored in card's RAM.
Creative WaveSynth/WG employs the latest technologies for sound creation and playback in personal
computer software: sample-based wavetable synthesis (WaveSynth) and physical model-based
waveguide (WG) synthesis.
The sample-based wavetable synthesizer allows you to play high quality music and sound effects via
software (instead of hardware FM synthesis) in any Windows-based multimedia application or game
that supports synthesized music.
It also has a physical model-based waveguide synthesizer which uses Sondius®Sound Synthesis
technology to play waveguide sounds polyphonically and multi-timbrally. In other words, it allows
you to play many notes and different instruments or sound effects at once. WaveSynth/WG is also a
General MIDI synthesizer that acts like a multi-channel mixer with high quality reverb.
WaveSynth/WG can be disabled in AWE Control Panel if not needed.
Read this Manual to find out how to install and begin making the most of your new audio card.

6
2. General Specifications
This appendix lists the general specifications of your audio card.
Plug and Play
ISA Specification version 1.0a compliant
Advanced WavEffects Synthesizer
32-voice polyphony
16 parts multi-timbral
1 MB ROM of General MIDI samples
32 MB built-in DRAM
Stereo Music Synthesizer
CQM stereo music synthesizer working either in 4-operator 11-voice or 2-operator 20-voice
mode
Original Yamaha YMF262 OPL3 music synthesizer with 2-operator 18-voice mode
Compatible with previous Sound Blaster and Adlib musicsynthesizer chips
DIP Switch for routing CQM/OPL3
Stereo Digitized Voice Channel
Full duplex
16-bit and 8-bit digitizing in stereo and mono modes
Programmable sampling rates from 5 kHz to 44.1 kHz in linear steps.
High and Low DMA channels using a single interrupt for audio playback and recording
Dynamic filtering for digital audio recording and playback
Built-in Digital/Analog Mixer
Mixes sources from digitized voice and inputs from MIDI devices, CD Audio, Line-In,
Microphone, and PC Speaker
Selectable input source or mixing of various audio sources for recording
Volume Control
Software volume control of Master Volume, Digitized Voice, and inputs from MIDI device, CD
Audio, Line-In, Microphone, and PC Speaker
PC Speaker at 4 levels in 6 dB steps

7
All sources at 32 levels in 2 dB steps
Treble/Bass control at 15 levels from -14 dB to 14 dB in 2 dB steps
Full software control of fade-in, fade-out, and panning
3D Stereo Enhancement Technology
Increased depth and breadth in perceived audio
Enhances mono and stereo audio output
Independent of speaker quality
Independent of setup configuration (for example, placement and alignment of speakers with
the listener)
MIDI Interface
Built-in MIDI interface for connection to external MIDI devices
Discrete HardMPU MIDI host controller with intelligent mode support
Wave Blaster connector for attaching various MIDI daughterboards
DIP Switches for routing MIDI host controllers and selecting IRQ and Port for HardMPU
DIP Switch for turning ON/OFF MFBEN (MIDI FeedBack Enable) function

8
3. System Requirements
Your computer must be compliant to the following hardware requirements in order to properly work
with AWE64 Legacy sound card:
Intel Pentium 90 MHz CPU of better
VGA or SVGA video card
Minimum of 8 MB RAM
20 MB of free hard disk space
4x speed CD-ROM drive (for installing drivers from CD)
Windows 95 or Windows 3.1x with MS-DOS 5.0 and a Plug and Play (PnP) configuration
manager

9
4. Examine Your Audio Card
AWE64 Legacy significantly differs from the original Creative AWE64 Value in jacks and connectors
which allow you to attach other devices to your card:
Figure 1. AWE64 Legacy front side view schematic
[1] Line-In Input (AUX). Connects an internal audio source, such as a TV Tuner, FM Radio or an MPEG
card.
[2] CD-In Audio connector. Connect a CD-ROM drive using a CD audio cable.
[3] S/PDIF-Out connector. Sony/Philips Digital Interface format connector. Use it to output digital
signal from EMU8000 to external receiver or other digital device.
[4] PC Speaker connector. Connects your motherboard’s speaker connector.
[5] AC'97 Audio connector. Allows you to route Line-Out and Mic-In interfaces to the front panel of
your PC's case.
[6] Wave Blaster connector. Connect your MIDI daughterboard here (for example, Yamaha DB50XG
or Dreamblaster X2).
[1]
[2]
[3]
[5]
[4]
[6]
[7]
[8]
[9]
[10]

10
[7] Line-In jack. Connects external devices (such as cassette, DAT, or Minidisc player) for playback or
recording.
[8] 2-RCA Line-Out connectors. Connect an AC or headphones for analogue stereo sound output.
"White" is the Left channel, and "Red" is the Right channel.
[9] S/PDIF Out jack. Connects an external digital device that uses an S/PDIF connector, such as AV
Receiver, for playback or recording.
The digital audio signals from the S/PDIF Out jack contain audio output from the EMU8000 wavetable
chip mixed with digital voice playback if the playback is in 16-bit stereo mode, 44.1 kHz CD quality. If
you want to listen to WaveSynth/WG through the S/PDIF Out jack, you must enable the "Enable
WaveSynth to play at CD quality" feature. To do so:
1. Start «Creative WaveSynth-Waveguide».The WaveSynth/WG properties sheet appears,
displaying the Profile tab.
2. Click the Performance Settings button.
3. In the Settings dialog box, select the Enable «WaveSynth To Play At CD Quality» check box
and click the OK button.
4. In the WaveSynth/WG properties sheet, click the Quit button to close it.
[10] Joystick/MIDI connector. Connects a joystick or an external MIDI device (such as Roland MT-32
or MIDI-keyboard).

11
Figure 2. AWE64 Legacy back side view schematic
[11] MIDI Host Routing switch. Allow you to switch between built-in Creative MPU-401 MIDI and
HardMPU MIDI host controllers.
[12] MFBEN (MIDI FeedBack Enable) switch. Sets MIDI Feedback Enable function ON or OFF (must be
disabled in order for the AWE64 built-in MPU-401 host controller to function).
[13] Discrete OPL3 FM Synth switch. Sets Yamaha OPL3 synthesizer ON or OFF. Please, note that
"ON" position disables OPL3, while "OFF (1)" position routes OPL3 to the port 388h.
[14] HardMPU IRQ Select switch. Use it to set the IRQ for HardMPU MIDI host controller (default is
2/9).
[15] HardMPU Port Select. Use it to set the port for HardMPU MIDI host controller (default is 330h).
[11]
[12]
[13]
[14]
[15]
12
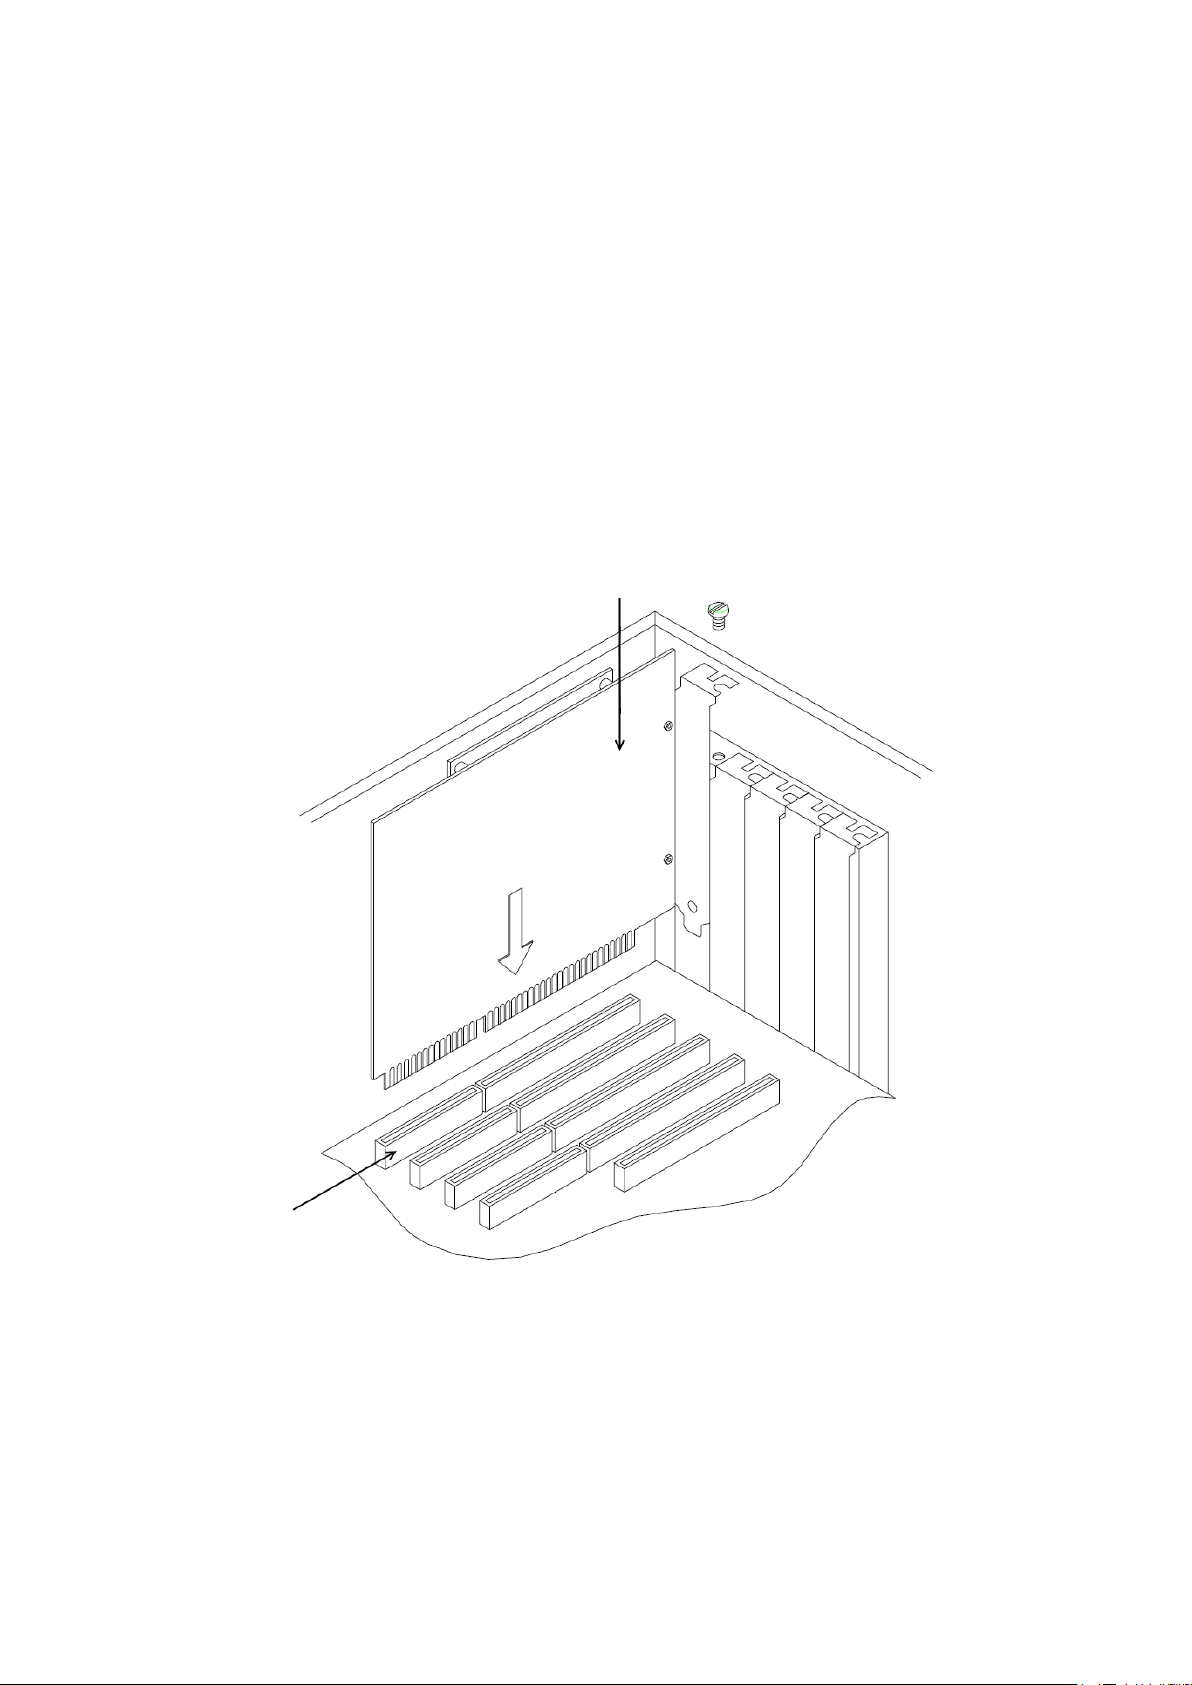
5. Installing the Card into PC
To install the card and related peripherals:
1) Power down your system and all peripheral devices, and turn off PSU (or unplug power cord
from the wall outlet).
2) Touch a metal plate on your PC case to ground yourself and discharge any static electricity.
3) Remove the shroud from your PC case
4) Find a free 16-bit ISA slot in your motherboard. Remove the corresponding metal plate from
the back side of your PC case.
5) Align your card with the ISA expansion slot and gently lower the card into the free slot as
shown.
Figure 3. ISA card installation
6) Secure the card to the expansion slot with the screw.
7) Connect powered speakers, headphones or an external amplifier to the 2-RCA Line-Outs. Use
2-RCA to 3.5mm jack adapter if needed.
8) Put the PC case shroud back.
9) Turn On PSU (or plug the power cord back into the wall outlet). Power up your system.
ISA 16-bit slot
Mounting screw
ISA expansion card

13
6. Installing Drivers and Software
From this chapter you will know how to install the audio software in Windows 95/98 and MS-
DOS.
Installing Drivers in Windows 95/98
You need to install device drivers to control the components on your audio card. AWE64 Legacy is
"Plug and Play" card. Therefore, after you have installed it and booted into your system, Windows
95/98 automatically detects the components, and either installs the drivers or asks you to specify the
path to the drivers:
Figure 4. Detection of the New Hardware
The system will also ask you to insert Windows installation disk to copy drivers from it:
Figure 5. Insert Disk to Copy Drivers
Installing Audio Software from CD
Insert your AWE64 Value drivers and software disk into CD-ROM drive (or mount its ISO image using
Daemon Tools utility). After that an Autorun window will appear on the screen.
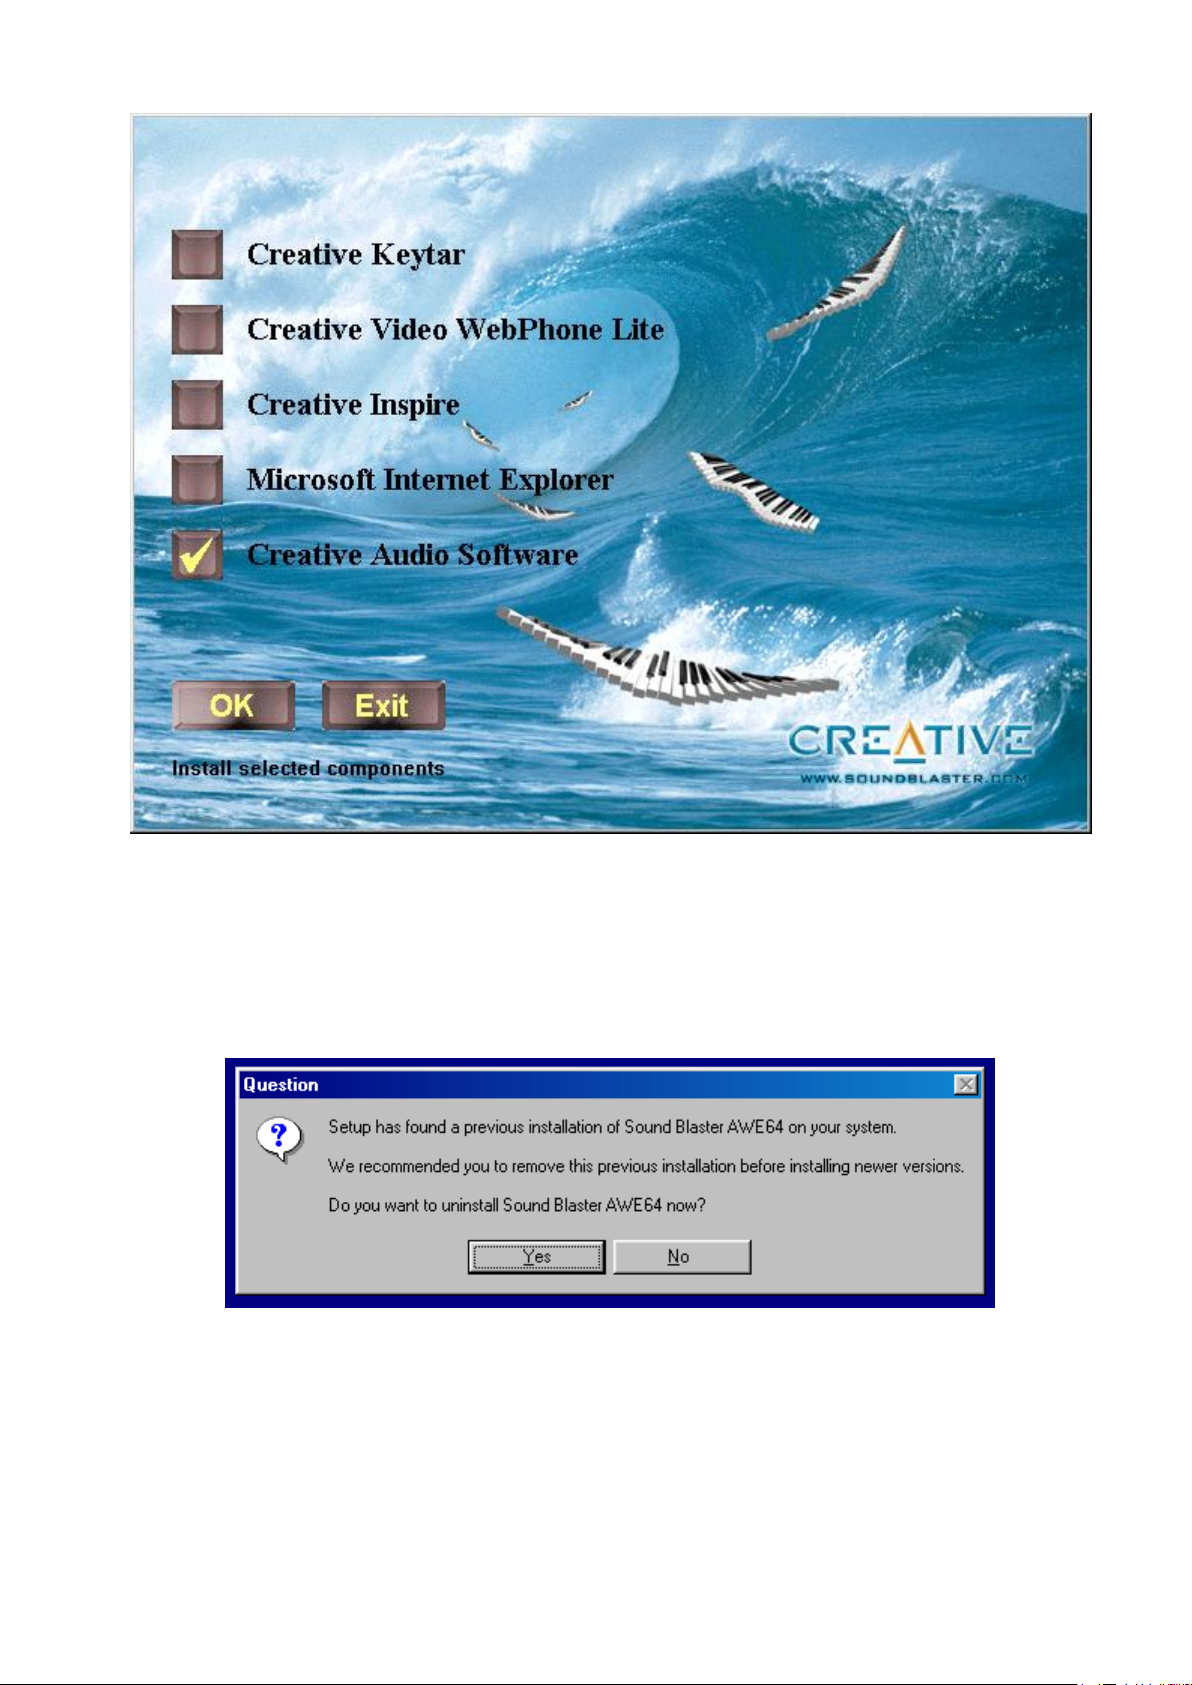
14
Figure 6. Autorun Window
Check the "Creative Audio Software" and press OK.
If you have any previous versions of AWE64 drivers and software installed, the Setup program will ask
your permission to automatically remove them.
Figure 7. Uninstall Sound Blaster AWE64
Then specify the path for Creative CTSND directory, which contains all the audio software for AWE64,
and press Next >:

15
Figure 8. Select Destination Directory for CTSND
In the next window check the boxes with programs you want to be installed. If you want to use
WaveSynth synthesizer you must install Creative WaveSynth-WG utility. And to get the ability of
loading custom soundfonts you'll need to install AWE Control utility.
Reboot your PC after the installation.
Installing MPU-401
Please, note that MPU-401 is non Plug and Play component and must be installed manually via
Windows 95/98 "Add New Hardware" wizard. To do that:
Open the Control Panel and launch the "Add New Hardware" wizard.
The wizard typically displays a screen explaining what it is used for. Click Next > to continue.
You will be told that the wizard will scan for new Plug and Play devices. Click Next > to
continue.
You will be asked if Windows should search for non Plug and Play hardware. Select "Yes" and
click Next >.
Hardware Wizard will start search and detects MPU-401 Compatible device (see fig.9).

16
Figure 9. Add MPU-401 via Hardware Wizard
Click Finish to install drivers for MPU-401 and insert you Windows CD when prompted.
Specify the path to the "driver16.cab" (e.g. E:\win98\) on your Windows CD:
Figure 10. Specify the path to MPU-401 drivers on Windows CD
Upon successful installation of all components, you will see the following devices in Windows Device
Manager:

17
Figure 11. Select Destination Directory for CTSND
Installing Software in DOS/Windows 3.1x (Classic Method)
To install your AWE64 Legacy card in DOS/Windows 3.1x you can follow the standard installation
procedure with Creative tools and utilities or use UNISOUND utility.
To install the software using Creative Tools (classic method):
1) Insert the installation CD-ROM into your CD-ROM drive.
2) If you are in Windows, exit to DOS. The installation will not work if you install from the DOS
prompt in Windows.
3) At the DOS prompt, change to the drive containing your CD-ROM. For example, type «D:».
4) Type INSTALL and press <Enter>.
5) Follow the instructions on the screen to complete the installation.
The Installer will copy all the initialization files to your hard disk (AWEUTIL, MIXERSET and DIAGNOSE)
and add links to them to AUTOEXEC.BAT file.
After you have completed the installation and rebooted your system, proceed to the next section to
test if your installation works.
Note: In order to use your AWE64 Plug and Play using DOS/Windows 3.x, you must install the
Creative Configuration Manager first. This is located on the Creative CD in the directory
<drive>\<lang>\ctcm\install, e.g. D:\english\ctcm\install

18
7. Installation and Initialization via UNISOUND Utility
UNISOUND is a Freeware DOS-only tool useful to configure and initialize ISA PnP sound cards from
several brands and models, and some non-PnP, like early SB16 software configurable models that
required tools like DIAGNOSE. It works on all x86 CPUs, including 8088/8086/80286/386, etc.
Note: All credits and rights for UNISOUND belong to its author, JazeFox. AWE64 Legacy project
team also avails itself of the opportunity to express respect and acknowledgement for the cooperation
and support granted while making this sound card into reality.
Here you can get more info and download UNISOUND:
https://www.vogons.org/viewtopic.php?t=72553
We recommend to use version 0.76b or newer. Download and unzip UNISOUND.EXE to your hard
disk, e.g. C:\UNISOUND\UNISOUND.COM
The most common usage to install and initialize your AWE64 Legacy card is setting a BLASTER variable
in AUTOEXEC.BAT file first. Here is the default configuration example:
SET BLASTER=A220 I5 D1 H5 P330 E620 T6 J200
UNISOUND.COM /V70
When you run UNISOUND.EXE without any options it initializes first PnP card found in the system
with internal default resource settings and the following Mixer volume defaults:
~85% Master vol,
80% Wave vol,
80% FM/Synth vol,
0% Line in vol,
0% Mic vol,
0% CD vol.
And for compatible Creative cards, Treble and Bass levels are 50% by default, and PC Speaker-In 0%.
To install and initialize your card with either CQM or OPL FM-Synthesizer you can just create and run
one of the following .BAT files (should you need to initialize the sound card with some resources
other than the default settings, feel free to modify them accordingly in the SET BLASTER line):

19
CQM Enabled, OPL3 Disabled
Find the «Discrete OPL3 FM Synth» switch on the back side of the sound card and set it to ON (0)
position. This will disable the OPL3 FM Synth.
C:\UNISOUND\CQM-FM.BAT
@unisound /d
@SET BLASTER=A220 I5 D1 H5 F388 P300 E620
@unisound /v90 /vw70 /vf99 /vc70 /vl00 /vm00 /vp45 /vb65 /vt85
@echo.
@echo Please note that Line-IN channel is muted because of OPL3
muting!
@echo.
@pause
OPL3 Enabled, CQM Disabled
Find the «Discrete OPL3 FM Synth» switch on the back side of the sound card and set it to OFF (1)
position. This will enable the OPL3 FM Synth at port 0x388h.
C:\UNISOUND\OPL-FM.BAT
@unisound /d
@SET BLASTER=A220 I5 D1 H5 F0 P300 E620 T6
@unisound /v90 /vw70 /vf99 /vc70 /vl80 /vm00 /vp45 /vb65 /vt85
@echo.
@echo Please note that OPL3 is usable as default "Adlib" setting,
0x388h.
@echo But in some games you can still take advantage of the CQM as it
is also available on Sound Blaster base IO address, 0x220h.
@echo.
@pause
You can download these BAT-files here:
https://vccollection.ru/wp-content/uploads/2022/05/unisound_fm_bat.zip
Now your AWE64 Legacy is ready to work. These .BAT files are suitable for changing settings on the
fly, without turning off or restarting your PC. Just make sure the «Discrete OPL3 FM Synth» switch is
set to OFF (1) if you ever need the OPL3 Synth.
Note: Your system may have different variables and interrupts. Read below to better understand
them.

20
8. Understanding the Software-Configurable Settings
Your audio card supports the Plug and Play (PnP) 1.0a standard. This allows a PnP system to assign
the necessary resources such as I/O addresses, interrupt lines and DMA channels to your card when
you install it.
If you are using Windows 95, its PnP configuration manager will automatically set up your card’s
resources. If you are using a non-PnP system such as Windows 3.1x, you must run your PnP
configuration manager to configure the card. For details, refer to the documentation of your PnP
configuration manager.
This section explains the following software-configurable resources of your audio card:
Input/Output (I/O) Addresses
Interrupt Request (IRQ) Lines
Direct Memory Access (DMA) Channels
Input/Output (I/O) Addresses
I/O addresses are communication areas used by your computer’s central processor to distinguish
among various peripheral devices connected to your system when sending or receiving data.
Table 1 lists the default I/O address ranges assigned by the PnP system to various devices on your
audio card.
I/O Address Range
Device
200H to 207H
Game/Joystick port
220H to 22FH
Audio interface
330H to 331H
MPU-401 UART MIDI
388H to 38BH
Stereo music synthesizer
620H to 623H,
A20H to A23H,
E20H to E23H
Advanced WavEffects synthesizer
100H
3D Stereo Enhancement device
Table 1. Possible default I/O addresses occupied by the audio card
Table of contents


