Volk Eye Check User manual

INSTRUCTIONS FOR USE
Volk® Eye Check
Ophthalmic Measurement Device

IM-078 Rev. F
Page 2 of 42 1
Shipping Contents
Item:
Part Number:
Description:
Volk Eye Check
18343-US
Ophthalmic measurement device
USB Cord
18338
For charging and data transmission
Power Adaptors
18339-US
For charging Volk Eye Check in a wall outlet
(Formats Supplied: USA)
Stylus
18349
For precise interaction with touch screen
Protective Case
18345
Case for Volk Eye Check
Protective Pouch
18346
Microfiber Pouch for Volk Eye Check
Quick Start Guide*
ML-1016
Abbreviated instructions
Registration Card
IM-081
Please fill out and return to Volk Optical
Optional Accessories
The Volk Precision Stickers are an accessory for Volk Eye Check which act as a positioning target aid. They also
remove the need to input patient IPD at the start of a session.
After removing from the backing strip, the sticker is placed on the patient’s forehead. On completion of the
session, the sticker is discarded.
Model:
Part Number:
Description:
Precision Sticker Pack
VLKSTKR
Volk Precision Stickers x72
Further copies of the Volk Eye Check Instructions For Use for the Volk Eye Check (This
document) and for the Volk Precision Stickers can be found at:
http://volk.com/eyecheck/literature/
Preparation for First Use
1. Remove Volk Eye Check from the package and check that all parts present are undamaged.
2. Sterilization or calibration prior to first use is not required.
3. Connect Volk Eye Check to the mains using the USB cord and the appropriate power adaptor.
4. The battery will start to charge.
5. Safely place Volk Eye Check on a flat surface.
6. Charge battery for at least 3 hours before the first use.

IM-078 Rev. F
Page 3 of 42 1
Table of Contents
Shipping Contents....................................................................................................................................... 2
Optional Accessories................................................................................................................................... 2
Preparation for First Use............................................................................................................................. 2
Intended Use............................................................................................................................................... 4
Indications for Use ...................................................................................................................................... 4
Recommendations Prior to Use.................................................................................................................. 4
Contraindications for Use ........................................................................................................................... 4
Warnings ..................................................................................................................................................... 4
Cautions ...................................................................................................................................................... 4
Important Symbols...................................................................................................................................... 5
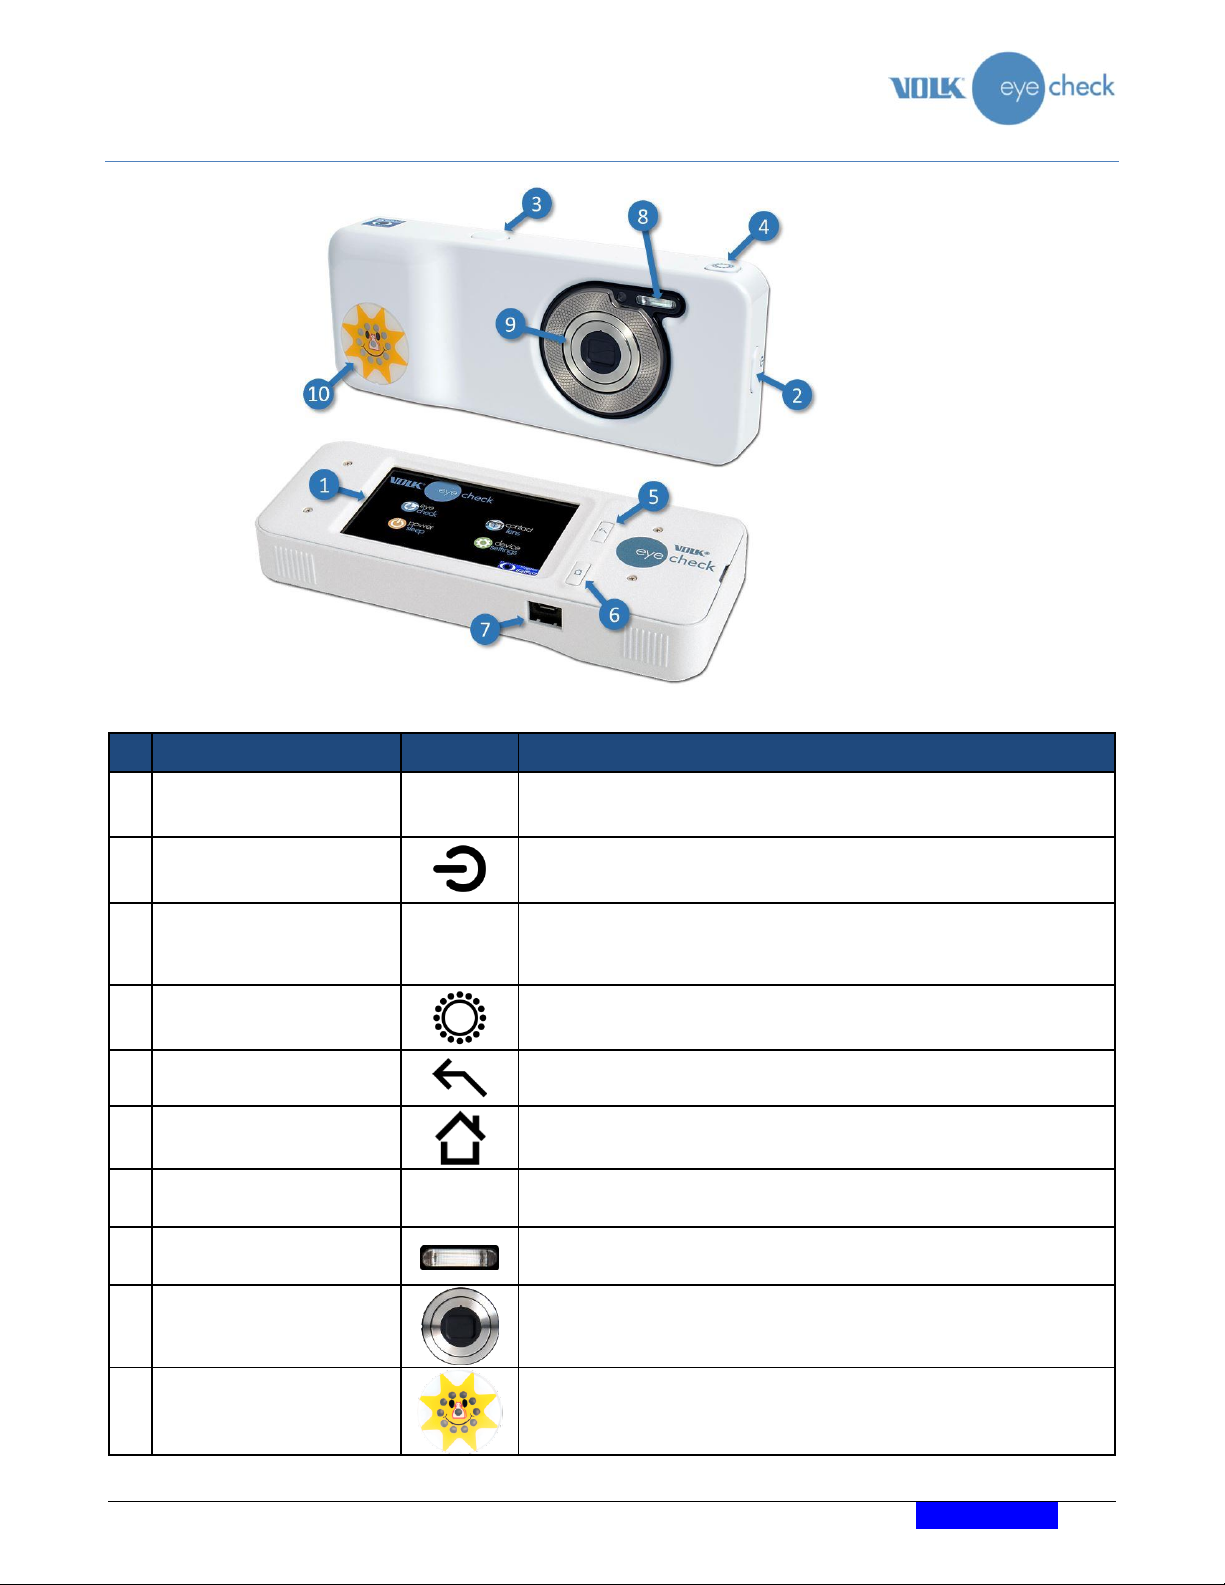
Hardware Controls and Connectors ........................................................................................................... 6
Soft Controls ............................................................................................................................................... 7
Environment and Photo-Taking Indicators................................................................................................. 8
Preparation ................................................................................................................................................. 9
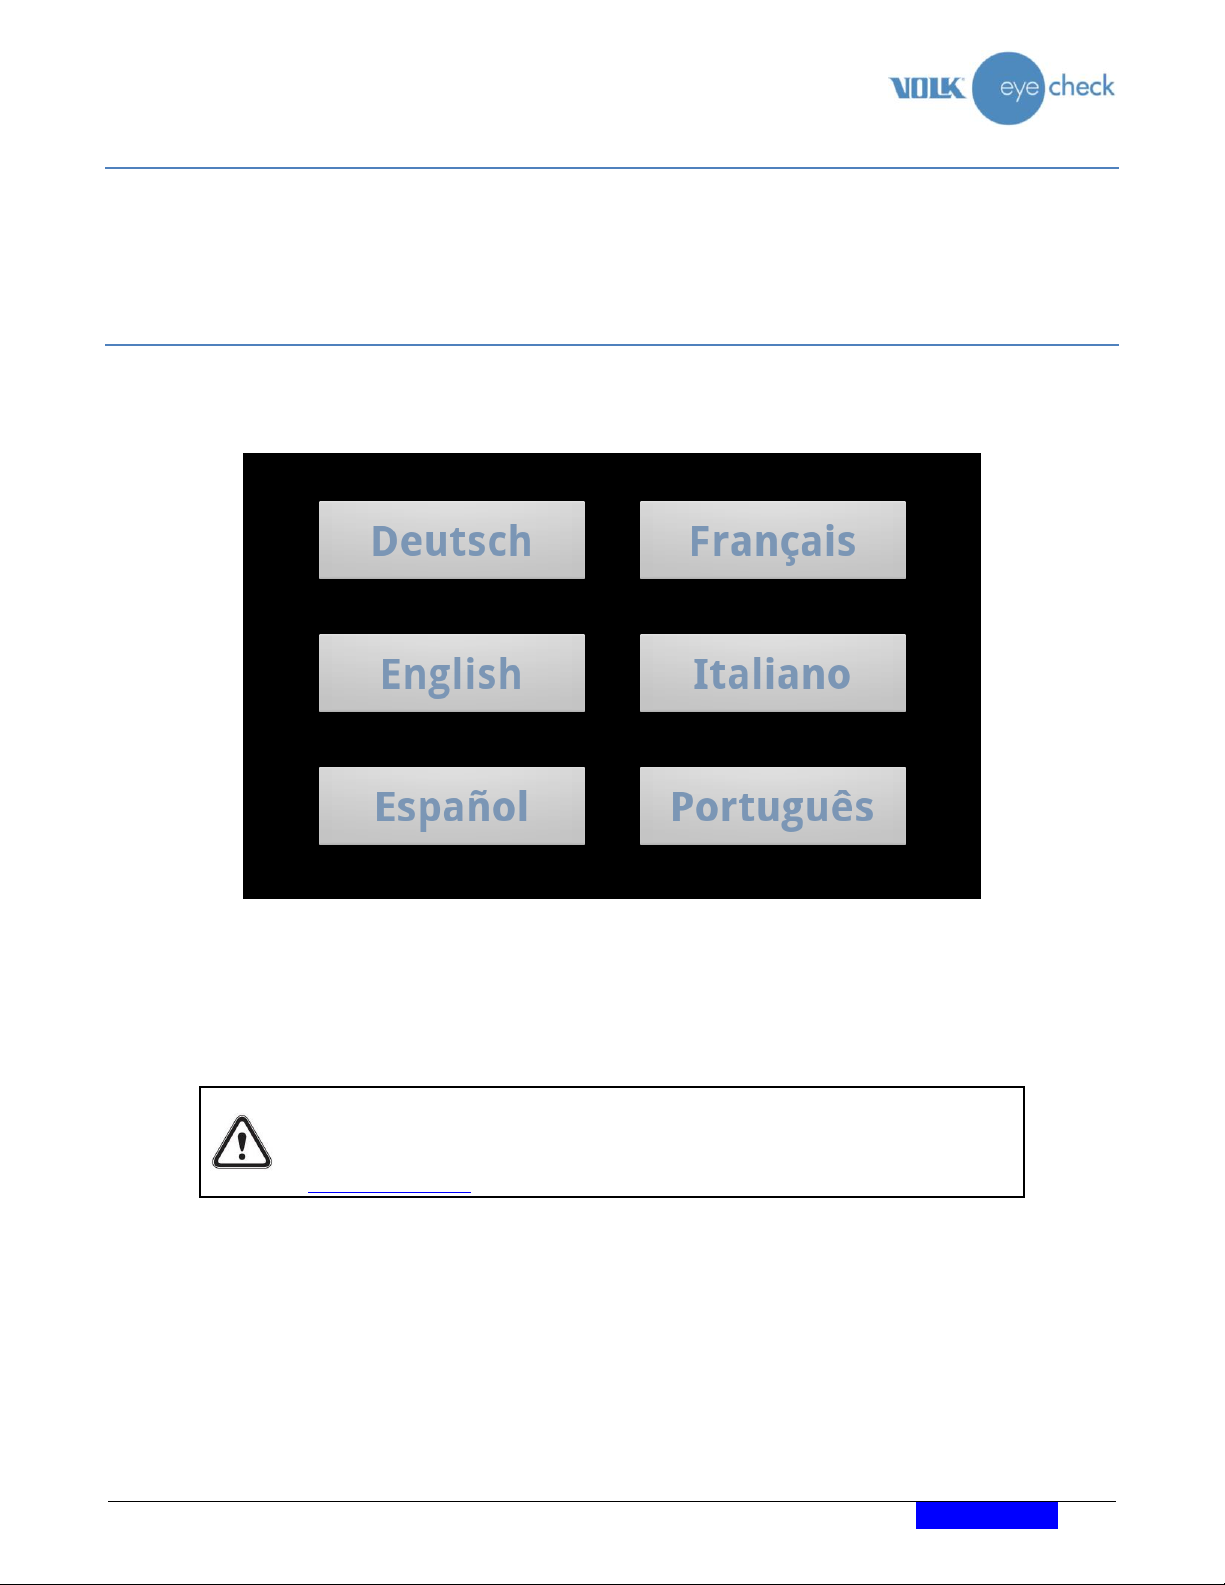
Language Selection ..................................................................................................................................... 9
Initial Settings............................................................................................................................................ 10
Device Settings.......................................................................................................................................... 11
Authorisation Code ................................................................................................................................... 12
Application Settings .................................................................................................................................. 13
Basic Use –Start Up, Shut Down, and Capturing an Image...................................................................... 15
Operational Modes –“Eye Check”, “Contact Lens” and “Oculoplastics”................................................. 16
Capturing a Patient Session ...................................................................................................................... 16
Measurements Provided by the Volk Eye Check Device .......................................................................... 21
Reviewing Patient Measurement Data..................................................................................................... 24
WiFi Upload............................................................................................................................................... 25
Pre-loading Patient details........................................................................................................................ 29
Adding a Patient Database........................................................................................................................ 29
Starting a new session for a patient already in the database .................................................................. 31
Freestyle Mode ......................................................................................................................................... 31
How to update Volk Eye Check Software ................................................................................................. 33
System Messages...................................................................................................................................... 34
Cleaning Instructions ................................................................................................................................ 35
Device Maintenance and Servicing........................................................................................................... 35
Calibration................................................................................................................................................. 36
EN 62479................................................................................................................................................... 36
Technical Description................................................................................................................................ 37
Environmental Conditions for Use, Storage and Transportation ............................................................. 38
Serial numbering....................................................................................................................................... 38
Intellectual Property Rights Information.................................................................................................. 39
Disposing of Volk Eye check...................................................................................................................... 39
Contact for Product Support..................................................................................................................... 39
Warranty ................................................................................................................................................... 39
Appendix A –FCC Statement .................................................................................................................... 40
Appendix B –Replacing the AAA Batteries............................................................................................... 41

IM-078 Rev. F
Page 4 of 42 1
Intended Use
Volk Eye Check is standalone ophthalmic software, loaded on a mobile electronic platform that is intended to
measure ophthalmic characteristics and to aid in the diagnosis of ophthalmic abnormalities.
Indications for Use
To be used by Ophthalmologists, Optometrists, and other trained health care professionals. Clinical support staff
can also use Volk Eye Check.
Recommendations Prior to Use
It is highly recommended that all persons, eye care specialists and healthcare professionals or clinical support
staff, thoroughly review this document prior to patient usage. Interpretation of the measurement data generated
is advised for eye care specialists and healthcare professionals only. There are no special facilities or qualifications
required relating to the device.
Contraindications for Use
Some patients may experience momentary discomfort when exposed to flash photography. Use of Volk Eye Check
on patients with photosensitive epilepsy is at the discretion and professional judgment of the healthcare
professional.
Warnings
There are no medicinal substances or biological materials incorporated within this device.
No personal protective equipment is required to be worn by the user or the patient when using this device.
Cautions
Use only accessories and Li-ion batteries provided by Volk Optical with this product.
Any good-quality Alkaline AAA batteries may be used in the Fixation Target.
No modification of this equipment is allowed.
No files may be copied to/from the device except as described later in this document.

IM-078 Rev. F
Page 5 of 42 1
Important Symbols
Symbol
Description
The CE mark on this product indicates it has been tested and conforms to
the provisions noted within the 93/42 EEC Medical Device Directives.
The CE mark with notified body identification number indicates a Class I
(measuring) product.
The FCC Declaration of Conformity, or the FCC label, or the FCC mark, is a
certification mark employed on electronic products manufactured or sold
in the United States which certifies that the electromagnetic interference
from the device is under limits approved by the Federal Communications
Commission.
Do not dispose of Volk Eye Check or Volk Eye Check’s battery (Lithium-
Ion) as unsorted municipal waste.
Li-ion
Recycle Volk Eye Check’s Lithium-Ion battery.
Read accompanying user documentation. Indicates that important
operating instructions are included in this User Manual. Failure to follow
these instructions could place the patient or operator at risk.

IM-078 Rev. F
Page 6 of 42 1
Hardware Controls and Connectors
Things that are found on the device itself:
Position
Indicator
Purpose
1
Back of device
----
INTERACTIVE TOUCH SCREEN
Shown is the Eye Check software “Home” screen.
2
Left side of device
(viewed from the back)
POWER –Physical button
Power on the device with long press.
3
Top right of device
----
SHUTTER –Physical button
Half-press - Locks the focus and exposure.
Full-press - Takes a photo.
4
Top left of device
ATTRACT –Physical button
To activate the fixation target (See item 10).
5
Back of device
BACK KEY –Physical button
To go back to the previous screen.
6
Back of device
HOME KEY –Physical button
To return to the Mode Selection Screen.
7
Bottom of device
----
USB CONNECTOR
Micro USB connector used for charging and data transfer.
8
Front of device
FLASH
Automatically illuminates the subject when taking pictures.
9
Front of device
LENS
Camera lens. Patients should look directly at the center of the
lens when the device is used in CL or OP mode.
10
Front of device
FIXATION TARGET
Flashes when activated by the Attract Button (See item 4), the
patient should look at this when using Eye Check mode.

IM-078 Rev. F
Page 7 of 42 1
Soft Controls
These controls will be found on the interactive touch screen and will change depending on mode:
Icon
Purpose
Eye Check Selects Eye Check (EC) mode when in the Mode Selection screen.
Mode Icon: Displays the regulatory labels when in the EC Patient Details screen.
Returns to EC Patient Details screen when in any other EC screen.
Contact Lens Selects Contact Lens (CL) mode when in the Mode Selection screen.
Mode Icon: Displays the regulatory labels when in the CL Patient Details screen.
Returns to CL Patient Details screen when in any other CL screen.
Oculoplastics Selects Oculoplastics (OP) mode when in the Mode Selection screen.
Mode Icon: Displays the regulatory labels when in the OP Patient Details screen.
Returns to OP Patient Details screen when in any other OP screen.
Start: Short press: Initiates a new session and enters capture mode.
Long press: Choose - normal or freestyle session or save patient details.
Attract: Plays a random sound when in picture capture mode.
Note: Audio needs to be enabled in Application Settings for icon to be visible.
Review: Initiates patient data review mode from the Patient Details or Capture screens.
Upload: Indicates the upload status of the selected session –
Red –not uploaded
Amber –upload in progress
Green –upload complete
Application Opens the Eye Check settings screen where upload, reporting and audio
Settings: features can be configured.
Session When pressed will generate and save a report file for the current session.
Report: Note: This control is only visible if the report file does not exist.
Help: Long press: Activates the help dialog.
Back: Go back to the previous screen.

IM-078 Rev. F
Page 8 of 42 1
Environment and Photo-Taking Indicators
These indicators are displayed on the interactive touch screen while taking pictures:
Indicator
Purpose
Good photos: Indicates number of valid photos in current session.
Poor photos: Indicates number of poor photos in current session.
Correct distance: Optimal patient-practitioner distance.
Distance too far: Face too small, move closer to patient.
Distance too close: Too close to patient, move back.
Brightness level: Optimum level is between 70 and 80.
Zoom: Lens zoom setting. Preset to Z5.
Battery: Indicates percentage remaining battery charge.
Gaze indicator –EC: Displayed when in Eye Check mode to remind the user that the
subject’s gaze should be directed to the fixation target.
Gaze indicator –CL & OP: Displayed when in Contact Lens or Oculoplastics mode to remind
the user that the subject’s gaze should be directed to the center of the lens

IM-078 Rev. F
Page 9 of 42 1
Preparation
Volk Eye Check can be charged by connecting the supplied USB cable to either a PC (Personal Computer) or the
appropriate mains power adaptor. When not using Volk Eye Check, it is recommended that the device is
completely shut down. The device will not function if the remaining battery charge falls below 15%.
Language Selection
Once the Eye Check device is prepared for first use, power it on with a long press on the power button. The
following screen will be displayed –
First-time run language selection screen
Select the desired language by touching the appropriate button. The device will be set to default to that
language and the Volk Eye Check Mode Selection Screen will be displayed.
NOTE:
Language selection is only possible during the very first use of the device. For
information on changing the selected language please contact Volk support at

IM-078 Rev. F
Page 10 of 42 1
Initial Settings
If not already on, power-up the device on with a long press on the power button. After completing a short self-
test, the Volk Eye Check Mode Selection screen will appear.
Mode Selection Screen
Swipe left on the Mode Selection screen to display the Utility screen
Utility Screen
Swipe right on the Utility screen to return to the Mode Selection screen.

IM-078 Rev. F
Page 11 of 42 1
Device Settings
From the Utility Screen touch the Device Settings icon. This will display a menu of items relating to the Volk Eye
Check hardware as shown below. Scroll the screen to locate the wireless and date/time settings.
Device Settings Menu
Enable WiFi functionality:
1. Select wireless & networks from the device settings menu.
2. In the next screen, check the WiFi box to turn on WiFi.
3. Select WiFi Settings.
4. Scroll down to select your preferred wireless network.
5. Input the password - if required - and then choose connect.
Press the physical back button to return to the Device Settings Menu.
Set the Date, Time and Time Zone:
1. Select Date & Time from the Device Settings Menu.
2. In the following screen, ensure Automatic is un-checked.
3. Touch set date. Spin the wheels to the correct date then touch set.
4. Choose select time zone and scroll the list up or down to select your location.
5. Touch set time, spin the wheels to the correct time and touch set.
6. Set the 24-hour check box.
7. Touch select date format to select the desired date format.
Press the physical back button to return to the Device Settings Menu.

IM-078 Rev. F
Page 12 of 42 1
Authorization Code
The first time any one of the three mode icons (Eye Check, Contact Lens or Oculoplastics) the device will prompt
for an authorization code. This code will be provided during the user training session that will be arranged by the
device supplier.
To input the code, touch the entry box and a keyboard will be displayed. Enter the given code, touch ‘done’ then
the OK button.
Authorization Code input screen

IM-078 Rev. F
Page 13 of 42 1
Application Settings
From the Mode Selection Screen, touch the Eye Check icon to start the Eye Check application. The first screen to
be displayed is Patient Details.
Eye Check Mode - Patient Details Screen
Touch the gear-wheel icon on the right side of the screen to access the main Application Settings screen.
Application Settings Screen

IM-078 Rev. F
Page 14 of 42 1
Touch the Advanced button to access the second Application Settings screen.
Advanced Application Settings screen
Setting
Purpose
User Prefix
A 1-3 character prefix which is added to all patient IDs. Useful to distinguish between
multiple devices in a common environment.
Email address
Enter the address where the email reports should be sent. Note: “Upload” must be
checked to enable the emailed report feature.
Session data:
Upload
Set if you wish to upload patient data automatically on completion of a patient session
Session data:
Report
Set if you wish to generate a data report at the end of a patient session. If you do not
check this option, no report will be generated on the device at the end of each patient
session.
Session data:
Include picture
Set if you wish to include the patient photo on session reports. Note –this setting
applies to both local and uploaded report content. Please be aware of HIPAA
regulations within your clinical setting for this feature.
Sound
Activates the audio attract feature. When checked, enables the Attract control that
helps to direct the attention of younger patients.
K Value units
Allows the units in which K values are expressed to be set to either mm or Diopters. On
first-run, all EU devices default to mm and US devices default to Diopters.
Show warning
dialogs
Unset if you wish to disable the warning dialogs that may pop up during a photo taking
session. It is highly recommended that this option remains set in order to direct the
user during the photo taking process for maximum efficiency.
Use Precision
Stickers for all
sessions
When checked, a Precision Sticker is required for all sessions. When unchecked, the
user may input IPD values instead. Note –Use of a precision Sticker is recommended in
order to achieve optimum precision.

IM-078 Rev. F
Page 15 of 42 1
Setting
Purpose
Add grid image
to upload
When checked and Upload is enabled, the grid images produced in CL and OP modes
will be uploaded along with the rest of the data and a separate email will be sent
containing the full-res image.
Password
protect grid
image
When the grid image is set to be uploaded, checking this option will resulting in the
grid image email being encrypted using the last 6 digits of the device serial number as
the key. Please be aware of HIPAA regulations within your clinical setting if you choose
to disable this feature.
Clear Database
Pressing this button will result in the deletion of all patient data stored on the device.
Please note: This action cannot be undone.
Generally, both Device Settings and Applications Settings only require attention once during initial setup.
However, they can be changed at any time if desired.
When finished, touch the back button(s) to return to the Patient Details screen, then again to return to the Mode
Selection Screen.
Basic Use – Start Up, Shut Down, and Capturing an Image
An image is captured using the dual-action shutter button. At the first detent (half press) the camera will focus on
the subject and lock-in its exposure settings. Pressing the shutter further, to its second detent (full press), the
image is captured and analyzed. Don’t wait too long between half-press and full-press because of camera-shake
and subject movement.
The device may be powered off or put to sleep by choosing the power / sleep soft key from the Utilities screen
(Accessed by swiping left on the Mode Selection screen). Choose either shut down or sleep. The device may also
be placed into sleep mode by a short press on the power button. To wake the device from sleep mode, short-
press the power button or the back button.
If a device is left in sleep/standby overnight, it will power itself down at approximately 2:30am.

IM-078 Rev. F
Page 16 of 42 1
Operational Modes – “Eye Check”, “Contact Lens” and “Oculoplastics”
From the Mode Selection Screen, choose Eye Check mode, Contact Lens mode or Oculoplastics mode as required.
Please note: All three modes may not be available on every device.
The key features of each mode are as follows:
Eye Check mode provides measurements of deviation, pupil and iris size and MRD. It is typically used in eye
medicine, to assist in the detection, diagnostics and treatment of eye conditions such as strabismus, anisocoria,
ptosis and others. The patient should look at the fixation target when using this mode.
Contact Lens mode provides detailed measurements of external eye features including pupils, HVID, lid positions
and corneal sag. It is typically used to assist in the fitting of soft and hard contact lenses and as a reference for
oculoplastic surgery. The patient should look directly at the lens when using this mode.
Oculoplastics mode provides detailed measurements of external eye features including three points on the lids –
one of which is MRD, pupil size, eye aperture and HVID. It is typically used to measure and document eye aperture,
lid position and pupil size, particularly in the context of lid surgery. The patient should look directly at the lens
when this mode is used.
Capturing a Patient Session
Follow the steps below to successfully complete a patient session.
1. Select the Eye Check, Contact Lens or Oculoplastics icon from the Mode Selection Screen.
2. In the Patient Details screen, enter the patient data as required. Patient ID, Date of Birth, Gender and IPD
are mandatory –as indicated by asterisk (*). Note: IPD input is not required if a Precision Sticker is
applied –As described below.
If the Use Precision Stickers for all Sessions option in Application Settings is unchecked, then IPD will be
mandatory - also indicated by an asterisk (*). IPD input is not required if a Precision Sticker is applied
as described below.
In Contact Lens mode, K Values are optional.
IPD:
IPD is only required if the Use Precision Stickers for all sessions option in
Application Settings is unchecked.
IPD can be input in one of two ways: as the full IPD or as right and left PD
respectively, both to the nearest 0.5mm. If the IPD measurement is not
available, then an optional Precision Sticker may be applied as shown below.

IM-078 Rev. F
Page 17 of 42 1
IPD Input Dialog
Precision Sticker:
An optional Precision Sticker may be applied to the patient’s forehead as
shown below. Long-press the IPD field to confirm the use of a sticker.
Positioning of an optional Precision Sticker
This can be used instead of inputting IPD

IM-078 Rev. F
Page 18 of 42 1
Long-press the IPD field to confirm the use of a sticker
K VALUES:
Used only in Contact Lens mode, 1 or 2 K Values per eye may be entered. If all
four are input (2 per eye) then the measurements output and reports will
include the calculated sag value for each eye. Otherwise, the sag value will be
estimated using only the iris measurements.
Note: Depending on the setting in the Application Settings, the K values may
be requested in mm or Diopters.
K Value Input Dialog (mm)
3. Touch the Start icon to initiate picture capture mode and begin the patient session.
The lens will extend and automatically be set to the correct zoom setting. There is a short lag as this takes
place and the device prepares the new session.

IM-078 Rev. F
Page 19 of 42 1
NOTE:
When capture mode is initiated, the camera focus motor makes a sound. This
sound is normal and is not a sign of any damage or problem.
4. The attract icon on the left hand side will only appear if the sound feature has been enabled in application
settings. Press this icon to hear the sound as required.
5. The optimum light level is between 70-80 for light skinned patients and around 60 for darker skinned
patients. A patient - practitioner distance of 50-60cm is required. Check the brightness level and distance
on the panel to the right side of the screen.
6. Ensure that the patient is sitting comfortably in front of a neutral background. The practitioner should be
at eye level with the subject. Avoid large windows, mirrors, strong reflections and computer screens.
7. Hold the camera comfortably but firmly with two hands to avoid shaking. Use the index finger of the left
hand to activate the fixation target button. This is located on the top left side of the device. The fixation
LEDs will be activated all the time this button is pressed. The patient is required to look at this target
throughout an Eye Check mode photo capture session. When using Contact Lens or Oculoplastics modes,
the patient must look directly at the camera lens.
8. Frame the subject’s face, aiming for 2/3 of the face to appear on the screen from forehead to mouth. Half-
press the shutter button to achieve correct focus. The white focus squares will turn green if this is the
case. Fully press the shutter button to take a photo. Do not linger after focus is achieved.
NOTE: All parameters –distance, brightness and focus lock - must be green to validate a picture. If the
focus squares are red, completely release the shutter button and half press again. Repeat until correct
focus is achieved.
Picture-taking screen in Eye Check mode
Note: Patient is looking at the fixation target as directed by the gaze indicator

IM-078 Rev. F
Page 20 of 42 1
Picture-taking screen in Contact Lens mode
Note: Patient is looking directly at the camera lens as directed by the gaze indicator
Picture-taking screen in Oculoplastics mode
Note: Patient is looking directly at the camera lens as directed by the gaze indicator
9. 2 to 4 green check photos are required to complete a session and report the measurements. The lens may
automatically recalibrate after “red” 4 photos. If a picture is invalid, please adjust your position, the
patient’s position or the surroundings to account for the factor that is not optimum. See “System
Message” for error messages and what to do. Please do read these messages and follow their instructions.
10. Once a session analysis has been completed, the appropriate measurements report will be displayed on
screen. Scroll up and down to review all data.
11. Touch the review icon to view thumbnails of the pictures for that session. Touch back to return to the
results screen. The upload icon on the right side will indicate the session upload status. See WiFi Upload
section.
Other manuals for Eye Check
1
This manual suits for next models
1
Table of contents
Popular Measuring Instrument manuals by other brands

Pyle
Pyle PST30 Operation manual

Keysight
Keysight FieldFox A Series user guide

Hanna Instruments
Hanna Instruments HI 2222 instruction manual

Digital Control Incorporated
Digital Control Incorporated DigiTrak LT Operator's manual

Micromeritics
Micromeritics AccuPyc 1330 Operator's manual

Motrona
Motrona AX 346 operating instructions