VOLTI 51045 User manual

Instruction manual
5 S TAR R AT IN G
510 42
Grenade Grill 18”
Grenade Grill 18”
510 4 4
Grenade Grill 22”
Grenade Grill 22”
510 45
Grenade Grill 24”
Grenade Grill 24”
51044 Grenade Grill 22 Handleiding aangepast.indd 151044 Grenade Grill 22 Handleiding aangepast.indd 1 13-1-2022 20:58:4513-1-2022 20:58:45

1
Registreer je garantie
Register your warranty
Registrieren Sie Ihre Garantie
WWW.VOLTINDUSTRIES.EU
Bedankt voor jouw aankoop! Lees de instructies zorgvuldig door.
Inhoudsopgave 1-11
Thank you for your purchase! Read the instructions carefully.
Index 12-20
Vielen Dank für Ihren Einkauf! Lesen Sie die Anleitung sorgfältig durch.
Index 21-29
51044 Grenade Grill 22 Handleiding aangepast.indd 151044 Grenade Grill 22 Handleiding aangepast.indd 1 13-1-2022 20:58:5013-1-2022 20:58:50

2
ONDERDELENLIJST
Vóór de montage moeten alle onderdelen aan de hand van de onderdelenlijst worden
gecontroleerd. Voer de montage uit op een zachte ondergrond om krassen op de lak te
vermijden. Om de montage te vereenvoudigen; draai de bouten slechts losjes aan en draai ze
pas volledig vast wanneer de gehele montage voltooid is.
WAARSCHUWING: Draai de bouten NIET te vast aan. Zet alle bouten slechts met
gematigde druk vast om beschadiging van de bouten of onderdelen van de Kamado Grill te
vermijden.
BELANGRIJK Verwijder zorgvuldig alle verpakkingsmaterialen vóór gebruik. LEES DEZE
INSTRUCTIES IN HUN VOLLEDIGHEID en let op alle veiligheidswaarschuwingen die in deze
instructies staan. Dit product is ENKEL voor huishoudelijk gebruik en dient niet commercieel
te worden gebruikt
1. (4x)
2. (2x) 3. (2x)
4. (2x)
5. (1x)
7. (1x)
8. (1x)
9. (1x)
10. (1x)
11. (1x)
12. (2x)
13. (2x)
14. (2x)
A. (16x)
B. (4x)
C. (4x)
D. (4x)
Bedankt voor jouw aankoop! Lees de instructies zorgvuldig door.
Inhoudsopgave 1-11
Thank you for your purchase! Read the instructions carefully.
Index 12-20
Vielen Dank für Ihren Einkauf! Lesen Sie die Anleitung sorgfältig durch.
Index 21-29
51044 Grenade Grill 22 Handleiding aangepast.indd 251044 Grenade Grill 22 Handleiding aangepast.indd 2 13-1-2022 20:58:5113-1-2022 20:58:51

3
RICHTLIJNEN VOOR ONDERHOUD EN VEILIG GEBRUIK
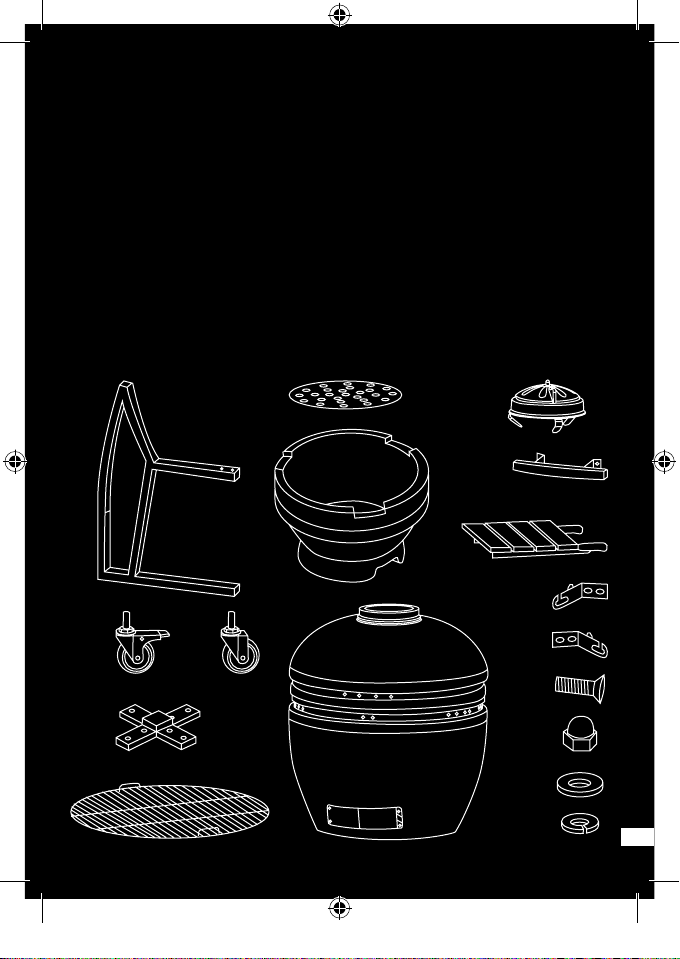
OVER JE KAMADO
4000 jaar geleden ontdekten archeologen grote kleivaten, waarvan men dacht dat het de
eerste versies waren van een Kamado keramisch fornuis. Ondertussen is dit fornuis op
allerlei manieren verder ontwikkeld: het deksel is afneembaar, er is een klep toegevoegd
voor een betere warmtebeheersing en er was de overschakeling van hout naar houtskool als
primaire brandstof. In Japan, was de Mushikamado een ronde kleipot met een verwijderbaar
koepelvormige deksel, ontworpen voor het stomen van rijst. De naam “Kamado” is in feite
het Japanse woord voor “fornuis” of “kooktoestel.” Deze naam werd overgenomen door de
Amerikanen en is nu een algemene term voor dit type keramisch fornuis.
Kamado fornuizen zijn uiterst veelzijdig. Niet alleen kunnen ze gebruikt worden om te grillen
of te roken, maar ook pizza’s, brood, taarten en koekjes kunnen er moeiteloos in gebakken
worden. Dankzij hun uitstekende warmtebehoudseigenschappen kunnen hoge temperaturen
worden bereikt en worden behouden door een nauwkeurige regeling van de luchtstroom
langs de bovenste en onderste ventilatieopeningen. Hoge temperaturen zijn ideaal om
snel hamburgers en worstjes te garen, terwijl bij lage temperaturen grotere stukken vlees
gedurende een langere periode kunnen garen. Probeer wat houtsnippers toe te voegen aan de
houtskool, of combineer houtsnippers van verschillende smaken om
om uw vlees nog smaakvoller te maken.
WAARSCHUWING! OPGEPAST!
Dit product is ALLEEN BESTEMD VOOR GEBRUIK BUITENSHUIS. NIET binnen gebruiken.
Laat een brandend vuur NOOIT onbeheerd achter. Houd ALTIJD kinderen en huisdieren op
een veilige afstand van de oven wanneer deze in gebruik is.
BRANDGEVAAR! Kan hete gloeiende kooltjes afgeven wanneer de oven in gebruik is.
Gevaar van koolmonoxidevergiftiging: NOOIT dit product aansteken, laten smeulen of
afkoelen in afgesloten ruimten.
Gebruik dit product NIET in een tent, caravan, auto, kelder, zolder of boot. Gebruik deze
Kamado NIET als oven.
LET OP! Gebruik geen benzine, terpentine, aanstekervloeistof, alcohol of andere soortgelijke
chemicaliën voor het aansteken of opnieuw aansteken. Gebruik alleen aanmaakblokjes die
voldoen aan EN1860-3 standaarden.
Het wordt sterk aanbevolen om losse houtskool in uw Kamado te gebruiken. Dit brandt
langer en produceert minder as, wat de luchtstroom kan beperken. Gebruik GEEN kolen voor
dit product.
BELANGRIJK! Bij hoge temperaturen is het is het essentieel om het deksel slechts
lichtjes op te tillen, zodat de lucht langzaam en veilig binnenstroomt, waardoor terugslag of
steekvlammen die letsels kunnen veroorzaken vermeden worden. NIET gebruiken onder
luifels, parasols of tuinhuisjes.
51044 Grenade Grill 22 Handleiding aangepast.indd 351044 Grenade Grill 22 Handleiding aangepast.indd 3 13-1-2022 20:58:5113-1-2022 20:58:51

4
Volg ALTIJD de kooktemperatuurgids in deze handleiding. Gebruik de Kamado
NIET op houten vloeren of andere brandbare oppervlakken zoals droog gras,
houtsnippers, bladmulch, of decoratieve schors. Zorg ervoor dat de Kamado ten
minste twee meter verwijderd is van brandbare voorwerpen.
LET OP! Dit product zal zeer heet worden. GEBRUIK ALTIJD hittebestendige handschoenen
bij het hanteren van heet keramiek of oppervlakken. Laat het toestel volledig afkoelen
alvorens het te verplaatsen of in opslag te plaatsen. Verplaats het toestel NIET tijdens het
gebruik. Controleer het toestel vóór gebruik altijd op slijtage en beschadigingen, en vervang
onderdelen indien nodig.
HET UITHARDEN VAN DE KAMADO
Om een vuur te maken, legt u opgerold krantenpapier en wat aanmaakblokjes op de
houtskoolplaat (7), in de bodem van de Kamado. Leg vervolgens twee of drie handenvol
houtskool op de krant.
Gebruik GEEN benzine, terpentine, aanstekervloeistof, alcohol of andere
chemicaliën voor het aansteken of opnieuw aansteken. Open de onderste ventilatieopening en
steek het krantenpapier aan met een lange aansteker of veiligheidslucifers.
Overlaad het toestel NIET met brandstof. Als het vuur te intens is, kan de hitte de Kamado
beschadigen. Laat branden tot alle brandstof is gebruikt
en het vuur gedoofd is.
Als de eerste brandingen te heet zijn, kunnen ze de viltafdichting beschadigen voordat deze de
kans heeft gehad om te rijpen door het gebruik.
Controleer na het eerste gebruik of alle bevestigingsmiddelen goed vastzitten. De metalen
band die uw deksel met de basis verbindt zal door de hitte uitzetten en deze kan losraken.
Het is aan te bevelen om dit te controleren en - indien nodig - de band met een sleutel vast
te zetten.
U kunt uw Kamado nu normaal gebruiken.
UITDOVEN
Om het toestel te doven: stop met brandstof toevoegen en sluit alle ventilatieopeningen en
het deksel om het vuur op natuurlijke wijze te laten doven.
Gebruik GEEN water om de houtskool te doven, want dit kan de keramische Kamado
beschadigen.
51044 Grenade Grill 22 Handleiding aangepast.indd 451044 Grenade Grill 22 Handleiding aangepast.indd 4 13-1-2022 20:58:5313-1-2022 20:58:53

5
OPSLAG
Wanneer de Kamado niet wordt gebruikt, en indien hij buiten is gestald, dek hem dan
volledig afgekoeld met een geschikte regenhoes. Het wordt aanbevolen de Kamado overdekt
op te slaan in een in een garage of schuur gedurende de winter voor volledige bescherming.
SCHOONMAAK EN ONDERHOUD
De Kamado Grill is zelfreinigend. Verhit hem tot 260ºC gedurende 30 minuten en al het
voedsel en vuil zal wegschroeien.
Gebruik GEEN water of andere schoonmaakmiddelen product om de binnenkant van uw
Kamado te reinigen. De wanden zijn poreus en zullen alle gebruikte vloeistoen absorberen,
waardoor de Kamado kan barsten.
Nadat de Kamado is afgekoeld, als er te veel roet is, gebruik dan de as-tool om de
koolstofresten eraf te schrapen voor het volgende gebruik. Open voorzichtig de onderste
ontluchtingsopening en hark het roet in een kleine afvalbak onder de ontluchtingsopening.
Gooi het weg of bewaar voor toekomstig gebruik (roet).
Om de grills en roosters schoon te maken, gebruik een niet-schurend schoonmaakmiddel
zodra het toestel volledig is afgekoeld. Het verchroomde grillrooster is NIET
vaatwasmachinebestendig; gebruik dus een mild afwasmiddel met warm water.
Om de buitenkant schoon te maken, wacht tot de Kamado is afgekoeld en
gebruik een vochtige doek met een mild reinigingsmiddel. Het is belangrijk om de banden te
controleren en aan te spannen. Olie de scharnieren twee keer per jaar of meer
indien nodig. U zou niet in staat moeten zijn om gemakkelijk een inbussleutel te draaien terwijl
u de moer op zijn plaats houdt.
AANSTEKEN, GEBRUIK & ONDERHOUDSINFO
Wanneer u de Kamado gebruikt, druk dan op beide vergrendelingswielen om te voorkomen
dat het apparaat tijdens het gebruik gaat verschuiven.
Zorg ervoor dat de Kamado op een permanente, vlakke, hittebestendig, niet-ontvlambaar
oppervlak, uit de buurt van ontvlambare voorwerpen staat. Plaats de Kamado op een afstand
van minimaal 2 m van een overkoepeling en minstens 2 m afstand van andere omringende
voorwerpen.
1. Om het vuur aan te steken, legt u een opgerolde krant en wat aanmaakblokjes op de
houtskoolplaat (7), in de basis van de Kamado. Leg vervolgens twee of drie handenvol losse
houtskool op de krant.
2. GEBRUIK GEEN benzine, terpentine, aanstekervloeistof, alcohol of andere soortgelijke
chemicaliën voor het aansteken of opnieuw aansteken.
3. Open de onderste ventilatieopening en steek de krant aan met een lange aansteker of
veiligheidslucifers. Zodra de krant is aangestoken, laat u de bodemopening en het deksel
51044 Grenade Grill 22 Handleiding aangepast.indd 551044 Grenade Grill 22 Handleiding aangepast.indd 5 13-1-2022 20:58:5313-1-2022 20:58:53

6
ongeveer 10 minuten open staan om een klein bedje van hete sintels te
bouwen.
4. Laat de houtskool opwarmen en houd het roodgloeiend gedurende minstens
30 minuten voor de eerste bereiding op de Kamado. NIET koken voordat de
brandstof een laagje as heeft. Het wordt aanbevolen dat u de kolen niet stookt of draait
zodra ze aangestoken zijn. Hierdoor kunnen de houtskooltjes gelijkmatiger en eciënter
branden.
5. Als de houtskool eenmaal brandt, gebruik dan ALLEEN hittebestendige handschoenen bij
het hanteren hete keramiek of kookoppervlakken.
Lees deze handleiding door voor een complete gedetailleerde gids over
bereidingstemperaturen voor het grillen.
HANDLEIDING KOKEN OP LAGE TEMPERATUUR
Volg ALTIJD de kooktemperatuurgids in deze handleiding. Gebruik ALTIJD hittebestendige
handschoenen wanneer u met heet keramiek of kookoppervlakken werkt.
1. Steek de houtskool aan volgens de instructies hierboven. Verplaats of stook de kolen NIET
als ze eenmaal aangestoken zijn.
2. Open de onderste opening volledig en laat het deksel open voor ongeveer 10 minuten om
een klein bed van hete sintels op te bouwen.
3. Houd de Kamado in de gaten totdat deze de gewenste temperatuur heeft bereikt. Sluit
de onderste opening volledig om de temperatuur te behouden. Zie de handleiding voor de
kooktemperatuur.
U bent nu klaar om de Kamado te gebruiken om te koken.
BELANGRIJK! Bij het openen van het deksel bij hoge temperaturen is het essentieel om het
deksel eerst LICHT op te tillen, zodat de lucht langzaam en veilig kan ontsnappen, zodat er
geen terugslag of vlammen ontstaan die die letsels kunnen veroorzaken.
ROOKGIDS
Volg de bovenstaande instructies alsof je een langzaam kookt. Houd de Kamado in de gaten
tot hij de gewenste temperatuur. Zie Handleiding voor kooktemperatuur.
1. Laat de onderste ventilatieopening een beetje open. Sluit de bovenste ventilatieopening en
blijf de temperatuur nog een paar minuten controleren.
2. Strooi met hittebestendige handschoenen de houtsnippers in een cirkel over de hete
houtskool. Gebruik ALTIJD hittebestendige handschoenen bij het hanteren van heet
keramiek of kookoppervlakken.
U bent nu klaar om de Kamado te gebruiken om op te roken.
51044 Grenade Grill 22 Handleiding aangepast.indd 651044 Grenade Grill 22 Handleiding aangepast.indd 6 13-1-2022 20:58:5413-1-2022 20:58:54

7
TIP! Week houtsnippers of kookplanken in water voor 15 minuten om het rookproces te
verlengen.
BELANGRIJK! Bij het openen van het deksel bij hoge temperaturen, is het essentieel om het
deksel eerst LICHT op te tillen, zodat de lucht langzaam en veilig kan ontsnappen, om een
terugslag of vlammen te voorkomen die letsels kunnen veroorzaken.
GIDS VOOR KOKEN OP HOGE TEMPERATUUR
Houd de Kamado in de gaten tot hij de gewenste temperatuur heeft bereikt. Zie de
handleiding voor de kooktemperatuur. Gebruik ALTIJD hittebestendige handschoenen bij het
hanteren van heet keramiek of kookoppervlakken.
1. Steek de houtskool aan volgens de Aanmaak-, Gebruiks en onderhoudsinformatie in deze
handleiding. Sluit het deksel en open de bovenste en onderste ventilatieopeningen.
2. Sluit de bovenste ontluchtingsopening half en blijf de temperatuur nog een paar minuten in
de gaten houden.
U bent nu klaar om de Kamado te gebruiken om te koken.
BELANGRIJK! Bij het openen van het deksel bij hoge temperaturen is het van essentieel
belang om het deksel eerst LICHT op te tillen, zodat de lucht langzaam en veilig kan
ontsnappen, zodat er geen terugslag of vlammen ontstaan die letsels kunnen veroorzaken.
INFORMATIE OVER HET KOKEN VAN VOEDSEL
Lees en volg dit advies wanneer u op uw Kamado kookt:
1. NIET koken totdat de brandstof een aslaag heeft.
2. Voordat u gaat koken, controleer of de grilloppervlakken en het gereedschap schoon en vrij
zijn van oude etensresten.
3. Was altijd uw handen voor en na het aanraken van ongekookt vlees en voor het eten.
4. Gebruik NIET hetzelfde keukengerei voor gekookt en ongekookt voedsel. Houd rauw vlees
altijd uit de buurt van gekookt vlees en andere voedingsmiddelen.
5. Zorg ervoor dat al het vlees goed gekookt is voordat u het eet.
LET OP! Het eten van rauw of onvoldoende verhit vlees kan voedselvergiftiging
veroorzaken (bijv. bacteriestammen zoals E.coli). Om het risico van ondergekookt vlees te
verminderen, snijdt u het vlees open om er zeker van te zijn dat het door en door gaar i
LET OP! Als het vlees voldoende gaar is, moet het vleessap helder zijn en mogen er geen
sporen van roze/rood sap, of vleeskleurstof aanwezig zijn. Het voorkoken van grotere
stukken vlees en stukken vlees wordt aanbevolen alvorens ze koken op uw grill.
6. Na het koken op uw Kamado, reinig altijd de grill, het kookoppervlak en het keukengerei.
51044 Grenade Grill 22 Handleiding aangepast.indd 751044 Grenade Grill 22 Handleiding aangepast.indd 7 13-1-2022 20:58:5513-1-2022 20:58:55

8
BIJVULLEN VAN DE GRILL
Met het bovenste en onderste ventilatiegat gesloten, zal de Kamado op hoge
temperatuur blijven gedurende enkele uren.
Indien u een langere gaartijd nodig heeft (bijv. bij het braden van een heel of
langzaam roosteren), kan het nodig zijn meer houtskool toe te voegen. Open het deksel, voeg
extra houtskool toe, en kook verder zoals beschreven in deze handleiding.
HANDLEIDING KOOKTEMPERATUUR
BELANGRIJK! Stel de bovenste of onderste ventilatieopening NIET bij terwijl de Kamado
grill in gebruik is. Dit kan resulteren in ernstig letsel. Het wordt aanbevolen om ALTIJD
hittebestendige handschoenen te gebruiken bij het werken met hete
apparaten.
HANDLEIDING KOOKTEMPERATUUR
LANGZAAM GAREN / ROKEN (83ºC - 108ºC / 180ºF - 225ºF)
Rundvlees brisket. . . . . . . . . . . . 2 uren per 450 gram
Pulled pork . . . . . . . . . . . . . . . 2 uur per 450 gram
Hele kip. . . . . . . . . . . . . . . . . 3-4 uren
Ribbetjes . . . . . . . . . . . . . . . . 3-5 uren
Braadstukken . . . . . . . . . . . . . . 9+ uren
BOVENSTE VENT. ONDERSTE VENT OPEN GESLOTEN
GRILLEN / BRADEN / BAKKEN (163ºC - 191ºC / 325ºF - 375ºF)
Zeevruchten (krab, kreeft, garnalen) . . Tot ze niet meer doorschijnend en stevig zijn
Zeevruchten (kokkels, oesters) . . . . Tot de schelpen opengaan
Vis . . . . . . . . . . . . . . . . . . . 15-20 Minuten
Varkenshaas . . . . . . . . . . . . . . 15-30 Minuten
Stukjes kip . . . . . . . . . . . . . . . 30-45 Minuten
Hele kip. . . . . . . . . . . . . . . . . 1-1,5 uur
Lamsbout . . . . . . . . . . . . . . . . 3-4 uur
Kalkoen. . . . . . . . . . . . . . . . . 2-4 uur
Ham . . . . . . . . . . . . . . . . . . 2-5 uur
BOVENSTE VENT. ONDERSTE VENT OPEN GESLOTEN
51044 Grenade Grill 22 Handleiding aangepast.indd 851044 Grenade Grill 22 Handleiding aangepast.indd 8 13-1-2022 20:58:5613-1-2022 20:58:56

9
DICHT SCHROEIEN (260ºC - 330ºC / 500ºF - 625ºF)
Sint-Jacobsschelpen. . . . . . . . . . . Tot ze ondoorschijnend en stevig zijn
Biefstuk . . . . . . . . . . . . . . . . . 5-8 Minuten
Varkenskoteletten . . . . . . . . . . . 6-10 Minuten
Burgers . . . . . . . . . . . . . . . . . 6-10 Minuten
Worstjes . . . . . . . . . . . . . . . . 6-10 Minuten
BOVENSTE VENT. ONDERSTE VENT OPEN GESLOTEN
MONTAGE-INSTRUCTIES
BELANGRIJK: Verwijder voor gebruik alle verpakking, maar bewaar de veiligheidsinstructies
en bewaar ze bij dit product. Zorg ervoor dat het deksel gesloten is vóór de montage.
STAP 1.
Bevestig de vier voorgedraaide
zwenkwieltjes (2 & 3) aan elk van de vier
beugels (1) door ze met de hand in het gat
vast te draaien.
3
1
STAP 2.
Om de kar in elkaar te zetten, plaatst u
de twee dwarsstukken (4) in twee van de
vier beugels (1) van zowel de boven- en
onderkant.
4
1
STAP 3.
Steek de dwarsstukken (4) verder in de
andere twee beugels (1). Zet de beugels
(1) vast aan de kruisstukken (4) met behulp
van de 16x schroeven (A). Neem de in de
diagram aangegeven positie in acht.
STAP 4.
Controleer of de kar stevig staat en alle
bouten vastzitten alvorens de Kamado Grill
(9) erin te zetten. Druk de zwenkwieltjes (2)
naar beneden om ze te vergrendelen, zodat
de Kamado niet kan bewegen.
51044 Grenade Grill 22 Handleiding aangepast.indd 951044 Grenade Grill 22 Handleiding aangepast.indd 9 13-1-2022 20:58:5713-1-2022 20:58:57

10
STAP 5.
Om de Kamado Grill (9) op de kar te
plaatsen, moet u eerst alle onderdelen die
zich binnenin de grill bevinden verwijderen
om het tillen te vergemakkelijken. Plaats één
van uw handen in de onderste ventilatiegat
van de Kamado en de andere onder de grill.
LET OP: Til de Kamado Grill met minimaal
twee personen op de kar. Optillen aan het
scharnier of de zijtafels kan leiden tot letsel
en schade aan het product.
STAP 6.
Plaats de Kamado Grill op het karretje
met de onderste ventilatieopening
naar de voorkant van de kar, zodat de
ventilatieopening zonder enige onderbreking
open en dicht kan gaan.
9
STAP 7.
Wanneer de grill stevig in de wagen zit,
bevestigt u de bovenste ventilator (10).
Lijn de inkeping aan de zijkant uit met de
thermometer aan de voorkant, en zet het
over de bovenste opening. Bevestig dit met
de voorgemonteerde bout en moer.
10
9
STAP 8.
Plaats de vuurkorf (8), de houtskoolplaat
(7), en het rooster (5) in de Kamado Grill.
Zie het diagram hieronder. Het verhoogde
rooster (6) kan indien gewenst boven op het
rooster (5) geplaatst worden.
5
7
8
9
STAP 9.
Bevestig de 2x tafelbeugels (13) aan de
Kamado Grill (9) met behulp van de
8x voorgemonteerde bouten met hun
bijbehorende sluitringen, borgringen en
moeren per beugel. Let op de positie zoals
aangegeven in de diagram hieronder.
51044 Grenade Grill 22 Handleiding aangepast.indd 1051044 Grenade Grill 22 Handleiding aangepast.indd 10 13-1-2022 20:58:5813-1-2022 20:58:58

11
9
13
14
STAP 10.
Bevestig de 2x tafelbeugels (14) aan de
Kamado Grill (9) met behulp van de
8x voorgemonteerde bouten met hun
bijbehorende sluitringen, borgringen en
moeren per beugel. Let op de positie zoals
aangegeven in de bovenstaande diagram.
STAP 11.
Plaats de 2x tafelscharnieren in elk van de
tafelbeugels (13 & 14).
9
12
STAP 12.
Om de handgreep (11) aan het deksel van
de Kamado Grill (9) te bevestigen, gebruikt
u de 2x voorgemonteerde bouten met hun
bijbehorende sluitringen, borgringen en
moeren per beugel.
11
De Kamado Grill is nu klaar voor gebruik.
Zorg ervoor dat de grill instructies goed
doorgelezen worden voor gebruik.
51044 Grenade Grill 22 Handleiding aangepast.indd 1151044 Grenade Grill 22 Handleiding aangepast.indd 11 13-1-2022 20:58:5813-1-2022 20:58:58

PARTS LIST
Prior to assembly, check all parts against the parts list. Carry out assembly on a soft surface
to avoid scratching the paint. For ease of assembly, only loosely tighten bolts and then tighten
fully when assembly is complete.
WARNING: DO NOT over-tighten bolts. Only tighten all bolts with moderate pressure to
avoid damaging the bolts or components of the Kamado Grill.
IMPORTANT Carefully remove any packaging before use. Please READ THESE
INSTRUCTIONS IN THEIR ENTIRETY and take note of all of the safety warnings listed
in these instructions. This product is for domestic use ONLY and should not be used
commercially.
1. (4x)
2. (2x) 3. (2x)
4. (2x)
5. (1x)
7. (1x)
8. (1x)
9. (1x)
10. (1x)
11. (1x)
12. (2x)
13. (2x)
14. (2x)
A. (16x)
B. (4x)
C. (4x)
D. (4x)
12
51044 Grenade Grill 22 Handleiding aangepast.indd 1251044 Grenade Grill 22 Handleiding aangepast.indd 12 13-1-2022 20:58:5913-1-2022 20:58:59

CARE & SAFE USE GUIDELINES
ABOUTYOUR KAMADO
Dating back 4000 years ago, archaeologists discovered large clay vessels, which were thought
to be early incarnations of the Kamado ceramic cooker. Since then, it has evolved in many
ways: removable lid, added draft door for better heat control and the switch from wood to
charcoal as the primary fuel. In Japan, the Mushikamado was a round clay pot with a removable
domed lid designed for steaming rice. The name “Kamado” is, in fact, the Japanese word for
“stove” or “cooking range.” This name was adopted by the Americans and has now become
a generic term for this style of ceramic cooker. Kamado cookers are extremely versatile.
Not only can they be used for grilling or smoking, but also pizzas, bread, pies and cookies
can be baked eortlessly inside them. Due to their excellent heat retention properties, high
temperatures can be achieved and maintained by precise control of airow via the top and
bottom vents. High temperatures are ideal for quickly cooking burgers and sausages, while
low heats can cook larger cuts over a longer period of time. Try adding some wood chips to
the charcoal, or try combining dierent avour wood chips to make your meats even more
avourful.
WARNING! CAUTION!
This product is intended FOR OUTDOOR USE ONLY. DO NOT use indoors. NEVER leave
a burning re unattended. ALWAYS keep children and pets at a safe distance from the oven
when in use. FIRE HAZARD! May emit hot embers while in use.
DANGER of carbon monoxide poisoning: NEVER light this product, let it smoulder or cool
down in conned spaces. DO NOT use this product in a tent, caravan, car, cellar, loft or boat.
DO NOT use this Kamado as a furnace.
CAUTION! DO NOT use gasoline, white spirit, lighter uid, alcohol or other similar
chemicals for lighting or relighting. Use only relighters complying to EN1860-3.It is highly
recommended that you use lump charcoal in your Kamado. It burns for longer and produces
less ash, which can restrict the airow. DO NOT use coal in this product.
IMPORTANT! When opening the lid at high temperatures it is essential to lift the lid only
slightly, which allows air to enter slowly and safely, preventing any back-draft or are-ups that
may cause injury. DO NOT use under any awnings, parasols or gazebos.
ALWAYS follow the Cooking Temperature Guide stated in this instruction manual.
DO NOT use the Kamado on decking or any other combustible surfaces such as dry grass,
wood chips, leaf mulch, or decorative bark. Ensure that the Kamado is positioned at least two
metres away from ammable items.
CAUTION! This product will become very hot. ALWAYS USE heat resistant gloves when
handling hot ceramics or cooking surfaces. Allow the unit to cool down completely before
moving or storing. DO NOT move it during operation. Always inspect the unit prior to use
for fatigue and damage, and replace as and when necessary.
13
51044 Grenade Grill 22 Handleiding aangepast.indd 1351044 Grenade Grill 22 Handleiding aangepast.indd 13 13-1-2022 20:59:0013-1-2022 20:59:00

CURING THE KAMADO
To start a re, place rolled-up newspaper and some lighter cubes or solid
relighters on the charcoal plate (7), in the base of the Kamado. Then, place two
or three handfuls of lump charcoal over the top of the newspaper.
DO NOT use gasoline, white spirit, lighter uid, alcohol or other similar chemicals for lighting
or relighting.Open the bottom vent and light the newpaper using a long- nosed lighter or
safety matches.
DO NOT overload the unit with fuel. If the re is too intense, the heat could damage the
Kamado. Burn until all the fuel is used and the re is extinguished.If the rst burns are too
hot, they could damage the felt gasket seal before it has had the chance to mature with use.
After rst use, inspect all fasteners for tightness. The metal band connecting your lid to the
base will expand from the heat and this could become loose. It is recommended you check
and -- if neccessary -- tighten the band with a wrench.
You can now use your Kamado as normal.
EXTINGUISHING
To extinguish unit: stop adding fuel and close all the vents and the lid to allow the re to die
naturally.
DO NOT use water to extinguish the charcoal as this could damage the ceramic Kamado.
STORAGE
When not in use, and if stored outside, cover the Kamado once completely cooled with a
suitable rain cover.It is recommended the Kamado be stored under cover in a garage or shed
over winter for complete protection.
CLEANING & MAINTENANCE
The Kamado Grill is self-cleaning. Heat it up to 260ºC for 30 minutes and it will scorch o all
food and debris.
DO NOT use water or any other types of cleaning product to clean the inside of your
Kamado. The walls are porous and will absorb any uids used, which could cause the Kamado
to crack.
After the Kamado has cooled, if the soot becomes excessive, use the ash toolto scrape o the
carbon remnants before the next use. Carefully open the bottom vent and rake the soot into
a small waste container under the vent opening. Dispose of container, or store for future use
(soot).
To clean the grills and grates, use a non-abrasive cleaner once the unit has fully cooled. The
chrome-plated cooking grill is NOT dishwasher safe; use a mild detergent with warm water.
To clean the outer surface, wait until the Kamado is cool and use a damp cloth with a mild
14
51044 Grenade Grill 22 Handleiding aangepast.indd 1451044 Grenade Grill 22 Handleiding aangepast.indd 14 13-1-2022 20:59:0113-1-2022 20:59:01

detergent. It is important to check and tighten the bands, and oil the hinges, twice a year or
more if needed. You should not be able to easily turn a hex key while holding the nut in place.
LIGHTING, USAGE & CARE INFORMATION
When using the Kamado, push down on both of the locking wheels to stop the unit from
moving around during use.
Ensure the Kamado is positioned on a permanent, at, level, heat-resistant non-ammable
surface, away from ammable items. Position the Kamado with a minimum of 2 m overhead
clearance and at least 2 m clearance from other surrounding items.
1. To start a re, place rolled-up newspaper and some lightercubes or solid relighters on
the charcoal plate (7), in thebase of the Kamado. Then, place two or three handfuls oump
charcoal over the top of the newspaper.
2. DO NOT use gasoline, white spirit, lighter uid, alcohol orother similar chemicals for
lighting or relighting.
3. Open the bottom vent and light the newspaper using along-nosed lighter or safety matches.
Once it has caught,leave the bottom vent and lid open for about 10 minutes tobuild a small
bed of hot embers.
4. Allow the charcoal to heat up and keep it red hot for at least30 minutes prior to the
rst cooking on the Kamado. DONOT cook before the fuel has a coating of ash.It is
recommended that you do not stoke or turn the coalsonce they are alight. This allows the
charcoals to burn moreuniformly and eciently.
5. Once alight, ONLY use heat-resistant gloves when handlinghot ceramics or cooking
surfaces.
Read through this manual for a complete detailed guide on cooking temperatures for grilling.
LOW-TEMPERATURE COOKING GUIDE
GUIDEALWAYS follow the Cooking Temperature Guide stated in this instruction manual.
ALWAYS use heat-resistant gloves when handling hot ceramics or cooking surfaces.
1. Light the lump charcoal according to the instructionsabove. DO NOT move or stoke the
coals once lit.
2. Open the bottom vent fully and leave the lid open for about10 minutes to build a small bed
of hot embers.
3. Monitor the Kamado until it has risen to the desiredtemperature. Fully close the bottom
vent to maintain thetemperature. See Cooking Temperature Guide.
You are now ready to use the Kamado for cooking.
IMPORTANT! When opening the lid at high temperatures it is essential to lift the lid ONLY
SLIGHTLY at rst, allowing air to enter slowly and safely, preventing any back-draft or are-
ups that may cause injury.
15
51044 Grenade Grill 22 Handleiding aangepast.indd 1551044 Grenade Grill 22 Handleiding aangepast.indd 15 13-1-2022 20:59:0113-1-2022 20:59:01

SMOKING GUIDE
Follow the instructions above as if you were starting a slow cook. Monitor the
Kamado until it has risen to the desired temperature. See Cooking Temperature
Guide.
1. Leave the bottom vent slightly open. Close the top vent andcontinue to check the
temperature for a few more minutes.
2. Using heat-resistant gloves, sprinkle the wood chips in acircle over the hot charcoal.
ALWAYS use heat-resistantgloves when handling hot ceramics or cooking surfaces.You are
now ready to use the Kamado to smoke on.
TIP! Soak wood chips or cooking planks in water for 15 minutes to prolong the smoking
process.
IMPORTANT! When opening the lid at high temperatures, it is essential to lift the lid
ONLY SLIGHTLY at rst, allowing air to enter slowly and safely, preventing any back-draft or
are-ups that may cause injury.
HIGH-TEMPERATURE COOKING GUIDE
Monitor the Kamado until it rises to the desired temperature. See Cooking Temperature
Guide.ALWAYS use heat-resistant gloves when handling hot ceramics or cooking surfaces.
1. Light the lump charcoal according to the Lighting, Usageand Care Information in this
manual. Close the lid and fully open the top and bottom vents.
2. Close the top vent halfway and continue to check thetemperature for a few more minutes.
You are now ready to use the Kamado for cooking.
IMPORTANT! When opening the lid at high temperatures it is essential to lift the lid ONLY
SLIGHTLY at rst, allowing air to enter slowly and safely, preventing any back-draft or are-
ups that may cause injury.
HIGH-TEMPERATURE COOKING GUIDEINFORMATION
ABOUT COOKING FOOD
Read and follow this advice when cooking on your Kamado:
• DO NOT cook until the fuel has a coating of ash.
• Before cooking, ensure grill surfaces and tools are cleanand free of old food residues.
• Always wash your hands before and after handlinguncooked meat, and before eating.
• DO NOT use the same utensils to handle cooked anduncooked foods. Always keep raw
meat away from cookedmeat, and other foods.
• Ensure all meat is cooked thoroughly before eating. CAUTION! Eating raw or undercooked
meat can cause foodpoisoning (e.g. bacteria strains such as E.coli). To reducethe risk of
undercooked meat, cut open to ensure it iscooked all the way through.
16
51044 Grenade Grill 22 Handleiding aangepast.indd 1651044 Grenade Grill 22 Handleiding aangepast.indd 16 13-1-2022 20:59:0213-1-2022 20:59:02

• CAUTION! If the meat has been cooked suciently, themeat juice should be clear and there
should be no tracesof pink/red juice, or meat colouring. Pre-cooking largerpieces of meat
and cuts is recommended before nallycooking on your grill.
• After cooking on your Kamado, always clean the grillcooking surfaces and utensils.
REFUELLING YOUR GRILL
With the top and bottom vent closed, the Kamado will stay at a high temperature for several
hours. If you require a longer cooking time (e.g. when roasting a whole cut or slow-smoking),
it may be necessary to add more charcoal. Open the lid, add additional charcoal, and continue
to cook as directed in this manual.
COOKING TEMPERATURE GUIDE
IMPORTANT! Do NOT adjust top or bottom vent while the Kamado grill is in use. This
could result in serious injury. It is recommended to ALWAYS use heat-resistant gloves when
working with hot appliances.
SLOW COOK / SMOKE (83ºC - 108ºC / 180ºF - 225ºF)
Beef brisket. . . . . . . . . . . . . . . 2 Hours per lb
Pulled pork . . . . . . . . . . . . . . . 2 Hours per lb
Whole chicken . . . . . . . . . . . . . 3-4 Hours
Ribs. . . . . . . . . . . . . . . . . . . 3-5 Hours
Roasts . . . . . . . . . . . . . . . . . 9+ Hours
TOP VENT. BOTTOM VENT OPEN CLOSED
GRILL / ROAST / BAKE (163ºC - 191ºC / 325ºF - 375ºF)
Seafood (crab, lobster, shrimp) . . . . . Until opaque & rm
Seafood (clams, oysters) . . . . . . . . Until shells open
Fish . . . . . . . . . . . . . . . . . . . 15-20 Minutes
Pork tenderloin. . . . . . . . . . . . . 15-30 Minutes
Chicken pieces . . . . . . . . . . . . . 30-45 Minutes
Whole chicken . . . . . . . . . . . . . 1-1.5 Hours
Leg of lamb . . . . . . . . . . . . . . . 3-4 Hours
Turkey . . . . . . . . . . . . . . . . . 2-4 Hours
Ham . . . . . . . . . . . . . . . . . . 2-5 Hours
TOP VENT. BOTTOM VENT OPEN CLOSED
17
51044 Grenade Grill 22 Handleiding aangepast.indd 1751044 Grenade Grill 22 Handleiding aangepast.indd 17 13-1-2022 20:59:0313-1-2022 20:59:03

COOKINGTEMPERATURE GUIDESEAR (260ºC - 330ºC / 500ºF -
625ºF)
Scallops . . . . . . . . . . . . . . . . . Until opaque & rm
Steak . . . . . . . . . . . . . . . . . . 5-8 Minutes
Pork chops . . . . . . . . . . . . . . . 6-10 Minutes
Burgers . . . . . . . . . . . . . . . . . 6-10 Minutes
Sausages . . . . . . . . . . . . . . . . 6-10 Minutes
TOP VENT. BOTTOM VENT OPEN CLOSED
ASSEMBLY INSTRUCTIONS
IMPORTANT: Remove all packaging before use, but retain the safety instructions and store
them with this product. Ensure that the lid is closed prior to assembly.
STEP 1.
Attach the four pre-threaded castor wheels
(2 & 3)to each of the four brackets (1) by
hand-tightening them in the hole.
3
1
STEP 2.
To assemble the cart, insert the two
crosspieces(4) into two of the four brackets
(1) from both thetop and bottom.
4
1
STEP 3.
Continue to insert the crosspieces (4)
into theother two brackets (1). Secure the
brackets (1) to the crosspieces (4) by using
the 16x screws (A). Please note the position
shown in the diagram.
STEP 4.
Make sure the cart is secure, and all of the
bolts are tight before placing the Kamado
Grill (9) into it. Press down on the castor
levers (2) to lock the castor wheels to
ensure the Kamado cannot move.
18
51044 Grenade Grill 22 Handleiding aangepast.indd 1851044 Grenade Grill 22 Handleiding aangepast.indd 18 13-1-2022 20:59:0413-1-2022 20:59:04

STEP 5.
To place the Kamado Grill (9) on the cart,
rst remove all of the items that are inside
of the grill to make lifting easier. Place
one of your hands in the bottom vent of
the Kamado and the other under the grill.
CAUTION: Use a minimum of two people
when lifting the Kamado Grill onto the cart.
Lifting by the hinge or the side tables could
result in injury and damage to the product.
STEP 6.
Place the Kamado Grill on the cart with the
bottomvent facing to the front of the cart
allowing the vent to open and close without
any interruption.
9
STEP 7.
Once grill is securely seated in the cart,
attachthe top vent (10). Align the side notch
with the thermometer at the front, and
set over the top opening. Secure with pre-
attached bolt and nut.
10
9
STEP 8.
Add the rebox (8), charcoal plate (7), and
cookinggrill (5) inside of the Kamado Grill.
Please reference the diagram below. The
raised cooking grid (6) can be placed atop
the cooking grill (5), if required.
5
7
8
9
STEP 9.
Attach the 2x table brackets (13) to the
KamadoGrill (9) using the 8x pre-attached
bolts with their corresponding washers,
locking washers, and nuts per bracket.
Please note the position shown in the
diagram below.
19
51044 Grenade Grill 22 Handleiding aangepast.indd 1951044 Grenade Grill 22 Handleiding aangepast.indd 19 13-1-2022 20:59:0413-1-2022 20:59:04
This manual suits for next models
2
Table of contents
Languages:
Popular Grill manuals by other brands

Bourgini
Bourgini Chef's Dinner Party instructions

George Foreman
George Foreman GR8BLK owner's manual

CDA
CDA VW601 Installation, use and maintenance

Masterbuilt
Masterbuilt GRAVITY GRIDDLE MB20043622 manual

Goldair
Goldair FEG200 operating instructions

Kenmore
Kenmore 415.162040 Assembly instructions/use and care manual