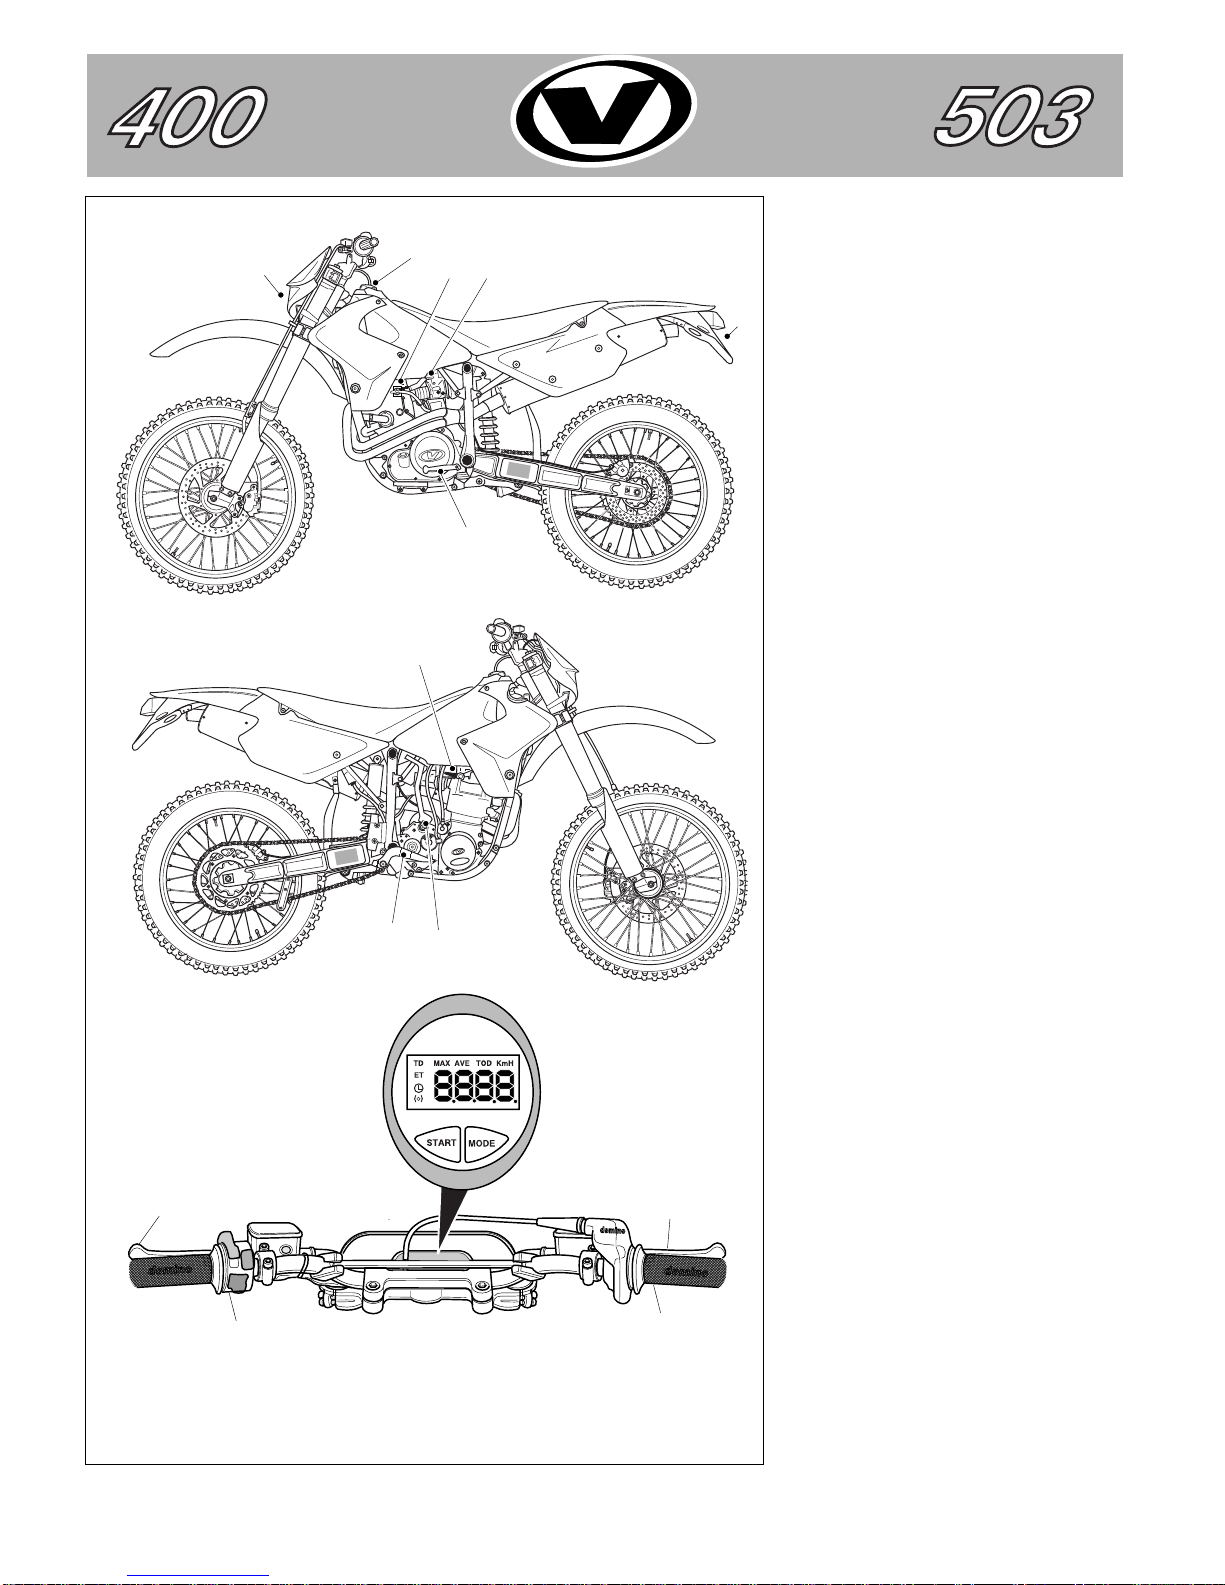
VOR Motore 400 User manual

400
503
MANUALE PER L'UTENTE
OWNER'S MANUAL
GEBRAUCHSANWEISUNGEN
ISTRUCTION D'EMPLOY

1
PREFAZIONE
Ci congratuliamo con voi che avete scelto una motocicletta VOR Motori.
La vostra VOR Motori è il risultato di molti anni d'esperienza nel settore delle competizioni sportive. La motocicletta è pro-
gettata e costruita per ottenere il massimo riguardo a prestazioni, affidabilità e sicurezza. Questo manuale vuole in modo
semplice fornirvi tutte le informazioni necessarie riguardo alla vostra motocicletta. Leggete attentamente queste istruzioni e
seguite tutti i consigli per ottenere le migliori prestazioni, costi di manutenzione ridotti e una lunga durata della vostra moto.
FOREWORD
Thank you choosing a VOR Motori motorcycle.
Your VOR Motori is backed by many years of competition experience. The motorcycle has been designed and
manufactered to meet the strictest conceivable demands on performance, reliability and safety. This Owner's Manual is
designed to present clearly all the information you will need to handle your motorcycle. By studying instructions carefully
and observing all recommendations, you will assure yourself of the best possible performance, lowest maintenance costs
and a long useful life.
VORWORT
Sie haben sich für eine VOR Motori-Maschine entschieden.
Damit sind Sie ein Kenner, der sich nur mit dem Besten zufrieden gibt. In ihrer VOR Motori stecken langjährige Er-
fahrungen aus dem Rennsport. Wir haben sie für höchste Ansprüche in bezug auf Leistung, Zuverlässigkeit und Sicherheit
konstruiert und gebaut. In dieser Betriebsanleitung finden Sie kurz und übersichtlich alles Wissenswerte für die Hand-
habung, Wartung und Pflege Ihrer VOR Motori Folgen Sie den Anweisungen - Ihre VOR Motori wird es Ihnen durch
optimale Leistung, minimale Unkosten und maximale Lebensdauer danken. Einige unserer Hinweise und Empfehlungen
sind vielleicht in Ihrem Land Gesetz oder Vorschrift. Wenn nicht, halten Sie sich bitte trotzdem daran. Viel Freude und Erfolg
mit Ihrer VOR Motori!
PRÉFACE
Nous vous félicitons d'avoir choisi cette motocyclette VOR Motori.
Aboutissement de nombreuses années d'expérience en matière de compétition, elle a été conçue et fabriquée confor-
mément aux normes les plus sévères de performances, de fiabilité et de sécurité. Ce Manuel de conduite et d'entretien
présente de façon simple et claire toutes les informations nécessaires pour son maniement. En lisant le texte soigneu-
sement et en suivant au pied de la lettre ces recommandations, vous arriverez aux meilleures performances, aux coûts
d'entretien les plus bas et à la plus longue durée de vie.

2
INDICE
Istruzioni per la garanzia.......3
Sicurezza..............................4
Guida....................................6
Verifica di funzionamento.....8
Guida normale....................12
Avviamento del motore.......12
Servizio/Manutenzione.......14
Specifiche tecniche.............40
CONTENTS
Terms of warranty.................3
Safety....................................4
Riding....................................7
General ceck.........................9
Normal riding......................13
Starting the engine..............13
Service and maintenance...15
Technical data....................41
INHALT
Garantiebedingungen...........3
Sicherheit.............................5
Fahren..................................7
Funktionskontrolle..............10
Normaler Fahrbetrieb.........13
Start des motors.................13
Wartung/Pflege...................15
Technische Daten..............42
SOMMAIRE
Conditions de garantie..........3
La sécurité............................5
Conduite...............................7
Vérification du fonction-
nement ...............................11
Conduite normale...............13
Lancement du moteur.........13
Entretien.............................15
Fiche technique..................43

3
ISTRUZIONI PER LA GARANZIA
La garanzia vale per problemi dovuti alla costruzione.
Il motociclo è stato concepito e costruito per le competizioni. L'affidabilità ed il buon funzionamento sono condizionati dal-
l'uso appropriato per cui la garanzia vale solo per problemi dovuti a materiali difettosi e relativamente alla sostituzione dei
materiali stessi.
TERMS OF WARRANTY
The terms of the warranty are as follows. The warranty is valid for all defective materials.
Motorcycle has been conceived and built for the competitions. Trust and the good fonctionnement I am conditioned by
appropriate usage for which guarantee counts alone for problems been obliged at material defective and relatively to the
substitution of the material same.
GARANTIEBEDINGUNGEN
Die Garantie gilt für Materialfehler.
Das Motorrad wurde für Wettkämpfe entwickelt und hergestellt. Die Zuverlässigkeit sowie der richtige Betrieb hängen von
der korrekten Verwendung ab; aus diesem Grund gilt die Garantie nur bei Problemen durch fehlerhate Materialien und in
Bezug auf die Ersetzung dieser Materialien.
CONDITIONS DE LA GARANTIE
La garantie couvre tous les cas où ce presente un probleme de construction.
La motocyclette à été prèvue seulement pour les compétitions. Le bon fonctionnement du vehicule dépend exclusivement
d'une utilisation adèquate; c'est pour cela que la garantie couvre seulement les problèmes de vices de forme et de ma-
tièriaux.

SICUREZZA
Indumenti di protezione
Per evitare danni fisici dovuti ad incidenti con la moto, è necessario utilizzare buoni indumenti di protezione per la testa ed il
corpo.
L'uso del casco di protezione è necessario per evitare danni alla testa in caso di cadute dalla moto. Per proteggere gli occhi
si devono usare occhiali da moto.
Guanti, stivali e un abbigliamento idoneo devono essere usati per chi viaggia in moto.
Motocicletta
Modifiche alla motocicletta o l'uso di ricambi non originali possono determinare situazioni pericolose. Mantenete la vostra
moto sempre in ottimo stato. Non trascurate la pulizia, l'ispezione e la manutenzione della vostra motocicletta.
Guida sicura
Effettuate sempre una verifica della moto prima di avviare il motore, onde evitare incidenti e danni tecnici.
Guidate con giudizio e non sopravvalutate la vostra abilità. Iniziate con calma e imparate a conoscere la vostra moto prima
di raggiungere prestazioni elevate.
Non prestate la vostra moto a persone inesperte. Molti incidenti si verificano spesso a causa di inesperienza del guidatore.
Trasporto
Trasportate sempre la moto in posizione eretta per impedire perdite di carburante o olio, che a loro volta possono dar luogo
ad incendi.
SAFETY
Protective clothing
Although motorcycling involves some risk of injuries, then can be minimised if the rider uses appropriate clothing to protect
his head and body.
A helmet is absolutely imperative for avoiding head injuries in the event of a fall. Motorcycle goggles are essential for protec-
ting the eyes.
The rider's equipment must obviously include gloves, boots and suitable motorcycling clothes. Loosely fitting clothes are inap-
propriate for a motorcycle rider.
The motorcycle
If the motorcycle is modified or if genui
ne parts are not used, the motorcycle
may become dangerous to ride. Always
keep your
motorcycle in the peak of
condition and in a safe state. Never o
mit cleaning, maintenance and servicing.
A safe ride
Make a habit checking that the motorcycle is ready for riding before you start the engine. This will prevent accidents and da-
mage to the motorcycle.
Ride with care and don't overestimate your capabilities. Take it easy in the initial stages and get know your new motorcycle
before trying to get the most out of it.
Never lend your motorcycle to any other before you have made certain that he can handle it. Inexperienced riders are often
involved in accidents.
Transport
Always transport your machine upright to prevent the leakage of fuel and oil. Leakage may involve the risk of fire.
4

5
SICHERHEIT
Schutzbekleidung
Auch wenn Sie ein guter und sicherer Fahrer sind, lassen sich Unfälle leider nicht immer vermeiden. Deshalb sollten Sie
Kopf und Körper entsprechend schützen.
Der Helm ist unumgänglich notwendig, um Schädelverletzungen zu vermeiden. Daß er der ECE 22 entsprechen muß, ist
Ihnen sicher bekannt, ebenso wie die etwaige in Ihrem Land geltende Tragevorschrift (in Deutschland die StVO). Dabei,
auch die Augen nicht vergessen, es gibt gute Schutzbrillen in großer Auswahl auf dem Markt.
Handschuhe, Stiefel und eine geeignete Kombination gehören natürlich auch zur Ausstattung des sicherheitsbewußten Mo-
torradfahrers. Locker herumflatternde Kleidungsstücke dagegen haben mit Motorradfahren nichts zu tun.
Motorrad
Von uns nicht freigegebene Veränderungen und Eingriffe an Ihrer Maschine ebenso wie die Verwendung von anderen als
Original-Ersatzteilen können Ihr Motorrad gefährlich machen, für Sie und für Andere. Denken Sie bitte auch daran, daß in
einigen Modifikationsfällen der Gesetzgeber mitreden will. Halten Sie die Maschine immer in optimalem und sicherem
Zustand. Dazu gehören auch Reinigung, Wartung und Pflege.
Sicheres Fahren
Beginnen Siejede Fahrt mit einem "Kurz-Check" bevor Sie den Motor starten. Dadurch können Sie sowohl Unfälle als auch
Schäden an der Maschine vermeiden.
Fahren Sie verantwortungsbewußt und rücksichtsvoll. Überschätzen Sie nie Ihre Fähigkeiten. Lassen Sie Ihre neue Maschi-
ne kennenlernen, bevor Sie das Gas mehr aufdrehen.
Lassen Sie keinen ungeübten Fahrer Ihre Vertemati pilotieren, bevor Sie sich davon überzeugt haben, daß er die Maschi-
ne beherrscht. Unerfahrene und ungeübte Fahrer sind häufig in Unfälle!
Transport
Beim Transport soll die Maschine aufrecht stehen. Dann gibt es weder Kraftstoff-noch Ölleckagen, die sonst eine
Feuergefahr darstellen.
LA SÉCURITÉ
Vêtements de protection
Les motocyclistes ne sont pas à l'abri des accidents, et pour éviter les blessures graves, il est important de porter des
vêtements de protection adéquats, tant sur la tête que sur le corps.
Le casque est une nécessité absolue, pour éviter les blessures du crâne en cas de chute. Les lunettes de motocy
cliste
protègent efficacement les yeux.
Gants, bottes et combinaison moto adéquates doivent évidemment faire partie de l'équipement. Les vêtements flottants au
vent sont à bannir.
La motocyclette
Toute modification de la motocyclette peut la rendre dangereuse sur la route, de même que l'utilisation de pièces dites
adaptables. Maintenez-la toujours en bon état, vérifiez les éléments de sécurité, ne sautez aucun nettoyage, contrôle ou
entretien.
Conduite sûre
Faites toujours un "contrôle avant condiuite" de la motocyclette avant de mettre le moteur en marche: vous éviterez ainsi ac-
cidents et dommages à la motocyclette.
Conduisez avec bon sens et ne surestimez pas votre capacité. Conduisez prudemment pendant les premiers jours, et ap-
prenez à connaître votre nouvelle motocyclette avant de la forcer.
Ne prêtez jamais votre motocyclette avant de vous assurer que la personne qui le demande la domine bien. Les motocycli-
stes inexpérimentés ont souvent des accidents.
Transport
Transportez toujours la motocyclette debout, pour éviter toute fuite d'essence et d'huile qui pourrait provoquer des
incendies.

6
5
4
3
2
Fig. 1
6
GUIDA
Comandi
1. Tappo serbatoio carburante
2. Leva comando frizione
3. Commutatore abbaglianti / anabba-
glianti, horn, short-circuit button
4. Tachimetro, contachilometri totale
e parziale
5. Leva comando freno anteriore
6. Comando acceleratore
7. Fanale posteriore
8. Fanale anteriore
9. Pedale comando freno posteriore
10.Rubinetti carburante
11.Starter
12.Pedale avviamento
13.Pedale comando cambio
FUNZIONI STRUMENTO DIGITALE
ON/OFF:Attivamento/Disattivamento
O: Orologio (ore/minuti)
ET: Cronometro. Indica il tempo tra-
scorso dall'ultima attivazione
TD: Percorrenza parziale. Indica la di-
stanza percorsa dall'ultima attivazione
MAX: Indica la velocità massima rag-
giunta dall'ultima attivazione
AVE: Indica la velocità media dall'ulti-
ma attivazione
TOD: Indica la distanza coperta dal mo-
mento della partenza
KM/H: Indica la velocità istantanea
NOTA:
Per selezionare qualsiasi funzione è
necessario che la moto rimanga
ferma 10 secondi. Dopo che è passa-
to un minuto dall'aver selezionato una
funzione il sistema ritornerà automa-
ticamente a zero.
Si attiverà nuovamente premendo il
pulsante funzione e mettendo la moto
in movimento.
NOTA:
Se non si seleziona nessuna funzione
lo strumento agisce come un sem-
plice tachimetro
912
1
7
810
10
13
11

7
RIDING
Controls
1. Fuel tank cap
2. Clutch control lever
3. Dip switch, horn, short-circuit button
4. Speedometer, trip meter and odo-
meter
5. Front brake lever
6. Twist-grip
7. Rear lamp
8. Headlamp
9. Rear brake pedal
10.Fuel cocks
11.Choke
12.Kick-starter
13.Gearchange pedal
INSTRUMENTS DIGITAL FUNCTIONS
ON/ OFF: Turned on / turned off
O: Clock(hours / minutes)
ET: Chronometer. It points to time pas-
sed by the last lighting
TD: Partial route. It points to distance
run along by the last lighting
MAX: Point to maximum speed rea-
ched by the last lighting
AVE: Point to middle speed from the
last lighting
TOD: Point to covered distance from
moment of departure
KM/H: Point to snapshot speed
NOTE:
To select any function is necessary
that motion remain still 10 second.
After that it is past a minute from the
to have selected a function system
will return automatically at 0.
It will activate itself again pressing
pulsating it function and putting
motion in movement.
NOTE:
Doesn't not select it function instru-
ment acts like a simple speedometer
FAHREN
Bedienungsorgane
1. Tankdeckel
2. Kupplungshebel
3. Abblendschalter, Signalknopf, Ab-
stellknopf
4. Geschwindigkeismesser mit Kilome-
ter-zähler und tageskilometer-zähler
5. Vorderradbremsgriff
6. Gasdrehgriff
7. Rücklicht
8. Scheinwerfer
9. Hinterradbremspedal
10.Kraftstoffhahnen
11.Choke
12.Kickstarterhebel
13.Fußschalterhebel
ANZEIGENSTELLUNG (L.C.D.)
ON/OFF: Ein /Aus
O: Uhr (Stunde / Minute)
ET: Chronometer. Zeitraum dem An-
zünden zeigen.
TD: Tageskilometerzäler. Entfernung
durchfhren dem Anzünden zeigen.
MAX: Geschwindigkeit maximal dem
Anzünden zeigen.
AVE: Mittel-Geschwindigkeit dem An-
zünden zeigen.
TOD: Entfernung durchfhren dem Ab-
fahrt zeigen.
KM/H: Geschwindigkeit zeigen.
HINWEIS:
Zur Wahl jeder function muss dass
Motorrad 10 Secunden still bleiben.
Nach wall ainer function (1 minute)
winde das System auf nul wieder
gestelt.
Zum Einschalten des system Drue-
taster function drüken.
HINWEIS:
Winde Wein function Gewählt, so
arbaitet dasse gerät as tachometer.
CONDUITE
Commandes
1. Bouchon de réservoir
2. Levier d'embrayage
3. Commutateur feux de route/croise-
ment, a
vertisseur sonore et coupe-
circuit
4. Compteur de vitesse avec compteur
kilomètrique et partiel
5. Levier du frein avant
6. Poignée de gaz
7. Feu arrière
8. Projecteur
9. Pédale de frein arrière
10.Robinets de carburant
11.Starter
12.Kick-starter
13.Sélecteur de vitesses
FONCTIONS DU QUADRANT L.C.D.
ON/OFF: Allumé /étéint
O: Horloge (Heures/minutes)
ET: Chronomètre. Indique le temps
passé depuis la derniere allumage.
TD: Parcours partial. Indique la distan-
ce parcourue depuis la derniere al-
lumage.
MAX: Indique le maxime vitesse ga-
gnèe depuis la derniere allumage.
AVE: Indique le vitesse moyenne ga-
gnèe depuis la derniere allumage.
TOD: Indique la distance parcourue
depuis le depart .
KM/H: Indique la vitesse au moment.
NOTE:
Pour selecter une fonction c'est neces-
saire que le motocyclette reste fermée
pendant 10 seconds. Dépuis un minu-
te qu'il a selectionnée une function le
sistème retourne à zero.
Le sistème functionne neuvement
quand on pousse le poussoir de
fonction et le motociclette est en
mouvement.
NOTE:
Si on ne selectionne aucune fonction
le quadrant signe seulement la vites-
se au moment.

VERIFICA DI FUNZIONAMENTO
Prendete l'abitudine di effettuare sempre un'ispezione generale della motocicletta prima e dopo la guida. Pulire e lubrificare
sempre la moto dopo l'uso. Controllare i seguenti punti ed intervenite in caso di guasti. Nel capitolo "Servizio e
Manutenzione" trovate informazioni più detagliate al riguardo.
Carburante
Livello olio motore
Candela
Accensione
Filtro dell'aria
Acceleratore
Regolazione del carburatore
Frizione
Catena
Freni
Sospensione anteriore
Sospensione posteriore
Ruota anteriore
Ruota posteriore
Pneumatici
Radiatore
Serraggio
Luci
8
Riempire il serbatoio se necessario.
Controllare il livello e rabboccare se necessario.
Controllare che il cappuccio e il filo della candela siano integri.
Controllare che il motore funzioni normalmente. Assicuratevi che il
sistema di accensione dentro il carter e il volano siano puliti.
Pulire e sostituire in caso necessario.
Controllare il funzionamento e i fili. In caso necessario regolare o
sostituire.
Regolare in caso necessario.
Controllare il funzionamento e i tubi. In caso necessario spurgare.
Regolare e in caso di danni sostituire.
Controllare il funzionamento e i tubi. In caso necessario regolare o
spurgare.
Controllare il funzionamento e il gioco dei cuscinetti. In caso necessario
regolare.
Controllare il funzionamento. In caso necessario regolare.
Controllare, serrare i raggi.
Controllare la pressione, il battistrada e eventuali danni.
Controllare che ci sia sufficiente liquido di raffreddamento. Rabboccare
in caso necessario.
Controllare viti e dadi con riferimento agli attacchi del motore, ai
componenti del telaio, al canotto di sterzo, ecc....
Controllare il funzionamento delle luci anteriori e posteriori.

9
GENERAL CECK
Make it a habit to give your motorcycle a general check before and after riding. After riding, it is also important to clean and
lubricate the machine. Check the following items and attend to any defects. For more detailed instructions, see the section
entitled "Service and maintenance".
Fuel
Engine oil level
Spark plugs
Ignition
Air cleaner
Throttle control
Carburettor setting
Clutch
Chain
Brakes
Front suspension
Rear suspension
Front wheel
Rear wheel
Tyres
Radiator
Tightening
Lighting
Top up as necessary.
Check and top up as necessary.
Check that the spark plug cap and HT lead are in good condition.
Check that the engine runs smoothly. Make sure that the ignition sy-
stem on the inside of the cover and flywheel is clean.
Clean or, if necessary, replace the filter elements.
Check the operation and cables. Adjust or replace as necessary.
Adjust as necessary.
Check the operation and tubes. Discarge as necessary.
Adjust as necessary or replace if damaged.
Check the operation and brake tubes. Adjust or discarge as necessary.
Check the behaviour and adjust as necessary.
Check the behaviour and fork head bearing clearance. Adjust as ne-
cessary.
Check, tighten the spokes.
Check the tyre pressure and tread, and check for damage.
Check the coolant level and top up as necessary.
Retighten the bolts and nuts, e.g. engine mountings, frame compo-
nents, swinging arm, etc.
Check that the front and rear lighting operates correctly.

FUNKTIONSKONTROLLE
Machen Sie es zur Gewohnheit, sowohl vor als auch nach der Fahrt eine allgemeine Inspektion vorzunehmen. Nach der
Fahrt sind außerdem eine Reinigen und Schmierung wichtig. Kontrollieren sie nachstehende Punkte und beseitigen Sie
etwaige Fehler. Im Abschnitt "Wartung/Pflege" finden Sie ausführlichere Anweisungen hierfür.
Kraftstoff
Motorölstand
Zündkerze
Zündanlage
Luftflter
Gasbetätigung
Vergaser
Kupplung
Kette
Bremsen
Vorderradfederung
Hinterradfederung
Vorderrad
Hinterrad
Reifen
Kühlmittelstand
Schraub-verbindungen
Beleuchtung
10
Bei Bedarf auffüllen.
Kontrolle, ggf. auffüllen.
Kerzenstecker und Zündkabel auf einwandfreien Zustand prüfen.
Motor auf einwandfreien Rundlauf prüfen. Dafür sorgen, daß Zündan-
lage unter Abdeckung und im Schwungrad sauber ist.
Reinigen, ggf. erneuern.
Funktion und Seilzug kontrollieren, ggf. einstellen oder schadhafte Teile
erneuern.
Einstellung ggf. korrigieren.
Funktion und Rohr kontrollieren, ggf. reinigen Teile erneuern.
Spannung kontrollieren, ggf. einstellen oder im Schadensfall erneuern.
Funktion und Rohr bzw. Gestänge kontrollieren, ggf. einstellen oder
reinigen Teile erneuern.
Funktion und Lenklagerspiel kontrollieren, ggf. einstellen.
Funktion kontrollieren, ggf. einstellen.
Speichen kontrollieren, ggf. spannen und schadhafte Speichen
erneuern.
Speichen kontrollieren, ggf. spannen und schdhafte Speichen
erneuern.
Fülldruck prüfen, ggf. korrigieren. Auf einwandfreies Profil und etwaige
Schäden kontrollieren, ggf. erneuern.
Kontrolle, ggf. auffüllen.
Schrauben, Muttern und andere. Schraubteile, z.B. an Motoraufhän-
gung,Rahmenteilen, Schwinge, auf festen Sitz kontrollieren.
Vorn und hinten auf einwandfreie Funktion kontrollieren.

VÉRIFICATION DU FONCTIONNEMENT
Prenez l'habitude de toujours faire un contrôle général de la motocyclette avant et après la conduite. Après la conduite, il
est également important de la nettoyer et de la lubrifier. Vérifiez les points suivants, et remédiez aux défaillances qu'il
pourrait y avoir. Vous trouverez les directives plus détaillées au chapitre "Entretien".
Carburant
Niveau d'huile dans le moteur
Bougie
Allumage
Filtre à air
Commande de Gaz
Embrayage
Chaîne
Freins
Suspension avant
Suspension arrière
Roue avant
Roue arrière
Pneus
Radiateur
Resserrages
Eclairage
Remplissez si besoin.
Vérifiez et rétabilissez si besoin.
Vérifiez que le capuchon et le fil de la bougie sont intacts.
Vérifiez que le moteur tourne bien, de façon "linéaire".Veillez à ce que
le système d'allumage soit bien propre et le carter étanche.
Nettoyez ou, si besoin, remplacez.
Vérifiez le fonctionnement et les tubes. Si besoin nettoyer.
Réglez si besoin. Vidangez régulièrement.
Réglez et nettoyez; remplacez si elle est endommagée.
Vérifiez le fonctionnement et les tubes. Si besoin réglez ou nettoyer.
Vérifiez le fonctionnement ainsi que le jeu des roulements. Réglez si
besoin.
Vérifiez le fonctionnement et le jeu des bielettes; graissez.
Vérifiez, serrez les rayons.
Vérifiez la pression de gonflage, les sculptures et l'état général.
Vérifiez qu'il y a suffisamment de liquide de refroidissement; si besoin,
rétabilissez le niveau.
Resserez les vis et les écrous: fixations du moteur, éléments du cadre,
bras oscillant, etc.
Vérifiez que l'éclairage avant et arrière fonctionne bien.
11

Guida normale ( Fig. 2)
Questa motocicletta ha 5 (3 per MX 3V)
marce ed è costruita per la guida "fuori
strada". Il motore raggiunge facil-mente
regimi di giri elevati. Per risolvere il
problema vogliamo darvi alcuni consigli
per il rodaggio:
Non mandate su di giri il motore, mar-
ciando con una marcia troppo bassa.
Con la moto ferma, è consentito fare
girare il motore al massimo per circa 1
minuto, al fine di evitare il surriscalda-
mento.
Utilizzare sempre olii di marche conosciute.
Avviamento del motore (Fig. 3)
1. Controllare che ci sia carburante
nel serbatoio.
2. Aprire (ON) il rubinetto del car-
burante.
3. Aprire lo starter (ON) se il motore è
freddo. In caso di motore caldo lo
starter è in OFF, chiuso.
AVVERTIMENTO
Verificate sempre prima della partenza
che l'acceleratore funzioni senza problemi
e che la farfalla nel carburatore ritorni
completamente.
4. Mettere in folle (N) con il pedale del
cambio. Fig. 2.
5. Ricordarsi che un motore a 4 tempi
necessita di 2 giri dell'albero motore per
un ciclo completo, quindi la pedalata
sulla leva della messa in moto (Fig.4)
deve sfruttare tutta la corsa della messa
in moto stessa. Vi è un decompressore
automatico che ritorna in posizione
quando la leva della messa in moto
ritorna in alto. Quindi ad ogni pedalata
lasciare ritornare la leva in posizione di
riposo, tutta in alto ( si sentirà un clic
che avverte che la leva del decom-
pressore è tornata in posizione per una
nuova pedalata). Una volta azionata
con il piede la leva della messa in moto
sfruttare tutta la corsa della messa in
moto stessa.
6. Riscaldare il motore accelerando
leggermente finchè il motore non giri
senza bisogno di starter (A-Fig.5).
7. Con il motore al minimo stringere la
leva della frizione e mettere la prima.
8. Accelerare leggermente, rilasciare
la frizione lentamente e partire.
Fig. 5
12
Fig. 2
Fig. 4
Fig. 3
N
1
2
345
N
23
N
N
MX 3V
5V
ON
OFF
1
1
A

13
Normaler Fahrbetrieb ( Abb. 2.)
Die 503 hat ein 5(3 fur MX-3V)-Gang-
Getrie-be und ist für den Off-Road-
Einsatz konstruiert. Durch sein
Konstruktion-
sprinzip erreicht der
Motor sehr schnell
hohe Drehzahlen.
Zur Vermeidung von
Störungen bitte
folgende Hinweise beachten:
Den Motor nicht durch Fahren in zu
niedrigem Gang überdrehen.
Der Motor darf bei Stillstand der
Maschine maximal ca. 1 Minute lau-
fen (Überhtzungsgefahr!).
Nur hochwertige anerkannter Fabri-
kate verwenden.
Start des Motors (Abb. 3)
1. Kontrollieren, daß der Kraftstofftank
aufgefüllt ist.
2. Den Kraftstoffhahn öffnen (ON).
3. Bei kaltem Motor den Choke öffnen
(ON) - bei warmem Motor den Starter
nicht öffnen (OFF).
VORSICHT
Vor dem Start immer kontrollieren,
daß sich der Gasdrehgriff leicht dreht
und der Scheiber im Vergaser ruckfrei
in seine Ausgangsstellung zurückgeht.
4. Den Gang mit dem Fußhebel
auslegen (N) - Abb. 2.
5. Den Motor ohne Gasgeben mit dem
Kickstarter starten. Bei jedem erneu-
ten Startversuch muß sich der Kick-
starter in seiner Ausgangsstellung be-
finden, da sonst die Decompressions-
automatik abgeschaltet ist -Abb. 4.
Ein automatisches Decompressions
Gerät erreicht position wenne der
hebel Zur Motorrade Zündung oben
ist. Nach Zündung den hebel in ruhe-
stellung ( man hört chiek: dass beden-
tet dear Decompressions Gerät hebel
in aufanslage position ist).
6. Den Motor mit wenig Gas warm-
fahren, bis er hone Starter einwand-
frei rundläuft (A-Abb.5).
7. Bei Leerlaufdrehzahl auskuppln
und den 1. Gang einlegen den Fuß-
schalthebel nach unten drücken.
8. Etwas Gas geben, den Kupplung-
sgriff langsam loslassen und anfah-
ren.
Conduite normale (Fig. 2)
Cette moto à 5(3 pour MX-3V)
vitesses est conçue pour le tout-
terrain. De par sa concep
tion, le
moteur permet d'arriver simple
ment
aux régimes élevés. Pour éviter tout
problème, suivez ces conseils
importants avant de prendre la route:
Evitez les surrégimes en roulant
aucun rapport trop bas.
A l'arrêt, le moteur ne doit pas tour-
ner plus d'une minute environ (pour é-
viter le surchauffage).
Utilisez toujours de l'huile d'une
marque renommée (voir sur la liste
annexéè).
Lancement du moteur (Fig. 3)
1. Vérifiez qu'il y a du carburant dans
le réservoir.
2. Ouvrez le robinet d'essence (ON).
3. Utilisez le starter (ON) si le moteur
est froid. Lorsque le moteur est chaud,
le starter doit être en (OFF).
ATTENTION
Avant le départ, assurez-vous tou-
jours que la commande des gaz tour-
ne facilement et que le volet du carbu-
rateur revient à sa position de repos.
4. Avec le sélecteur, mettez au point
mort (N), fig. 2.
5. Lancez le moteur en actionnant le
kick-starter sans gaz du tout. Pour
que le décompresseur automatique
fonctionne, le levier doit revenir à sa
position de repos entre chaque tenta-
tive, fig. 4.
6. Avec un peu de gaz, faites monter
la température du moteur jusqu'à ce
qu'il tourne uniformément sans starter
(A-Fig.5).
7. Moteur au ralenti, débrayez et en-
gagez la première.
8. Accélérez légèrement, embrayez
prudemment et... en route.
Normal riding (Fig. 2)
This motorcycle has a 5-speed gear-
box (3 for MX-3V) and is designed for
off-road riding. Due to its design, the
engine can reach very high speeds.
To avoid problems, bear in mind the
following advice before riding:
Don't overspeed the engine by failing
to change up to a higher gear.
Don't run the more than about one
minute while the motorcycle is statio-
nary (to avoid overheating).
Always use a well-known brand of oil.
Starting the engine (Fig. 3)
1. Check that there is fuel in the tank.
2. Open the fuel starter (ON).
3. If the engine is cold, set the starter
to ON. If the engine is warm, leave
the starter on OFF.
CAUTION
Before starting the engine, make sure
that the throttle control moves freely
and that the carburettor throttle
returns to fully closed.
4. Set the gearchange pedal to neu-
tral (N) (Fig. 2).
5. Remembering what a an engine at
4 times hesitates of 2 tours of engine
tree for a complete cycle, therefore
pedaled
(Fig. 4)
it on lever of mass in
motion has to exploit the whole run of
mass in same motion. It has you
automatic decompressor that it re-
turns in position when lever of mass in
motion returns in high. Therefore at
any pedaled letting return lever in
position of rest, everything in high(will
feel it a clik that it warns that lever of
the decompressor has returned in
position for a new pedaled). One time
ago to starting with foot lever of mass
in motion exploiting the whole run of
mass in same motion.
6. Warm up the engine with a little
throttle, until it runs smoothly with the
starter off (A-Fig.5).
7. With the engine idling, pull the
clutch lever towards the handlebar.
8. Open the throttle slightly, carefully
release the clutch lever and pull away.

Fig. 7
Fig. 6
!
ATTENZIONE!
Non lasciare il rubinetto per l'ali-
mentazione della benzina in posi-
zione "ON" a motore spento per
non ingolfare il carburatore. Il mo-
tore rischia di incendiarsi o di es-
sere gravemente danneggiato al
momento del suo avviamento.
Il rubinetto del carburante deve es-
sere sempre posizionato su "OFF"
quando il motore è spento.
Controllo del livello olio motore:
Verificare il corretto livello dell'olio mo-
tore come illustrato in fig.6.
1. Tenere la moto in posizione vertica-
le con il terreno.
2. Togliere il tappo di carico olio "A".
3. Controllare che il livello olio sia in
prossimità del centro del dado "1"
(Fig.6) di bloccaggio del pignone mo-
tore.
SERVIZIO / MANUTENZIONE
Olio motore
La sostituzione dell'olio (Qt. 1 Kg.) de-
ve avvenire dopo ogni gara: è comun-
que consigliato non oltrepassare i 500
Km. (300 miglia). Utilizzare olio
SPRINGOIL MOTO 4T sintetico (SAE
5W-50). Contemporaneamente al
cambio dell'olio, controllare anche il
funzionamento dell'alzavalvole auto-
ma
tico, vedi "Automatismo di decom-
pres
sione".
Livello dell'olio
Controllare sempre il livello dell'olio
prima della partenza.
Sostituzione dell'olio
1.
La sostituzione dell'olio va eseguita
a
motore caldo.
2. Spurgare l'olio con le viti di spurgo
(Rif.C - Fig.7).
3. Pulire sempre il filtro dell'olio (Rif.B -
Fig.7) sostituire ogni 3 - 4 cambi d'olio.
4. Riserrare le viti di spurgo (Rif.C -
Fig.7)
e rabboccare con olio nel foro di
rabbocco (Rif.A - Fig. 6) fino a raggiun-
gere
il livello corretto.
MAGNESIUM
A
A
B
C
14
1
SPRINGOIL

!
!
!
15
AVERTISSEMENT!
Le fait de laisser le robinet d'es-
sence sur la position "ON", à
mouteur-fermé, c'est risque de
noyer le carburateur. Le moteur
risque de prendre feu ou d'être
gravement endommagé au moment
du démarrage du moteur.
Le robinet d'essence doit toujours
être positionné sur "OFF" lorsque
le moteur ne tourne pas.
Contrôle niveau huile moteur:
Contrôler le niveau de l'huile du
moteur: voir Fig.6.
1. Tenir la motocyclette en positionne
verticale à l'ègarde du sol.
2. Enlever le bouchon d'introduction
de huile "A".
3. Contrôler que le niveau de l'huile
coincide avec le centre de l'écrou "1"
(fig.6) de serrage du pignon-moteur.
ENTRETIEN
Huile moteur
Première vidange à 100 km (60 mil-
les), puis dèpuis 100 km (60 milles):
C'est conseillée effectuer cette opera-
tion avant de 500 km (300 milles).
Utilisez huile de synthèse . A chaque
vidange, vérifiez également l'ouver-
ture automatique. des soupapes;
reportez-vous au chapitre "Décom-
presseur automatique".
Niveau d'huile
Vérifiez toujours le niveau d'huile
avant de prendre la route.
Vidange
1. Le plus simple est de procéder à la
vidange lorsque le moteur est chaud.
2. Enlevez les bouchons de vidange
(Rèf.C - Fig.7) et laissez couler l'huile.
3. Nettoyez le filtre de l'huile (Rèf.B -
Fig.7) chaque vidange et le-rempla-
cez dèpuis 3 ou 4 vidanges.
4. Remettez en place les bouchons
de vidange (Rèf.C - Fig.7) et faites le
plein d'huile pour l'orifice (Rèf.A -
Fig.6) jusqu'au niveau indiqué.
ACHTUNG!
Bei stilgesetztem Motor den Hahn
zur Benzinzuführung auf "ON"
nicht lassen, andernfass erfolgt die
überflutung des Vergasers. Es be-
steht die Gefahr, dass im Zeit-
punkt des Motoranlassens sich der
Motor entzündet oder beschädigt
wird.Der Hahn zur Benzinzufüh-
rung soll immer auf "OFF" sein,
wenn der Motor aus ist.
Prüfung des Motorenölstandes:
Prüfen, dass der Ölstand richtig ist:
siehe Abb.6.
1. Das Motorrad senkrecht zum Grund
halten
2. Stöpsel "A" zfum Ölgiessen entfer-
nen.
3. Prüfen, dass der Ölstand der Mitte
der Mutter "1" (Abb.6) entspricht.
WARTUNG/ PFLEGE
Motoröl
Der erste Ölwechsel ist nach 100 km
(60 meilen) erforderlich. Alle 500 km
(300 meilen) austauchen. .
Motoröl:Synthetisches SPRINGOIL
MOTO 4T. Bei jedem Motorölwechsel
die Funktion des automatischen Ven-
tilhebers kontrollieren, s. "Dekom-
pressionsautomatik".
Ölstand
Vor jeder Fahrt den Motorölstand
bei
betriebswarmen Motor und aufrech-
tstehender Maschine kontrollieren.
Ölwechsel
1. Den Ölwechsel bei betriebswar-
mem Motor vornehmen.
2. Die Ölablaßschrauben (Bez.C- Abb.7)
herausdrehen und das Öl ablassen-
Entsorgungsvorschriften beachten!
3. Das Ölfilter (Bez.B - Abb. 7) bei je-
der 3 oder 4 Ölwechselen erneuern.
Das Ölfilter bei je
der Ölwechsel reini-
gen.
4. Die Ölablaßschrauben(Bez.C -
Abb.7)
eindrehen und Öl an der Einfül-
löffnung (Bez.A - Abb.6) bis zum vor-
schriftsmäßigen Ölstand einfüllen.
WARNING!
Leaving not tap of petrol in
position "On" at off engine fooding
not carburettor. Engine risks to set
fire or to be gravely damaged in
moment of the its start. Tap of fuel
has always to be positioned on
"Off" when engine is off.
Oil engine level control:
Verifying the correct level of engine oil
how illustraded in Fig.6.
1. Keeping the motocycle in vertical
position to ground.
2. To remove the oil cap of loaded "A".
3. Checking that the oil level is in
proximity of centre of nut "1" (Fig.6) of
tighten the engine pinion.
SERVICE AND MAINTENANCE
Engine oil
Change the oil (Qt. 1 Kg.) for the first
time after 100 km (60 miles). Then
change the oil before 500 km (300
miles).
Use SPRINGOIL MOTO 4T synthetic
oil (SAE 5W-50). When changing the
oil, also check the operation of the
automatic valve lifter ( see under
"Automatic decompression").
Oil level
Always check the oil level before
riding the machine.
Changing the oil
1. It il best to change the oil when the
engine is warm.
2. Drain the oil by removing the drain
plugs (Ref.C - Fig.7).
3. When 3 or 4 changing the oil,
always clean the oil filter at (Ref.B -
Fig.7) or fit a new filter.
4. Refit the drain plugs (Ref.C - Fig. 7)
and fill the engine with new oil through
the filler hole(Ref.A - Fig.6) to the
correct level.

Candela
1. Scollegare il cappuccio della candela
e svitare quest'ultima con apposita chi-
a
ve.
2. Controllare la copertura dell'elettro-
do della candela. Sostituirla se gli elet-
tro
di sono usurati o sporchi. Una can-
dela sporca o bagnata può essere pu-
lita con uno spazzolino di acciaio. La
candela è buona se la copertura ha un
colore marrone chiaro.
3. Controllare la distanza tra gli elettro-
di e regolare in caso necessario.
Candela consigliata:
NGK CR7 RK - NGK CR8 RK
Distanza tra gli elettrodi:
0,6 mm.
Coppia di serraggio candela:
1,8 Kg/m (18 Nm)
ATTENZIONE!
Sostituire le candele d'accensione
con altre di grado termico diffe-
rente può comportare gravi danni
al motore!
16
Fig. 9
Fig. 8
!

!
!
!
Zündkerze
1. Den Kerzenstecker abziehen und
die Zündkerze mit vorschriftsmäßigem
Zündkerzenschlüssel herausdrehen.
2. Die Kerzenelektroden kontrollieren.
Bei einwandfreier Zündkerze haben
die Elektroden hellbraunen Farbton.
Bei stark abgebrannten oder ver-
schmutzten Elektroden die Zündkerze
erneuern. Eine verrußte oder nasse
Zündkerze kann mit einer Drahtbürste
gereinigt werden.
3. Den Elektrodenabstand kontollieren
und ggf. neu einstellen.
Empfohlenes Zündkerze:
NGK CR7 RK - NGK CR8 RK
Elektrodenabstand:
0,6 mm.
Anzugsdrehmoment:
1,8 Kg/m (18 Nm)
ACHTUNG!
Die Ersetzung von Kerzen durch
andere Kerzen mit verschiedenem
Wärmegrad kann zu schweren
Motorbeschädingungen führen!
Spark plugs
1. Disconnect the HT lead and use the
appropriate box spanner to remove
the plug.
2. Check the electrode coating on the
spark plug. If the electrodes are worn
or heavily fouled, fit a new spark plug.
If the electrodes are coated with a
carbon deposit or are wet, use a steel
wire brush to clean them. The spark
plug is in good condition if the colour
of the electrode coating on it is pale
brown.
3. Check the electrode gap and adjust
as necessary.
Reccomended spark plug:
NGK CR7 RK - NGK CR8 RK
Electrode gap:
0,6 mm.
Spark plug tightening torque:
1,8 Kg/m (18 Nm)
WARNING!
Replacing candles of lighting with
others of thermic degree different it
can behave grave damages to
engine!
17
Bougie
1. Détachez le fil et dévissez la bou-
gie à l'aide de la clé prévue à cet ef-
fet.
2. Vérifiez les dépôts sur les élec-
trodes. Remplacez la bougie si les
électrodes sont usées ou encrassées.
S'il y a des dépôts charbonneux ou de
l'humidité, nettoyez avec une brosse
métallique. Un dépôt brun clair montre
que la carburation fonctionne bien.
3. Vérifiez l'écartement des élec-
trodes, et réglez si besoin.
Bougie recommandée:
NGK CR7 RK - NGK CR8 RK
Ecartement des électrodes:
0,6 mm.
Couple de serrage:
1,8 Kg/m (18 Nm)
AVERTISSEMENT!
Le fait de modifier incorrectement
le degré thermique de la bougie
d'allumage risque d'endommager le
moteur.

Sistema di accensione
Il sistema di accensione è del tipo a
transistor e non prevede componenti
meccanici mobili ad eccezione del vo-
lano. Ciò significa che il sistema di ac-
censione non è sensibile all'umidità e
alla polvere, quindi non richiede per-
tanto di particolare manutenzione.
Rimuovere il volano di tanto in tanto
per la pulizia. L'accensione non va
normalmente regolata. Per il controllo
e la pulizia eseguire quanto segue:
1. Allentare il carter (Rif.A - Fig.10)
per accedere al sistema di accen-
sione.
2. Bloccare il volano con un attrezzo
di ritegno (Rif.B - Fig.11) . Allentare il
dado nel centro del volano girandolo
in senso orario.
3. Applicare l'estrattore (Rif.C - Fig.12)
al centro del volano e allentare que-
st'ultimo.
4. Allentare lo statore leggermente :
Portare il pistone al P.M.S. e girare in
senso antiorario il rotore fino a leg-
gere sul comparatore la distanza di 8
mm. dal P.M.S.
Inserire l'apposita spina nel foro del
rotore che deve coincidere con l'ap-
posita tacca posizionata sullo statore.
Serrare le viti con una coppia di 0,8
Kg/m. (8 Nm.)Rimontare il volano e
serrarlo ad una coppia di 5 Kg/m. (50
Nm). Controllare che il carter ed i cavi
elettrici siano nella giusta posizione
ed a tenuta stagna (Fig.13).
18
Fig. 11
Fig. 10
Fig. 13
Fig. 12
A
B
C

Zündanlage
Die Zündanlage ist transistorgesteuert
und hat außer dem Schwungrad keine
beweglichen Teile. Daher ist die Zün-
danlage auch nicht besonders emp-
findlich gegen Feuchtigkeit und Ver-
schnutzung, sondern im Gegenteil
ausgesprochen wartungsarm. Deshalb
ist keine besondere Wartung erfo-
derlich. Es empfiehlt sich jedoch, das
Schwungrad von Zeit zu Zeit ab-
zubauen und die Zündanlage wu
reinigen. Eine Neueinstellung ist im
Normalfall nicht erforderlich. Für Kon-
trolle und Reinigung siehe:
1. Die rechte Abdeckung (Bez.A - Abb.
10) entfernen.
2. Das Schwungrad mit einem
halteeisen blockieren (Bez.B - Abb.
11) und die Schwungradmutter (Links-
gewinde!) abschrauben.
3. Den Abzieher (Bez.C - Abb.12) in
Schwungradmitte anbringen und das
Schwungrad abziehen.
4. Den Stator etwas lösen:
Den Kolben bis zum oberen Totpunkt
bringen und den Rotor gegen
Uhrzeigersinn so drehen, bis der
Komparator den Abstand von 8 mm
zum oberen Totpunkt zeigt.
Den zweckmässigen Stift in die
Rotorbohrung so einsetzen, dass der
Stift mit dem Strich auf dem Stator
zusammenfällt.
Die Statorschrauben mit 0,8 Kg/m. (8
Nm.)anziehen. Prüfen, dass der De-
ckel sowie die Kabel in der richtigen
Position und dicht sind(Abb.13).
Ignition system
The ignition system is of transistor
type and has no moving mechanical
parts other than the flywheel. So the
ignition system and it doesn't expect
particular maintenance.
However, the flywheel should be
removed occasionally for cleaning.
The ignition timing need not normally
be reset. For checking and cleaning,
proceed as described :
1. Remove the right-hand cover (Ref.A
- Fig.10) to gain access to the ignition
system.
2. Use a holding tool (Ref.B - Fig.11)
as shown in the figure to lock the
flywheel. Then turn the nut in the cen-
tre of the flywheel clockwise to remo-
ve it.
3. Apply the extractor (Ref.C - Fig.12)
into the center of the flywheel and un-
screw the fly-wheel.
4. Release the stator slightly :
To place the piston to the P. M. S. and
turning in counterclockwise the rotor un-
til light on comparator distance of 8
mm.
From the P. M. S. inserting the suita-
ble pin in court of the rotor that it has
to coincide with the apposite notch
positioned on the stator.
Tighten the bolts to a torque of 0,8
Kg/m. (8 Nm.). To install the fly-wheel
and shutting at a couple of 5 Kg/m.
(50 Nm.). Checking that cover and the
hollow electric are in the right position
and at farm solders (Fig. 13).
Allumage
L'allumage transistorisé ne contient
pas de pièces mécaniques en mou-
vement, mis à part le volant. Cela fait
qu'il n'est pas particulièrement sen-
sible à l'humiditè et à l'encrassement,
et ne nécessite pas de particulier en-
tretien. Il convient toutefois de dépo-
ser le volant de temps à autre pour un
nettoyage. Il n'est normalement pas
nécessaire de régler l'allumage. Pour
la vérification et le nettoyage, repor-
tez-vous ci-dessous:
1. Dèposez le carter de droite (Rèf.A
- Fig.10) pour accéder à l'allumage.
2. A l'aide d'un outil (Rèf.B - Fig.11),
bloquez le volant. Desserez ensuite
l'écrou qui se trouve au centre du vo-
lant, en tournant dans le sens horaire.
3. Mettez en place l'extracteur (Rèf.C
- Fig.12) au centre du volant, et dé-
tachez celui-ci.
4. Desserez quelque peu le stator et
tournez-le :
Mettre le piston au P.M.H. et tourner
en sens antihoraire le rotor jusqu'à on
lit sur le comparateur la distance de 8
mm. de P.M.H.
Insèrer la pige dans le trou du rotor
qui doit coincider avec l'encoche qui
est positionnée sur le stator.
Serrez les vis à 0,8 Kg/m. (8 Nm.).
Remettez en place le volant et le-
serrez à 5 Kg/m. (50 Nm.)
Controller que les carters les câbles
éléctriques soient positionnés correc-
tement et bien étanchéifié (Fig. 13).
19
This manual suits for next models
1
Table of contents