Voxx Electronics Rostra 250-8215HD Quick start guide

Owner’s / Installation Guide
Wireless DVR Monitor / 250-8215HD

Table of Contents
Precautions........................................................................................................3
Features & Specifications..........................................................................4
Features & Specifications..........................................................................5
Accessories......................................................................................................6
Layout..............................................................................................................7-9
Installation..................................................................................................10-12
Troubleshooting.............................................................................................13
Operation...................................................................................................14-29
Warranty..........................................................................................................30

Precautions
1. Do not expose the monitor to excessive temperatures. Storage
temperature is -30~+80°C
2. Operating temperature is -20~+70°C ; Battery operating
temperature is 0-70°C; Humidity is 90%.
3. Never use this device near standing pools of water
4. Never use this device in an environment with excessive
moisture, dust or smoke.
5. Avoid dropping or striking.
6. Never puncture, scratch or use abrasive cleaning materials on
this device.
7. Do not place cables where they may be pinched or stepped on.
8. Leave at least a 2” space between the monitor and walls,
cabinets, or other objects to allow adequate air circulation
around the device.
9. The monitor is not designed to be waterproof.
Storage Precautions
1. The device may be powered by a 12 or 24 volt automotive
battery or vehicle electrical system.
2. Make sure all cables are connected properly. Observe polarity.
Improper cable connections may damage the monitor. Remove
the power cable connections when you do not intend to use the
device.
3. Do not watch video while driving unless monitoring a video feed
for safety purposes.
Operating Precautions

Features & Specifications
1. LCD monitor with wide angle view and high resolution display.
2. Horizontal and vertical image flipping.
3. Support for multiple image display modes (single, dual, and quad
views).
4. (5) Trigger inputs. Trigger priority & trigger delay are selectable.
5. Supports auto scan. Scan channel and scan time are selectable.
6. Supports back light adjustment manually and automatically.
7. Adjustable parking grid. Parking line size and position can be
adjusted.
8. Built-in 1.5W speaker.
9. Wireless remote control included.
10. Operating voltage: 10-32V DC.
11. (4) Wireless camera inputs.
Features

Features & Specifications
Technical Specifications
LCD Size 7 inch
Resolution 1024 x 3 (RGB) x 600
Contrast 600:1
Brightness 600 cd/m
View Angle U: 85 / D: 85, R / L: 85
Aspect Ratio 0.2175(W) x 0.2088(H)
Channel 4 Channels
Operating Frequency 2400 -2483.5MHz
Receiving Sensitivity -78dBm
Decompression Form H.264
Modulation FHSS
Time Delay 200 ms
Transmitting Distance Max. 300 m
Micro SD Card Max. 128 GB
Power Supply DC 10-32V
Power Consumption Max. 10W
Loudspeaker 1.5W / 8
Operating Temperature -20 ~ +70C, RH90%
Storage Temperature -30 ~ +80C, RH90%
16GB 32GB 64GB 128GB
Single 15h 30H 60h 120h
Dual 17H 34h 68h 136h
Quad 18h 36h 72h 144h
Capacity
Video
Storage
Display
Storage Capacity

Accessories
IR Remote Control
Dash Mount Bracket
Sun Shield Power Cable
Angle Adjustment Screws
U-Support Bracket
Included Accessories

Layout
1
5
3
2
4 6 7
10
8
9
Monitor Layout Front
1. Light Sensor
2. Remote Control Sensor
3. Power Indicator
4. Power Switch (ON/OFF)
5. Volume - or Menu Left
6. Volume + or Menu Right
7. Menu
8. Channel Select
9. Speaker
10. Menu “OK” or Record ON/OFF

Layout
1
2
3
Monitor Layout Rear
1. SD Card Slot (128GB MAX)
2. Monitor Stand
3. Power Cable

Layout
Remote Control Layout
• MUTE : Press to select MUTE or enable sound.
• POWER : Press to turn on / off the monitor.
• OK : Press OK button to enter menu item or save user settings.
Press OK button - shortcut for start / stop recording.
• MENU : Press to show menu or exit menu.
• VOL (Volume) - : Decrease and menu selection left.
• VOL (Volume ) + : Volume increase and menu selection right.
• SEL : Key selector or Switch to next view following CAM1-CAM2-
CAM3-CAM4-DUAL-QUAD loop.
• PAIR : Fast pairing when camera is activated.
• MIR : Mirror Video Display
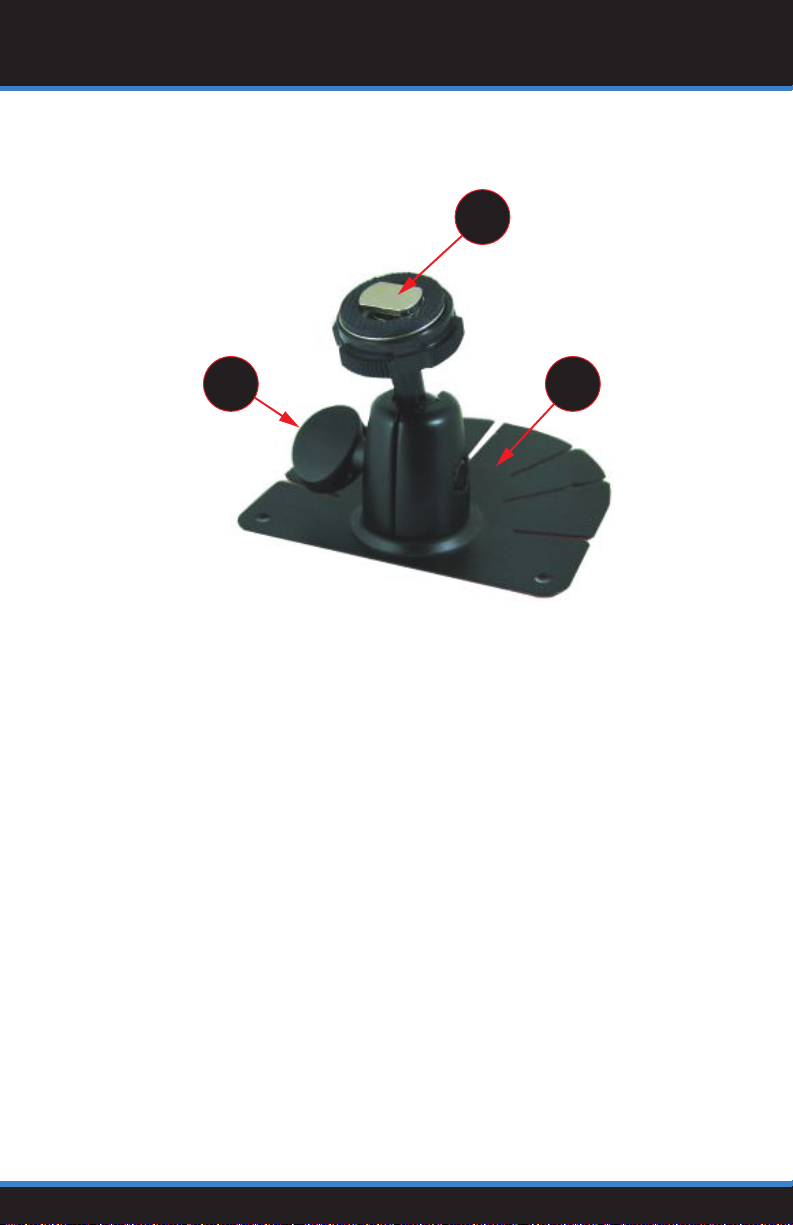
Installation
1
3
2
1
Mounting Bracket
1. Loosen knob (1) so that the bracket is easily adjusted.
2. Attach bracket to monitor using “Center Support” (2).
3. Attach base plate (3) to the vehicle mounting surface.
4. Adjust monitor to desired position and tighten knob (1).

Installation
RED
Black
White
Blue
Green
Brown
Yellow
Wiring
• RED : 12v (+) Accessory
• BLACK : Ground (-)
• White : Camera 1 Trigger (+)
• GREEN : Camera 3 Trigger
• BLUE : Camera 2 Trigger (+)
• BROWN : Camera 4 Trigger (+)
• YELLOW: Split Screen View Trigger (+)
Note: Input triggers have programmable delays. Please see page 25
for more details.

Installation
Installation Tips
Antennas should be vertically lined to the ground. Make sure there
is no obstacle around antennas.
Camera Installation
Pair the monitor with the camera before installing the wireless
system on vehicle:
1. Before pairing, power off the unpaired camera and switch the
monitor channel to the one to be paired. Enter MENU interface,
select PAIRING and then press OK. The monitor enters the
PAIRING countdown of 20 seconds, during which the camera
to be paired should be connected to the power supply. After
5 seconds, the camera will be paired with the monitor and the
images of the paired camera will be displayed on the monitor if
the pairing is successful. If image is not displayed. Repeat the
process again.
2. After one channel of the monitor is paired successfully, switch
to the next channel to be paired. Power off the previous paired
camera and repeat steps above.
3. After pairing all channels, connect all paired cameras with power
supply. Press SEL button on the monitor to switch channels;
check images of each channel and then install the wireless
system on vehicle after confirming that there is image on each
channel.

Troubleshooting
Please confirm the height of the camera from the ground is
more than 1 meter, the antennas of the display and camera are
perpendicular to the ground, and the antennas are tightened.
Symptoms Causes / Solutions
No Picture, No Sound Improper connection to power supply
Power switch is on OFF position.
No Signal Check the camera power supply.
Pair the monitor and the camera again.
No Sound
Check the sound volume.
Make sure it is turned ON and Volume is
adjusted properly.
Dark Picture Check brightness and contrast are
adjusted correctly.
No Color Adjust the HUE settings.
Solutions for Poor Monitor Signal

Operation
CAM1 CAM2
CAM3 CAM4
Preview Display
The Preview display is shown on power-up. This preview display
can be customized to show one, two, or four camera previews.
Press the “CH” button to change the preview display

Operation
Main Menu
Using the left and right arrows, highlight the Audio Source Menu
shown above. Press “OK” to enter the Audio Source Menu.
Selecting the camera number in this menu will play the audio from
that channel on the display speaker.
Pressing the MENU button on the display or the remote control will
activate the Main Menu screen shown below.
Audio
Source
Mode
Pairing
Record
Control
Playback
Settings
Power
Audio Source

Operation
Main Menu (CONT.)
Using the left and right arrows, highlight the Mode Menu shown
above. Press “OK” to enter the Mode Menu. Highlight the option
and confirm the selection by pressing OK. Selecting 1-4 will display
the matching camera as a full screen view. Additional options are
described below.
Audio
Source
Mode
Pairing
Record
Control
Playback
Settings
Power
Split Screen Auto ScanQuad View
Mode

Operation
The Pairing menu is used to connect a new or additional camera.
A green box indicates that a camera is pair to its corresponding
channel.
To Pair a camera:
1. Make sure all cameras are powered OFF.
2. Enter the pairing menu and select the camera channel to be
paired.
3. Power the camera ON. The camera will automatically pair to the
monitor.
4. Repeat steps 1-3 for all additional cameras.
To Delete a camera:
1. Enter the pairing menu and select the camera channel to be
paired.
2. Select the camera channel to be deleted. The camera will be
automatically deleted from the monitor memory.
Pairing

Operation
Main Menu (CONT.)
Selecting this option will allow for video playback. File folders are
automatically generated as the system records additional video. A
new folder is generated when the previous folder reaches 997 video
files. The larger the number in the folder name, the more recent the
recording.
Playback
Record Control
Selecting this option will start or Stop AV Recording.
Audio
Source
Mode
Pairing
Record
Control
Playback
Settings
Power

Operation
The screen above will be displayed to choose between single
viewing or split screen viewing.
Opening a file folder will display the details for each video file. An
example is shown below.
• Camera : Channel Number
• Name : File Name
• Created : Date and time stamp video was created.
• Group Num : The corresponding value will increase with each recording. The
Group Num of the video recorded is the same as the Group Num of the video
recorded under multi-split mode. For Example: All videos in Group 1 can be
viewed individually or together in a split screen view.

Operation
A. Main Menu (CONT.)
Audio
Source
Mode
Paring
Record
Control
Playback
Settings
Power
The Settings menu is used to configure all the system settings
and user preferences. Note: The system will automatically exit the
setting menu after 30 seconds with no activity.
Settings
Table of contents
Other Voxx Electronics Monitor manuals