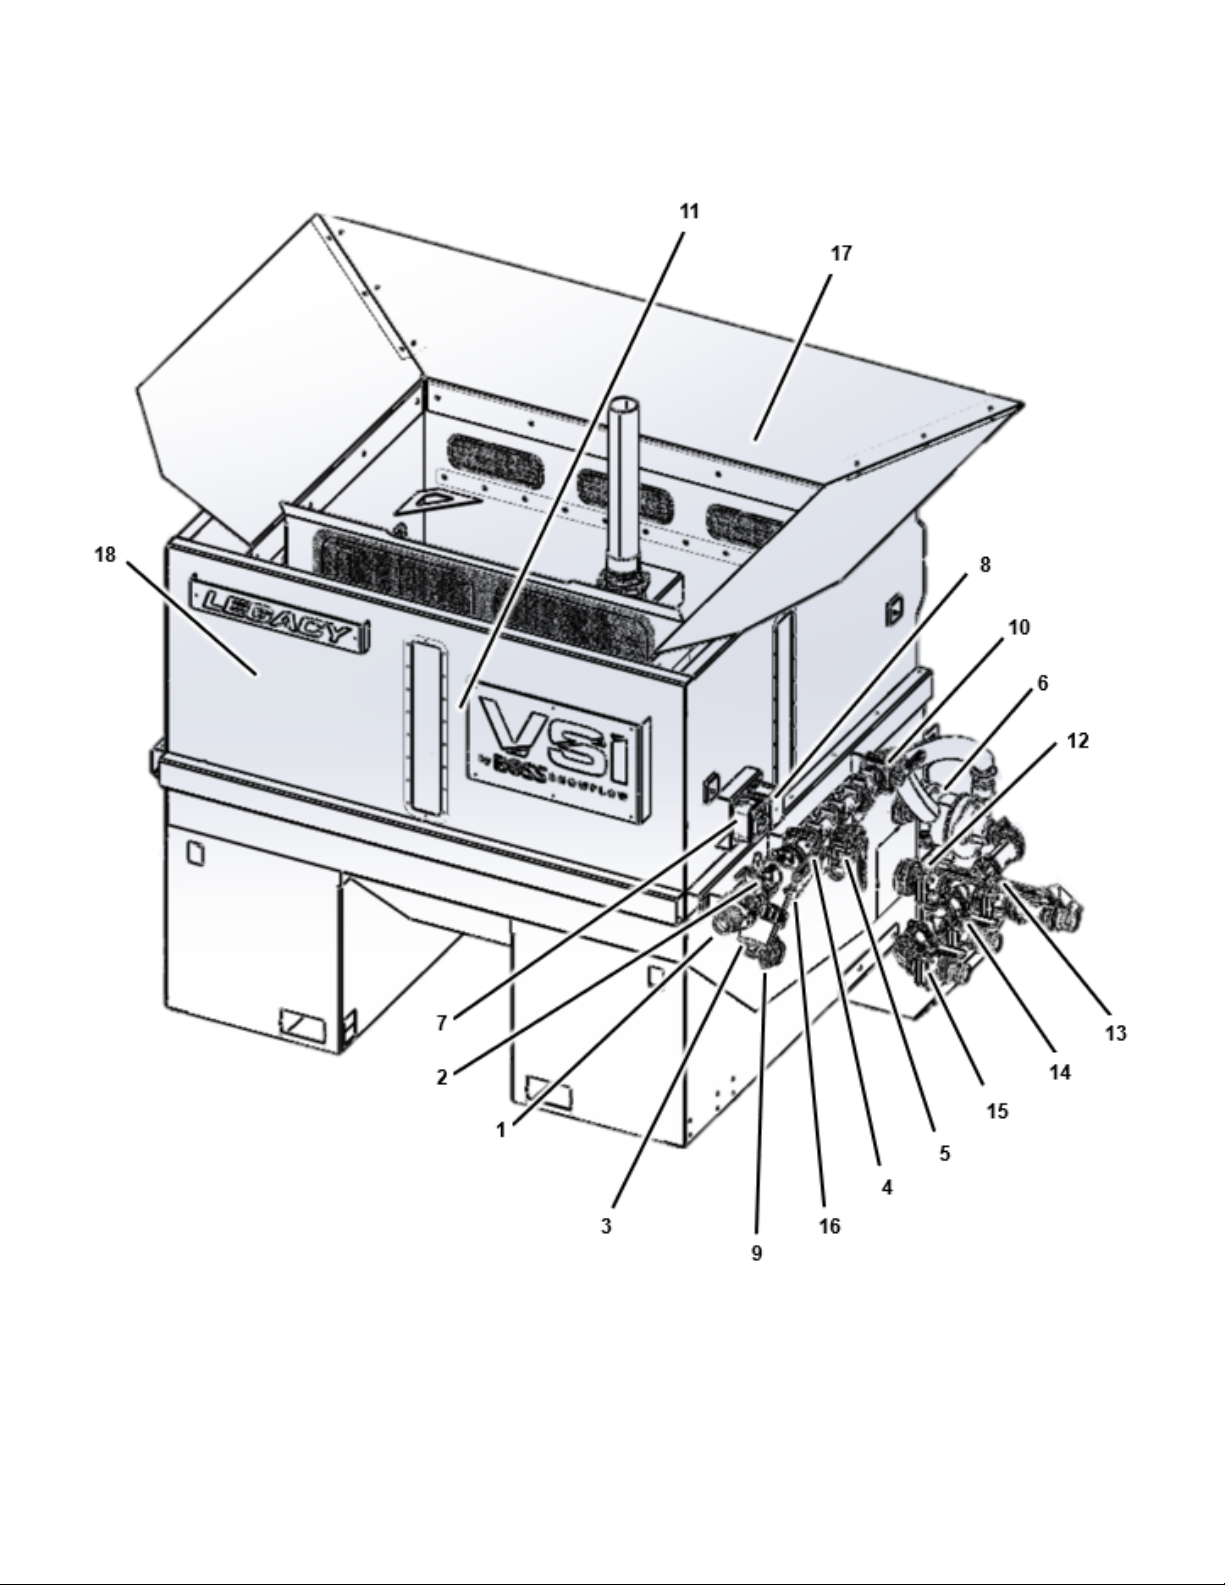
VSI Legacy Series User manual

Owner’s Manual
Legacy Series
Brine Maker
Voigt Smith Innovation, LLC
23371 610th Avenue
Madison Lake, MN 56063

IMPORTANT: READ THIS MANUAL IN
ENTIRETY BEFORE OPERATING
2

Table of Contents
General Safety 5
Safety Instructions 5
Quick-Start Installation 5
Detailed Installation Instructions 6
1. Electrical Outlet 6
2. Space and Clearance 6
3. Download the VSI Spray App 6
4. Connect to Machine Via Bluetooth 6
5. Connect Machine to WiFi 7
Product Overview 8
Specifications 10
Attachments and Accessories 10
Before Operation 10
Before Operation Safety 10
Chemical Safety 11
Sprayer Control Box Light Modes 12
VSI Spray Control App Display 13
Plumbing to Auxiliary Tanks 14
Understanding Valve Positions 15
During Operation 17
During Operation Safety 17
Loading the Mix Tank Hopper with Bulk Salt 17
Filling the Batch Tank with Water 17
Using the VSI Spray Control App Information Display 17
Agitating a Batch of Brine 18
Pumping Out Brine to Storage Tanks 18
Filling Trucks with Brine From Storage Tanks 18
Filling Trucks with Additives From Storage Tanks 19
Air Purge 19
After Operation 19
After Operation Safety 19
Washing the Brine Maker 20
Maintenance 20
Recommended Maintenance Schedule(s) 20
Maintenance Safety 21
Electrical System Maintenance 21
3

Electrical System Safety 21
Brine Maker System Maintenance 21
Service the In-Line Filter Screen 21
Inspecting the Hoses 22
Cleaning 22
Cleaning the Salt Hopper 22
Cleaning the BatchTank 22
Flushing the System 22
Conditioning the Machine 23
Storage 23
Storage Safety 23
Storing the Machine 23
Removing the Machine from Storage 23
Troubleshooting 24
4

Introduction
This machine is a dedicated ice-control solution
creation system and is intended to be used by
professional, trained operators for creating ice-control
solutions used on residential or commercial
properties. Using this equipment improperly or for
purposes other than its intended use may prove
dangerous to you and others. You are responsible for
operating the equipment properly and safely.
Read this manual carefully to learn how to operate
and maintain your equipment properly and to avoid
injury and product damage.
A digital version of this manual that can be accessed
on the VSI Spray Control app (“Getting Started/FAQ”
button on the Profile” tab).
If service, parts, or additional information is needed
please contact VSI Technical Service
(1-507-252-3033) for more information.
General Safety
This product is capable of causing personal injury.
Always follow all safety instructions to avoid personal
injury.
● Read and understand the contents of this
Owner’s Manual before operating or servicing
the equipment.
● Use your full attention while operating the
machine. Do not engage in any activity that
causes distractions; otherwise, injury or
property damage may occur.
● Use appropriate personal protective equipment
(PPE) to guard against contact with chemicals.
● Do not put your hands or feet near moving
components of the machine.
● Do not operate the machine without all guards
and other safety protective devices in place
and in proper working order on the machine.
● Keep bystanders, children, and pets out of the
operating area.
● Never allow children to operate the machine.
Allow only people who are responsible,
trained, familiar with the instructions, and
physically capable to operate the equipment.
● Shut off the equipment, wait for all movement
to stop, and allow the equipment to cool before
adjusting, servicing, cleaning, or storing it.
Improperly using or maintaining this machine can
result in injury. To reduce the potential for injury,
comply with these safety instructions and always pay
attention to the safety alert symbol. Failure to comply
with these instructions may result in personal injury or
death.
Safety Instructions
● Read the Operator’s Manual.
● All operators should be training before
operating the machine.
● Wear eye protection.
● Do not enter the tank.
● Shut off the machine before walking away.
● Do not put flammable liquids in the tank.
● Only lift an empty tank; do not lift the tank
when full.
Quick-Start Installation
Follow the steps below to set up and prepare the
machine for use.
1. Ensure proper electrical outlet is available
2. Ensure machine is positioned for space and
clearance for loading
3. Download the VSI Spray App
4. Connect to machine via Bluetooth
5. Connect machine to WiFi
5

Detailed Installation
Instructions
1. Electrical Outlet
The electric motor for the pump requires wiring to
220V, single phase, 30 amp circuit. This is not
pre-wired on the unit and should be installed by a
licensed electrician. It is important that the motor
must be wired for opposite rotation (red and yellow,
black and blue).
The digital salinity reader comes from the factory with
an un-wired cord to an electrical box. No switch is
provided from the factory. The digital salinity meter
converts to DC power and can be wired on either
220V or wired to a 110V, 15 amp circuit. We
recommend wiring the digital salinity meter into the
always hot leads so that the reader can be powered
even with the pump motor switch in the “off” position.
Reference our wiring guide here: Legacy Brine Maker
Wiring Guide.docx
2. Space and Clearance
Ensure you position the machine to allow for space
and clearance to load the machine with salt. Ideally,
situate the brine maker where it is located near your
220V outlet, near your water source, and also near
your brine storage tanks. (Brine storage tanks can be
stored outside, but must be connected via hose.) If
these are not present in the area you wish to set up
your machine, make the accommodations necessary
to have them available.
3. Download the VSI Spray
App
To begin using the machine, you must first download
the VSI Spray Control App from either the Apple App
store or Google Play store onto your phone or tablet.
4. Connect to Machine Via
Bluetooth
4.1. Once downloaded, open the app, read the
liability prompt, press OK , and click on the DETAILS
tab on the bottom of the app screen.
4.2. Select the drop down arrow in the upper right
concern to toggle to a BrineMixer . Press the
CONNECT button in the app.
4.3. All machines within Bluetooth range will appear.
Select the machine you are wanting to connect (serial
numbers are listed).
Note : The serial number can be found on the side of
the control box.
4.4. The app is now connected to the machine.
Note : No other devices can connect to a unit that is
actively paired to a device.
4.5. If desired, rename the machine through the
DETAILS page in the app.
6

5. Connect Machine to WiFi
The machine uses WiFi to search for new firmware
releases that may come out to increase performance
and reliability of the system. The machine will search
for active WiFi networks once per day for 5 minutes. If
the sprayer has already recently connected to the
WiFi, is in range of WiFi, and if an update is available
the sprayer will automatically update.
Connect to WiFi after you first purchase the machine.
You can also do a prompted connection at any point in
time by following these connection steps:
5.1. Ensure you are already connected to the
machine via Bluetooth connection.
5.2. Click on the PROFILE tab at the bottom of the
app screen. Connect the machine to the nearest WiFi
to where the machine will be stationed.
5.3. To save WiFi credentials, select SCAN FOR WIFI
NETWORKS . A list of available networks will be
displayed.
5.4. Select the network that you wish to connect and
enter the credentials for the network. You will be
prompted with either a successful connection or a
failed connection. The sprayer will store the
credentials for the last ten (10) WiFi connections
entered.
7

Product Overview
1. Truck Fill Camlock
2. Air Purge
3. Filter
4. Truck Fill Valve
5. Pump Out Valve
6. Pump Motor
7. Pump Motor Switch
8. Digital Salinity Module
Box
9. Digital Salinity Sensor
10. Agitation Valve
11. Agitation Nozzles
12. Tank Valve
13. Aux 3 Brine Valve
14. Aux 2 Additive Valve
15. Aux 1 Water Valve
16. Eductor Nozzle
17. Salt Hopper/ Mix Tank
18. Batch Tank
8

1. Truck Fill Camlock
The truck fill camlock is used to pump out the brine to
your brine sprayer via a sprayer fill hose.
2. Air Purge
The air-purge valve is used with an air compressor
(not-included) to prevent spilling brine or additives
when you remove the hose after pumping brine to
your sprayer.
3. Filter
Each machine is equipped with a filter right before the
inlet to the pump. Inside the filter housing is a
reusable stainless steel 30 mesh filter.
If you suspect the filter is clogged:
1. Close the tank valve and loosen the collar
around the filter housing.
2. Pull the outer housing off and remove the filter.
3. Rinse the filter clean and place it back in the
housing.
4. Truck Fill Valve
The truck fill valve is on the pressure side of the pump
and is used when pumping brine/additive out of the
machine and into a sprayer using the Fill Hose. See
Understanding Valve Positions later in the manual.
5. Pump-Out Valve
The pump-out valve is on the pressure side of the
pump and is used to pump the brine out of the
machine and into a storage tank. See Understanding
Valve Positions later in the manual.
6. Pump Motor
The pump moves the water and brine for agitation and
for pumping the brine.
7. Pump Motor Switch
The pump switch turns the pump on or off.
8. Digital Salinity Module Box
The digital salinity module box houses the circuit
board for connecting to the VSI Spray Control App
and transmitting the digital salinity reading.
9. Digital Salinity Sensor
The sensor reads the salinity of the brine. Use this
with the app to verify the correct salinity.
10. Agitation Valve
The agitation valve is on the pressure side of the
pump and is used to pump liquid through the agitation
nozzles in the mix tank to dissolve the salt. See
Understanding Valve Positions later in the manual.
11. Agitation Nozzles
The agitation nozzles push water across the bulk salt
to dissolve the salt and create the brine.
12. Tank Valve
The tank valve is on the suction side of the pump and
is used by liquid in the batch tank that needs to be
filled, agitated, added, or pumped out. See
Understanding Valve Positions later in the manual.
13. Aux 3 Brine Valve
9

The aux 3 brine valve is on the suction side of the
pump and is used when drawing liquids out of a brine
storage tank. See Understanding Valve Positions later
in the manual.
14. Aux 2 Additive Valve
The auxiliary valve is on the suction side of the pump
and is used to draw additives from a storage tank into
a sprayer via a fill hose line. See Understanding Valve
Positions later in the manual.
15. Aux 1 Water Valve
The auxiliary valve is on the suction side of the pump
and is used for connection to a bulk water storage
tank for faster filling of the brine tank. It can also be
used as a secondary additive storage tank if providing
water to the brine maker in a different manner. See
Understanding Valve Positions later in the manual.
16. Eductor Nozzle
The eductor nozzle helps create the brine mixture.
Keeping this nozzle free from debris and clogs will aid
in a consistent salinity reading.
17. Salt Hopper/Mix Tank
The salt hopper is for loading salt to create the brine.
18. Batch Tank
The batch tank is used for mixing salt brine.
Specifications
Note: Specifications and design are subject to change
without notice.
Machine Specifications
Description
Brine Maker
Length (inches)
86
Width (inches)
98
Height (inches)
76
Weight (Empty)
2100 lbs
Attachments and Accessories
A selection of VSI approved attachments and
accessories are available for use with the sprayer to
enhance and expand its capabilities. Contact VSI for
further information.
To ensure optimum performance and continued safety
certification of the machine, use only genuine VSI
replacement parts and accessories. Replacement
parts and accessories made by other manufacturers
could be dangerous, and such use could void the
product warranty.
Operation
Before Operation
Before Operation Safety
General Safety
● Never allow children or untrained people to
operate or service the machine. Local
regulations may restrict the age of the
operator. The owner is responsible for training
all operators and mechanics.
10

● Become familiar with the safe operation of the
equipment, operator controls, and safety signs.
● Shut off the pump, wait for all movement to
stop, and allow the machine to cool before
adjusting, servicing, cleaning, or storing it.
● Know how to shut off the pump on the machine
quickly.
● Check that safety switches and shields are
attached and functioning properly. Do not
operate the machine unless they are
functioning properly.
● Before operating the machine, inspect it to
ensure that the components and fasteners are
in good working condition. Replace worn or
damaged components and fasteners.
● Ensure that all fluid line connectors are tight
and that all hoses are in good condition before
applying pressure to the system.
Chemical Safety
Chemical substances used in the machine system
may be hazardous and toxic to you, bystanders, and
animals, and they may damage plants, soil, and other
property.
● Read the information on each chemical.
Refuse to operate or work on the sprayer if this
information is not available.
● Verify that there is an adequate supply of clean
water and soap nearby, and immediately wash
off any chemicals that contact you.
● Carefully read and follow the chemical warning
labels and safety data sheets (SDSs) for all
chemicals used, and protect yourself according
to the chemical manufacturer’s
recommendations.
● Always protect your body while using
chemicals. Use the appropriate personal
protective equipment (PPE) to guard against
contact with chemicals, such eye protection
and/or face shield and chemical-resistant
gloves.
● Obtain proper training before using or handling
chemicals.
● Use the correct chemical for the job.
● Follow the chemical manufacturer’s
instructions for safely applying the chemical.
Do not exceed the recommended system
application pressure.
● Do not fill, calibrate, or clean the machine
while people, especially children, or pets are in
the area.
● Do not clean nozzles by blowing through them
or placing them in your mouth.
● Always wash your hands and other exposed
areas as soon as possible after working with
chemicals.
● Keep chemicals in their original packages and
stored in a safe location.
● Properly dispose of unused chemicals and
chemical containers as instructed by the
chemical manufacturer and your local codes.
● Follow all local, state, and federal regulations
for spreading or spraying chemicals.
11

Sprayer Control Box Light
Modes
The computer inside the control box will display
different light modes depending on the operation
status of the machine.
Common light modes include the following:
Status LED Indicator
Mode and Meaning
Flashing magenta
Control box is receiving a firmware update. It is normal for the light to appear
solid for a short period of time and flash at different rates while the firmware update
is being downloaded. Once the process is finished the computer will restart and the
user will need to reconnect to the machine with their smart device.
Flashing green, then
breathing cyan
Operator is connecting the machine board to WiFi . When the user chooses to
connect to WiFi the computer will start flashing green as it tries to connect to the
WiFi network chosen. When the network is connected the light will flash cyan until
it is able to establish a connection with the cloud. Then when it connects to the
cloud it will start breathing cyan. If there is a firmware update available the
computer will start downloading it and the color will change to Magenta. If the
computer does not change from flashing green it could mean that an incorrect
password was entered, or the network uses some security measures that don’t
allow the computer to connect to the internet.
No status LED
indicator
If there is no light coming from the computer it could mean that the control box is
not connected to power.
12

VSI Spray Control App Display
When connected to the machine, the VSI Spray
Control app will display the concentration of salt in the
water.
Profile Tab
The PROFILE tab is used to search and connect to
WiFi networks. Reference the Connect Machine to
WiFi section of the manual. The PROFILE tab will also
display the Product ID, Product Version, and app
version that are currently configured and installed.
Product version relates to the firmware version of the
machine and will be used frequently in diagnosing and
troubleshooting. VSI customers will be notified when
new firmware versions are available for download.
Details Tab
The DETAILS tab contains the serial number of the
machine and the last reset reason.
Select the drop down arrow in the upper right concern
to toggle to a BrineMixer . Press the CONNECT button
in the app.
All machines within Bluetooth range will appear.
Select the machine you are wanting to connect (serial
numbers are listed).
Note : The serial number can be found on the side of
the control box.
The app is now connected to the machine.
Note : No other devices can connect to a unit that is
actively paired to a device.
If desired, rename the machine through the DETAILS
page in the app.
Last Reset Reason: The reason for the last reset on
the machine will be displayed.
Mix Tab
The MIX tab of the app is where the reading of the
machine salinity level will be displayed.
Settings Tab
The app settings should be left alone unless you have
consulted with your VSI distributor first.
Note: If needed, tap the RESET TO DEFAULTS
button at the bottom of the app to reset the settings to
factory defaults.
Note: Ensure to tap the SAVE button after any
settings changes.
13

Plumbing to Auxiliary Tanks
A manifold bank of three (3) valves are provided with
each machine. This manifold system can be
configured to best fit your operation. A typical setup
will be explained below.
Auxiliary 1 Valve- Water
The valve situated at the far left of the manifold (when
facing the plumbing) is commonly designated for the
water source.
In the event that your facility possesses an ample
water supply exceeding 40 gallons per minute, you
have the option to connect your water directly to this
manifold valve. However, it is crucial to comply with
local regulations regarding the installation of a
backflow prevention device.
If your facility lacks an adequate water supply (less
than 40 gallons per minute), we recommend the
installation of a water float tank. This tank serves as a
reservoir, holding anywhere from 1,000 - 3,000 gallons
of water. By incorporating a float shut-off valve, the
tank can be replenished with little interaction prior to
actively making a batch of brine. The water stored in
this float tank can then be directed into the brine
maker manifold using a 2” hose and valve. This
arrangement enables you to efficiently and promptly
draw water into your brine maker.
Auxiliary 2 Valve- Additive
The valve situated in the middle of the manifold (when
facing the plumbing) is commonly designated for
blending additives.
This storage tank for additives can be plumbed to the
manifold using a 2” hose and valve.
See later in the manual for description of how
additives can be pumped out of the storage tank
through the manifold and out into the sprayers.
Auxiliary 3 Valve- Brine
The valve situated at the far right of the manifold
(when facing the plumbing) must be used for the
storage tank of the brine.
This storage tank for brine should be plumbed to the
manifold using a 2” hose and valve.
See later in the manual for description of how brine
can be pumped out of the storage tank through the
manifold and out into the sprayers.
Additional Auxiliary Brine or
Additive Tanks
Additional storage tanks for brine or additives may be
added to your storage solution. Poly fittings with ball
valves and tees can be used to tie common liquids
(brine with brine, or additives with additives) into a
singular feed line into the manifold system.
Reference this link for a graphic for an example of a
dual-brine storage tank plumbing configuration:
https://www.vsinnovation.com/collections/brine-plant-s
etup . Or reference this graphic for an example of an
additional tank plumbing to add other storage tanks:
https://www.vsinnovation.com/collections/brine-plant-s
etup/products/additional-brine-plant-tank .
14

Understanding Valve Positions
Proper valve positioning is vital to the machine
working correctly for each given task.
Suction-Side Valves vs.
Pressure-Side Valves
Suction-side valves: Any valves on the machine that
are entering the lower portion of the pump housing.
Pressure-side valves: Any valves on the machine
that are high up or connected to the top portion of the
pump housing.
Off Mode Valve Position
Set the valves in the OFF MODE VALVE POSITION
when you are not actively performing any tasks with
the brine maker or are loading the brine maker with
salt to make a batch of brine. The figure below shows
the valves in this positioning.
Note: All valves are in the closed position.
Agitation Mode Valve Position
Set the valves in AGITATION MODE VALVE
POSITION when the batch tank is full of water, salt is
loaded into the hopper, and you are creating and
monitoring the salinity of the brine. The figure below
shows the Agitation Valve and Tank Valve in the open
positions.
Pump-Out Mode Valve Position
Set the valves in PUMP-OUT MODE VALVE
POSITION when you are ready to pump the contents
of the brine tank out to a storage tank. The figure
below shows the Tank Valve and Brine Pump-Out
Valve in the open positions.
Auxiliary 1 Water Fill Mode Valve
Position
15

Set the valves in AUXILIARY 1 WATER FILL MODE
VALVE POSITION when needing to add water to the
batch tank.
The figure below shows the Tank Valve and Aux 1
Water Valve in the open positions.
Auxiliary 2 Additive Truck Fill
Mode Valve Position
Set the valves to AUXILIARY 2 ADDITIVE TRUCK
FILL MODE VALVE POSITION when you are ready to
draw a different liquid from an additive storage tank
and out through the fill hose to a truck.
The figure below shows the Truck Fill Valve and Aux 2
Additive Valve in the open positions.
Auxiliary 3 Brine Truck Fill Mode
Valve Position
Set the valves to AUXILIARY 3 BRINE TRUCK FILL
MODE VALVE POSITION when you are ready to draw
liquids from a brine storage tank and out through the
fill hose to a truck.
The figure below shows the Truck Fill Valve and Aux 3
Brine Tank Valve in the open positions.
16

During Operation
During Operation Safety
● The owner/operator can prevent and is
responsible for accidents that may cause
personal injury or property damage.
● Wear appropriate clothing, including eye
protection; substantial, and slip-resistant
footwear. Tie back long hair and do not wear
loose clothing or loose jewelry.
● Wear appropriate personal protective
equipment as directed in Chemical Safety.
● Use your full attention while operating the
machine. Do not engage in any activity that
causes distractions; otherwise, injury or
property damage may occur.
● Do not operate the machine while ill, tired, or
under the influence of alcohol or drugs.
● Shut off the pump, wait for all movement to
stop, and allow the machine to cool before
adjusting, servicing, cleaning, or storing it.
● Use accessories and attachments approved by
VSI only.
Loading the Mix Tank Hopper
with Bulk Salt
Capacity: 2 yards of bulk salt (approximately 4,300
lbs.)
Note: Use only sodium chloride (salt) to create brine
in this machine. Do not use any treated salt products
in the making of salt brine.
For the first batch of brine you make you will start with
this step of loading the mix tank hopper with bulk salt.
Load bulk salt into the mix tank hopper using a loader
and bucket. Align loader bucket towards the center of
the hopper to avoid spilling salt over the hopper
extensions or directly into the belch pipe. Each batch
of brine will utilize between 1,500- 1,700 lbs.
Overloading the mix hopper can result in salt spillage
into the batch tank.
Note: For future additional batches of brine there will
already be some bulk salt in the mix tank hopper so
you can begin with the next step of filling the batch
tank with water. You will add bulk salt as needed at
this point.
Load salt slowly when there is already water in the
brine maker to avoid splashing or overflow.
Filling the Batch Tank with
Water
Capacity: 650 Gallons
1. Put the machine valve positions into Auxiliary 1
Water Fill Mode Valve Position (see earlier in the
manual).
2. Turn on the water supply and fill until the tank is ¾
of the way up the window, leaving room for salt
saturation and agitation.
3. Turn off the water supply and wipe up any spills.
Note: Opening the Agitation Valve, Tank Valve, and
Aux 1 Water Valve will speed up the mixing process
by agitating the solution while simultaneously filing
with water. Important: Allow the batch tank to partially
fill with water before turning on the pump motor to
avoid running the pump while dry. The pump will suck
air for a moment on startup.
Using the VSI Spray Control
App Information Display
1. Open the VSI Spray Control app.
17

2. Connect to the machine via Bluetooth. Refer to
Connect to Machine Via Bluetooth earlier in the
manual.
3. Select the MIX tab to display the brine salinity.
Agitating a Batch of Brine
Note: Use only sodium chloride (salt) to create brine
in this machine. Do not use any treated salt products
in the making of salt brine.
Important: Mix the brine to a salinity reading of
23.3%.
Brine Mixture- Water to Salt Ratios
Water
Salt
0.4385 Gallons
1 lbs
1 Gallon
2.28 lbs
1. Once you have loaded your brine maker with bulk
salt and water, plug the pump into a 220V, single
phase, 30 amp circuit.
2. Put the machine into AGITATION MODE VALVE
POSITION (see earlier in the manual).
3. Turn on the pump switch.
4. Continue to add salt into the hopper until the correct
salinity of 23.3% is reached. Use the VSI Spray app to
monitor the salinity level. A manual hydrometer is
also included.
5. Turn the pump switch off.
Pumping Out Brine to Storage
Tanks
Once agitation is complete and the brine is mixed to a
salinity reading of 23.3% proceed with the steps below
to pump brine out of the brine maker into a storage
tank.
1. Move the valves into the PUMP-OUT MODE
VALVE POSITION (see earlier in manual).
2. Turn the pump switch on and pump brine out of the
brine maker to the storage tank.
Note: Ensure the valve at the storage tank is open to
allow liquid to flow into the storage tank.
3. Once pumping is complete, close the valves and
return to the OFF MODE VALVE POSITION (see
earlier in manual) and quickly turn off the pump motor.
Filling Trucks with Brine From
Storage Tanks
The brine maker can be used to fill trucks, pulling
liquid from either the batch tank or storage tanks via
the manifold.
18

1. Connect the brine maker to a sprayer via the 2” fill
hose line with camlocks.
2. Open the Truck Fill Valve and the Aux 3 Brine
Valve. Turn on the pump motor.
3. Fill the sprayer with the desired quantity of brine.
4. Close the Truck Fill Valve and Aux 3 Brine Valve.
Turn off the pump motor.
5. Proceed to Filling Trucks with Additives From
Storage Tanks, if needed. Otherwise proceed to the
Air Purge section.
Filling Trucks with Additives
From Storage Tanks
The brine maker can be used to fill trucks with
additives, pulling it from a storage tank via the
manifold.
1. If not already connected, connect the brine maker
to a sprayer via the 2” fill hose line with camlocks.
2. Open the Truck Fill Valve and the Aux 2 Brine
Valve. Turn on the pump motor.
3. Fill the sprayer with the desired quantity of
additives.
4. Close the Truck Fill Valve and Aux 2 Additive Valve.
Turn off the pump motor.
5. Proceed to the Air Purge section.
Note: If filling a truck with brine and then immediately
using additives, it is possible to simultaneously close
the Aux 3 Brine Valve and open the Aux 2 Additive
Valve without having to turn off the pump motor.
Air Purge
After you are finished filling trucks with liquid you can
use the Air Purge to prevent spilling liquid from the
hoses and valves after each movement of liquid.
If desired, connect an air compressor to the air-purge
valve. Ensure the Air Purge Valve is closed.
Note: A minimum of (20 psi) and a maximum of (120)
psi is needed for pressure to clear out the brine.
1. After you are finished pumping out to the trucks,
with the fill hose still connected, and with the pump
motor off. Put the valves into the OFF MODE VALVE
POSITION . The fill valve and tank valve on the
sprayer should remain open.
2. Open the air-purge valve until air is purged out and
heard going into the sprayer.
3. Close the fill valve on the sprayer and immediately
close the Air Purge Valve.
4. Slowly remove the camlock connection on the
sprayer or storage tank as well as machine.
Never disconnect the hose fittings under
pressure.
If pressure is suspected to be present, open the
Truck Fill Valve to relieve the pressure before
disconnecting the hose.
10. Disconnect your air-compressor hose.
After Operation
After Operation Safety
● Shut off the machine, wait for all movement to
stop, and allow the machine to cool before
adjusting, servicing, cleaning, or storing it.
● Keep all parts of the machine in good working
condition and all hardware tightened.
● Replace all worn, damaged, or missing decals.
19

Washing the Brine Maker
Wash the inside of the salt hopper and batch tank with
clean water.
Note: Use only clean water when cleaning the
system.
Maintenance
Failure to properly maintain the machine could result in premature failure of machine systems, causing
possible harm to you or bystanders.
Keep the machine well maintained and in good working order as indicated in these instructions.
Recommended Maintenance Schedule(s)
Maintenance Service Interval
Maintenance Procedure
Before each use or daily
● Ensure the electrical connections are secure and safe
Every 50 hours
● Service the in-line filter screen
● Clean the salt hopper and batch tank (or sooner as needed)
Every 200 hours
● Inspect all hoses and connections for damage and proper
attachment
Before storage
● Flush the machine after each pump-out or at times of prolonged
storage
● Condition the machine after each season
● Check and tighten all fasteners
● Clean the brine batch tank
● Clean the salt hopper
● Condition the spray system
Monthly
● Clean the brine batch tank
20
Other manuals for Legacy Series
2
Table of contents