VuPoint SM-FL10-VP User manual

Scanner Mouse
User’s Manual

2
Safety Precautions
Before using this device, please read through and follow the Safety Precautions as
listed below.
yKeep this User’s Manual for future reference.
yThis device is NOT waterproof. Avoid all contact with water.
Avoid placing a container lled with water (or any type of liquids) near the
device.
Avoid spilling water on the device.
Avoid using the device near water.
Dry your hands before using the device.
yDo not store the device in a place with high humidity.
yDo not install the device near appliances that emit heat such as heater, light
bulb, etc.
yDo not install the device in a dusty area.
yDo not apply excessive shock to the device.
yDo not place heavy objects on the top of the device.
yAvoid looking directly into the laser beam when scanning the document.
yDo not use the device if its USB cable is damaged.
yUnplug the device from your computer if you are not using the device for an
extended period of time.
yKeep the device out of the reach of children.
Basic Care For Your Device
To optimize scan performance, we recommend you clean the scanner mouse at
least once a week.
yWipe the device gently with a dry clean cloth.
yDo not apply pressure to the scan window when cleaning the bottom of the
device.
yWhen cleaning the scan window, be careful not to scratch the window surface.

3
CONTENTS
INTRODUCTION .................................................................................4
Features .................................................................................................................................. 4
Package Contents ............................................................................................................... 4
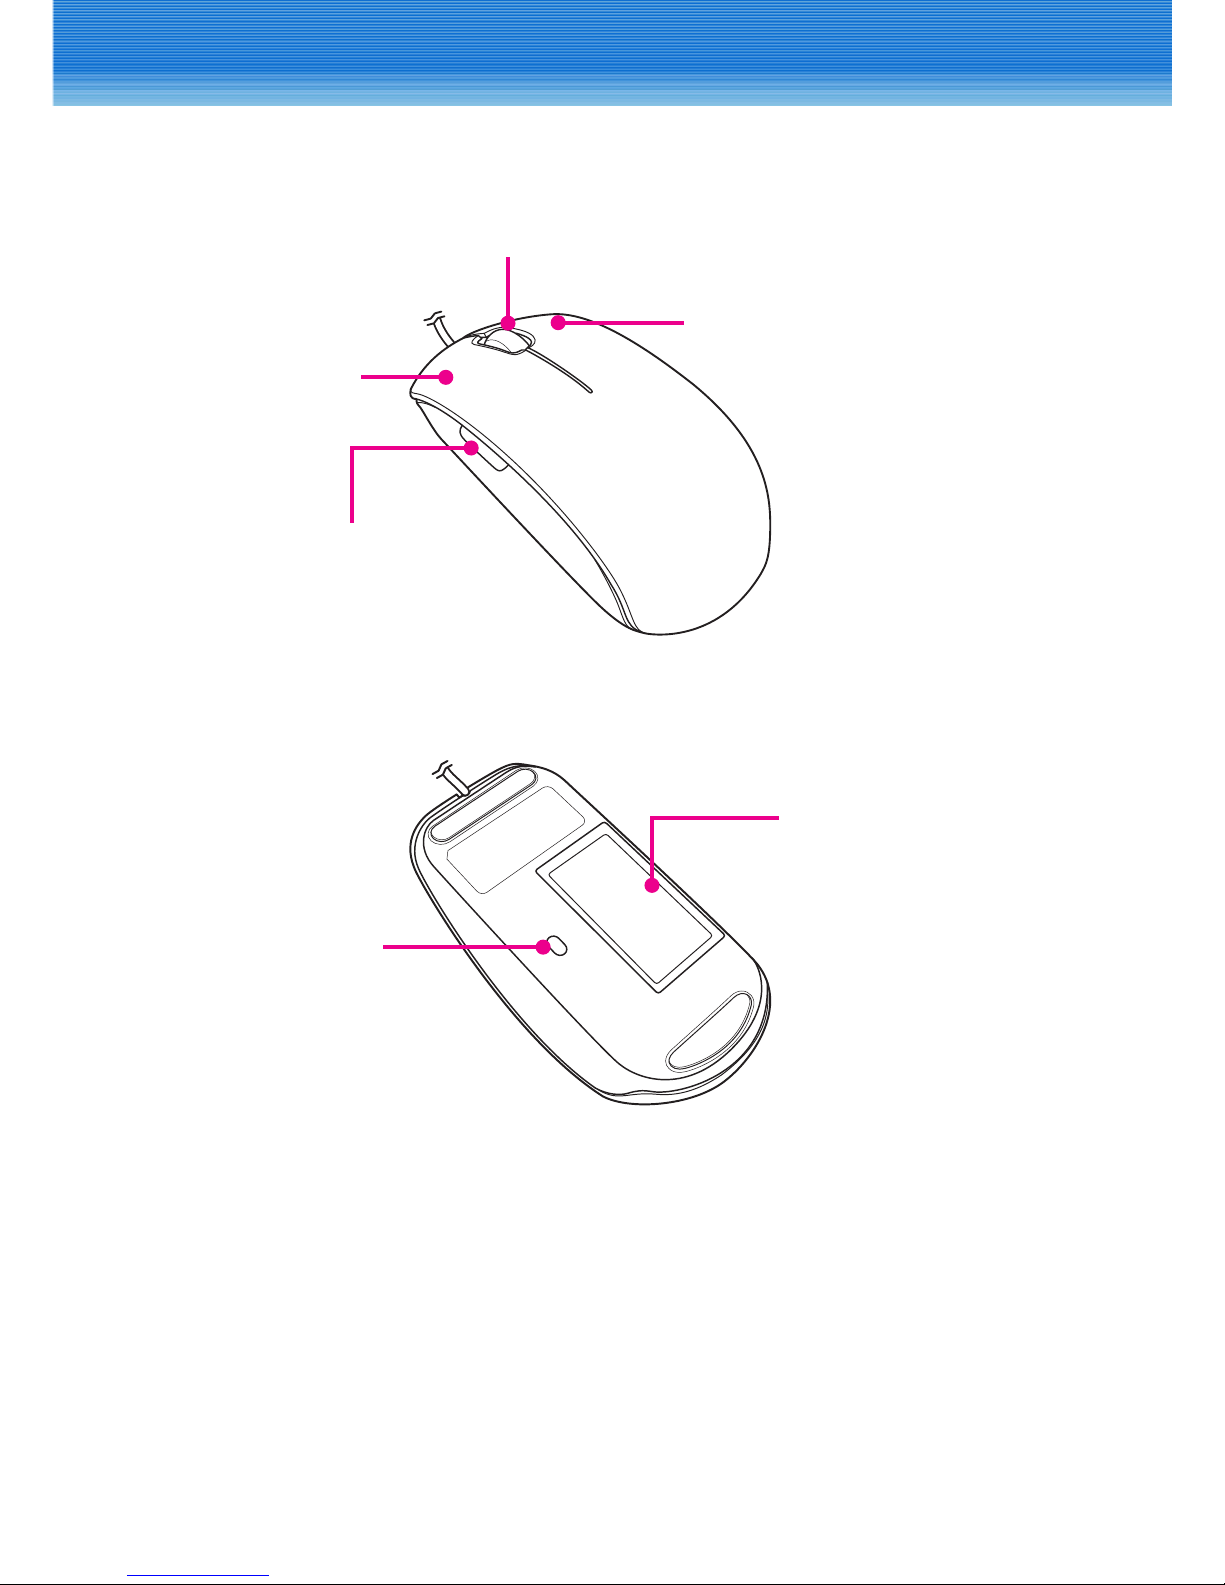
Product Overview ............................................................................................................... 5
SOFTWARE INSTALLATION................................................................6
System Requirements........................................................................................................ 6
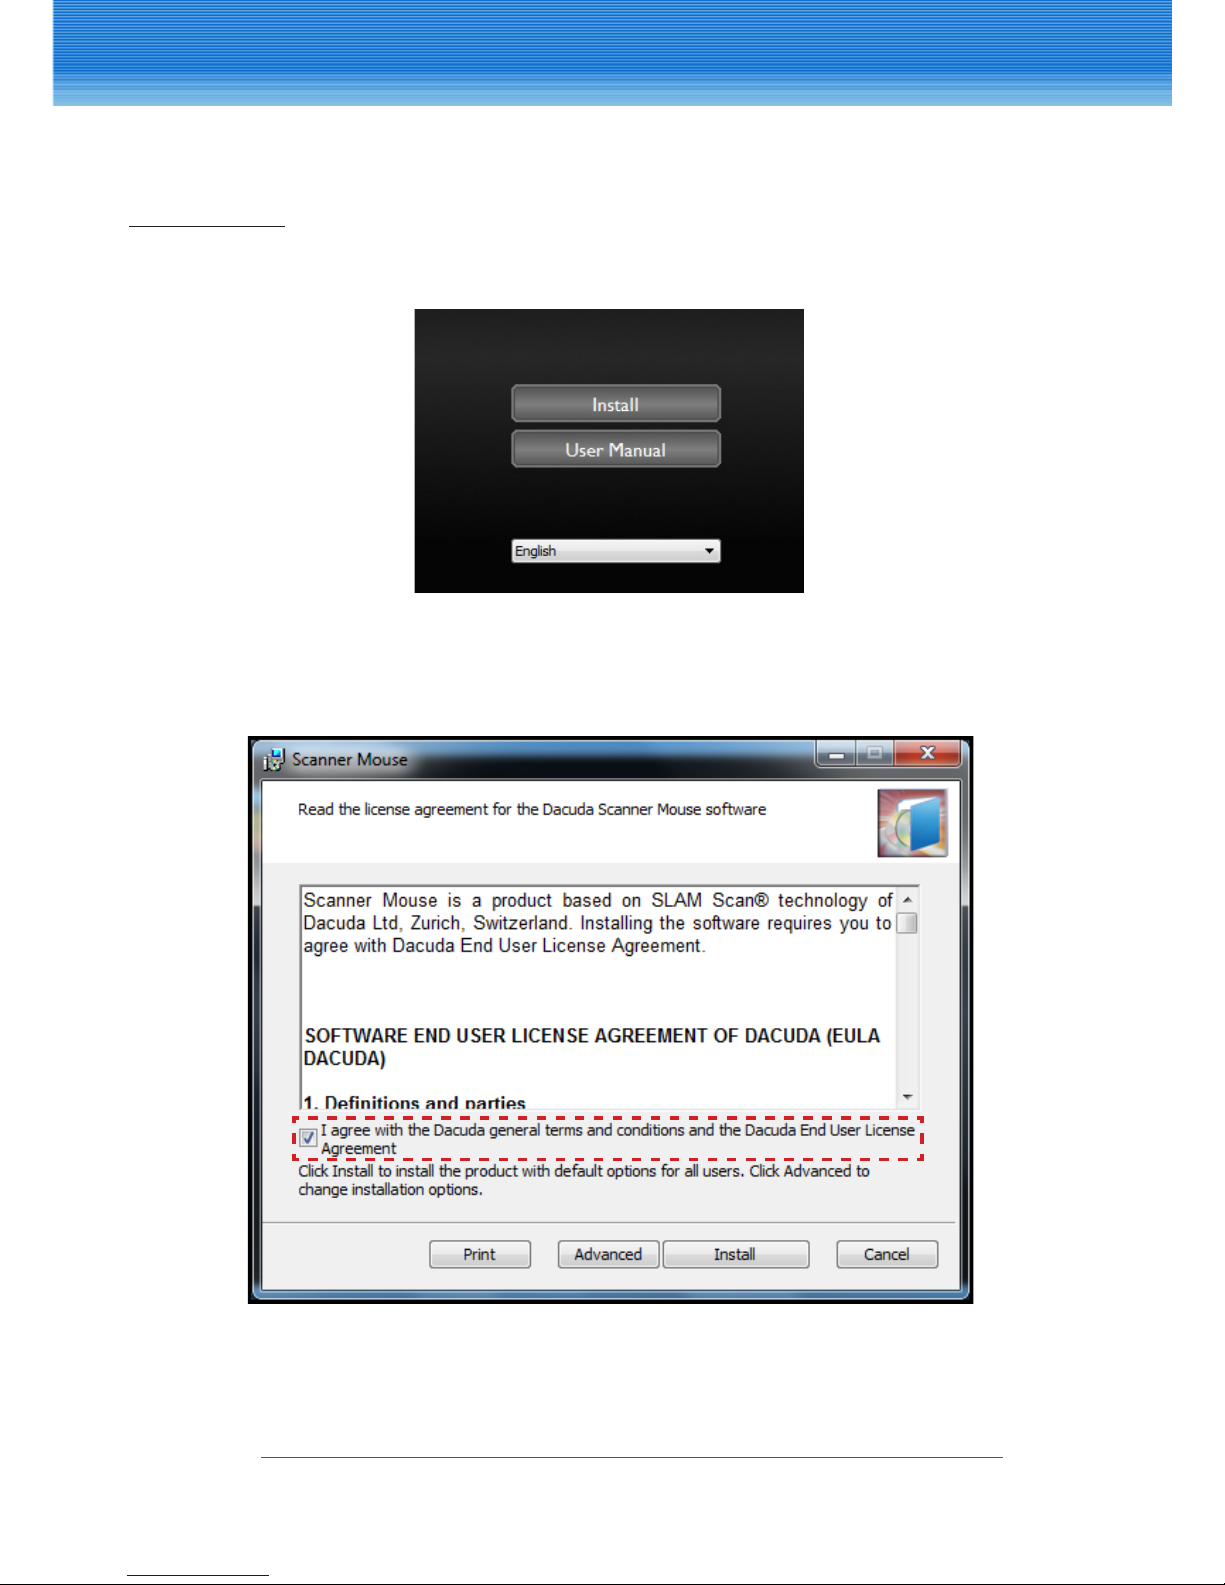
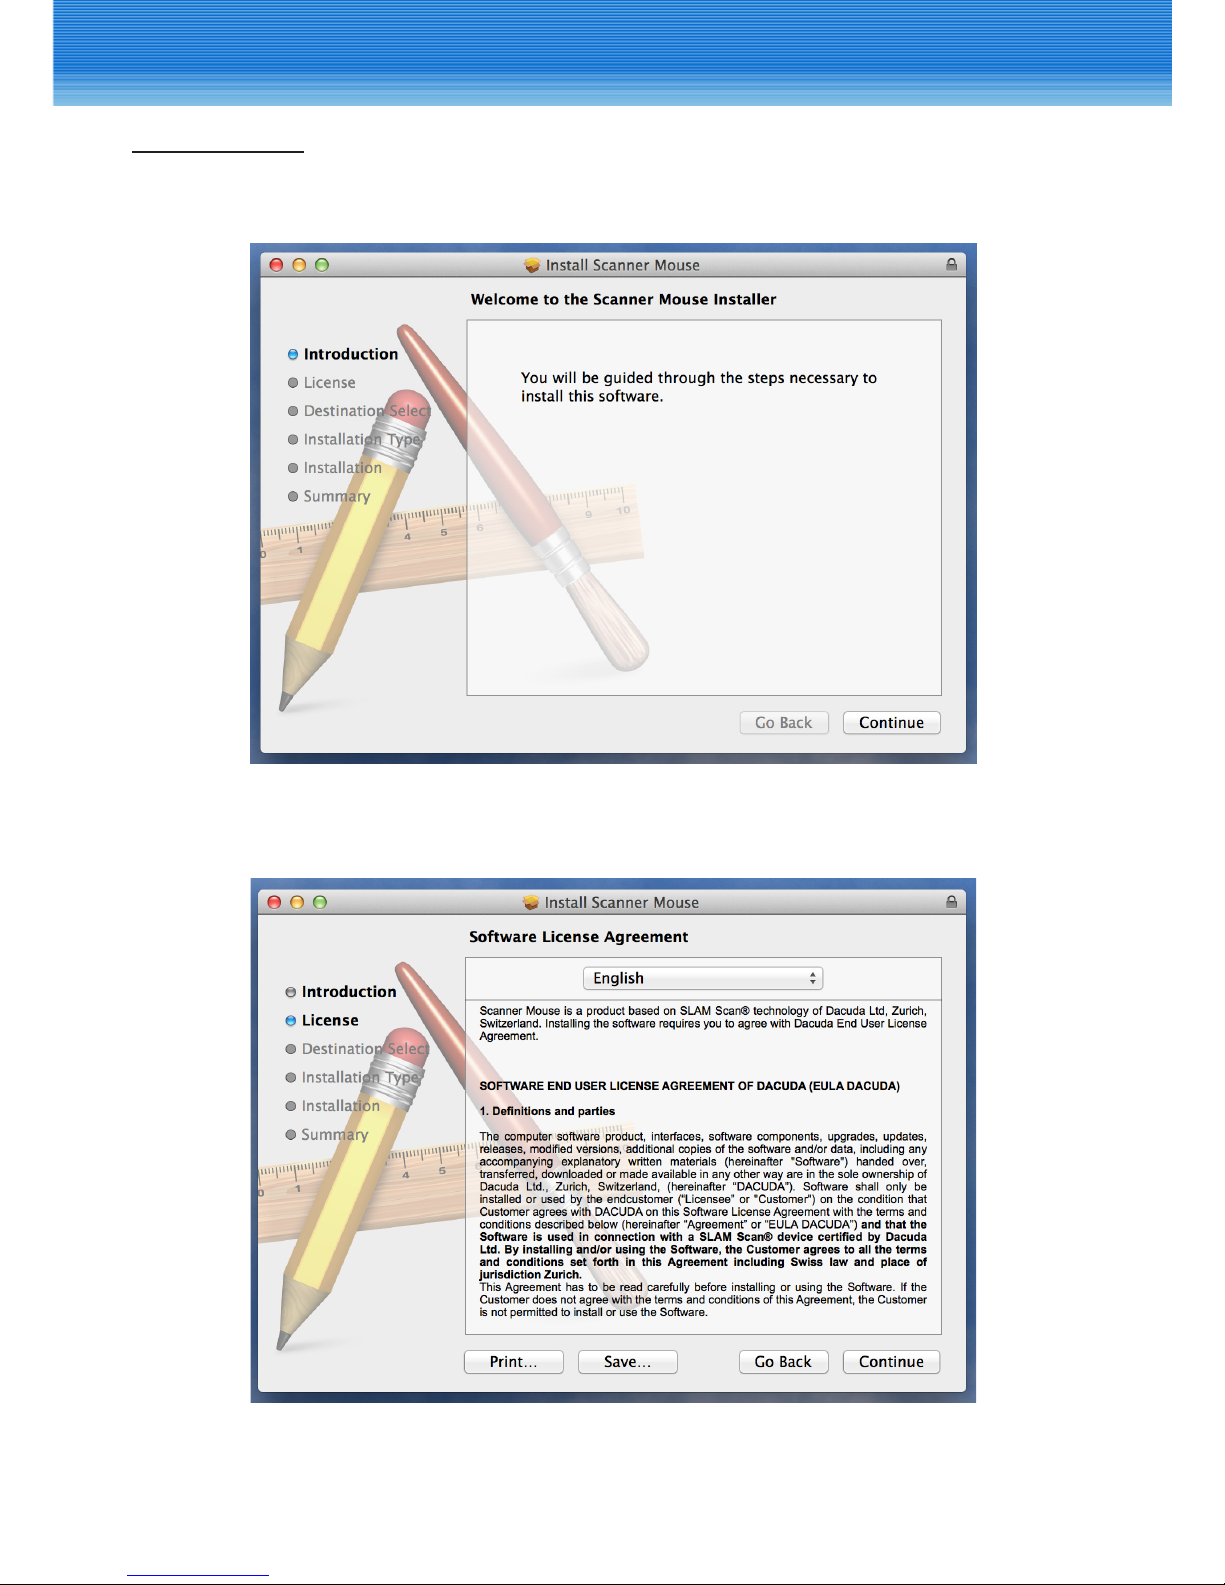
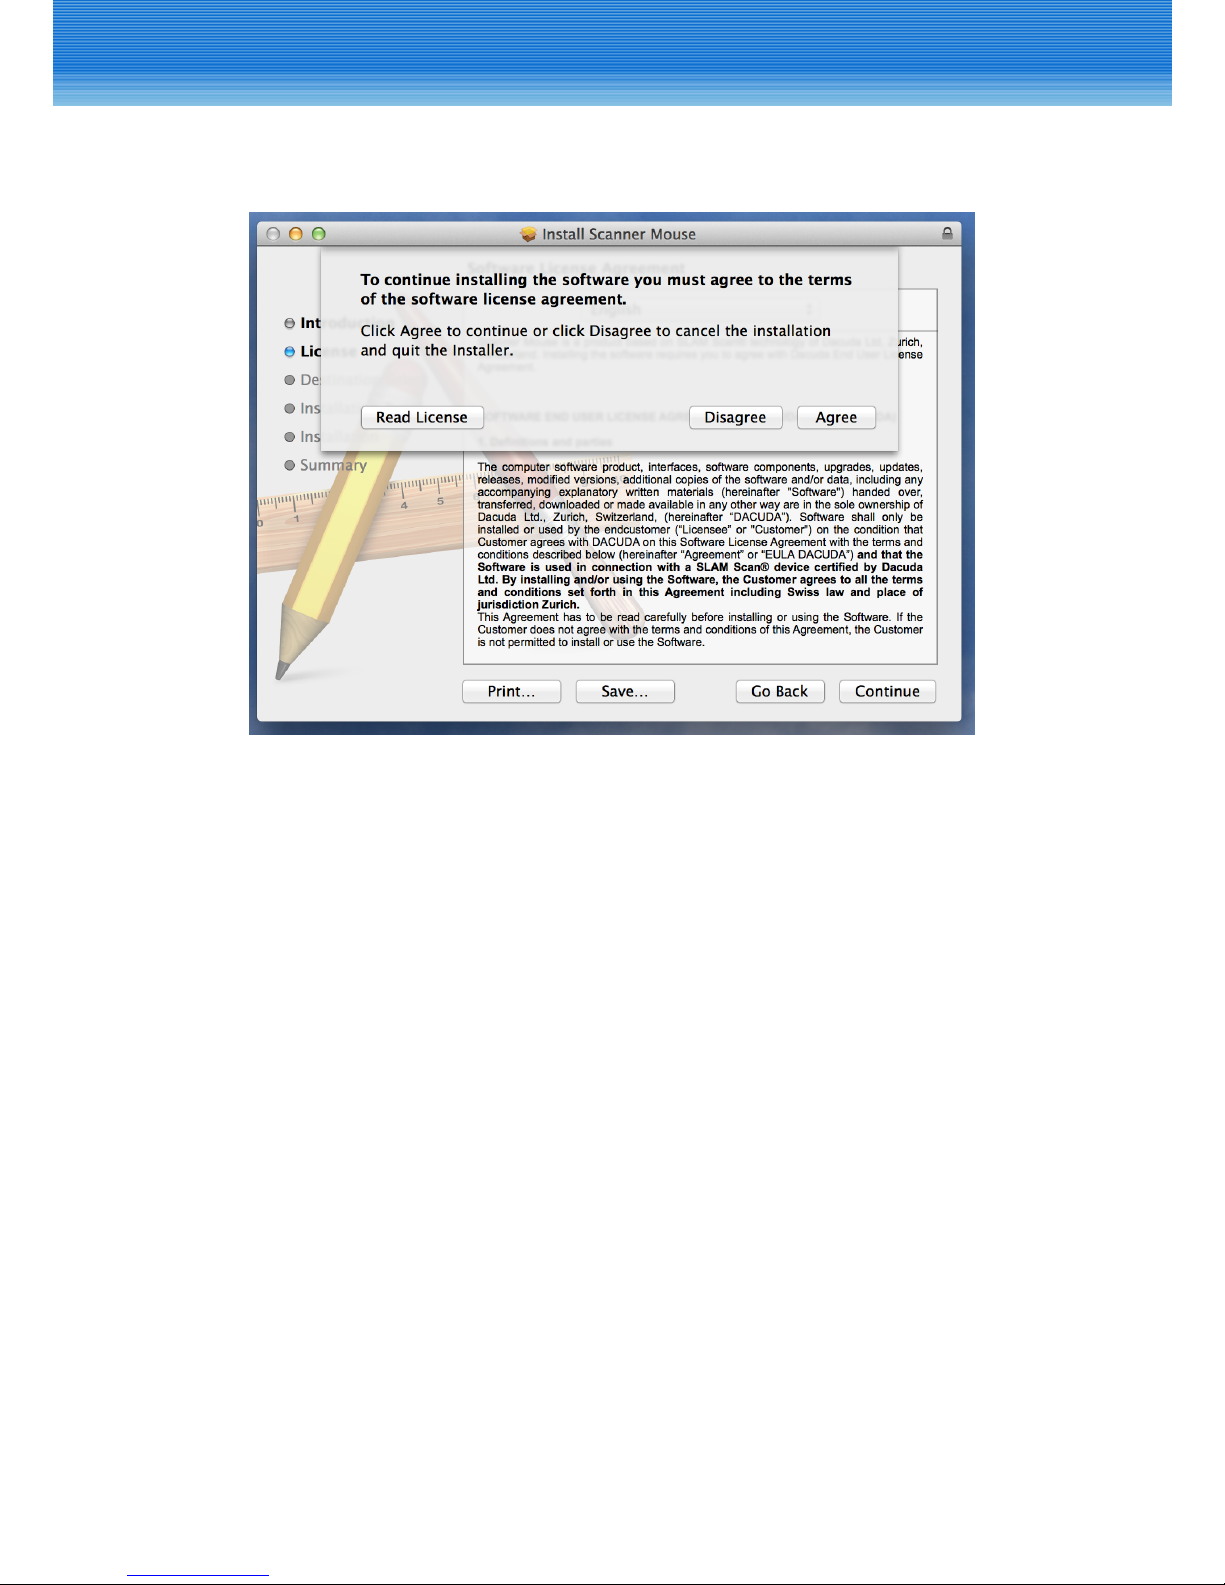
Installing the Software ...................................................................................................... 7
USING THE SOFTWARE ....................................................................11
Scanning the Document.................................................................................................11
Editing Scanned Image...................................................................................................13
Saving Scanned Image....................................................................................................14
Sharing Files ........................................................................................................................16
Uploading Files to Dropbox/Evernote.......................................................................17
Searching Image via Google Search...........................................................................17
Translating Text via Google Translation.....................................................................17
CONFIGURING SOFTWARE SETTINGS ............................................18
Display Language and Scan Resolution....................................................................18
Software Window Positions...........................................................................................19
Filename Prex and Document(JPEG) Quality .......................................................19
Text Recognition................................................................................................................19
Software Updates..............................................................................................................20
Proxy Settings.....................................................................................................................20
Reset To Default .................................................................................................................20
APPENDIX.........................................................................................21
Specications......................................................................................................................21
Changing the Mouse Cover...........................................................................................22
Frequently Asked Questions (FAQ) .............................................................................23
Safety Regulations ............................................................................................................25

4
INTRODUCTION
Congratulations on purchasing this All-in-One Scanner Mouse. This device with
it’s easy-to-use software lets you scan any type of document or pictures with one
click! Once the scanning process is complete, the scanned image is then ready for
editing, saving, or sharing with your family or friends.
Features
yScan variety types of printed document including text, images, tables, and
QR code.
ySupport OCR function.
ySupport document editing right after scanning complete.
ySave scanned document in multiple le formats (JPEG / PNG / BMP / XLS / DOC
/ PDF).
ySupport sharing and upload functions via social networking site or e-mail
service.
ySupport image searching and text translation functions via Google.
Package Contents
The following items should be included in your package.
Quick Guide
Scanner mouse Software CD Quick Guide
Warranty Card
Warranty Card Spare Mouse Cover
(optional)
Mouse Pad
(optional)

5
INTRODUCTION
Product Overview
Left button
Right button
Scan button
Scroll wheel
Scan window
Laser sensor
8Note:
yBe sure to remove the protective lm attached on the scan window before
using the mouse.

6
SOFTWARE INSTALLATION
When using the scanner mouse for the rst time, you need to install the software
on your computer.
System Requirements
Before installing the software, be sure that your computer meets the following
specications:
vMinimum System Requirements
Windows
Intel® Core™ Duo 1.2 GHz or AMD Athlon™ 64 X2, 1.7 GHz or better
2 GB of RAM of which at least 512 MB are free
128 MB NVIDIA® GeForce® 8400 GS or 128 MB ATI Radeon™ X1300 or 384 MB
(shared) Intel® GMA X3000 or better
1 GB free disk space
Macintosh
Intel® Core™ Duo 1.8 GHz (MacBook Pro 1.1) or Intel® Core™ 2 Duo 1.4 GHz
(MacBook Air 3.1) or better
2 GB of RAM or more of which at least 512 MB are free
ATI Mobility Radeon™ X1600 128 MB DDR3 dedicated (MacBook Pro 1.1) or
NVIDIA® GeForce® 320M 256 MB DDR3 SDRAM shared (MacBook Air 3.1) or
better
1 GB free disk space
vSupported Operating Systems
yWindows XP (SP3) 32 Bit
yWindows Vista - 32 Bit and 64 Bit
yWindows 7 - 32 Bit and 64 Bit
yWindows 8 - 32 Bit and 64 Bit
yMac OS X 10.8
yMac OS X 10.9
vRecommended System
yIntel® Core™ i5 or better
y4 GB System RAM or more
y512 MB Graphics memory or more

7
SOFTWARE INSTALLATION
Installing the Software
Windows OS
1Insert the supplied software CD into your CD-ROM drive. The setup wizard
appears.
2Specify the language and click Install. The installation process begins.
3Read the License Agreement and check the Agreement check box as shown
below. Then click Install to continue.
8Note:
yIf you encounter error messages during installation process, please
download the “Microsoft Visual C++ 2008 Redistributable package”
from http://www.microsoft.com/en-us/download/details.aspx?id=29,
double-click on the downloaded executable le, and follow the on-screen

8
SOFTWARE INSTALLATION
instructions to complete the package installation process. You may then
restart the scanner mouse installation process again.
4The software installation may take a while to complete.
5Click Finish to complete the installation.

9
SOFTWARE INSTALLATION
Macintosh OS
1Insert the supplied software CD into your CD-ROM drive. The setup wizard
appears.
2Click Continue. The installation process begins.
3Specify the language and click Continue to continue.

10
SOFTWARE INSTALLATION
4Read the License Agreement and click Agree to continue. Follow the
instructions to complete the installation process.
8Note:
yOn Macintosh OS, refer to the software Help for information about the
operating instructions.

11
USING THE SOFTWARE
After the software installation is complete, now you are ready to
use the scanner mouse.
Connect the scanner mouse to the USB port of your
computer.
Scanning the Document
To scan a document, perform the following:
1Place the mouse on the document that you want
to scan.
2Press the Scan button to start scanning.
The scanning screen appears.
3Move the mouse steadily over the document to scan the desired area.
8Note:
yWe highly recommend you scan the
document in S-shape (from top to bottom).
yMake sure to always cover some of the already
scanned content to ensure the highest scan
quality. In case an area is not perfectly scanned,
simply move the device over this area again and
the scan quality will improve.
yThe scanning process is automatically paused
when you lift the mouse. To resume, place the
mouse at an area where you have scanned earlier.
yWhen scanning multi-language document or document in a language other
than English, you can specify the OCR language in Settings menu. Refer to
“Text Recognition” on page 19.
yWhen scanning a book, be sure the position of the laser sensor is within the
area of the scanned page.
4Press the Scan button again to end scanning.

12
USING THE SOFTWARE
Scan Screen
8Note:
yDuring scanning, use the scroll wheel to zoom in/out on the scanned image.
yWhen the scan frame turns yellow or red, this indicates the mouse is moving
too fast. If this happens, move the mouse slowly.
yThe scanning will end automatically when the system consumes all available
memory.
Scan frame
Button guide
Scan memory
status
Scanned image

13
USING THE SOFTWARE
Editing Scanned Image
The editing screen automatically appears after the scanning stops. The system
automatically rotates the image and displays it in full screen.
Refer to the guidelines below to edit the scanned image.
After all necessary adjustments have been made, click OK to save the le.
8Note:
yUse the scroll wheel to zoom in/out on the scanned image.
yPress the Scan button to rescan the document.
yPress the Right button to activate the Hand tool.
Button guide
Move to adjust the
image orientation.
Drag or resize the
frame to crop the
scanned area.
Drag the slider
to adjust the
colors.
Click to activate
the Eraser tool.
Select to rotate the
image left/right.
Select to change the
background color.

14
USING THE SOFTWARE
Saving Scanned Image
The system can save the scanned image in the following le formats:
PNG (*.png)
JPEG (*.jpg)
BMP (*.bmp)
PDF (*.pdf)
Excel (*.xls)
Word (*.doc)
TXT (*.txt)
(File conversion in progress) (File conversion is complete)
Double-click the output le to view the content of the scanned image in its
default program.
For example, if you double-click the “*.txt” le, the system will automatically
launch Notepad and display the extracted plain text. Then you can save the le
directly to your computer.
8Note:
yYou can also copy the content (image/text) of the scanned image by clicking
Save > Copy Image or Copy Text. Open the desired program and then paste
the content.
yMore options are available on the menu bar. For example, click File to access
Save As, Share, Apps, Print, or Quit option.
Default
output
format
Quick
Menu
Preview
image
Menu bar

15
USING THE SOFTWARE
You can also save the image to the desired le type using other methods:
a. Click Save tab. Then browse to select the le path/location and specify the
desired le type. Click Save to save the le.
b. Drag and drop the le you wish to save onto your computer desktop.

16
USING THE SOFTWARE
Sharing Files
Prior sharing le via popular social networking site, you need to have a Facebook,
Flickr, or Twitter account. For sharing le via email, you have to congure the
e-mail settings rst on your computer.
8Note:
yIf you do not have any social network site account, go to the desired social
networking page and follow the on-screen instructions to create an account.
yYou can also congure the user login settings by clicking Options > Manage
Apps.
yTo share your le via social networking site, click Share tab and select
Facebook, Flickr, or Twitter. When sharing a le for the rst time, you need to
sign in rst with your account. After you login, you can post the scanned image
directly on Facebook/Flickr/Twitter.
yTo share your le via e-mail, click Share tab and select Mail. The e-mail
program automatically opens, and then the le is directly attached to an open
e-mail message.

17
USING THE SOFTWARE
Uploading Files to Dropbox/Evernote
Prior uploading le to Dropbox/Evernote, you need to install the related
application and register an account rst on your computer.
8Note:
yYou can also congure the application settings by clicking Options > Manage
Apps.
yTo upload your le to Dropbox, click Apps tab and select Dropbox. It will
automatically sync the le to your Dropbox.
yTo add your le to Evernote, click Apps tab and select Evernote. It will
automatically upload the le to your Evernote.
Searching Image via Google Search
With this function, it allows you to nd the similar images online via Google
Image Search.
yTo search the similar images as the scanned le, click Apps tab and
select Google Search By Image. The browser program opens and then it
automatically redirects you to the Google Image Search page. The thumbnail
images appear on the Search Results screen. Click the desired thumbnail
image to view it in full screen.
Translating Text via Google Translation
When you need to translate the text shown on the scanned image, this function
can redirect you to Google Translate to do the translation. You do not need
to copy and paste the text to translate it to other language. However, Google
Translate App only supports up to 300 characters for translation. It is possible
to drag and drop or copy and paste longer text from the scan application to the
Google Translate web page.
yTo translate the text, click Apps tab and select Google Translate. The browser
program opens and then it automatically redirects you to the Google Translate
page. Specify the target language and the translated text appears on the
screen.

18
CONFIGURING SOFTWARE
SETTINGS
To customize the Scan software settings, click Options on the menu bar and
select Settings.
Display Language and Scan Resolution
On Settings screen, click General on the left panel menu.
Congure the following settings:
yUser interface language: Change the display language.
yScan resolution: Select the image resolution. Available options: Low/Medium/
High/Full.
8Note:
yScans at lower resolution, it consumes less memory and allows you to scan
larger documents, up to A3 size.
yScans at higher resolution, it produces better OCR results.

19
CONFIGURING SOFTWARE SETTINGS
Software Window Positions
On Settings screen, click General on the left panel menu.
Congure the following settings:
yAlways on top: Select Yes to let the software window always stays on top of all
other windows.
yWindow position: Specify the window position. Available options: Right/Left/
Remember last position.
Filename Prex and Document(JPEG)
Quality
On Settings screen, click Save on the left panel menu.
Congure the following settings:
yDefault lename prex: Specify the default text to be added to the beginning
of the lename for every le that is saved.
yJPEG quality: Select the level of JPEG compression. Available options: Low/
Medium/High.
Text Recognition
On Settings screen, click Text Recognition on the left panel menu.

20
CONFIGURING SOFTWARE SETTINGS
Congure the following settings:
yFilter: Filter the language selection. Available options: Show available
languages/Show enabled languages.
ySearch: Enter several letters in your search text box to narrow down the
options. Click the check box to select the desired language(s).
Software Updates
On Settings screen, click Updates on the left panel menu. Select one of the
available methods to update the Scan software.
8Note:
yYou can also manually check for the latest software by clicking Options >
Check for updates.
Proxy Settings
You only need to congure this option if you access the Internet via a proxy
server. On Settings screen, click Proxy Settings on the left panel menu. Select
one of the applicable methods to congure the network settings.
8Note:
yIf you encounter any problem to set up the settings, please contact your
network service provider.
Reset To Default
On Settings screen, click Advanced on the left panel menu. Click Reset to reset all
parameters to the factory default settings.
Table of contents