VWR International 89404-492 User manual

Man.V100 (28 Sept. 2012)
VWR Stereo Microscope
Operation Manual
(Version 1.0.0)
VWR Stereo Microscope
89404-492, 89404-494
89404-496, 89404-498
89404-500, 89404-502
89404-492 VWR Stereo Microscope Dual Halogen 2x/4x
www.vwr.com

VWR International, LLC., Stereo Zoom Microscope 2

VWR International, LLC., Stereo Zoom Microscope 3
Safety Instructions
Please read this manual carefully before using this product for optimal use. The indicated cautions are
related to safety and you should observe all safety and warning instructions to avoid potential damage
to product and injury to operators. Keep this manual for future reference.
Note: Use this product only in a way described in the product literature and this manual. Before using
the product, verify that this product is suitable for its intended use.
Do not modify the system components or use the unauthorized parts as this will void the product
warranty.
The following warning labels (or symbols) are found on the microscope, Study the meaning of the
warning labels (or symbols) and always use the equipment in the safest possible manner.
Warning Label / Symbol Explanation
Indicates that the surface becomes hot, and
should not be touched with bare hands.
Indicates that the main switch is ON.
Indicates that the main switch is OFF.
~
Indicates alternating current.

VWR International, LLC., Stereo Zoom Microscope 4
Introduction
Thank you for your purchase of a VWR stereomicroscope. VWR stereomicroscopes are precision
instruments, subjected to meticulous examination to reach you in perfect condition. Their design
combines easy management and optimum functioning with minimum maintenance.
The information contained in this manual is likely to go beyond what the average user needs to know to
use the stereomicroscope, however, it is provided to answer any queries that may arise.
Stereomicroscopes are used to study three dimensional objects, examine small parts, or dissect
biological specimens. They also permit the observation of slide specimens.
These instructions should be read carefully before operating the microscope. They will permit you to
use your new stereomicroscope to its fullest capabilities. Terminology used to describe components
and controls can be found in the diagram on page 2.
These instructions are based on the assembly of a binocular model model, with additional notes
applying specifically for the other models in the series. For those models with A objectives, objectives
referred to are 1X and 2X (rather than 2X and 4X); whilst for models with B objectives, objectives
referred to are 1X and 3X.
Unpacking
All components of the stereomicroscope have been carefully packed to ensure they reach you in
perfect condition. We recommend that you do not discard any packing containers in case you need to
return the microscope or store it for long periods of time; or should it become necessary to transport it
to a technical service for any repair, or maintenance procedure.
The box should contain the following components, depending on the model:
●Binocular: Base with illumination; a fixed head holder, also with illumination; an opaque black and
white stage; a binocular head with eyepieces; eyepiece protectors; a frosted glass stage; a blue
filter;
a protective base and a hexagonal key measuring 1.5mm.

VWR International, LLC., Stereo Zoom Microscope 5
Avoid touching optical elements and keep out of contact with dust, water or other
contaminating agents, as they could stain, or damage the lens surface and affect the quality of
the image.
Remove and handle all components of the stereomicroscope with extreme care.
Assembly
All the steps described for the assembly of the stereomicroscope must be undertaken with
extreme care, and without forcing the placement of the distinct parts and elements of the
microscope.
a. Place the base in an upright position on a flat, stable and clean surface.
b. Loosen the head locking screw, and place the head in the head holder with extreme care.
c. Re-tighten the head locking screw.
Warning: Before connecting the microscope to an electrical source, always check that the
voltage coincides with that of the stereomicroscope.
Operation
A. Starting Up
The stereomicroscope comes with two stages. One is frosted glass for the observation of microscopic
specimens slides, or thin, or transparent samples such as leaves, insect wings, and so forth. The
black/white stage is used to study opaque objects, or for dissection. The best contrast of a sample
would depend on the side of the stage chosen.
Warning: ONLY use transmitted light with the frosted glass stage. HEAT GENERATED BY THE
TRANSMITTED LIGHT MAY MELT OR DAMAGE THE BLACK/WHITE STAGE. SUCH DAMAGE IS
NOT COVERED BY THE WARRANTEE.
1. Changing the Stage
a. Loosen the locking set screw situated on the front, and remove the stage plate.

VWR International, LLC., Stereo Zoom Microscope 6
b. If using the frosted glass plate, insert the blue filter into the centre of the base, with the frosted
surface facing down.
c. Place the glass plate on top, again, with the frosted surface facing down.
d. Re-tighten the locking set screw.
2. Before using the stereomicroscope, adjust the light intensity control to minimum position. This
should be repeated every time the stereomicroscope is switched on or off to prolong the use of the
bulb. (Intensity control not available for models with the 2LBB base).
Three light switches are situated on the stereomicroscope base.
MAIN : Turns the entire unit on or off.
I : Turns incident light on or off. (Top illumination)
T : Turns transmitted light on or off. (Bottom illumination)
3. Press the main switch to position “I”.
4. Press the incident or transmitted illumination switch, or both at once, to position “I” or “II”, according
to necessities in examining the sample.
5. Light intensity should be adjusted according to the objectives utilised, or the type of sample
observed.
6. The angle of the incident illumination can be adjusted using the screw that permits variation on the
orientation of the illuminator lenses.
7. If the stereomicroscope does not work, please check the “Troubleshooting” section of this manual.
B. Interpupillary Adjustment
1. Whilst looking through both eyepieces, move eyepiece tubes on their axis, holding head by the
eyepiece tubes housing the prisms.
2. When a full field of view is obtained, and converted into a single image, interpupillary distance is
correct for your eyes.
3. Each user should adjust interpupillary distance to match their eyesight.
C. Focusing
1. Turn objective turret so that the lowest magnification number 2X is facing the front of the
microscope,
lined up with the eyepiece, and the 4X magnification is located at the two sides, perpendicular to the
eyepiece. The turret permits a ¼ turn. Ensure that turret is “clicked” into its correct position.
NB: For models with N3GG or 2LBB bases, omit steps 2, 3 and 4, passing directly to 5.
2. Place a flat object, or a specimen slide on the centre of the stage.

VWR International, LLC., Stereo Zoom Microscope 7
3. Turn focus knobs to mid-focus range.
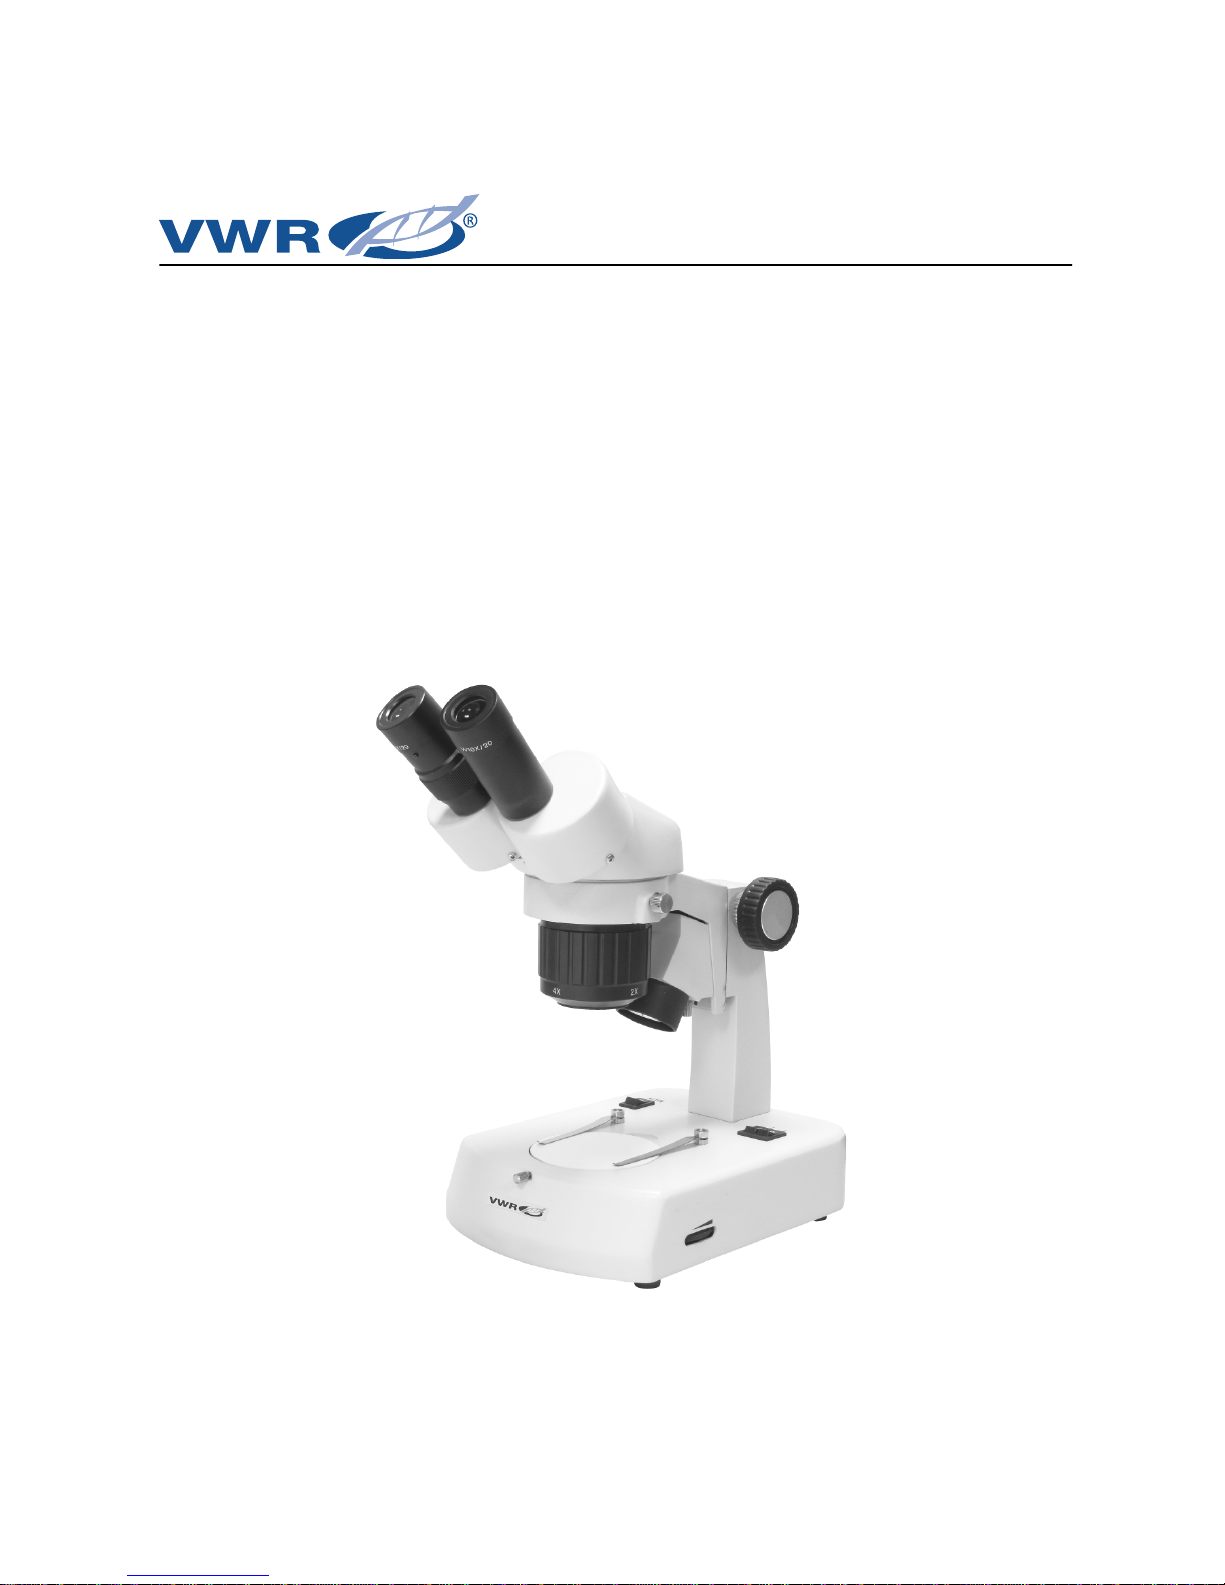
4. The head holder is mounted on a column, so that it can move up or down to accommodate the size
of the object focussed.
a. Support the head with one hand without touching any lens, and with the other, loosen the locking
knob on the locking support collar, so that the head can freely slide towards the base.
b. Without letting go of the head, loosen the head locking screw.
c. Whilst looking through the eyepieces of the microscope, move viewing head up and down on the
column, until the object comes into focus
d. Firmly re-tighten the head locking screw, but do not let go of the head.
e. Position the support collar under the focussing block and tighten locking knob on support collar. The
head can now be released.
f. It is not necessary to repeat these steps every time the object is changed, so long as the objects are
of similar thickness or height.
5. Adjust again focus knob until the image is completely detailed.
C. Adjusting the diopter
On the left hand eyepiece tube there is a diopter adjustment collar. Its normal position is when the lower
part of the collar is aligned with the sign marked on the eyepiece tube.
In the case of differences in eyesight:
1. With the right eye, look through the right eyepiece and adjust focus.
2. Now use the left eye to look through the left eyepiece, and adjust the focus by turning the diopter
adjuster, on the left hand eyepiece tube, until a detailed image is achieved. Do not adjust the focus
with the focus knobs.
D. Changing magnification
Turn objective turret so that the highest magnification number 4X is facing the front of the microscope,
lined up with the eyepiece, and the 2X magnification at the two sides, perpendicular with the eyepiece.
The turret permits a ¼ turn. Ensure that turret is correctly “clicked” into correct position.
1. Although this stereomicroscope comes parfocalled, the focus has to be adjusted owing to the
greater field profundity offered by those objectives of lower magnification. Field profundity is the
capacity to focus on distinct points, on distinct levels.
2. Once the image with objectives of higher magnification is brought into focus, it is not necessary to
re-focus for those of a lower magnification level.

VWR International, LLC., Stereo Zoom Microscope 8
Specification chart:
Objectives
Eyepieces
WF5x
(optional) WF10x WF15x
(optional)
WF20x
(optional) Working distance
Total
magnific
ation
Field size
Total
magnific
ation
Field size
Total
magnific
ation
Field size
Total
magnific
ation
Field size Binocular Trinocular
A 1x 5x 22 mm 10x 20 mm 15x 13 mm 20x 9,5 mm 95 mm 95 mm
2x 10x 11 mm 20x 10 mm 30x 6,5 mm 40x 4,8 mm
B 1x 5x 22 mm 10x 20 mm 15x 13 mm 20x 9,5 mm 94 mm 80 mm
3x 15x 7,3 mm 30x 6,7 mm 45x 4,3 mm 60x 4,3 mm
C 2x 10x 11 mm 20x 10 mm 30x 6,5 mm 40x 4,8 mm 94 mm 80 mm
4x 20x 5,5 mm 40x 5 mm 60x 3,3 mm 80x 3,3 mm
Maintenance
WARNING: FOR YOUR OWN SAFETY SWITCH OFF AND DISCONNECT THE MICROSCOPE
FROM ANY ELECTRICAL SOURCE BEFORE ATTEMPTING ANY MAINTENANCE PROCEDURE TO
AVOID THE RISK OF ELECTROCUTION.
CONSULT YOUR DISTRIBUTOR IF ANY REPAIR OR MAINTENANCE PROCEDURE IS REQUIRED
TO YOUR MICROSCOPE THAT DOES NOT APPEAR IN THIS INSTRUCTION MANUAL.
A. Optical maintenance
Do not attempt to disassemble any optical component. For any repair work not specified in this manual,
consult the technical service responsible in your area.
Before cleaning the lens surface, remove dust with a brush specifically for lenses, or with low pressure
compressed air, found in any photography shop.
1. Cleaning the eyepiece
a. Do not remove the eyepiece (1) from the eyepiece tube (3).
b. Only clean the outer surface, misting the lens with breath.
c. Next, dry the lens with special lens paper in circular motions,
from the centre of the lens, outwards.
Do not clean the lens when dry, as they scratch easily.
2. Cleaning the objectives
a. Do not remove the objectives from the stereomicroscope.
Fig. 2

VWR International, LLC., Stereo Zoom Microscope 9
b. Only clean the outer surface, dampening a soft cotton cloth slightly with Xylene, and afterwards,
drying the lens with the same cloth.
B. Electrical maintenance
1. Changing the bulb
●Changing the transmitted illumination bulb
a. Turn the stereomicroscope on its side with extreme care,
especially with the eyepiecesand the stage.
b. Unscrew the four screws indicated. (Fig. 2)
c. Open the cover on the base.
d. Using a cloth, carefully pull out the bulb to disconnect it from the socket.
e. Do not touch the new bulb with bare hands, use a clean cloth. Insert the pins of the bulb in the
socket.
f. If the bulb is accidentally touched with bare hands, it must be cleaned, as this could affect the
transmission of light, and life span of the bulb.
g. Close the cover on the base and screw down firmly.
●Changing incident illumination bulb
a. Unscrew the illuminator protector tube, turning it anti-clockwise, and removing the tube from that of
the lenses.
b. With a cloth carefully pull out the bulb to disconnect it from the socket.
c. Do not touch the new bulb with bare hands, use a clean cloth. Insert the pins of the bulb in the
socket.
d. If the bulb is accidentally touched with bare hands, it must be cleaned, as this could affect the
transmission of light, and life span of the bulb.
e. Replace illuminator lens tube, turning in clockwise, and screwing in the protector tube.
3. Changing the fuse
a. With a flat screwdriver, lightly press on the slot of the fuse holder cover (Fig. 1) and turn 1/4 in the
direction of the arrow marked.
b. Release pressure and completely remove the loosened cover.
c. Remove the fuse from the removed cover, and insert the new one, make sure that it is 0.5 Amps.
d. Insert the cover.
e. Repeat step (a.) but turning 1/4 in the opposite direction to the arrow. The cover must be firmly
closed.

VWR International, LLC., Stereo Zoom Microscope 10
C. Mechanical maintenance
1. Adjusting the tension of the focus
Tension comes pre-adjusted by the factory. The best point of tension is that which permits the focus
knobs to move as loosely as possible, without the head sliding down with its own weight.
The tension adjustment collar for focussing is situated between the focussing knob and the head
holder.
a. Loosen the screw located in the collar hole with the 2mm hexagonal key.
b. To increase the tension, turn the collar anti-clockwise; to decrease it, turn the collar clockwise.
c. Re-tighten the hexagonal key.
Troubleshooting
Electrical Problems
PROBLEM CAUSE SOLUTION
The bulb does not work. Outlet inoperative.
Cable not connected.
Bulb burned out.
Fuse blown.
Wrong Bulb.
Have it repaired by a qualified
specialised technician.
Connect the cable to the power
source.
Replace bulb.
Replace fuse.
Replace with appropriate bulb.
Bulb has short life span. Very high voltage. Reduce light intensity to the
minimum before turning on or off
the stereomicroscope.
Bulb burns out immediately. Wrong bulb. Replace with the appropriate
bulb.
Bulb flickers. The bulb is not inserted correctly
into socket.
Bulb on the point of burning out.
Fuse cover badly closed.
Bad connection with power
source.
Insert bulb correctly.
Replace bulb.
Close correctly.
Have repaired by a qualified
specialised technician.
Fuse blown quickly Wrong fuse. Replace with appropriate fuse.
Fuse blown instantly Short circuit. Have repaired by a qualified
specialised technician.

VWR International, LLC., Stereo Zoom Microscope 11
Image Quality
PROBLEM CAUSE SOLUTION
No image. Objectives turret badly
positioned. Adjust, until it “clicks” into place.
Poor resolution. Eyepieces dirty.
Objectives dirty. Clean eyepieces.
Clean objectives.
Spots, or stains in field of view. Eyepieces dirty. Clean eyepieces.
* NB. Stains in field of view may also be attributed to dirt on the inside of the eyepiece. It is
recommended therefore that the lens be cleaned by a recognised service technician.
Mechanical Problems
PROBLEM CAUSE SOLUTION
It does not stay in focus. The head drops down. Adjust the tension of the coarse
focus knob.
Moving the microscope
●If possible, avoid moving the stereomicroscope.
●Carry the stereomicroscope in both hands. One hand should hold the stereomicroscope arm, and
the other should support it under the base.
●Maintain the stereomicroscope in a vertical position.
This manual suits for next models
5
Table of contents
Popular Microscope manuals by other brands

Olympus
Olympus CHS Instructions for use

3B SCIENTIFIC PHYSICS
3B SCIENTIFIC PHYSICS 1013377 instruction manual

Celestron
Celestron 44341 instruction manual

DOMAILLE ENGINEERING
DOMAILLE ENGINEERING DE3200 Series user guide

Bresser
Bresser 88-52200 operating instructions

BestScope
BestScope BS-6020DRF user manual