Waldbeck 10032087 User manual

10032087
Raketenofen


3
DE
English 15
Français 29
Italiano 43
Español 57
Sehr geehrter Kunde,
wir gratulieren Ihnen zum Erwerb Ihres Gerätes. Lesen Sie die folgenden
Hinweise sorgfältig durch und befolgen Sie diese, um möglichen Schäden
vorzubeugen. Für Schäden, die durch Missachtung der Hinweise und
unsachgemäßen Gebrauch entstehen, übernehmen wir keine Haftung.
HERSTELLER
Chal-Tec GmbH, Wallstraße 16, 10179 Berlin, Deutschland.
SICHERHEITSHINWEISE
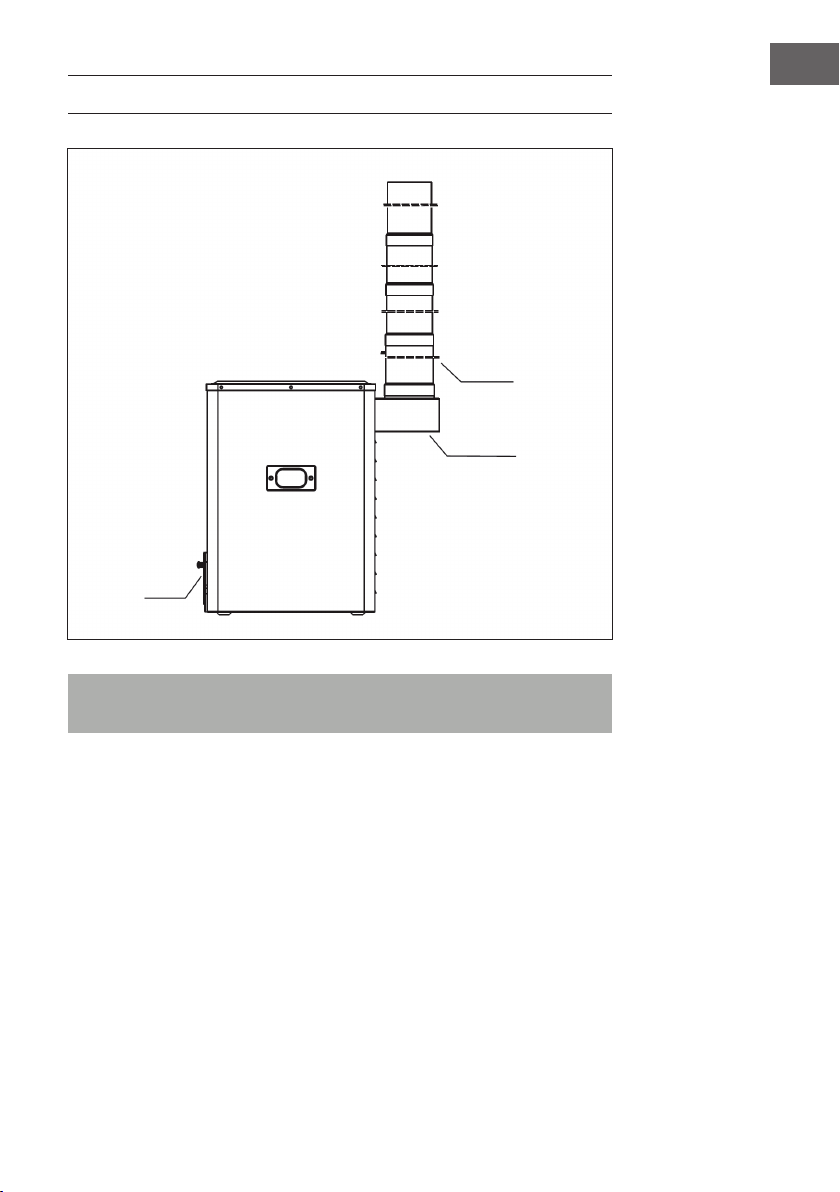
• Achten Sie auf ausreichende Belüftung und achten Sie darauf, dass die
Abluft über den Kamin komplett nach außen geleitet wird.
• Halten Sie entzündliche Materialien und Kinder vom Ofen fern. 1 Meter
um den Ofen herum sollten sich keine Gegenstände oder Brennmaterial
be nden.
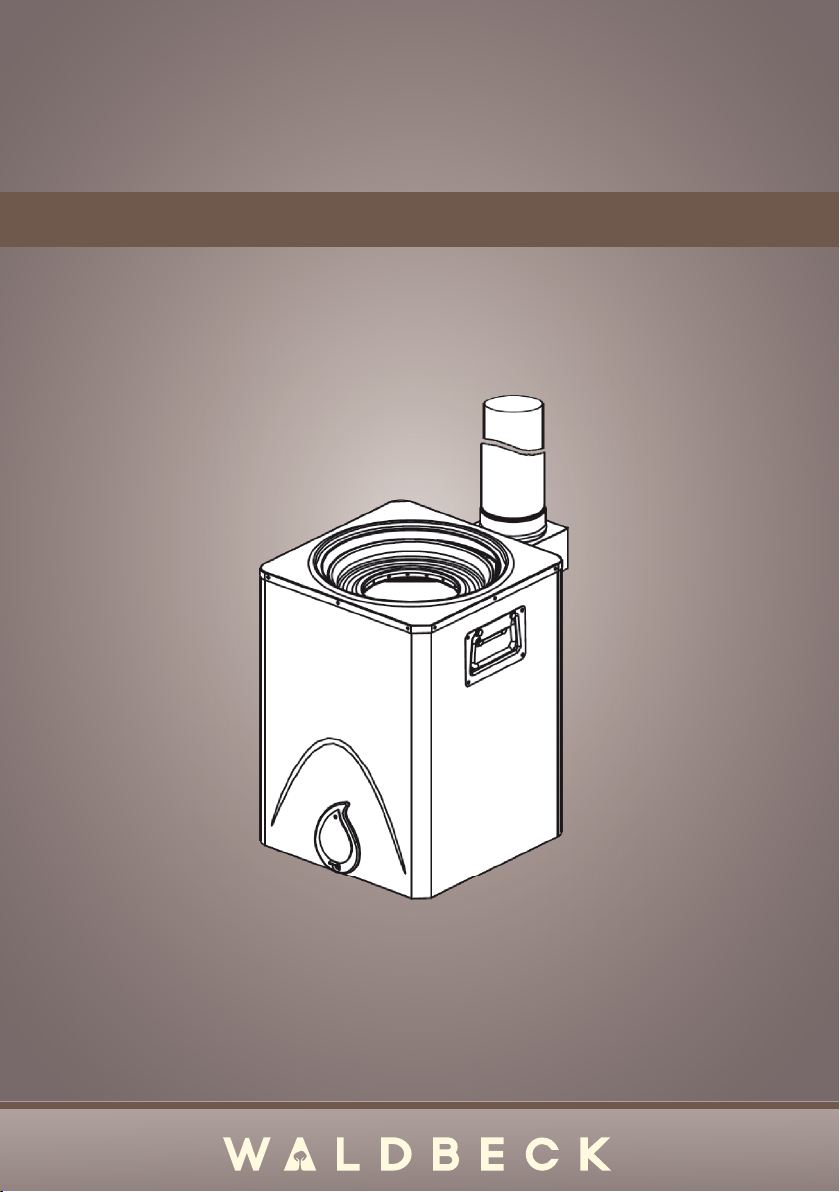
• Der Ofen wird horizontal beladen. Das Brennmaterial muss auf dem Gitter
platziert und von Hand nachgeschoben werden. Lassen Sie den Ofen
während der Benutzung nicht aus den Augen.
• Der Ofen kann mit kleineren Brennstoffen, wie Holzspänen,
zusammengepressten Zweigen, Baumrinde, Borke und kleiner Biomasse
befeuert werden. Benutzen Sie keine Flüssigbrennstoffe!
Hinweis: Löschen Sie den Ofen nach er Benutzung niemals von oben mit
Wasser! Das Feuer kann nicht erstickt oder ausgelöscht werden, bis alle
Brennstoffe aufgebraucht sind.
• Entfernen Sie die Glut und Asche erst nachdem Sie komplett abgekühlt ist.
Warten Sie bis auch der Ofen komplett abgekühlt ist. Drehen Sie ihn dann,
um die Asche zu entleeren.
• Wenn Sie die Feuerintensität regeln, warten Sie 20 Sekunden und
beobachten Sie wie sich entwickelt, bevor Sie weiteren Brennstoff
hinzugeben.
VORSICHT
Verbrennungsgefahr! Der Kochbereich des Ofens wird während
der Benutzung sehr heiß . Fassen Sie ihn nicht an, bevor er
komplett abgekühlt ist.

4
DE
GERÄTEÜBERSICHT
Hinweis: Für den Ofen ist optional ein Grill-Aufsatz (Artikelnummer
10032088) erhältlich.
Tür
Kamin
Kaminverbindung

5
DE
INBETRIEBNAHME UND BEDIENUNG
Hinweis: Der Ofen wird komplett zusammengebaut geliefert. Versichern
Sie sich vor der Benutzung, dass kein Teil fehlt oder Teile beschädigt sind.
Vor der ersten Benutzung
1 Stellen Sie den Ofen auf einen festen, ebenen Untergrund.
2 Befestigen Sie den Kamin am Ofen, und versichern Sie sich, dass er fest
sitzt und alle Abgase nach ins Freie ableitet.
3 Versichern Sie sich, dass der Kamin gerade nach oben führt. Überprüfen
Sie alle Kaminverbindungen und versichern Sie sich, dass der Kamin dicht
ist.
Bedienung
1 Beladen Sie den Ofen von oben mit kleineren Brennstoffen, wie
Holzspänen, zusammengepressten Zweigen, Baumrinde, Borke und
kleiner Biomasse.
2 Stellen Sie die Ventilationsöffnung auf die 3-Uhr-Position (a), bevor Sie das
Brennmaterial entzünden.
3 Die Verbrennung ist nach ca. 5 bis 8 Minuten ideal. Stellen Sie die
Ventilationsöffnung dann auf die 6-Uhr-Position (b). Die Öffnung ist jetzt
geschlossenen.
4 Falls nach einer gewissen Zeit keine Flamme mehr zu sehen ist oder die
Leistung nachlässt, stellen Sie die Ventilationsöffnung auf die 4-Uhr-
Position (c). Die Öffnung ist teilweise geöffnet.
5 Sollte der Brennstoff im Ofen ausgehen, stellen Sie die
Ventilationsöffnung wieder auf die 3-Uhr-Position und fügen Sie kleine
Menge an Brennstoff hinzu.

6
DE
FEHLERSUCHE UND FEHLERBEHEBUNG
Problem Mögliche Ursache Lösungsansatz
Der Brennstoff lässt
sich nicht entzünden.
Unzureichende Menge an
Brennstoff.
Geben Sie mehr Brennstoff
hinzu.
Feuchter oder nasser
Brennstoff.
Verwenden Sie nur trockene
Brennstoffe.
Die Brennkammer ist
überladen.
Lassen Sie zum Rand der
Brennkammer 3 cm Platz.
Das Entzünden
dauert zu lange.
Feuchter oder nasser
Brennstoff.
Verwenden Sie nur trockene
Brennstoffe.
Rauch von Blättern und
Gräsern.
Verwenden Sie trockene
Holzspäne oder Zweige
Starke
Rauchentwicklung.
Feuer zu groß. Verwenden Sie weniger
Brennstoff.
Rauchentwicklung
bei geringer
Brennstoffmenge.
Das Mischen von
verschiedenen Brennstoffen
kann zu unregelmäßigem
Feuer führen.
Verwenden Sie nur trockene
Brennstoffe, keine Blätter
oder Gräser.
Rauch nach dem
Hinzufügen von
Brennstoff.
Rauch von Blättern und
Gräsern.
Verwenden Sie trockene
Holzspäne oder Zweige
Die Brennkammer ist
überladen.
Lassen Sie zum Rand der
Brennkammer 3 cm Platz.
Der Rauch
verschwindet nicht.
Manche Brennstoffe haben
einen niedrigen Schmelzpunkt
und einen hohen Aschegehalt
(Blätter, Stroh, Gräser,
Tannennadeln, etc.)
Verwenden Sie trockene
Holzspäne oder Zweige

7
DE
HINWEISE ZUR ENTSORGUNG
Bendet sich die linke Abbildung (durchgestrichene
Mülltonne auf Rädern) auf dem Produkt, gilt die
Europäische Richtlinie 2012/19/EU. Diese Produkte
dürfen nicht mit dem normalen Hausmüll entsorgt
werden. Informieren Sie sich über die örtlichen
Regelungen zur getrennten Sammlung elektrischer und
elektronischer Gerätschaften. Richten Sie sich nach
den örtlichen Regelungen und entsorgen Sie Altgeräte
nicht über den Hausmüll. Durch die regelkonforme
Entsorgung der Altgeräte werden Umwelt und
die Gesundheit ihrer Mitmenschen vor möglichen
negativen Konsequenzen geschützt. Materialrecycling
hilft, den Verbrauch von Rohstoffen zu verringern.

8
EN
Dear Customer,
Congratulations on purchasing this equipment. Please read this manual
carefully and take care of the following hints to avoid damages. Any failure
caused by ignoring the mentioned items and cautions mentioned in the
instruction manual are not covered by our warranty and any liability.
PRODUCER
Chal-Tec GmbH, Wallstraße 16, 10179 Berlin, Grmany.
SAFETY INSTRUCTIONS
• Insure adequate ventilation. This stove is designed for outdoor use.
• Prevent burns and injury. Keep all ammable material and children a
minimum of 3 feet / 1 meter from operating stove.
• The SilverFire Survivor is a horizontal fuel fed stove. All wood or biomass
must be placed on side and pushed into stove combustion chamber. The
design is intended to burn the tips of wood or biomass, as slid into stove.
This stove is intended to be monitored at all time during operation.
• Fuel can be top lit with small tinder such as wood shavings, match sized
twigs, and other small ammable biomass thinly layered in combustion
chamber.
Note: After cooking, the fuel ember combustion is not complete until all
fuel in the combustion chamber is completely exhausted. Special Note:
The re cannot be smothered or extinguished until all fuel is exhausted.
Entfernen Sie die Glut und Asche erst nachdem Sie komplett abgekühlt ist.
Warten Sie bis auch der Ofen komplett abgekühlt ist. Drehen Sie ihn dann,
um die Asche zu entleeren.
• Removing spent embers & ash: After all fuel is exhausted and stove is cool
to touch, simply turn stove upside down to clear ash.
• When adjusting repower,it is suggested to make small gradual
adjustments and wait 20 seconds after adjustment to ne tune ame.
CAUTION
Risk of burns! Use caution and do not touch cooking area of
stove during and after use until entirely cool to prevent burns
or scalding.

9
EN
PRODUCT DESCRIPTION
Note: A grill attachment (item number 10032088) is optionally available for
the oven.
Door
Exhaust pipe
Joint of exhaust pipe

10
EN
USE AND OPERATION
Note: The SilverFire Hunter stove is shipped fully assembled, the addition
of the chimney is required prior to use. Please conrm there are no missing
or damaged parts upon opening packaging.
Before rst Use
1 Place stove on a level, secure surface to insure safe operation.
2 Attach chimney to stove emissions outlet , insure appropriate t to
exhaust emissions through chimney outside. See diagram below.
3 Insure the chimney assembly is stable and orientated in the vertical
position. Inspect chimney connections are tight and free from exhaust
leaks. The chimney must be vented outdoors.
Operation
1 Top load combustible biomass fuel in combustion chamber, in vertical
position with small tinder on top.
2 Adjust natural draft ventilation door to the 3 o’clock position (a), before
lighting. Ignite small tinder on top of combustion chamber.
3 Fuel combustion is ideal at approximately 5 to 8 minutes after ignition.
Adjust ventilation door to the 6 o’ clock position (b). It is now in the closed
position.
4 In the event there is no ame or loss of repower after the initial
combustion period, adjust ventilation door to the 4 o’clock position (c). The
ventilation door is partially opened.
5 In the event there is inadequate fuel while cooking, adjust the ventilation
door back to the 3 o’clock position to add more fuel (fully open position).
Add small amount of additional fuel.

11
EN
TROUBLESHOOTING
Problem Possible Cause Suggested Solution
Difculty igniting
fuel.
Inadequate amount of fuel. Add fuel.
Wet or damp fuel. Use dry Fuel.
Combustion chamber
overloaded.
Insure minimum clearance of
fuel (3 cm from fuel to top of
combustion chamber).
Excess smoke during
ignition.
Wet fuel.. Use dry fuel.
Smoke from leaves and green
yard debris.
Use dry wood shavings or
twigs.
Smoke during high
power operation,
after ignition phase.
Fire too large. Use less fuel.
Smoke during low
power operation,
after ignition phase.
Mixed fuels can cause erratic
ame.
Insure fuel dry, not green.
Smoke observed
when adding fuel.
Fuel Green. Use dry fuel.
Fuel overloaded. Add less fuel.
Continued smoke
after combustion.
Fuel has low melting point
an high ash content (leaves,
straw, etc.) or green.
Normal outcome, add dry
wood or twigs.

12
EN
HINTS ON DISPOSAL
According to the European waste regulation 2012/19/
EU this symbol on the product or on its packaging
indicates that this product may not be treated as
household waste. Instead it should be taken to the
appropriate collection point for the recycling of
electrical and electronic equipment. By ensuring this
product is disposed of correctly, you will help prevent
potential negative consequences for the environment
and human health, which could otherwise be caused by
inappropriate waste handling of this product. For more
detailled information about recycling of this product,
please contact your local council or your household
waste disposal service.

13
ES
Estimado cliente:
Le felicitamos por la adquisición de este producto. Lea atentamente el
siguiente manual y siga cuidadosamente las instrucciones de uso con el
n de evitar posibles daños. La empresa no se responsabiliza de los daños
ocasionados por un uso indebido del producto o por haber desatendido las
indicaciones de seguridad.
FABRICANTE
Chal-Tec GmbH, Wallstraße 16, 10179 Berlín, Alemania.
INDICACIONES DE SEGURIDAD
• Compruebe que hay su ciente ventilación y utilice el horno solo al aire
libre.
• Mantenga a los niños y los materiales in amables lejos del horno. No debe
haber ningún objeto o combustible a un 1 m alrededor del horno.
• El horno se llena horizontalmente. El combustible se debe colocar en la
parrilla y empujarse manualmente. El horno debe vigilarse durante su uso.
• El horno puede calentarse con combustibles más pequeños como astillas
de madera, ramas comprimidas, corteza y biomasa pequeña. No utilice
combustibles líquidos.
Aviso: No apague nunca el horno tras su uso desde arriba con agua. El fuego
no se puede extinguir hasta que todos los combustibles estén agotados.
• No retire las brasas y las cenizas hasta que se haya enfriado
completamente. Espere hasta que el horno se haya enfriado
completamente. Gírelo para vaciar las cenizas.
CUIDADO
Riesgo de quemaduras. La zona de cocción del horno se calienta
mucho durante el uso. No la toque hasta que se haya enfriado
completamente.

14
ES
CARACTERÍSTICAS
Aviso: Hay disponible una parrilla accesoria opcional para el horno (número
de artículo: 10032088).
Puerta
Chimenea
Unión de la chimenea

15
ES
PUESTA EN MARCHA Y FUNCIONAMIENTO
Aviso: El horno se envía completamente montado. Asegúrese antes de la
utilización de que ninguna pieza falte o esté dañada.
Antes del primer uso
1 Coloque el horno en una supercie plana y estable.
2 Fije la chimenea al horno, y asegúrese de que está bien colocada y todo el
humo sale al exterior.
3 Asegúrese de que la chimenea esté orientada recta hacia fuera.
Compruebe todas las conexiones de la chimenea y asegúrese de que es
hermética.
Uso
1 Llene el horno desde arriba con combustibles pequeños, como astillas de
madera, ramas comprimidas, corteza y biomasa pequeña.
2 Coloque la abertura de ventilación en la posición de las 3 (a) antes de
prender el material.
3 La quema es ideal después de aprox. 5 a 8 minutos. Coloque entonces la
abertura de ventilación en posición de las 6 (b). La abertura ahora está
cerrada.
4 En caso de que después de un determinado tiempo no vea llamas o la
potencia disminuya, coloque la abertura de ventilación en posición de las 4
(c). La abertura está abierta parcialmente.
5 En caso de que el combustible se salga al horno, coloque la abertura de
nuevo en posición de las 3 y añada una pequeña cantidad de combustible.

16
ES
BÚSQUEDA Y RESOLUCIÓN DE ERRORES
Problema Posible causa Solución
El combustible no se
prende.
No hay suciente cantidad de
combustible.
Añada más combustible.
Combustible húmedo o
mojado.
Use solo combustible seco.
La cámara de combustión está
sobrecargada.
Deje 3 cm de espacio desde
el borde de la cámara de
combustión.
Tarda demasiado en
encenderse.
Combustible húmedo o
mojado.
Use solo combustible seco.
Humo de hierba y hojas. Utilice virutas de madera o
ramas secas.
Se origina demasiado
humo.
El fuego es demasiado grande. Utilice menos combustible.
Aparece humo al
usar poca cantidad
de combustible.
La mezcla de distintos
combustibles puede ocasionar
fuegos irregulares.
Use solo combustible seco, no
hojas ni hierba.
Aparece humo tras
añadir combustible.
Humo de hierba y hojas. Utilice virutas de madera o
ramas secas.
La cámara de combustión está
sobrecargada.
Deje 3 cm de espacio desde
el borde de la cámara de
combustión.
El humo no
desaparece.
Algunos combustibles tienen
un bajo punto de fusión y un
alto contenido de cenizas
(hojas, paja, hierba, agujas de
pino, etc.).
Utilice virutas de madera o
ramas secas.

17
ES
RETIRADA DEL APARATO
Si el aparato lleva adherida la ilustración de la izquierda
(el contenedor de basura tachado) entonces rige
la normativa europea, directiva 2012/19/UE. Este
producto no debe arrojarse a un contenedor de basura
común. Infórmese sobre las leyes territoriales que
regulan la recogida separada de aparatos eléctricos y
electrónicos. Respete las leyes territoriales y no arroje
aparatos viejos al cubo de la basura doméstica. Una
retirada de aparatos conforme a las leyes contribuye
a proteger el medio ambiente y a las personas a su
alrededor frente a posibles consecuencias perjudiciales
para la salud. El reciclaje ayuda a reducir el consumo
de materias primas.

18
FR
Cher client,
Toutes nos félicitations pour l’acquisition de ce nouvel appareil. Veuillez lire
attentivement les instructions suivantes de branchement et d’utilisation
a n d’éviter d’éventuels dommages. Le fabricant ne saurait être tenu pour
responsable des dommages dus au non-respect des consignes de sécurité et à
la mauvaise utilisation de l’appareil.
FABRICANT
Chal-Tec GmbH, Wallstraße 16, 10179 Berlin, Allemagne.
CONSIGNES DE SÉCURITÉ
• Veillez à ce que le four soit suf samment ventilé et utilisez-le uniquement
à l‘extérieur.
• Tenez les enfants et les matériaux in ammables à distance du four. Aucun
objet ou matériau in ammable ne doit se trouver à moins d‘ 1 mètre tout
autour du four.
• Le four est alimenté horizontalement. Les combustibles doivent être
placés sur la grille et poussés à la main. Ne quittez pas le four des yeux
pendant le fonctionnement.
• Vous pouvez alimenter le four avec des matériaux combustibles de petite
taille comme des copeaux de bois, des branches compressées, des écorces
d‘arbre et de la petite biomasse. N‘utilisez pas de liquide in ammable !
Remarque : n‘éteignez jamais le four par en haut avec de l‘eau ! Le feu ne
peut pas être éteint ni étouffé avant que tous les combustibles n‘aient été
consommés.
• Retirez les braises et les cendres uniquement lorsqu‘elles sont
complètement refroidies. Attendez également que le four soit
entièrement refroidi. Tournez-le ensuite pour retirer les cendres.
ATTENTION
Risque de brûlure ! la zone de cuisson du four est très chaude
pendant le fonctionnement. Ne touchez pas le four avant qu‘il ne
soit entièrement refroidi.

19
FR
APERÇU DE L‘APPAREIL
Remarque : un accessoire pour grillades idéal pour le four est disponible
(numéro d‘article 10032088).
Porte
Cheminée
Branchement de la
cheminée

20
FR
MISE EN SERVICE ET UTILISATION
Remarque : le four est livré entièrement monté. Avant de l‘utiliser, assurez-
vous qu‘aucune pièce ne manque ou est endommagée.
Avant la première utilisation
1 Installez le four sur un support solide et horizontal.
2 Fixez la cheminée sur le four et assurez-vous qu‘elle est bien xée et dirige
bien tous les gaz produits vers l‘extérieur.
3 Assurez-vous que la cheminée est dirigée droit vers le haut. Contrôlez
tous les branchements de la cheminée et assurez-vous que la cheminée est
étanche.
Utilisation
1 Alimentez le four par le haut avec du petit combustible tel que des
copeaux de bois, des branches compressées, des écorces et de la petite
biomasse.
2 Placez les ouvertures de ventilation sur la position 3 heures (a) avant
d‘allumer le combustible.
3 La combustion se fait bien au bout d‘environ 5 à 8 minutes. Réglez ensuite
les ouvertures de ventilation en position 6 heures (b). L‘ouverture est
maintenant fermée.
4 Si au bout d‘un certain temps vous n‘apercevez plus de amme ou si la
puissance diminue, mettez les ouvertures de ventilation en position 4
heures (c). l‘ouverture est partiellement ouverte.
5 Si le combustible s‘éteint dans le four, remettez l‘ouverture d‘aération en
position 3 heures et ajoutez une petite quantité de combustible.
Table of contents
Languages:
Popular Stove manuals by other brands

Dal Zotto
Dal Zotto OMBRETTA Instructions for installation, use and maintenance

ADURO
ADURO H5 manual

Heta
Heta Classic Series operating instructions

Regency Fireplace Products
Regency Fireplace Products FireGenie FG37-NG manual

Desa
Desa SBVBN(C) OWNER'S OPERATION AND INSTALLATION MANUAL

HASE
HASE Sendai 175 operating instructions