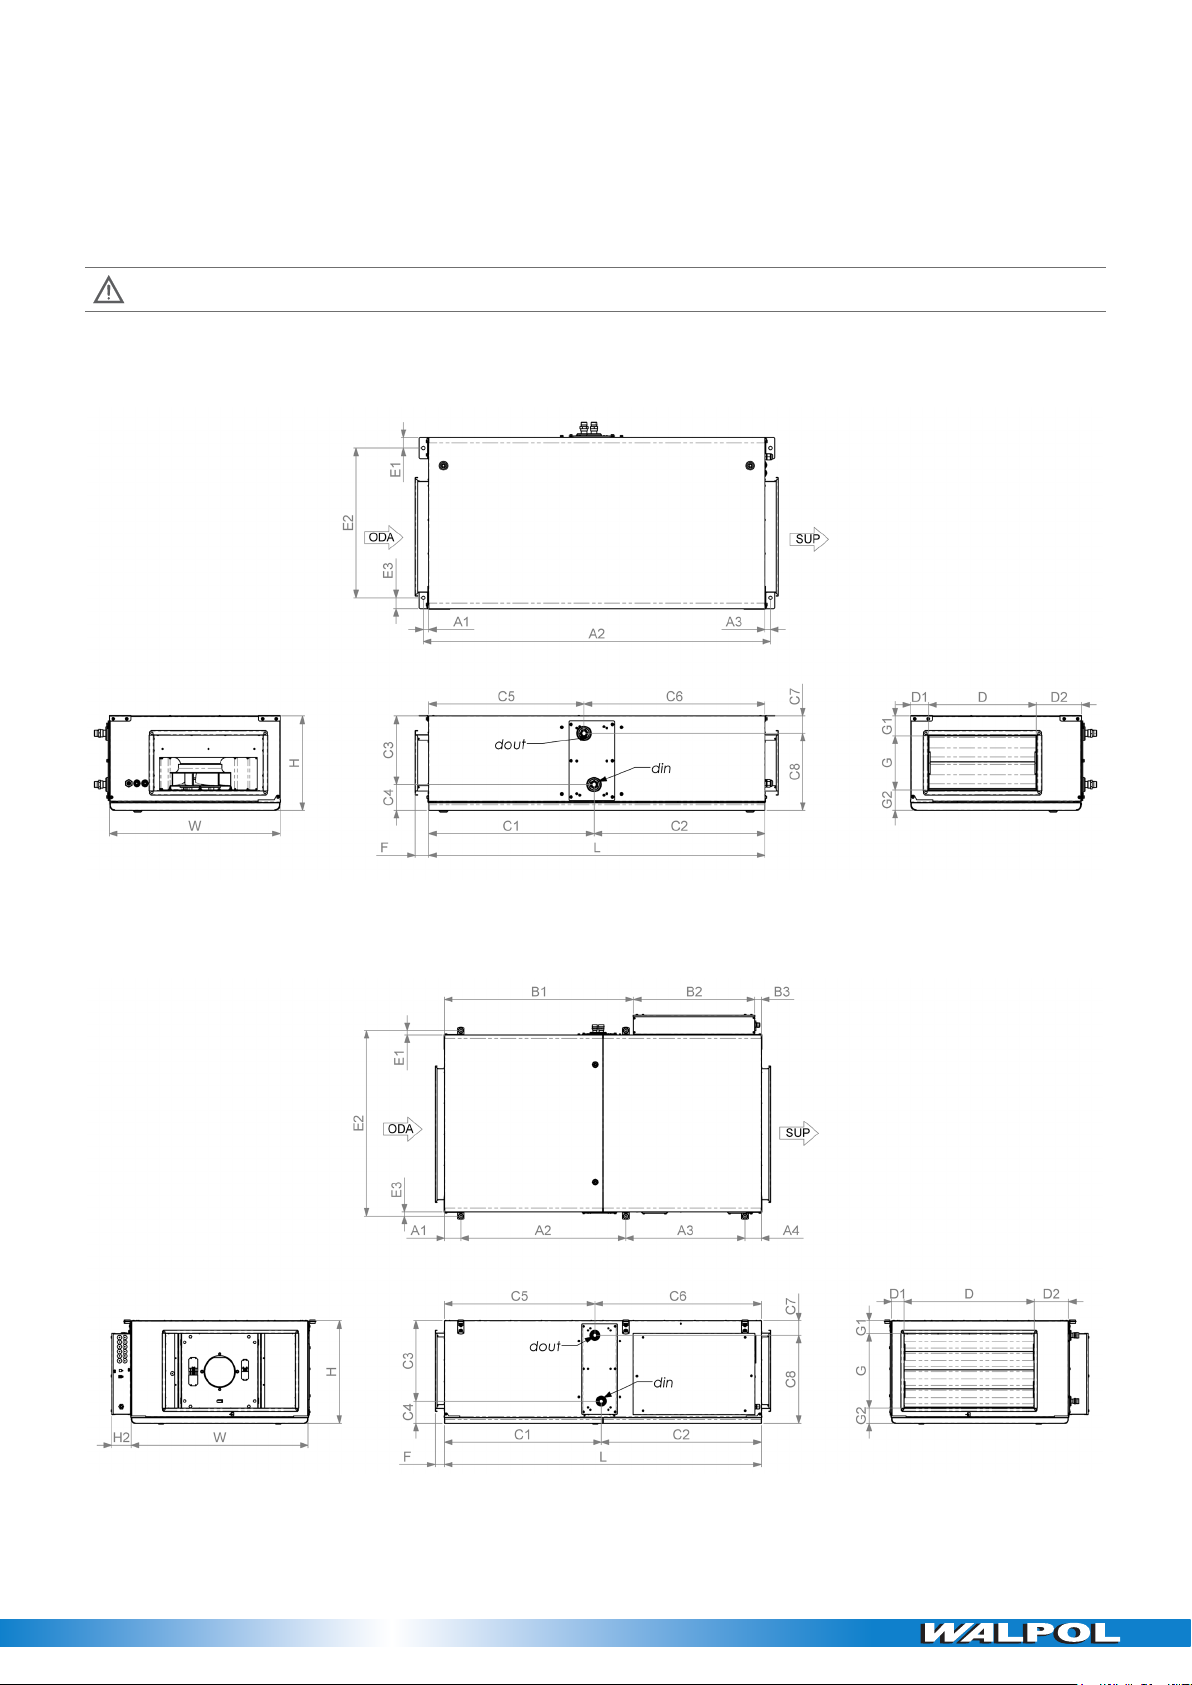
WALPOL WPZ-15E User manual

Installation and operating instructions
Version 6.0 E
B19
Air handling units
type WPZ

2
1. CONTENT
2. SYMBOLS AND MARKING 3
3. SAFETY INSTRUCTIONS AND PRECAUTIONS 4
4. INFORMATION ABOUT THE PRODUCT 5
4.1. DESCRIPTION 5
4.2. DIMENSIONS AND WEIGHT 5
4.3. TECHNICAL DATA 6
4.4. OPERATING CONDITIONS 7
4.5. STANDARD PACKAGE OF COMPONENTS 7
4.6. DESCRIPTION OF COMPONENTS 7
5. INSTALLATION 8
5.1. RECEPTION OF GOODS 8
5.2. TRANSPORTATION AND STORAGE 8
5.3. UNPACKING 8
5.4. PIPING AND INSTRUMENTATION DIAGRAM 9
5.5. MOUNTING 10
5.5.1. UNIT PLACING AND MOUNTING POSITIONING REQUIREMENTS 11
5.5.2. CEILINGMOUNTING OF THE UNIT 11
5.5.3. ROOF MOUNTING (ACCESSORY) 11
5.6. CONNECTION OF THE AIR DUCT 12
5.7. CONNECTION OF THE UNIT TO ELECTRIC NETWORK 12
5.8. STARTUP RECOMMENDATIONS 13
5.8.1. SYSTEM PROTECTION 13
5.8.2. PRESTARTUP RECOMMENDATIONS OF THE UNIT (IN THE PRESENCE OF THE ENDUSER) 13
6. MAINTENANCE 13
6.1. SAFETY INSTRUCTION 13
6.2. GENERAL RECOMMENDATIONS FOR VENTILATION SYSTEM MAINTENANCE 13
6.3. COVER OPENING 14
6.4. FILTERS MAINTENANCE 14
6.5. FANS MAINTENANCE 14
6.6. HEATER MAINTENANCE 15
6.7. CONTROL BOARD MAINTENANCE 16
6.8. AIR DAMPER MAINTENANCE 16
7. CONTROL 16
7.1. DEVICE CONTROL 16
7.2. DEVICE FUNCTIONS 16
8. CONNECTION OF ACCESSORIES 17
8.1. FIRE PROTECTION SIGNAL INPUT (FIRE PROTECTION INPUT (NC)) 17
8.2. CONNECTION OF AIR DAMPERS 17
8.3. CONNECTION OF REMOTE CONTROL PANEL 17
8.4. WATER HEATER CIRCULATION PUMP AND VALVE ACTUATOR 18
8.5. EXTRACT AIR FAN 18
8.6. EXTRACT AIR FILTER PRESSURE SWITCH 18
8.7. RECOMMENDED SCHEME FOR CONNECTION OF INTERNAL AND EXTERNAL COMPONENTS 19
9. POSSIBLE FAULTS AND TROUBLESHOOTING 25
10.ECODESIGN DATA TABLE 25
11.COMMISSIONING PROTOCOL 26
12.MAINTENANCE BOOK 28

3
2. SYMBOLS AND MARKING
Warning – pay attention Additional information
Apply the auxiliary label on the unit (on an easily accessible location) or on the dashed location of the technical manual in order to keep the im-
portant information about the unit.
Figure 2.1. Technical label
Skaidrus
Šilkografinis. PANTONE 294 C
Sukarpymas pagal kontūrus
MastelisM 1:1
Skaidrus
Šilkografinis. PANTONE 485 C
Sukarpymas pagal kontūrus
MastelisM 1:1
Figure 2.2. Indication for duct connection
(ODA - outdoor air; SUP - supply air).
Figure 2.3. Indication for water flow connection
Figure 2.4. Technical label place and air duct indication WPZ - E Figure 2.5. Technical label place and air duct indication WPZ - W
NOTE. Ducts are not the part of the unit.

4
3. SAFETY INSTRUCTIONS AND PRECAUTIONS
Read these instructions very carefully before installing and using this equipment. Installation, connection and maintenance should be carried out
by a qualified technician and in accordance with the local regulations and legislation.
The company shall take no responsibility for the injuries or damaged property if the safety requirements are not followed or the device is modified
without the permission of the manufacturer.
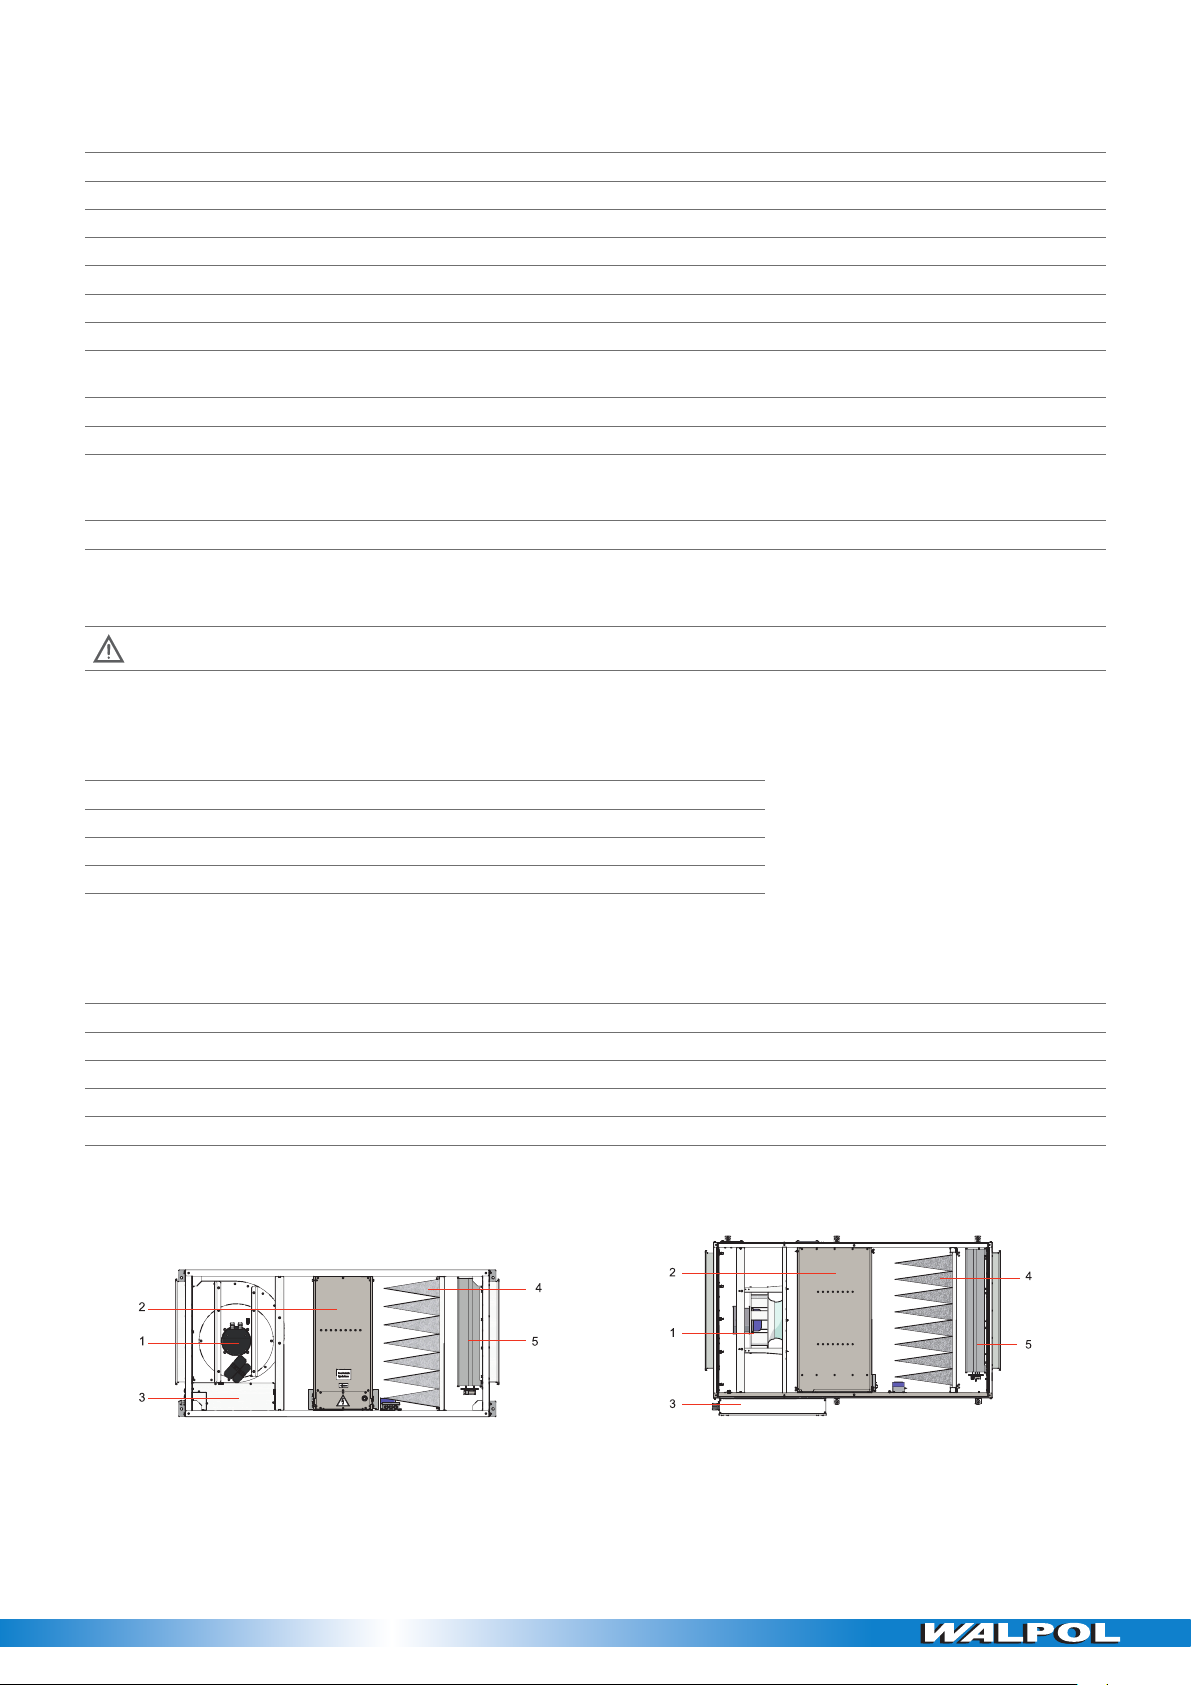
Main safety rules
Danger
• Before carrying out any electrical or maintenance works, make sure that the device is disconnected from the mains and all moving
parts of the device have stopped.
• Make sure that the fans are not accessible through air ducts or branch openings.
• If any liquids on electric parts or connections that bear voltage are noticed, stop the operation of the device.
• Do not plug the device into the mains that differ from the one indicated on the label or on the housing.
• Voltage of the mains should comply with the electro technical parameters indicated on the label.
• The device should be earthed in accordance with the regulations on the installation of electric devices. Turning on and using unearthed
device is not allowed. Follow the requirements specified on the device’s labels that indicate danger.
Warnings
• Connection of electricity and maintenance of the device should be performed by the qualified personnel only and in accordance with the
manufacturer’s instructions and safety requirements.
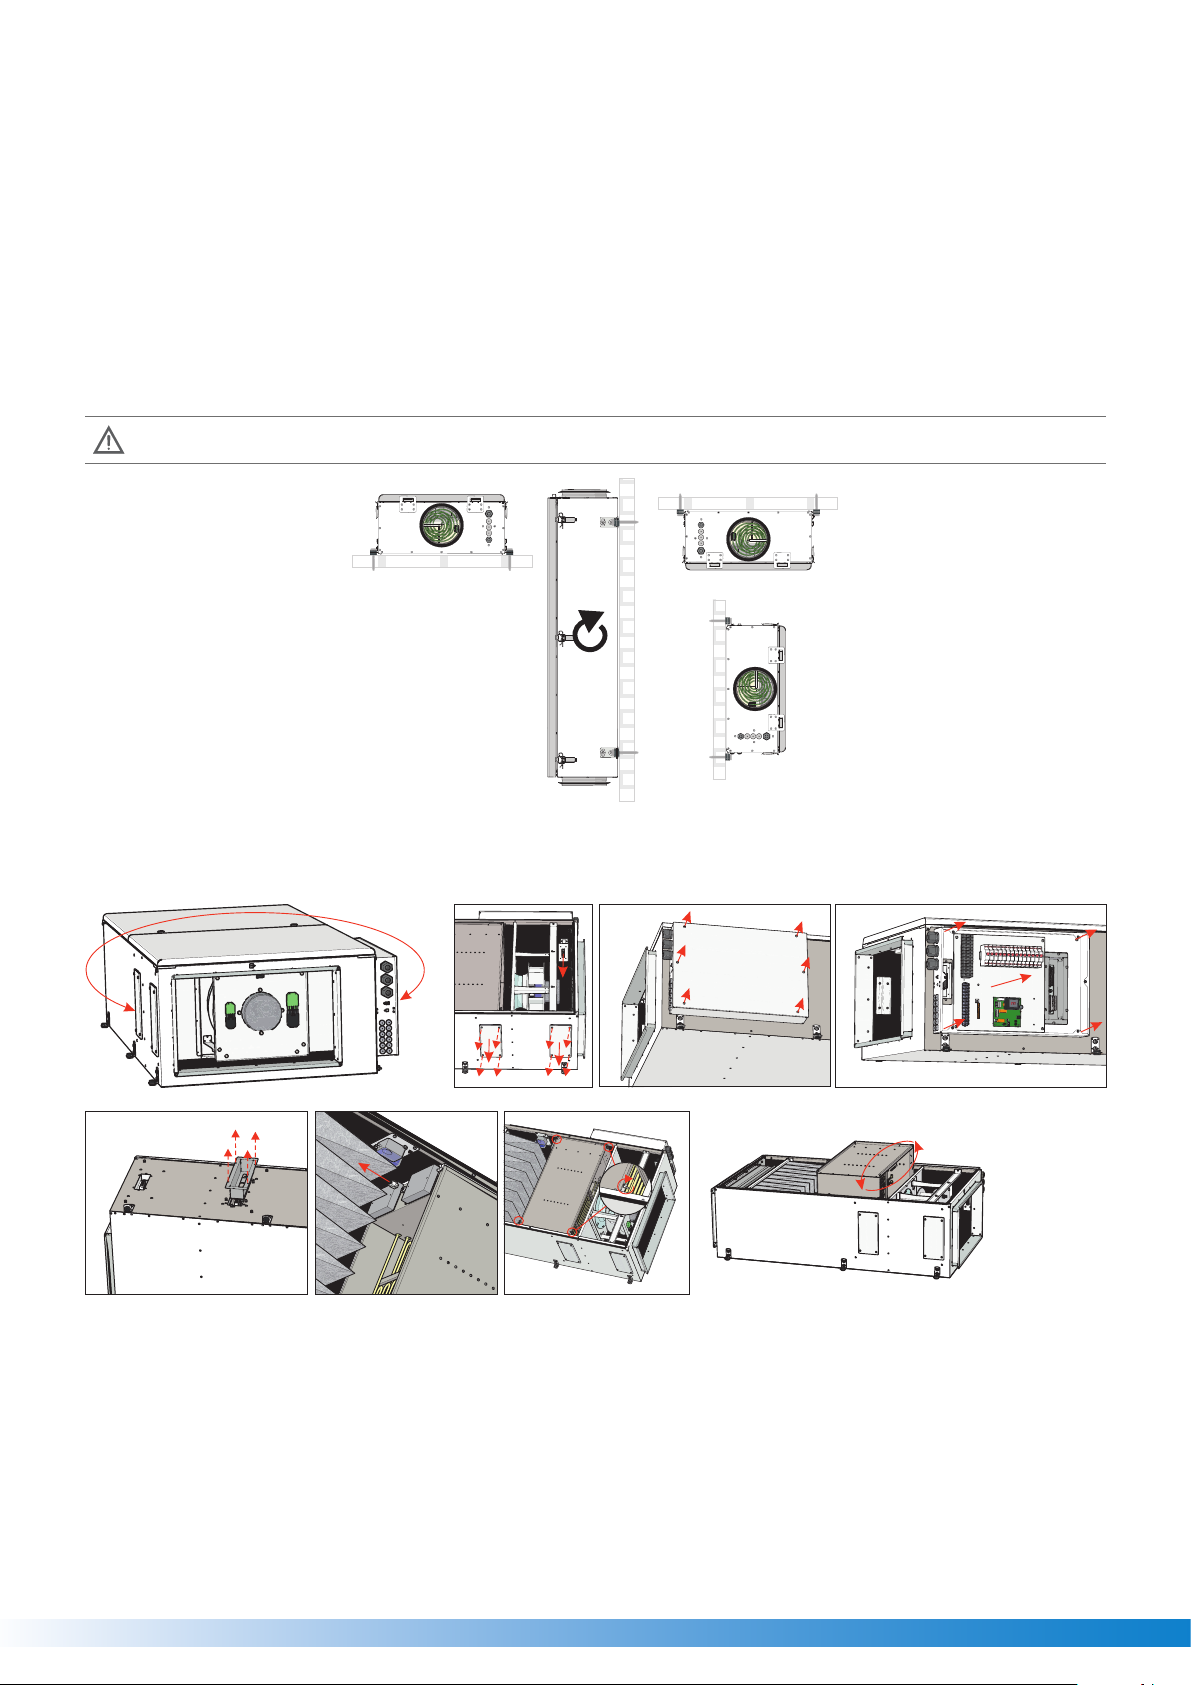
• In order to reduce the risk during installation and maintenance, suitable protective clothing must be worn.
• Beware of sharp angles while carrying out installation and maintenance works.
• Do not touch heating elements until they haven’t cooled down.
• Some devices are heavy, you should be very careful while transporting and installing them. Use suitable lifting equipment.
• When connecting electricity to the mains, a circuit breaker of suitable size must be used.
Warning!
• If the device is installed in a cold environment, make sure that all connections and tubes are properly isolated. Intake and discharge air
ducts should be isolated in all cases.
• Openings of the ducts should be covered during transportation and installation.
• Make sure not to damage the heater when connecting the piping of the water heater. For tightening up, use a wrench/spanner.
Before starting up the device
• make sure, that there are no strange objects inside;
• manually check fans to make sure they are not stuck or blocked;
• if rotary heat exchanger is installed in the device, make sure that it is not stuck or blocked;
• check the earthling;
• make sure that all components and accessories are connected in accordance with the wiring diagram or provided instructions.
Danger: Fumes
Antifrost system uses dis-balancing of the air flow and it may cause negative pressure in premises. Great care should be taken when
using at the same time in premises as another heating appliance what depend on the air in premises. Such appliances include gas, oil,
wood or coal-fired boilers and heaters, fireplaces, continuous flow or other water heaters, gas hobs, cookers or ovens which draw air
in from the room and duct exhaust gases out through a chimney or extraction ducting. The heating appliance can be starved of oxygen,
impairing combustion. In exceptional cases harmful gases could be drawn out of the chimney or extraction ducting back into the room. In
this case we strictly recommend to turn off Antifrost and use an external preheater for heat exchanger anti-frost protection (see Antifrost
function on the Remote controller manual).

5
4. INFORMATION ABOUT THE PRODUCT
4.1. DESCRIPTION
Air supply units WPZ designed for the air supply to commercial, warehousing, industrial kitchen, etc. premises where heat recovery is not required.
The ventilation unit has a low height for the installation under the ceilings, alternatively, WPZ can be installed on the wall or under the roof.
WPZ has EC-type motor, heater (depends on model), filter, motorized air damper and control board.
WPZ can be controlled by external remote panel (accessory).
Not suitable for operation in pools, saunas and other similar premises.
4.2. DIMENSIONS AND WEIGHT
Figure 4.2.1. WPZ - 09 / 14 / 15 / 21 / 26 (1000-2000)
Figure 4.2.2. WPZ - 30 / 39 / 40 / 54 (3000-4000)

6
WPZ 9ED 14WD WPZ-15ED /
21ED 26WD 30ED
/39ED 40WD 54WD
L[mm] 1250 1550 1701
W[mm] 635 750 950
H[mm] 350 460 550
ØD/D [mm] 400 500 700
G[mm] 200 250 400
F[mm] 50
H2 [mm] - 105
A1 [mm] 20 88
A2 [mm] 1291 1591 886
A3 [mm] 20 640
A4 [mm] - 88
B1 [mm] - 1015
B2 [mm] - 651
B3 [mm] - 35
C1 [mm] - 615 - 727 - 842 842
C2 [mm] - 635 - 823 - 859 859
C3 [mm] - 254 - 369 - 432 432
C4 [mm] - 96 - 91 - 118 118
C5 [mm] - 577 - 693 - 807 807
C6 [mm] - 673 - 857 - 894 894
C7 [mm] - 64 - 72 - 78 78
C8 [mm] - 286 - 388 - 472 472
D1 [mm] 67
D2 [mm] 168 182 183
din - G1/2 - G1/2 - G3/4 G3/4
dout - G1/2 - G1/2 - G3/4 G3/4
E1 [mm] 40 23
E2 [mm] 555 670 996
E3 [mm] 40 23
G1 [mm] 74 124 69
G2 [mm] 76 86 81
WPZ 9ED 14WD 15ED 21ED 26WD 30ED 39ED 40WD 54WD
WEIGHT [kg] 57 57 87 89 86 141 143 132 130
4.3. TECHNICAL DATA
WPZ 9ED 14WD 15ED 21ED 26WD
FAN
phase/voltage [50 Hz/VAC] ~1/230 ~1/230 ~1/230 ~1/230 ~1/230
power/current [kW/A] 0,17/1,4 0,17/1,4 0,37/1,65 0,37/1,65 0,37/1,65
speed [min-1] 2860 2860 2010 2010 2010
control input [VDC] 0-10 0-10 0-10 0-10 0-10
protection class IP54 IP54 IP54 IP54 IP54
Integrated electrical heater [kW] 9,0 - 15,0 21,0 -
Total power/current consump-
tion [kW/A] 0,09/14,41 0,17/1,4 15,37/23,30 21,37/31,96 0,37/1,65
Automatic control integrated ✓✓✓✓✓
Insulation of walls [mm] 30 30 30 30 30
Air filter (class, dimensions
LxWxH) [mm]
FMK
566x283x270/7
ePM10 65%
FMK
566x283x270/7
ePM10 65%
FMK
682x394x307/7
ePM10 65%
FMK
682x394x307/7
ePM10 65%
FMK
682x394x307/7
ePM10 65%
Device protection class IP34 IP34 IP34 IP34 IP34

7
WPZ 30ED 39ED 40WD 54WD
FAN
phase/voltage [50 Hz/VAC] ~1/230 ~1/230 ~1/230 ~1/230
power/current [kW/A] 0,87/4,5 0,87/4,5 0,87/4,5 1,3/6,4
speed [min-1] 2200 2200 2200 2390
Streuerungsspannung [VDC] 0-10 0-10 0-10 0-10
protection class IP54 IP54 IP54 IP54
Integrated electrical heater [kW] 30,0 39,0 - -
Total power/current consump-
tion [kW/A] 30,87/47,50 39,87/60,50 0,87/4,5 1,30/6,40
Automatic control integrated ✓✓✓✓
Insulation of walls [mm] 30 30 30 30
Air filter (class, dimensions
LxWxH) [mm]
FMK
822x485x340/8
ePM10 65%
FMK
822x485x340/8
ePM10 65%
FMK
822x485x340/8
ePM10 65%
FMK
822x485x340/8
ePM10 65%
Device protection class IP34 IP34 IP34 IP34
Not suitable for installation in living rooms: additional noise insulation required.
4.4. OPERATING CONDITIONS
WPZ all WPZ
Outdoor air temp. without frost protection -
Ambient air temp. -25 .. 40 oC
Max. ambient air humidity -
Operation environment Indoors
4.5. STANDARD PACKAGE OF COMPONENTS
WPZ 09 / 14 / 15 / 21 / 26 30 / 39 / 40 / 54
Washers 5 DIN 440R - 12
ANTI VIBRATION PAD 313508000 - 6
KEY 291103 1 1
SUSPENSION BRACKET - 6
BOLT M5X20 - 12
4.6. DESCRIPTION OF COMPONENTS
Figure 4.6.1. WPZ - 09 / 14 / 15 / 21 / 26 (1000/2000) Figure 4.6.2. WPZ - 30 / 39 / 40 / 54 (3000/4000)
1 - Supply fan; 2 - Electrical/water heater/pre-heater; 3 - Control board; 4 - Supply air filter (pocket); 5 - Supply air damper.

8
5. INSTALLATION
5.1. RECEPTION OF GOODS
Each device is carefully checked before transportation. When receiving the goods, checking the devices for any damage made during transporta-
tion is recommended. If any damage to the unit is observed, immediately contact the representatives of a transport company. Please inform the
representative of the manufacturer, if any deviation of the device is noticed.
5.2. TRANSPORTATION AND STORAGE
• All units are factory-packaged to withstand normal conditions of transportation.
• When unpacking, check the unit for any damage made during transportation. Installing of damaged units is not allowed!
• The packaging is used for protection purpose only!
• When unloading and storing the units, use suitable lifting equipment to avoid damage and injuries. Do not lift units by holding on power supply
cables, connection boxes, air extract or exhaust flanges. Avoid hits and shock overloads. Before installation, the units must be stored in a dry
room with the relative air humidity not exceeding 70% (at +20°C) and with an average ambient temperature ranging between +5 °C and +30 °C.
The storage place must be protected against dirt and water.
• The units must be transported to the storage place or installation site using forklifts.
• The recommended storage i period should not be longer than one year. In case of storing the units for a period longer than one year, checking
if the fan bearings and motor rotate without difficulty (turning the impeller by hand) and if the electric circuit insulation is not damaged or the
moisture has not accumulated must be performed before the installation of the unit.
W2
L2
H2
H1
L1
W1
W2
L2
H2
H1
L1
W1
WPZ H2 W2 L2
MAX. NUMBER OF
TRANSPORTED
PACKAGES
[mm] [mm] [mm] [pcs.]
9ED 630 705 1460 1
14WD 630 745 1460 1
15E / 21ED 740 815 1760 1
26WD 740 854 1760 1
30ED / 39ED / 40WD 830 1130 1870 1
54WD 830 1130 1870 1
Figure 5.2.1. Lifting by forklift.
In order to prevent damage to the casing, only a product placed on a pallet should be lifted.
5.3. UNPACKING
Accessories may be packed together with the product. Prior to transporting the unit, the accessories should be unpacked first.
• Remove the film from the unit.
• Remove the bracing packaging tape that keeps the protective profiles in place.

9
• Remove the protective profiles.
• After unpacking the unit, examine it to make sure that no damage was made during transportation. Installing of damaged units is not allowed!
• Before commencing the installation of the unit, please check if all ordered equipment have been delivered. Any variation from the ordered equip-
ment list must be reported to the product supplier.
5.4. PIPING AND INSTRUMENTATION DIAGRAM
Figure 5.4.1. WPZ - 40WD / 54WD (* For WPZ - 14WD / 26WD (1000-2000) units TL is outside of the unit on the left side of M2)
LIST OF COMPONENTS
PV Supply air fan TL Outdoor air temperature sensor
KE1 Electric heater TJ Supply air temperature sensor
PF Supply air filter PS1 Supply air filter differential pressure sensor
M2 Outdoor air damper actuator M4/M Water heater circular pump
KV1 Water heater RC1 Stouch or Flex remote control panel
M6/SV1 Water heater valve actuator TV Water heater temperature sensor
M
CO2
Ventilated premises T1 Water heater thermostat
DX DX cooler
POSSIBLE PCB INPUTS/OUTPUTS
EAS External alarm H2 Alarm indication output
H1 Working indication output
Fans speed switch (BOOST) System mode switch (START/STOP)

10
5.5. MOUNTING
• Installation should be carried out by qualified and trained staff only.
• When connecting air ducts, consider the labels on the casing of the unit.
• Before connecting to the air duct system, the connection openings of ventilation unit should be closed.
• When connecting the ducts, the air-flow direction indicated on the device housing should be observed.
• Do not connect the bends close to connection flanges of the unit. The minimum distance of the straight air duct between the unit and the first
branch of the air duct in the supply air duct must be 1xD, in air exhaust duct 3xD, where D is the diameter of the air duct.
• It is recommended to use the brackets (accessories). This will reduce the vibration transmitted by the unit to the air duct system and environ-
ment.
• Sufficient space must be provided for opening of the manhole and filter covers.
• If the ventilation unit is wall-mounted wall, it may transmit noise vibrations to the premises. Though the level of noise generated by the fans is
admissible, mounting the unit it the distance of 400 mm from the nearest wall is recommended. Where this is not possible, mounting of the unit
on the wall of the room where the level of noise is not significant is recommended.
• Ducts are connected to the unit in such way that they could be easily disassembled and the heater could be removed from the unit when carrying
out maintenance, servicing and/or repairs
The protective film is used to protect the unit during transportation. It is recommended to remove the film; otherwise, oxidation
signs may occur.
180o
d
c
180o
ab
Figure 5.5.1. Mounting positions (d - mounting position not possible for units with pocket filters;
b, d - mounting position not possible for water version)
Figure 5.5.2. all WPZ (1000-4000) maintenance side change

11
5.5.1. UNIT PLACING AND MOUNTING POSITIONING REQUIREMENTS
L
1,5xL
L
1,5xL
H
H
Figure 5.5.1.1. Min. distance to open the door - 1,5xL; Min. distance to open the control box door - H > 400 mm.
5.5.2. CEILINGMOUNTING OF THE UNIT
Figure 5.5.2.1. Ceiling mounting
5.5.3. ROOF MOUNTING (ACCESSORY)
1 2
Figure 5.5.3.1. WPZ - 09 / 14 / 15 / 21 / 26 (1000-2000) Roof mounting

12
1
2
12
1
3
2
Figure 5.5.3.2. WPZ - 30 / 39 / 40 / 54 (3000-4000)
5.6. CONNECTION OF THE AIR DUCT
• The connected air ducts must not be bent and have separate fixing.
• Make sure that the fans can not be accessed through air duct heads. Otherwise, protective grid should be installed. You may choose the grid from
the range of products provided in our website.
• Do not reduce the diameter of the piping near air inlet or exhaust ducts. If you want to reduce the airflow speed in the system, drop of pressure
and noise level, you can increase the diameter.
• In order to reduce the level of the noise in the air supply system, install dampers (see the chapter on air supply system installation).
• In order to reduce air loss in the system, the air ducts and profile components should be of class C and higher. The catalogue on the above-men-
tioned items can be found in our website.
• External air and exhaust system piping should be isolated in order to prevent heat loss and condensation.
• Maintaining the distance of up to 8 meters between air intake and air exhaust ducts is recommended. Air supplying system should be installed
away from potential air pollution sources.
• When installing air ducts next to the ventilation equipment, brackets must be used. They suppress vibration and assure secure installation of the
various system parts. The necessary brackets can be found in our catalogue or website.
• Air ducts are often mistakenly connected in inappropriate location. The ventilation units bear the labels indicating the correct air duct connection
layout. Before starting up the system, carefully check if all related works have been performed properly.
For flange diameters see chapter "DIMENSIONS AND WEIGHT".
5.7. CONNECTION OF THE UNIT TO ELECTRIC NETWORK
• Supply voltage to the unit must be connected by a qualified specialist following the manufacturer’s instructions and applicable safety guidelines.
• The unit’s power network voltage must correspond to electro technical specifications of the unit indicated in the technical decal.
• The unit’s voltage, power and other technical specifications are provided in the unit’s technical decal (on the unit casing). The unit must be con-
nected to the voltage plug socket of the grounded power network in accordance with the applicable requirements.
• The unit must be earthed according to electrical equipment installation regulation.
• Using extension wires (cables) and power network plug socket distribution devices is not allowed.
• Prior to carrying out any ventilation unit installation and connection works (before the unit is commissioned), the unit must be disconnected from
the power network.
• After installation of the ventilation unit, the power network plug socket must be accessible at any time. If the unit is equipped with circuit break-
er, disconnection from the power network is performed through the two-pole or four-pole circuit breaker (by disconnecting phase poles and
neutral).
• Before it is connected to the power network, the unit must be carefully checked for any damage (execution, control, and measurement nodes)
made during transportation.
• The power cable can be replaced only by a qualified technician, having evaluated the rated power and current.
The manufacturer does not assume any liability for personal injuries and property damage due to non-conformance with the pro-
vided instructions.

13
5.8. STARTUP RECOMMENDATIONS
5.8.1. SYSTEM PROTECTION
Units with integrated control board have integrated protection devices against short circuit. WPZ 400-2000 units have controller with F2 protection
fuse of 250mA, 315mA or 350mA value. WPZ 3000-4000 units control board is equipped with additional protection devices:
WPZ 30ED / 39ED 40WD / 54WD
Q2 (F1) B25 6,3A
Q3 (F2) B16 1A
Q4 (F3) B25 6,3A
Q5 B32 -
Q6 C10 -
Q7 C10 -
It is recommended to use protection device on units that are unequipped with internal power supply protection devices.
WPZ 9ED 14WD 15ED 21ED 26WD 30ED 39ED 40WD 54WD
Protection value 20 A 3 A 32 A 40 A 4 A ??? ??? 6 A 10 A
If additional accessories are used, external protection device value can be different.
To ensure safe maintenance of the unit, it is necessary to turn off main switch and/or external protection device.
5.8.2. PRESTARTUP RECOMMENDATIONS OF THE UNIT (IN THE PRESENCE OF THE ENDUSER)
Prior to start-up, the system must be carefully cleaned. Check for the following:
• operation systems and unit elements as well as automation and automation devices were not damaged during installation,
• all electrical devices are connected to power supply and fit for service,
• all necessary automation elements are installed and connected to power supply and terminal blocks,
• cable connection to terminal blocks comply with the existing wiring diagrams,
• all electrical equipment protection components are properly connected (if they are additionally used),
• cables and wires correspond to all applicable safety and functional requirements, diameters, etc.,
• earthling and protection systems are properly installed,
• condition of all seals and sealing surfaces is proper.
6. MAINTENANCE
6.1. SAFETY INSTRUCTION
Unplug the unit from the mains before opening the door (disconnect the power plug from the outlet or in case an automatic circuit
breaker installed, disconnect it as well. Make sure that it cannot be turned on by third parties) and wait until the fans completely
stop (for about 2 min.).
6.2. GENERAL RECOMMENDATIONS FOR VENTILATION SYSTEM MAINTENANCE
In order to ensure proper functioning of the system, maintenance requirements and its periods should be observed. Otherwise, the warranty shall
be void. Some recommendations are provided in the table below, but they are just advisory, as the need for system maintenance depends on the
location of the unit installation, the pollution of atmosphere, population, working hours, etc.
COMPONENT DURING START-UP AT LEAST EVERY 6 MONTHS
Filters Check the cleanliness of the filters Replace filters every 3 to 4 months or according to the
control device indications.
Fans Check the connections and the direction of rota-
tion
Check cleanliness. Clean, if necessary
Make sure that the impellers are not unbalanced.
Make sure that the impellers do not cause noise when
rotated by hand.
Make sure that the fastening screws are not loose and
free of mechanical damage.
Check electrical connections and make sure that these
are secured properly and are free of signs of corrosion.
Control panel Check the connections Check the connections

14
Electric heater Check the connections Clean off dust, and check the electrical components
and connections of the heater
Pressure sensor Check electrical connections Check the operation
Temperature sensor Check electrical connections Check the operation
Air supply and extract system Check the connections Clean
Air duct system Check the tightness Clean
Dampers, diffusers, grid Check the tightness of connections Clean
Switching unit (contactor)
Every 3 to 4 months, visually assess the functioning
of the switching unit (contactor), i.e. make sure that
its casing has no signs of melting or is not thermally
damaged otherwise and does not produce any unusual
sounds. All the contactors in the product or in its ac-
cessories must be checked.
6.3. COVER OPENING
Before opening the covers, first, unplug the unit from the mains, then wait for 2 minutes (until the fans completely stop).
Figure 6.3.1. WPZ
6.4. FILTERS MAINTENANCE
Figure 6.4.1. WPZ
In order to remove the filters, open unit door and take off the filters.
Dirt increases air resistance in the filter, therefore, lower amount of air is supplied into the premises. Arrows on the filters must comply with
airflow direction.
After changing the filters, please reload the filter timer (if used). The instruction on reloading can be found in the control panel
operation manual
Operation of the unit without filters is not allowed.
Change the filters every 3-4 months or according to the notification on the control device.
6.5. FANS MAINTENANCE
• Fan maintenance should be performed by experienced and trained staff only.
• The fan should be inspected and cleaned at least once per year.
• Prior to commencing any maintenance or repairs , make sure the fan is disconnected from the power source.
• Proceed to maintenance and repair after any fan rotation is stopped.
• Observe staff safety regulations during maintenance and repairs.
• The motor features a heavy-duty ball bearing design. The motor is completely sealed and grease- free.
• Detach the fan from the unit.
• The impeller should be particularly checked for built-up material or debris that may cause an imbalance. Excessive imbalance may lead to ac-
celerated wear on motor bearings and vibration.
• Clean impeller and inside housing with mild detergent, water and damp, soft cloth.
• Do not use high-pressure cleaner, abrasives, sharp tools or caustic solvents that may scratch or damage the housing and impeller.

15
• Do not plunge the motor into any fluid while cleaning the impeller. Make sure the impeller’s balance weights are not moved.
• Make sure the impeller is free of any obstacles.
• Install the fan back into the unit. Connect fan power and control signals.
• In case the fan after maintenance does not automatically start up or stop, contact the manufacturer. Malfunction of the fan can be identified by
the pressure in the system (when pressure switches are connected). In case of any fault in the fan motor, a notice will appear on the control panel.
Prior to commencing any maintenance or repairs, make sure the unit is disconnected from the power source.
Figure 6.5.1. all WPZ (1000-4000)
6.6. HEATER MAINTENANCE
ELECTRICAL HEATER:
• In case manual protection is activated, check for a fault before pressing the RESET button. If the fault is identified after it has been rectified, press
the RESET button using a screwdriver or a similar object.
• Electrical heater does not require additional servicing. The filters must be replaced as described above.
• Heaters are equipped with 2 thermal protection devices: an automatic self-resetting protection device that is activated at +50 °C, and a manually
restored protection device that is activated at +100 °C.
• After an activation of the manually restored protection device, make sure the unit is disconnected from the power supply. Wait until all heating
elements cool down and the fans completely stop. Having identified and rectified the failure, to start the unit, press the RESET button. The failure
can be identified by a qualified technician only.
• For AmberAir Compact VEKA INT 400-700 EKO units remove control board cover, disconnect the electrical heater connector and remove the
heater. For AmberAir Compact VEKA INT 1000-4000 EKO units disconnect the electrical heater connector and remove the heater.
Figure 6.6.1. all WPZ (1000-4000)
WATER HEATER:
• Disconnect product unit from electric power source.
• Open the doors of the product.
• Drain the heating liquid from the system.
• Disconnect the heater from the system.
• Detach water thermostat sensor from the water heater.
• Unattach water heater temperature sensor from water heater.
• Remove 2 screws and remove the heater.
Figure 6.6.2. all WPZ (1000-4000)

16
6.7. CONTROL BOARD MAINTENANCE
• Disconnect product unit from electric power source.
• Open unit cover (except WPZ 3000-4000 units).
• Unscrew the bolts of the control box cover.
• Remove the control box cover.
• Disconnect all necessary cables, wires, and connectors from control board.
• Unscrew the control board mounting bolts and remove control board.
• To reassemble, follow all maintenance steps in reverse order. When re-connecting cables, wires, and connectors, make sure to match each wire
and connector to corresponding connection terminal and connector.
Figure 6.7.1. all WPZ (1000-4000)
6.8. AIR DAMPER MAINTENANCE
• Disconnect product unit from electric power source.
• Open the doors of the product.
• Detach air damper cable from the unit.
• Disconnect damper actuator.
• Remove the screws holding air damper.
• Remove air damper by sliding it upward.
Figure 6.8.1. WPZ
7. CONTROL
7.1. DEVICE CONTROL
Ventilation unit equipped with EKO control board can be controlled with FLEX or Stouch remote controller.
7.2. DEVICE FUNCTIONS
EKO control board operation functions and control of the device depends on the following:
1. Selected control interface (remote control panel). The selected interface affects access to the information and settings, however, it does not
affect the logic of control. Full access to the information and settings is available on FLEX.
2. Unit configuration (internal/external components, sensors and control board settings or controller type).
Refer to the instruction manual of the existing control device for unit control instructions.

17
8. CONNECTION OF ACCESSORIES
8.1. FIRE PROTECTION SIGNAL INPUT (FIRE PROTECTION INPUT (NC))
Fire protection signal input must be normally closed for WPZ, until the fire protection system is not connected a jumper is installed in the factory.
Figure 8.1.1. WPZ - 9ED / 14WD / 15ED /
21ED / 26WD
Figure 8.1.2. WPZ - 30ED / 39ED with
electrical heater
Figure 8.1.3. WPZ - 40WD / 54WD with
water heater
8.2. CONNECTION OF AIR DAMPERS
WPZ products have integrated supply air dampers. WPZ - 15ED / 21ED / 26WD / 30ED / 39ED / 40WD / 54WD (2000-4000) units additionally can
control external extract air damper by Open/Close actuators.
Wiring diagram for WPZ 15ED / 21ED / 26WD / 30ED / 39ED / 40WD / 54WD (2000-4000)
M3 - Open/Close damper actuator. Upon activation of control output, the damper opens, upon deactivation of control output, the damper closes.
Control output:
WPZ - 15ED / 21ED / 26W - X16:3;
WPZ - 30ED / 39ED - X16:26;
WPZ - 40WD / 54WD - X16:24
Figure 8.2.1. WPZ - 30ED / 39ED Figure 8.2.2. WPZ - 40WD / 54WD WPZ - 15ED / 21ED / 26W
8.3. CONNECTION OF REMOTE CONTROL PANEL
controller X1

18
8.4. WATER HEATER CIRCULATION PUMP AND VALVE ACTUATOR
Water heater circulation pump and valve actuator can only be connected to the units that are designed to operate with water heater.
Wiring diagram
Valve actuator is controlled by 0-10 VDC signal. Circulation pump is controlled by On/Off signal.
Figure 8.4.1. WPZ - 14WD / 26WD (1000-2000 W) Figure 8.4.2. WPZ - 40WD / 54WD (3000-4000 W)
8.5. EXTRACT AIR FAN
WPZ units are able to control external extract air fan. Fan should be 230VAC, EC type with 0-10VDC control.
Figure 8.5.1. WPZ 9ED / 14WD (400-1000) Figure 8.5.2. WPZ - 15ED / 21ED / 26WD
(2000)
Figure 8.5.3. WPZ - 30ED / 39ED / 40WD /
54WD (3000-4000)
8.6. EXTRACT AIR FILTER PRESSURE SWITCH
WPZ WPZ - 30ED / 39ED / 40WD / 54WD (3000-4000) units have designated input for external extract air filter differential
pressure switch – type NC.
Figure 8.6.1. WPZ - 30ED / 39ED (3000-4000 E) Figure 8.6.2. WPZ - 40WD / 54WD (3000-4000 W)

19
8.7. RECOMMENDED SCHEME FOR CONNECTION OF INTERNAL AND EXTERNAL COMPONENTS
PV - supply air fan EC,
IV - extract air fan EC,
KE1 - supply air heater,
AT1 - automatic reset thermostat supply air
heater,
RT1 - manual reset thermostat supply air
heater,
TL - fresh air temperature sensor,
TJ - supply air temperature sensor,
TE - exhaust air temperature sensor,
M2 - outside air damper actuator,
EAS - fire alarm,
PS - filter pressure switch
F2 - fuse 250mA,
F - automatic circuit breaker
C
RT1
EAS
PS
PS PS
EASEAS
PE L3
N L1 L2
A2
A1
G
A2
V1
G
V2
A1
AT1
L2L1PE L3
K4
KE
L1 L2 L3PE
F
N
Remote control
M2
N
L
L
0-10V
ECO
t-10V
GND
p-10V
VAL-
Rotor
Water
Alarm
GND
GND
p-mA
VAL+
+24V
VAL
COOLING
P
1
3
Supply air sensor
TJ
X12
X11
X5
X14
X15
PE -
NL +
IV
Extract air fan (max. 10A)
X32
0-10Vout
GND
PV
L
N
PE
L1
L2
L3
N
PE
X3
5
4
3
2
1
6
X12
X11
X5
X15
X13
Supply air fan
(max. 10A)
X1
W1
W2
W1
W2
612345
X29
612345
X22
Figure 8.7.1. WPZ-9ED (1000-9.0; 12)

20
PV - supply air fan
IV - extract air fan
TJ - supply air temperature sensor
TL - outside air sensor
TV - antifrost sensor
T1 - antifrost thermostat (15°C)
M2 - outside air damper actuator 230VAC
(with spring return)
M6 - water valve actuator 24VDC, 0-10V
(heating)
M3 - circulator pump 230V
K1 - circulator pump relay (out. 230V)
K3 - outside air damper relay (out.230V)
EAS - fire alarm
PS - filter pressure switch
PCB indication
LED3 - PCB status
LED4 - outside air damper actuator open
LED5 - cooling switch on
LED6 - light - cooling is ON (M5 water
actuator)
LED7 - dark - cooling is OFF (M5 water
actuator)
F - automatic circuit breaker
F2 - fuse 250mA
VAL
+24V
VAL+
p-mA
GND
GND
Alarm
Water
Rotor
VAL-
p-10V
GND
0-10V
ECO
0-10V
L
N
M2
Remote control
TJ
N
F
PE L
LNPE
TV
T1
F2
TL
X12
X11
X5
X14
X15
IV
PE -
NL + 1 2X1 PE
PS
PS
EAS
PS
EASEAS
J1
Extract air fan (max. 10A)
0-10Vout
GND
PV
L
N
PE
L1
L2
L3
N
PE
5
4
3
2
1
6
X12
X11
X5
X15
X13
Supply air fan
(max. 10A)
X14
X15
X13
Figure 8.7.2. WPZ-14WD (1000-14.4 W)
This manual suits for next models
9
Table of contents
Popular Air Handler manuals by other brands

AAON
AAON F1-060 Installation, operation & maintenance manual

Trane
Trane 2TEE3F31A1000A Installer's guide

Zehnder Rittling
Zehnder Rittling ComfoSpot 50 manual

ActronAir
ActronAir ECOFLEX MINI VRF R-32 Series owner's manual

Munters
Munters DesiCool operating manual

Lennox
Lennox CBX25UH Series installation instructions

Amana
Amana AVPTC 24B14A Series manual

Bosch
Bosch DX Series Installation and maintenance manual

Ingersoll-Rand
Ingersoll-Rand TAM7A0A24H21EA Service facts

REC
REC TEMOVEX RT400S-EC-RS manual

System air
System air HHCompact Series Installation, operation and maintance instructions

System air
System air SAVE VTR 300/B installation manual