WARRIOR C8360 User manual

LITHIUM-ION RECHARGEABLE
BATTERY & CHARGER
Charger
(Model:C8360/8362)
2.0/4.0/2.5/5.0Ah Battery
(Model:BP8302)
Owner
’
s
Manual
Read all safety rules and instructions carefully before operating this tool.

BATTERY
SPECIFICATIONS
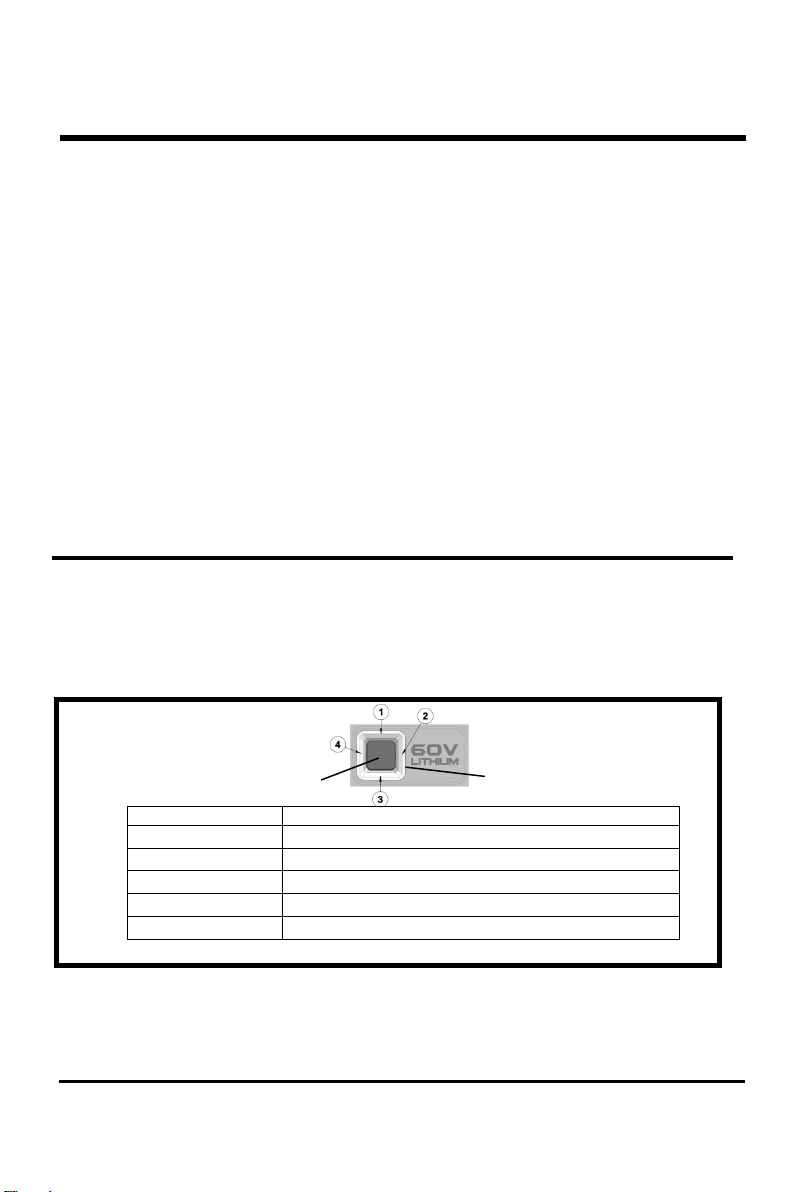
Battery pack: BP8302
Battery capacity
: 2.0/4.0/2.5/5.0Ah Lithium-lon
Charge time: from 30 to 75 minutes
Weight:2.9-4
.5lbs
SAFETY INFORMATION
1
W A R N I N G
To avoid risk of fire, electric shock, or electrocution
•Do not use a damp cloth or detergent on the battery or battery charger
•Always remove the battery pack before cleaning, inspecting, or performing any maintenance
on the tool.
SAFETY NOTES AND PRECAUTIONS
1.
Do not disassemble the battery.
2.
Keepawayfromthechildren
.
3.
Do not expose the battery to water or salt water, and store the battery in cool and dry environment.
4.
Do not place the battery in high-temperature locations, such as near a fire, heater, etc.
5.
Do not reverse the positive terminal and the negative terminal of the battery.
6.
Do not connect the positive terminal and the negative terminal of the battery to each other with
any metal objects
7.
Do not knock, strike, or step on the battery
8.
Do not solder directly onto the battery and pierce the battery with nails or other sharp objects.
9.
In
the
event
that
the
battery
leaks
and
the
fluid
gets
into
one
’
s
eye
,
do
not
rub
the
eye.
Rinse
well with water. Immediately discontinue use of the battery if the battery emits an unusual smell
feels hot, changes color, changes shape, or appears abnormal in any other way
W A R N I N G
If thebattery fluidgetsinyour eyes,flushimmediatelywithcleanwaterforatleast15minutes
Getimmediatemedicalattention. Donotchargethebatterypackinrainorinwetconditions. Do
notimmersethetool, batterypack,orchargerinwaterorotherliquid
For the proper use, maintenance and storage of this battery, it is important that you read and
understand the instructions given in this manual.
To avoid serious injury, risk of fire, explosion and danger of electric shock or electrocution-
•Do not probe the charger with conductive materials. The charging terminals hold 120-240V.
•If the battery pack case is cracked or damaged, DO NOT insert into the charger. Replace the
battery pack.
•Do not charge these battery packs with any other type of charger
•Do not allow liquid inside the charger.
•Do hot try to use the charger for any other purpose than what is presented in this manual.
(1.32-2.05kg)

BATTERY
•
Do not allow the battery pack or charger to overheat. If they are warm, allow them to cool down.
Recharge only at room temperature.
•
Keep the ventilation slots of the charger
clear.
•
Do not allow small metal items or material such as steel wool, aluminum foil, or other foreign
particles into the charger cavity.
•
Unplug the charger before cleaning and when there is no battery pack in the charger.
•Do not leave the battery pack in the sun or in a warm environment for extended periods of time.
•
Do not try to connect two chargers together.
•
The battery pack cells may develop a small leak under extreme usage or temperature conditions
•
If the battery will not be used for 3 months or more, store the battery in a room temperature
environment. Fully charge before storage
If the outer seal is broken and the leakage gets on your skin:
•Use soap and water to wash immediately.
•Neutralize with lemon juice, vinegar, or other mild acid
•If
leakage
gets
in
you.
r
eyes,
follow
instructions
above
and
seek
medical
attention.
IMPORTANT SAFETY INSTRUCTIONS—
SAVE THESE INSTRUCTIONS
TO REDUCE THE RISK OF FIRE OR ELECTRIC SHOCK.
CAREFULLY FOLLOW THESE INSTRUCTIONS
CHECKING BATTERY CAPACITY
Note: The battery is not shipped fully charged. It is recommended to fully charge before first use to
ensure that maximum run time can be achieved. This lithium-ion battery will not develop a memory
and may be charged at any time. A fully discharged battery pack will takethe allotted time as stated in
thespecificationsportion of thismanual
Press the battery capacity indicator button. The LED lights will illuminate according to the batteries
current power level. See chart below:
LED light meter
Battery capacity
indicator button
2
Lights
Capacity
4 LED are lit
The battery is more than 75% capacity
3 LED are lit
The battery is between 50%and 75%capacity
2 LED are lit
The battery is between 25%and 50%capacity
1 LED is lit
The battery is less than 25%capacity
4 LED flash
The battery requires charging immediately

BATTERY
If the battery pack cracks or breaks, with or without leaks, do not recharge it and do not use.
Dispose of it properly and replace with a new battery pack. DO NOT ATTEMPT TO REPAIR IT!
To avoid injury and risk of fire, explosion, or electric shock, and to avoid damage to the
environment:
•
Cover the battery's terminals with heavy-duty adhesive tape
•DO NOT attempt to remove or destroy any of the battery pack components
•DO NOT attempt to open the battery pack
•
If a leak develops, the released electrolytes are corrosive and toxic. DO NOT get the solution in
the eyes or on skin, and do not swallow it
•
DONOT place these batteries in your regular household trash
•
DO NOTincinerate
•
DONOT place them where they will become part of any waste landfill or municipal solid waste
stream
•
Take them to a certified recycling or disposal center
3
W A R N I N G
All toxic materials must be disposed of in a specified manner
to prevent contamination of the
environment. Before disposing of damaged or worn out Lithium-ion battery packs, contact
your local waste disposal agency, or the local Environmental Protection Agency to information
and specific instructions. Take thebatteries toa local recycling and/or disposal center, certified
for Li-iondisposal
ENVIRONMENTALLY SAFE BATTERY DISPOSAL
The following toxic and corrosive materials are in the batteries used inthis tool battery pack
Li-ion, a toxicmaterial.
Do not use strong solvents or detergents on the plastic housing or plastic components. Certain
household cleaners may cause damage and may also cause a shock hazard.
CAUTION
W A R N I N G

BATTERY CHARGER
SPECIFICATIONS
Charger:C8360/8362
Input
:
120-240VAC,
50/60Hz,
Max. 3A
Output: 63VDC, Max.4.5A
Weight: 2.6Ibs(1.2kg)
CHARGING PROCEDURE
NOTE:
The
battery
is
not
shipped
fully
charged
.
It
is
recommended
to
fully
charge
before
first
use
toensure thatmaximum run timecanbe achieved. This lithium-ionbattery willnot develop a memory
and
may
be
charged
at
any
time
Low voltage charging
:
If the battery has been stored with little to no charge for a long period of time, the charged will go into
recovery
mode
,
which
will
take more time
to
fully charge
the
batt
e
ry. This
will
enhance
the
life
of
the
battery
.
Once it
is
fully
charged,
the-
next
charge
will return
to
standard charging.
A fully discharged battery pack willtake the allottedtimeas statedinthespecifications portionofthis
manual.
Plug
the
charger
in to
an
AC
power
outlet
Insert the battery into the charger.
This is a diagnostic charger. The Charger LED Lights will illuminate in specific Order to communicate
the current battery status. They are as follows
False defect note:
When
the battery is inserted
into
the
charger
and
the
statu
s LED
blinks
RED,
remove
the
battery
from
the charger for 1 minute, then reinser
t.
If the status LED blinks GREEN, then the battery is
properly
charging.
JJ
the status LED is still blinking
RED
,
remove
the battery and unplug the
charger
for
1
minute.
After 1 minute, plug in the charger and reinsert the battery. If the status LED blinks GREEN, then the
battery is
Properly
charging.
If
the status LED is
still
blinking RED, the battery is defective
an
d
needs
to
Be replaced.
4
Charging
Fully
Charged
Charging
Fault
Over
Temperature
Fig. 5
Standby
Other manuals for C8360
1
This manual suits for next models
2
Table of contents
Languages:
Popular Camera Accessories manuals by other brands

Trojan
Trojan GC2 48V quick start guide

Calumet
Calumet 7100 Series CK7114 operating instructions

Ropox
Ropox 4Single Series User manual and installation instructions

Cambo
Cambo Wide DS Digital Series Main operating instructions

Samsung
Samsung SHG-120 Specification sheet

Ryobi
Ryobi BPL-1820 Owner's operating manual