Watchguard V300 User manual

Getting Started
Getting Started
In this guide...
What's new with the WatchGuard V300 Camera (page 2)
V300 Camera overview (page 3)
First steps (page 4)
V300 basics (page 6)
V300 Camera field of view (page 5)
Wearing the V300 (page 7)
Running Information sequence screens (page 10)
V300 LCD display (page 11)
Powering on and off (page 12)
Starting and stopping an event (page 13)
Momentary Mute (page 15)
Categorizing an event (page 16)
Associating with a group event (page 17)
Docking the V300 Camera overview (page 22)
Transfer Station II overview (page 24)
Removing the V300 Camera battery (page 21)
Recording Group overview (page 17)
Important Notice
WatchGuard V300 Camera
Quick Start Guide
WGD00170 Revision: B
1

Getting Started
What's New with the WatchGuard V300
Camera
The V300 is the next generation of the body camera. Features include:
lUser-replaceable, stand-alone
battery allows 24 hr shifts with
same camera
lElectronic turret (+15/-20 degrees
adjustment)
lMomentary mute
lV300 WiFi base
lTransfer Station II
l120 dB Wide Dynamic Range (WDR)
that better resolves details in bright
versus dark lighting situations
lReduced fisheye effect from wide-angle lens
l8MP back-illuminated HDR, WDR image sensor which realizes high
picture quality in the visible light and near infrared light regions
lStores 24 - 36 hours of events with maximum resolution and 30 frames
per second with 128 GB of storage
lWorks with other V300 Wearable Cameras and the 4RE to form a
recording group
lThe V300 Camera has a rating of IP67 from the International Electrical
Commission. IP67 means the camera can survive a drop into fresh water
no more than 1.5 meters (5 feet) deep and for no more than 30 minutes.
lTo prevent unauthorized access to your data, V300 Wearable Camera
elevates your data security with encryption at rest and in transit
2
WatchGuard V300 Camera
Quick Start Guide
WGD00170 Revision: B

Related documents
Related documents
lEvidence Library (EL) Online Help
l4RE DVR In-Car Video User Guide
Transfer Station II and WiFi base
The V300 Camera needs a second generation transfer station and a V300
WiFi base. You can dock either the stand-alone battery in the Transfer
Station II or WiFi base or dock the camera and battery together. Docking
both lets you charge and upload at the same time. Both the Transfer
Station II and WiFi base have keyed orientation so that the cameras and
battery only dock in one direction.
Using V300 Camera Overview
The WatchGuard V300 Camera serves as a Digital Video Recorder (DVR)
to capture, process, and store video and audio evidence. Connect the
camera to Evidence Library (EL) to configure it and upload video for
evidence management.
The V300 Camera works with other V300 cameras and the 4RE DVR to
form a recording group (page 17).
Note: The V300 cannot pair as part of a group with the
VISTA WiFi or VISTA XLT cameras in the same car. You
can combine the videos of V300, VISTA WiFi, and VISTA
XLT video captures for the same event in EL.
WatchGuard V300 Camera
Quick Start Guide
WGD00170 Revision: B
3

Getting Started
First Steps
For best results, before using your WatchGuard® V300 for the first time:
1. Fully charge the camera and removable battery.
2. Ensure the camera software is current using Evidence Library (EL).
To charge the camera:
nDock the camera in a Transfer Station II.
Note: The camera battery charges any time it is docked.
A blinking LED means the camera is charging. A solid
green LED on any of the bases means the battery is fully
charged.
To configure the camera:
1. Dock the camera in a Transfer Station II.
2. Using EL, create and/or assign a configuration and an officer to the
docked V300.
When the configuration is applied, the screen displays Checked out to
on the first line and the officers name on the second line. The camera
then reboots to apply the configuration and displays the same
information then transitions to an idle screen.
4
WatchGuard V300 Camera
Quick Start Guide
WGD00170 Revision: B

V300 Camera Field Of View
V300 Camera Field Of View
WatchGuard V300 Camera Field of View can be configured in Evidence
Library for individual officers. The 130-degree wide-angle lens adjusts
vertically +15/-20 degrees.The camera angle is based on where the
camera is worn and is set in Evidence Library.The graphic below shows
the difference of views for +15°, 0°, and -20° for a camera worn in the
middle of the chest.
WatchGuard V300 Camera
Quick Start Guide
WGD00170 Revision: B
5

Getting Started
V300 Basics
The V300 functions as an HD camera and DVR combination to collect
video and audio evidence.
V300 has four buttons:
lPower: Press and release the Power button to power V300 on or off
lRecord Start/Stop: Press the Record Start/Stop button to start or
stop a recorded event
lDisplay Backlight: Press the Display Backlight button to:
oTurn on the backlight for the LCD Display
oSee the camera status or review categories for a recording
oStart momentary mute
lFunction (top): Press and Hold for Covert mode or to tag an event
V300 uses the center chest mount
6
WatchGuard V300 Camera
Quick Start Guide
WGD00170 Revision: B

Wearing WatchGuard V300 Camera
Wearing WatchGuard V300 Camera
The WatchGuard V300 Camera uses the Magnetic Chest Mount, with
magnets to secure the mount to your clothing.
Warning! Do not wear the Magnetic Chest Mount near
sensitive medical equipment or implants such as
pacemakers or other magnetically programmable medical
devices. The chest mount uses magnets to hold the
camera in place.
Wear the V300 Camera on your clothing where it is most comfortable,
convenient, and secure. Ensure that the lens is not obstructed and that it
is aimed at the horizon. The mount is made to fit over the buttons or
zipper in the center of your chest. You can wear it over your pocket or on
the protective vest or jacket.
The magnets are strong with 65 pounds of pressure when snapped
together.
WatchGuard V300 Camera
Quick Start Guide
WGD00170 Revision: B
7
Getting Started
Wearing the center V300 Camera chest mount
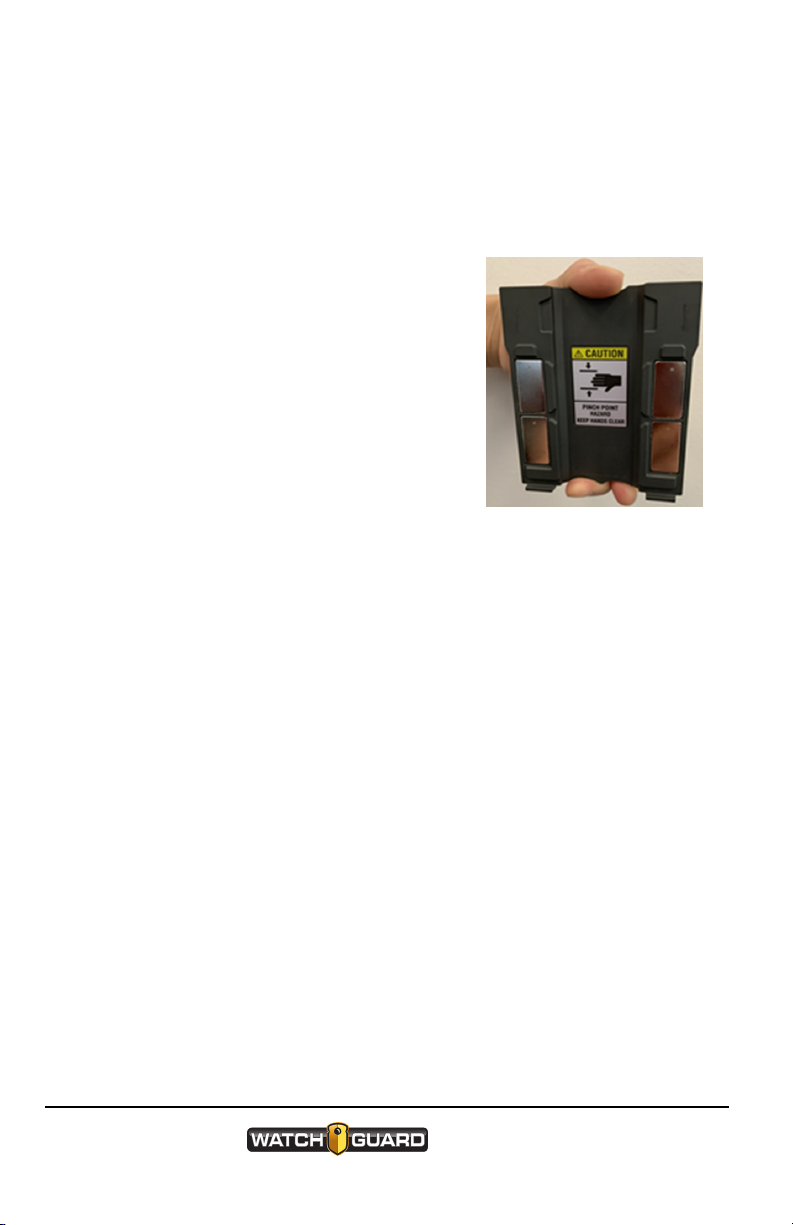
To use the chest mount:
1. Separate the under-shirt bracket from the over-shirt bracket:
a. Hold the under-shirt bracket in one
hand with the thumb on top and the
two middle fingers on the bottom.
b. Raise the levers on both sides.
c. Pull the front and back apart.
d. While holding the levers up, pull the
brackets apart.
2. Match the anchor tabs and camera slots
on the over-shirt bracket with the back of
the camera—keeping the magnets apart.
You can attach the camera before or after the mount is in place.
3. Place the under-shirt bracket under your shirt where you want to wear
your camera.
4. Line up the anchor slots and place the over-shirt bracket against the
under-shirt bracket, with your shirt between them. (These will snap
together forcefully.)
8
WatchGuard V300 Camera
Quick Start Guide
WGD00170 Revision: B

Wearing the center V300 Camera chest mount
The magnets on both brackets line up automatically, securing the mount to
your shirt.
Caution: WATCH YOUR FINGERS! Because of the
strength of the magnets, separating the brackets
requires some effort. Realigning the brackets causes
them to snap together forcefully. Keep your hand flat and
keep your fingers away from the snap-to area.
WatchGuard V300 Camera
Quick Start Guide
WGD00170 Revision: B
9
Getting Started
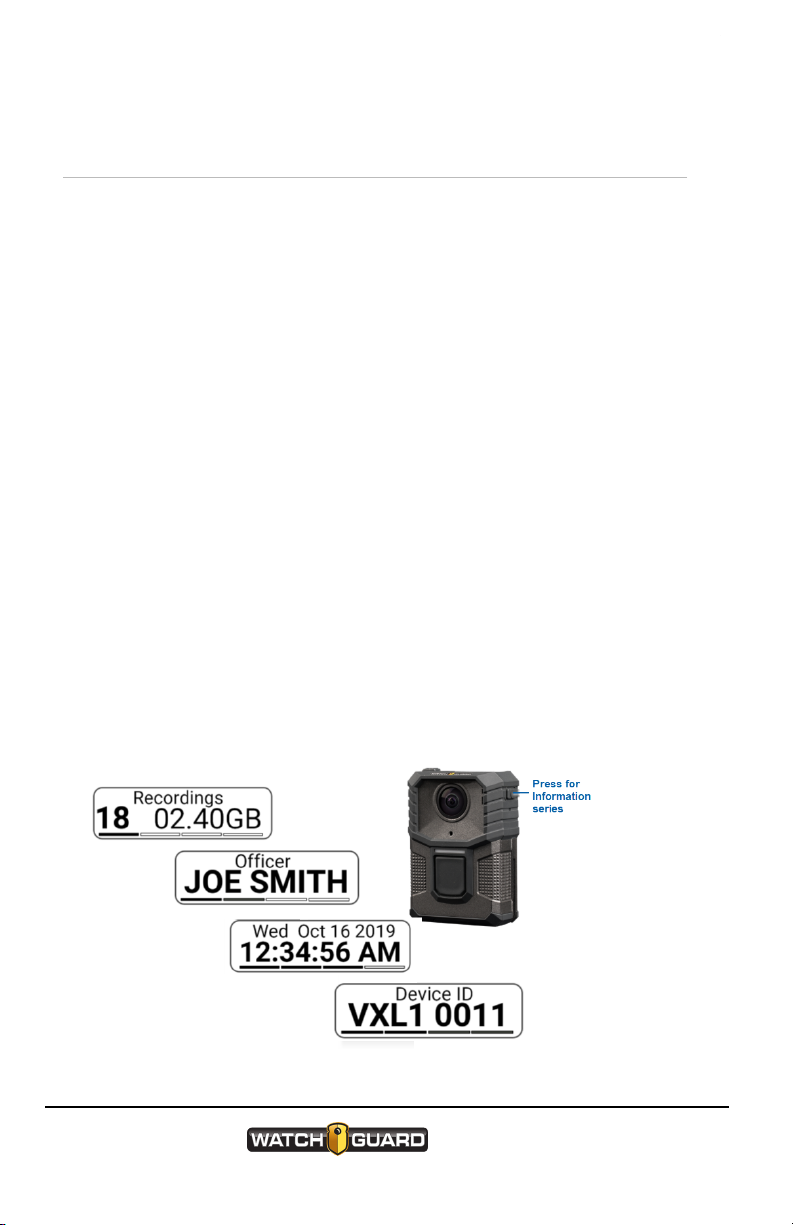
Running information sequence screens
The Information Sequence screens display the status of the camera as
part of the bootup process or on-demand.
1. Press the Display Backlight button twice within 2 seconds to start
the information sequence. The screens appear in this order:
a. Number of recorded events in storage and total saved storage in
gigabytes.
This screen also shows RATF® (Record After The Fact) if RATF is
enabled.
b. Officer name.
c. Date in the format DDD MMM DD YYYY and 24-hour time in the
format HH:MM:SS.
For example, MONJUL 22 2019 and 12:23:49.
d. Device ID.
2. Press and release the Display Backlight button to manually advance
through information sequence screens. When manually advancing the
sequence, each screen stays on the display about 4 seconds.
10
WatchGuard V300 Camera
Quick Start Guide
WGD00170 Revision: B

V300 LCD Display
V300 LCD Display
The LCD display shows:
lBattery status backlight
The V300 battery charge lasts up to 12
hours, depending on your configuration.
The camera display shows the icon and
the percentage of battery remaining.
lCurrent recording length
lStorage status and number of
recordings in storage
When recording in HD format, V300
Wearable Camera can store about 36
hours of maximum-resolution events or
up to about 200 hours at low resolution.
As the storage on the camera fills, the
storage icon fills and the percentage
increases until storage is full.
lRecording status and Recording
length
lAssigned officer name
lCurrent date and time
lCamera ID
lAvailable event categories
WatchGuard V300 Camera
Quick Start Guide
WGD00170 Revision: B
11

Getting Started
Error messages
If an error appears on the V300 display screen the top LED flashes red to
show an error condition.
Press the Backlight button to acknowledge the error. The LED may then
turn solid amber until the error is cleared by the camera. If it does not
clear on it's own, reboot the camera.
Power On and Off
Use the Power button to power the
WatchGuard V300 Camera on and off. The
Power button is a rectangle on the bottom of
V300 Camera.
Power on
To power on the camera:
nPress and release the Power button.
The camera goes through its booting and information sequences. When it
is ready to use, the display shows the number of events in storage and
displays a solid green LED light on the top. The camera vibrates or
ascending tones sound (depending on your configuration).
Tip: Press the Display Backlight button to advance
through the information sequence screens.
12
WatchGuard V300 Camera
Quick Start Guide
WGD00170 Revision: B

Power off
Power off
To power off the camera:
nPress and release the Power button.
The camera prompts you to press the Power button again.
Forcing power off
Warning! Avoid forcing the V300 to power off. Forcing
the camera to power off can result in data corruption.
If the V300 stops responding to commands (or if WatchGuard Technical
Services instructs you to), remove the battery to force the camera to
power off.
Starting and Stopping a Recorded Event
Use the Record Start/Stop button on the front of the camera to start or
stop a recorded event.
If your WatchGuard V300 is a member of a recording group, the camera
can start or stop a recorded event automatically.
Both LEDs on the camera are green when recording and red when
stopped.
WatchGuard V300 Camera
Quick Start Guide
WGD00170 Revision: B
13

Getting Started
Starting a recorded event manually
To manually start a recorded event on the V300:
nPress the Record Start/Stop button.
The display shows RECORDING. The dot above REC in the display
begins to blink and shows the recording length. The camera LEDs appear
solid red.
As the recorded event continues, the display shows the length increasing
every second and the storage indicators updating.
Stopping a recorded event manually
To manually stop a recorded event on the V300 Camera:
nPress the Record Start/Stop button.
nPress the Record Start/Stop button a second time within 5 seconds to
confirm the event stop (depending on your configuration).
Important! The V300 can be configured in EL to NOT
allow manual event stop.
On the camera the display and the front red LED turn off and the top LED
turns green.
14
WatchGuard V300 Camera
Quick Start Guide
WGD00170 Revision: B

Momentary Muting of the Audio
After a recorded event stops, if your configuration requires event
categorization, the event categorization sequence starts (page 16).
Momentary Muting of the Audio
Note: A configuration setting in Evidence Library
controls whether you can mute your WatchGuard V300
Camera during a recorded event.
Muting audio
To temporarily suspend recording of audio by muting the microphone:
1. Press and hold the Backlight button to briefly mute the audio. Audio
resumes when you release the button.
Your administrator must set the configuration to allow muting.
The display shows MUTED while you hold down the Backlight button
and REC in a smaller font.
2. Release the Backlight button.
Tip: You cannot mute the audio while you are
categorizing a recorded event. After you finish
categorizing, you can again mute the audio.
WatchGuard V300 Camera
Quick Start Guide
WGD00170 Revision: B
15

Getting Started
Categorizing a Recorded Event
Note: Event categorization is set up in the WatchGuard
V300 Camera configuration in Evidence Library (EL).
To categorize a recorded event:
1. Stop the event manually or allow the camera to stop the event
automatically.
2. Press and release the Backlight button as many times as needed to
move through the list of event categories, one at a time.
3. Press the Function (top) button when the event category you want to
select appears on the display.
The display shows the event type in small type and SAVED in large
letters below the saved event category. The camera vibrates when the
category is saved. One long tone sounds with a vibration (depending on
your alert configuration).
If another recorded event starts (manually or automatically) while the
camera is in the middle of the event categorization sequence, the camera
saves the event category as unknown and starts a new event. Complete
categorizing the recorded event in EL.
Note: V300 always adds a tag to an event if you do not
tag the event. For example, NOTAG or UNCATEGORIZED
is applied.
Categorizing an event on the camera in a recording group
If your camera is a member of a recording group, the camera can
automatically accept an event category from the 4RE DVR group member
as its own category. Any category selected directly on the V300 overrides
the 4RE category.
16
WatchGuard V300 Camera
Quick Start Guide
WGD00170 Revision: B

Associating V300 Wearable Camera with a recording group
Associating V300 Wearable Camera with a
recording group
When you dock your V300 in a V300 WiFi base, the camera pairs with the
base. This pairing allows the camera to associate with the local recording
group that includes other V300 Wearable Cameras and the 4RE DVR. A
recording group is typically associated with a vehicle.
Note: You can pair multiple cameras with the same WiFi
base. You cannot pair with VISTA cameras.
Group Events
The collaboration of WatchGuard V300 Cameras and the 4RE DVR creates
a group event. Each device in the same recording group creates
individual recorded events of the same incident providing a more
comprehensive view of an incident.
When a group event is uploaded to Evidence Library (EL), the individual
events are automatically linked together.
V300 Camera behavior during a group event
Any DVR device (4RE or V300 Wearable Camera) in the recording group
can start a group event. The other DVR devices in the group are informed
of that change in event status, so they can join in the group event, each
according to its configuration.
Recording Group Overview
When you dock V300 in the WiFi base, the camera pairs with the base.
This pairing lets the camera associate with other V300 Cameras as a local
WatchGuard V300 Camera
Quick Start Guide
WGD00170 Revision: B
17

Getting Started
recording group.
The decision to create an event for the group recording is made by each
device in the local recording group network. This is called Distributed
Multi-Peer Recording™. Starting a recorded event on one device alerts
the other devices in the group that there has been a change in recording
status on that device. In response, the other devices in the group can
start recording an event, each according to its own configuration.
Recordings from the individual cameras are uploaded and automatically
linked in evidence management software for viewing and sharing.
Smart Power Switch (SPS)
As part of the local recording group network, the SPS:
lFunctions as the central connection point for a recording group
Through the switch, the devices connect together to form a network,
letting the 4RE DVR and/or V300 group members communicate with each
other.
lIntelligently manages power within the local recording group network
The SPS can detect the status of the devices in the network, whether they
are powered on or have powered themselves off after finishing event
upload or charging. When the switch detects that the devices in the local
recording group network no longer need power, it shuts down any
remaining devices connected to the local network, including itself.
lFunctions as the local network DHCP server for the local recording group
network and other devices connected to it (for example, wireless radio)
The SPS is required to form a recording group. There can only be one
Smart Power Switch in a recording group.
4RE DVR
Note: The 4RE DVR must be at firmware version 4.0.7 or
later to participate in a recording group.
18
WatchGuard V300 Camera
Quick Start Guide
WGD00170 Revision: B

V300 Camera
If your agency uses the 4RE DVR as part of a local recording group
network, the 4RE DVR:
lInitiates group recordings
lStops group recordings
lResponds to group-recording starts by other group members
lPasses on its event categorization to other members' recorded events in
the group recording
The 4RE DVR connects to the recording group network with a wired
connection into the SPS. It also connects (wired connection) to the power
source (vehicle battery).
V300 Camera
As part of the local recording group network, the V300:
lPairs with the V300 WiFi base
After docking (page 22) and pairing the cameras with the WiFi base,
the pairing associates the cameras with the local recording group.
Note: You can have a maximum of eight cameras
in a recording group with one WiFi base.
lInitiates group recordings
lResponds to group-recording starts or stops by other group members
Important! If a V300 Wearable Camera moves out of
range of its associated recording group network, it does
not receive notifications of group recording starts and
stops until it is back in range.
WatchGuard V300 Camera
Quick Start Guide
WGD00170 Revision: B
19

Getting Started
Other Devices in a recording group
lRadio
If present in the system, the wireless radio connects to the SPS.
lMDC/laptop
The MDC (mobile data computer) or other laptop computer connects to
the SPS.
If the computer is configured to be a DHCP client, it can also get its
network address from the SPS.
20
WatchGuard V300 Camera
Quick Start Guide
WGD00170 Revision: B
Table of contents
Other Watchguard Digital Camera manuals


