Watchguard SMODETI240 User manual

ART-SD3792A-00, REV.00
Hardwired Ionization Smoke Alarm with Silence and
Interconnectable Function (Model No: SMODETI240)
BACKGROUND
There are two different types of smoke alarms currently in general use: the ionization smoke
alarm and the photoelectric smoke alarm. While both types of alarms are suitable for general
residential use, an ionization smoke alarm will normally response faster to fast flaming fires
while a photo-electric smoke alarm may be more sensitive in detecting slow smoldering fires.
Because home fires develop in different ways and are often unpredictable in their growth, it
is impossible to predict which type of alarm will provide the earliest warning. For best home
protection install at least one photoelectric and one ionization smoke alarm.
RECOMMENDED LOCATION OF ALARMS
*As close to the center of the ceiling as possible; or at least no closer than 61cm to any
wall or corner. If mounting smoke alarm on wall, always locate the top of the smoke
alarm 10 to 30.5 cm from ceiling (see Diagram A).
*As a minimum, smoke alarms should be located between sleeping areas and potential
sources of fire such as a kitchen, heated garage or basement. In single storey homes with
one sleeping area, an alarm should be installed in the hallway outside the bedrooms. In
single storey homes with two sleeping areas, a minimum of two alarms are required: one
outside each sleeping area. In multilevel homes (includes guest, hostel etc.), an alarm
should be installed outside and inside each sleeping area, in the basement and on every
level of the home.
*Additional smoke alarms should be installed in bedrooms in anticipation of fires
originating within these rooms, caused by faulty wiring lamp, appliances, smoking or
other hazards.
*For best protection, smoke alarms should be installed in every room, or every level of
your home.
*Install smoke alarms in hallway at a distance no longer than 4 meters from the farthest
wall and no greater than 8 meters from the next alarm.
*The distance from the apex of cathedral ceiling to the top of the smoke alarm should be
90cm minimum.
AVOID THESE LOCATIONS
IN ORDER TO AVIOID A DECREASE IN OPERATIONAL EFFECTIVE, DO NOT
LOCATE YOUR SMOKE ALARM IN:
* the kitchen - smoke from cooking might cause an
unwanted alarm.
* the garage - products of combustion are present
when you start your automobile.
* the front of forced air ducts used for heating and air
conditioning.
* the peak of an "A" frame type of ceiling.
* areas where temperatures may fall below 5oC or rise above 45oC.
* areas where relative humidity may be out from 10% to 90%.
* the ceiling in a caravan or similar rooms. The shining sun is heating the ceiling and the
air at the upper part of the room. Hot air at the ceiling prevents smoke from a dangerous
smolder process from reaching the smoke alarm. (In this case, mount it on internal walls.)
DEVELOP AND PRACTICE A PLAN OF ESCAPE
BASICS OF ESCAPE PLAN
*Make a floor plan indicating all doors and windows and at least two escape routes from
each room. Second story windows may need a rope or chain ladder.
*Have a family meeting and discuss your escape plan, showing everyone what to do in
case of fire.
*Determine a place outside your home where all of you can meet if a fire occurs.
*Familiarize everyone with the sound of the smoke alarm and train them to leave your
home when they hear the sound.
*Identify children's bedrooms with red stickers placed in the upper left corner of the
windows for easy identification.
*Practice a fire drill at least six months. Practice allows you to test your plan before an
emergency. You may not be able to reach your children. It is important they know what
to do.
WHAT TO DO WHEN THE ALARM SOUNDS
ART-SD3792A-00, REV.00
*Leave immediately by your plan of escape. Every second counts, so don't waste time
getting dressed or picking up valuables.
*In leaving, don't open any inside door without first feeling its surface. If not, or if you
see smoke seeping through cracks, don't open that door! Instead, use your alternate exit.
If inside door is cool, place your shoulder against it, open it slightly and be ready to slam
it shut if heat and smoke rush in.
*Stay close to the floor if air is smoky. Breathe shallowly through a cloth, wet if possible.
*Once outside, go to your selected meeting place and make sure everyone is there.
*Call the fire department from your neighbor's home - not from yours.
*Don't return to your home until fire officials say that it is all right to do so.
FALSE ALARMS
The smoke alarm is designed to minimize false alarms. Smoking will not normally set off
the alarm unless smoke is blown directly into the smoke alarm. Combustion particles from
cooking may set off the alarm if the smoke alarm is located close to the kitchen cooking
surface. Large quantities of combustion particles are generated from spills or broiling.
If the smoke alarm does sound, check for fires first. If a fire is discovered, get out and
call the fire department. If no fire is present, check to see if one of the reasons listed above
may have caused the alarm.
INSTALLATION AND MOUNTING INFORMATION
The alarm must be installed by licensed electrical contractor only!
The smoke alarm will function correctly either as a stand-alone alarm or inter-connected.
All inter-connected smoke alarms must be supplied from a single power circuit.
Do not connect Inter-connect wire to Live or Neutral.
Do not connect the smoke alarm to a circuit protected by a Residual Current Device.
Connect and powered the smoke alarm with 220-240VAC only.
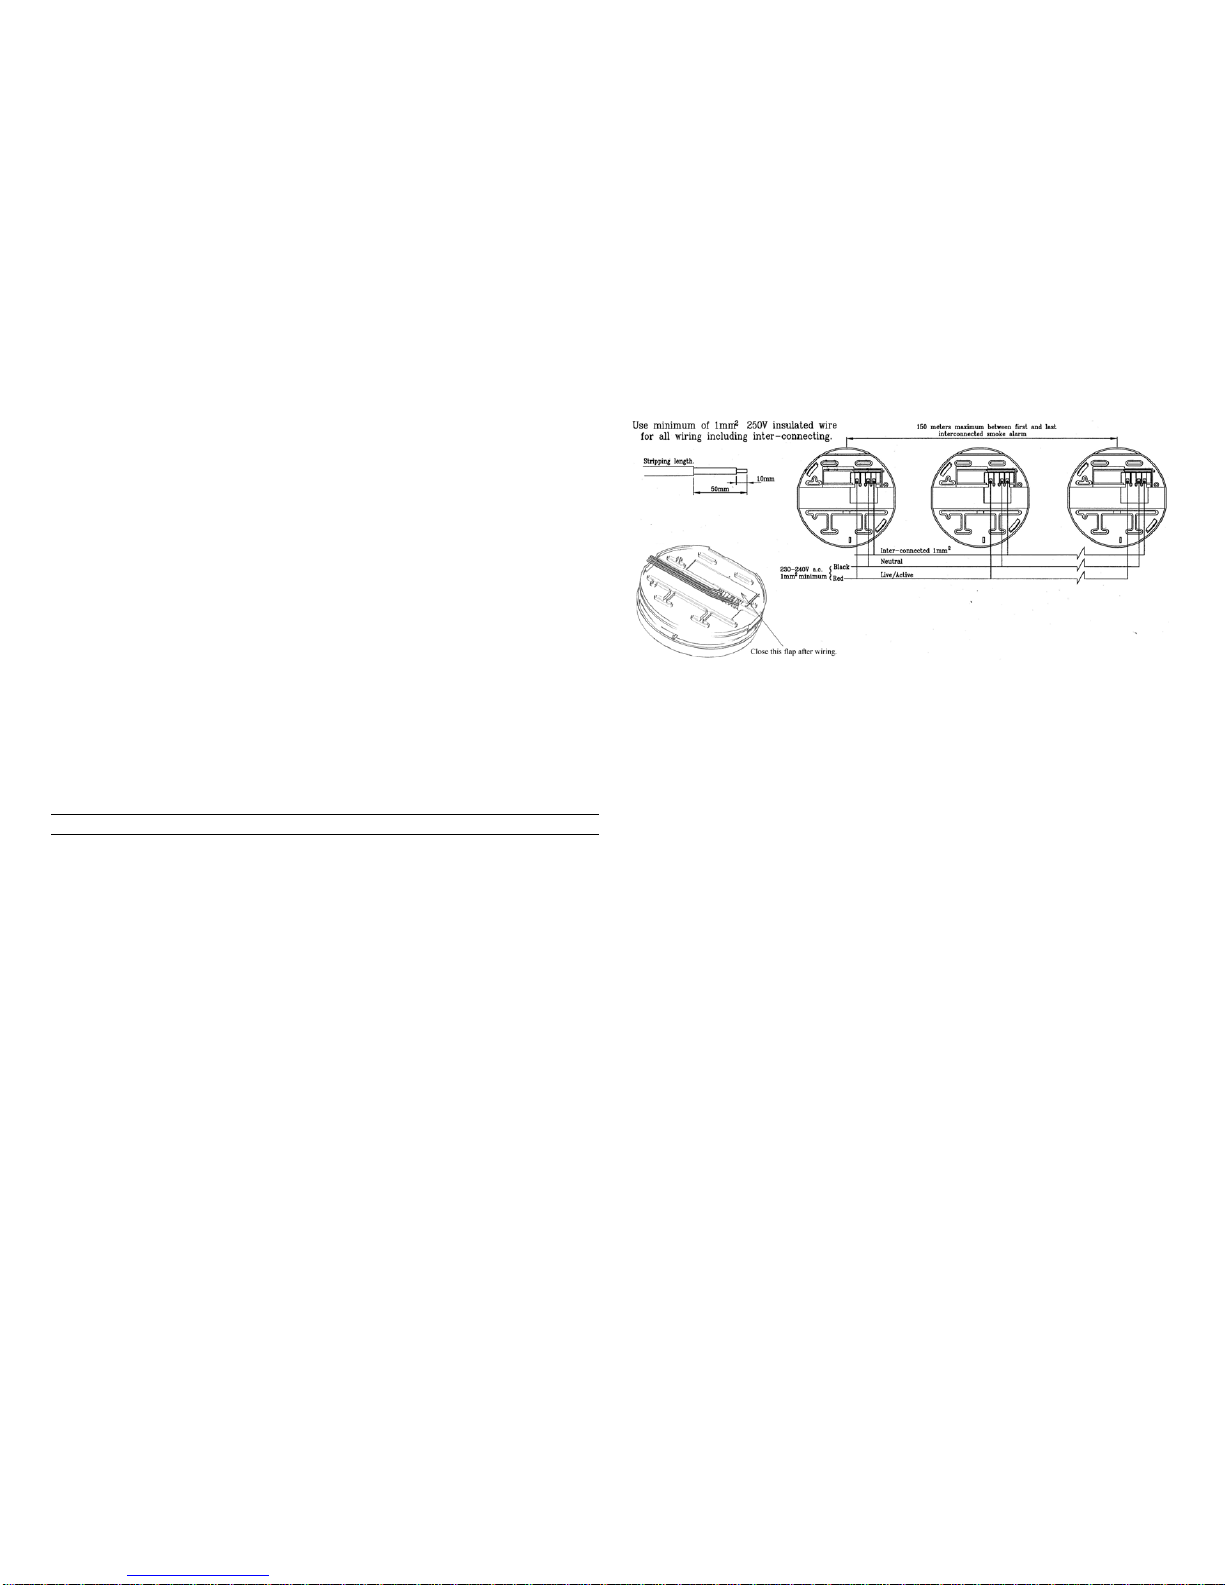
Solid wires with 1mm2(or larger) cross-section area are recommended for power supply and
inter-connection. Strip the Live, Neutral, and Inter-connect wires back to the length of
10mm. Connect the wires to the terminals in the wall mount and ensure the screws are fully
tightened. The colors of wires are: Live=Brown; Neutral=Blue, Inter-connect=White. The
smoke alarms can be inter-connected as many as 20 units in series. Check the connections
carefully before closing the junction box. Incorrect connection may damage the unit.
Your smoke alarm is designed for easy mounting on wall or ceiling. Ideally, this smoke
alarm is designed for mounting on standard flush box (84mm mounting centers). Place the
mounting bracket on it and locate the screw-holes of flush box. Then attach the bracket
directly on it with the screws provided. Then, check the mounting firmly.
For mounting without standard flush box, place the mounting bracket on the wall or ceiling
surface, use the pencil to mark down two drill-holes location on it. Usually, the distance
between two centers of drill-holes should be 84mm. For wooden surface, attach the bracket
directly on it with the screws provided. For the concrete surface or masonry, use drilling
machine to drill these two holes on the surface firstly. The sizes of holes are around 5.5mm
diameter and 25-30mm deep. Insert two dowels into the drilled holes before attached the
bracket. Then, check the mounting firmly.
Insert a 9VDC battery. Fold the alarm to wall mount tightly. The alarm cannot be hooked
if the battery is not installed properly.
Green LED will be brightened. Press TEST button to check the alarms work. Inter-
connected alarms must also be checked. Do not leave installation until the alarms have
been checked for correct operation.
During power up the unit, several ‘beep’ alarming may happen. It is normal operation
for the unit.
OPERATION, TESTING & MAINTENANCE
OPERATION

ART-SD3792A-00, REV.00
The smoke alarm is operating once the power is connected and turned on (the battery must
also be installed). When products of combustion are sensed, the unit sounds a loud alarm
which continues until the air is cleared.
FALSE ALARM “SILENCE” CONTROL
Units with the ‘silence’ feature have the capability of temporarily reducing the sensitivity of
the alarm circuit for approximately 8 minutes. This feature is to be used only when a known
alarm condition such as smoke from cooking activates the smoke alarm. The smoke alarm is
deactivated by pushing the hush button on the smoke alarm once. The smoke alarm will
automatically reduce sensitivity and light up the red indicator for approximately 8 minutes to
indicate the alarm is in the temporary silent condition. It will reactivate after such 8 minutes
and sound the alarm if particles of combustion are still present. The “silence” feature may be
used repeatedly until the air has cleared.
CAUTION: Before using the alarm “silence” feature, identify the source of smoke and
be certain that safe conditions exist.
TESTING
Test by pressing the test button on the smoke alarm cover for at least four seconds, until the
alarm sounds. It activates the self-test program and the alarm sounds if all electronic
circuitry, horn and battery are working. When any smoke alarm is tested, all interconnected
units should sound an alarm. Highly recommend to test the alarm weekly to assure
proper operation. In case of no alarm sounds on test, and/ or the unit has a defective
battery, then try to replace the battery by a new one. You can also test the alarm by blowing
smoke into the unit.
PLEASE DISPOSE OFF THE BAD OR DISCHARGED BATTERIES PROPERLY TO
PROTECT OUR ENVIRONMENT.
MAINTENANCE
The smoke alarm is virtually maintenance free. However, under dusty conditions, a vacuum
hose may be used to clear the dust through the side opening. It is recommended to clean the
alarm monthly to keep best performance. Normally, the alarm can be operated up to 10
years without replacement. See the replacing date on the bottom of alarm unit.
BATTERY REPLACEMENT
The power of this smoke alarm is backup by one 9VDC battery. The battery should last for
at least one year under normal operating conditions. The smoke alarm has a low battery
indicator, and audible "chirp". It will operate at 30 - 40 second intervals for a minimum of 7
days. Replace the battery when this indication occurs. Only following 9VDC batteries
(available at most drug, hardware or electronic parts stores) may be used for replacement.
Carbon-Zinc Type: Eveready #216; Gold Peak #1604P; Gold Peak #1604S; Gold Peak
#1604G.
Alkaline Type: Eveready Energizer #522; Gold Peak #1604A; Duracell #MN1604.
Lithium Type: Ultralife U9VL-J
GOOD SAFETY HABITS
There are situations where a smoke alarm may not be effective in protecting against fire, for
instance:
*Smoking in bed;
*Leaving children home alone; and
*Cleaning with flammable liquids, such as gasoline.
WARNING
Disposal of unit - The unit contains a small quantity of radioactive source
Americium 241, 1.0 microcurie. Return to supplier or Department of Health in
your state for disposal by courier or hand delivery. Do not send smoke alarm by
Australia Post.
Alternative disposal is not permitted.
Do not try to tamper with sealed source.
ELECTRICAL RATING
MAINS POWER
Operating voltage (Max.): 220-240VAC, 50Hz
Operating current (Max.): 80mA
BACKUP BATTERY
Operating voltage (Max.): 9VDC
Operating current (Max.): 20mA
Battery type: 6F22
Popular Smoke Alarm manuals by other brands


Fire Fighting Enterprises
Fire Fighting Enterprises Fireray 50 user manual

Aico
Aico Ei141 Technical specification

BRK electronic
BRK electronic ZCOMBO-G quick start guide

Ei Electronics
Ei Electronics Ei 169 Instruction leaflet

Kidde
Kidde FIRE SENTRY i9040 Specifications

Landmann
Landmann Great Outdoors Smoky Mountain 3425GLA Assembly and owner's manual

pyrexx
pyrexx WBM operating instructions

Flamingo
Flamingo FA23B user manual

Fire-Lite Alarms
Fire-Lite Alarms BG-12LX operating instructions

Ningbo Siterwell Electronics
Ningbo Siterwell Electronics GS522C user manual

Rielta
Rielta Ladoga PD-RK installation guide

Ei Electronics
Ei Electronics Ei161e instruction manual