manuals.online logo
Brands
  1. Home
  2. •
  3. Brands
  4. •
  5. Rielta
  6. •
  7. Smoke Alarm
  8. •
  9. Rielta Ladoga PD-RK User manual

Rielta Ladoga PD-RK User manual

Design of the Detector
The Detector outside view is shown in Figure1.
The Detector is enclosed in a plastic case (1). Two LED indicators (2)
are located on the face side of the case. The operability of the Detector
is checked by means of the introduction of a reflector (needle, clip,
wire with maximal thickness 1 mm) through the opening (3) located
on the case (1). The PCB comprises tamper contacts (4), the main
power supply battery holder (5) and the backup power supply battery
holder (6), «Reset» contacts (7).
LED Indication
Table 3
Detector Status Indication
«Norm» mode
LED indicator lights green (once per 15 s)
Mode «Binding» LED indicator blinks green intermittently
«Fire»
LED indicator blinks red alternately at 1 Hz
frequency
«Communication
Quality Appraisal» see Table 4
«
Identification
»
indication is on
LED indicator blinks red and green
alternately
No communication
with the CP
LED indicator blinks red (once per 15 s)
Binding with the CP
The «Binding» procedure is intended for logging of the connected
Detector in the CP/Repeater, and for the reception of communication
parameters by the Detector.
1. Install the reserve battery first and then the main battery (battery
type CR123A) or remove these insulators.
2. Close «Reset» contacts on the PCB in order to reset the Detector.
3. The green LED blinking displayes the Detector operation in the
«Binding» mode.
4. After a successful binding with the CP, the red LED indicator
lights for 2 s.
5. The time during which the Detector operates in the «Binding»
mode is limited to 100 s, after what the Detector changes to the sleep
mode. The «Binding» mode may be resumed.
Note - A Detector supplied by the manufacturer is ready for the
binding procedure and does not require an additional contacts closing.
Introduction
The wireless smoke detector «Ladoga PD-RK» (hereinafter, the Detector)
is intended for detecting ignition accompanied by smoke, generating and
sending a «Fire» message within the 433.05 to 434.79 MHz
frequency
range via a two-way communication by the «Rielta-Contact-R»
exchange protocol.
The Detector is designed for operation as a component of any control
panel (hereinafter, CP) supporting the «Rielta-Contact-R» wireless
exchange protocol.
The mode of operation of the Detector is based on the detection of
the optical radiation reflected from smoke particles.
Features
The Detector has the following features:
- Received command «Set On» from the CP by the wirelwss two-way
communication «Rielta-Contact-R» protocol is the obligatory condition
of the Detector restart after the fire «Alarm» message generation;
- The Detector comprises built-in functional testing module;
- Failure message is generated by the Detector in case of circuit
layout failure or sensitivity decrease for more than 2.5 times;
- The Detector provides compensation of the optical smoke chamber
dust content. Upon reaching the dust concentration threshold, the
«Optical Smoke Chamber Dustiness» message is generated by the
Detector;
- Alarm messages in case of wall or cover tampering and removal
the detector from the base are generated by the Detector;
- The Detector provides automatical switch to a backup operating
frequency in case of an imperfect interference situation at the main one;
- «Identification» LED indication is switched on and disabled by the
relevant command from CP;
- The Detector is powered by two lithium batteries CR123A type.
One is the main battery the other is the reserve battery;
- The Detector ensures not less than three years of standby operation
under main battery power supply and not less than two months under
the backup one.
Features
Table 1
Parameter Name Value
Threshold of sensitivity 0.14 dB/m;
Detector response delay maximum 5 s
Broadcast period 10 sec to 10 min
Operating temperature from minus 20 to +55 °С
Dimensions maximum
Ø
125 x 70 mm
Weight (without batteries) maximum 0.2 kg
IP rating IP30
Scope of delivery
The Detector scope of delivery is referenced in Table 2.
Table 2
Description QNT
Wireless smoke detector «Ladoga PD-RK»
Screw 3-3х40.016
Screw plug «SORMAT» NAT 5x25
CR123A lithiun power supply battery
Wireless smoke detector «Ladoga PD-RK».
Installation Guide
1 pc.
2 pcs.
2 pcs.
2 pcs.
1 copy
Informativity
The Detector ensures transmission and indication of the following
messages:
- «Fire» - in case the optical density of the environment exceeds
the threshold of sensitivity;
- «Tamper» - in case the Detector is resumed from its base;
- «Fault» - in case of the Detector system fault or its sensitivity drops
more than 2.5 times;
- «Norm» - in case there are no other messages;
WIRELESS SMOKE DETECTOR
«Ladoga PD-RK»
Installation Guide
5
6
1
2
3
Reset
4
7
Backup
Main
- «Main low-battery» - upon power voltage drops below (2.4±0.2) V
during a communication session;
- «Backup low-battery» – upon power voltage drops below (2.4±0.2) V
during a communication session;
- «Binding» mode - during logging of the Detector in the system;
- «Identification» - upon receipt of a relevant command from the CP;
- Communication quality appraising.
Figure 1
Installation
Install the Detector in the location, where the quality of communication
is appraised «excellent» or «good».
Install the base at the chosen place. Insert the Detector into the base
and fix it by turning clockwise.
Maintenance
The operability of the Detector should be checked at least annually.
The Detector should be cleaned from dust if the Detector generates
«Fault» or «Optical Smoke Chamber Dustiness» message. For this purpose,
sweep the optical system of the Detector by air under 0.3–0.5 kg/cm
2
pressure.
In order to prevent the optical smoke chamber dustiness, depending
on the operating conditions and according to statistical data, it is
recommended to carry out periodical technical maintenance of all
Detectors logged in the fire alarm system.
Attention! For the power supply battery life safe-energy, do not leave
the Detector energized with the repeater powered off for a long time.
Storage and Transportation
The Detectors are transported without power supply battery. The
Detector in their original packaging are resistant to:
- transport jolting with the acceleration up to 30 m/sec2at impact
frequency range from 10 to 120 per minute or 15 000 strikes;
- ambient temperature range minus 50 ... +50 °С;
- relative air humidity (95 ± 3) % at a temperature +35 °С.
The Detector in original package may be transported by any means
of transportation in closed vehicles over any distances in compliance
with the existing shipping rules concerning the respective means of
transportation.
After transportation under the conditions different to exploitation
conditions the Detector shall be ready to operate after a maximum
of six hours.
The storage room shall be free from current-conducting dust, acid
vapors, alkali and gases that cause corrosion and destroy insulation.
Manufacturer’s Guarantees
«RIELTA» JSC guarantees conformity of the Detector to it’s Technical
Specifications if conditions of transportation, storage, assembling and
operation are observed. The guaranteed storage period is 63 months
since the date of manufacturing the Detector.
The guaranteed period of operation is 60 months since the date of
commissioning within the storage period guaranteed.
For warranty service contact address:
Research and technology business company «C.Nord» LLC
199 – 201, Obvodny Canal Embankment, Saint-Petersburg, Russia,
190020
Tel: +7 (812) 327-16-36
E-mail: [email protected], [email protected]
www.cnord.ru
Note - Warranty obligations are not applied to the power supply
batteries.
Installing the Detector
When choosing the place of installation for the Detector, take
into account the fact that the Detector refers to fire Detectors with
operability control and therefore, a single Detector may be installed
in the monitored premise.
All other conditions being equal, the location chosen for the
installation of the Detector should meet the following requirements:
- prevention of water ingress from the front side and the base side;
- minimum vibrations of building structures;
- minimum illumination
- maximum distance from sources of electromagnetic interference
and infrared radiation (heating units);
- maximum convenience of installation, checking and removal of
the Detector.
Transmission quality may differ from premise to premise; therefore,
it is advisable to apprise a communication quality before the Detector
is finally installed.
Communication Quality Appraising
The Detector should be installed within the radio coverage zone of the
CP; therefore, it is recommended to check the messages transmission
from the presumed installation place and to appraise the quality of
the communication.
After removal from its base (tamper contact is released), the Detector
transmits the «Tamper» message and then displays the quality of
communication as per Table 4.
Table 4
LED Indication Communication
Quality
Appraisal
Recommendations
Color Mode
Green Three
blinks Excellent
Install the Detector at
this place
Green Two blinks Good
Green One blink Communication
established Choose another place
for installation or use
a repeater*)
Red Four
blinks
No
communication
*) - «Ladoga-RK»system repeater
Operability Test
Push the operability test button (5) and hold it during not less than 5
s, until the red LED indicator starts blinking. Make sure that «Fire» alarm
message at correspondent zone is received and logged in CP.
Feed testing spray or introduce the reflector (needle, clip, wire with
maximal thickness 1 mm) into the optical smoke chamber opening. To
restart the Detector after the fire «Alarm» message generation, «Set On»
command by the wirelwss two-way communication «Rielta-Contact-R»
protocol from the CP is required.
Rev. 9 of 05.12.2019
v.10.2
Made in Russia
«RIELTA» JSC, www.rielta.com
Chapaeva Str. 17, Saint Petersburg, Russia, 197046, [email protected]
Tel./fax: +7 (812) 233-0302, 703-1360
Technical support, tel.: +7 (812) 233-29-53, 703-13-57, [email protected]

Other Rielta Smoke Alarm manuals

Rielta Ladoga PD-RK-A User manual

Rielta

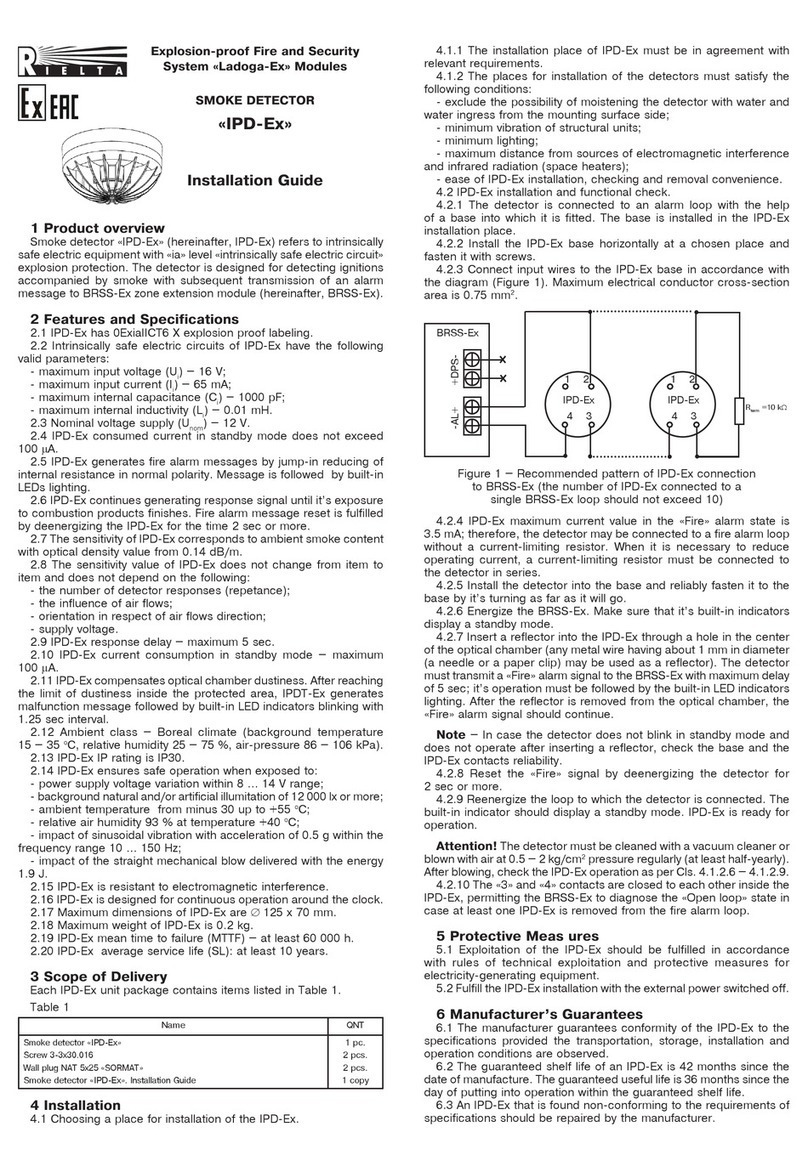
Rielta Ladoga PD-RK-A User manual

Rielta Ladoga PD-RK User manual

Rielta

Rielta Ladoga PD-RK User manual

Rielta IPD-E Series User manual

Rielta

Rielta IPD-E Series User manual

Popular Smoke Alarm manuals by other brands

Perenio PECSS01 quick start guide

Perenio

Perenio PECSS01 quick start guide

Eterna SDION Safety and installation instructions

Eterna

Eterna SDION Safety and installation instructions

Siemens Synco living AP260 manual

Siemens

Siemens Synco living AP260 manual

Rosslare AS-34 Installation instructions and operators manual

Rosslare

Rosslare AS-34 Installation instructions and operators manual

Kidde PI9010 user manual

Kidde

Kidde PI9010 user manual

Kidde KN-COSM-BCA user guide

Kidde

Kidde KN-COSM-BCA user guide

System Sensor Innovair DH200PL Installation and maintenance instructions

System Sensor

System Sensor Innovair DH200PL Installation and maintenance instructions

Kidde KN-COB-B-LP user manual

Kidde

Kidde KN-COB-B-LP user manual

System Sensor FAAST LT Control guide

System Sensor

System Sensor FAAST LT Control guide

First Alert 7010LBL user manual

First Alert

First Alert 7010LBL user manual

ESYLUX PROTECTOR K RADIO MODULE user manual

ESYLUX

ESYLUX PROTECTOR K RADIO MODULE user manual

olympia electronics BSR-6155/MAR quick start guide

olympia electronics

olympia electronics BSR-6155/MAR quick start guide

Bosch FPE-1000-CITY installation guide

Bosch

Bosch FPE-1000-CITY installation guide

usi IoPhic MDS101L user manual

usi

usi IoPhic MDS101L user manual

usi USI-1213 manual

usi

usi USI-1213 manual

Inovonics EE1265 Installation and operation manual

Inovonics

Inovonics EE1265 Installation and operation manual

Landmann Great Outdoors Smoky Mountain 3425GLA Assembly and owner's manual

Landmann

Landmann Great Outdoors Smoky Mountain 3425GLA Assembly and owner's manual

jablotron JA-85ST quick start guide

jablotron

jablotron JA-85ST quick start guide

manuals.online logo
manuals.online logoBrands
  • About & Mission
  • Contact us
  • Privacy Policy
  • Terms and Conditions

Copyright 2025 Manuals.Online. All Rights Reserved.