waves system EVP380 User manual
EVP380
User guide
Version : 2.1 (for firmware 1.11 or higher)
Date : Oct 2021
Éditeur : Waves System
Auteur(s) : Thierry Roger

2
Licence
Waves System products are exclusively manufactured by Waves System
14, rue Philippe Lebon- 44980 Sainte Luce Sur Loire- FRANCE
Sales and informations : +33 (0)2 40 78 22 44
E-mail : [email protected]
Website : https://waves-system.com

3
Table des matières
Welcome ...................................................................................................................................................................... 6
1. Safety instructions .................................................................................................................................................. 7
2. Content of the box ................................................................................................................................................ 10
3. Description of the player ...................................................................................................................................... 12
3.1. Input contacts 14
3.2. Output contacts 17
4. Startup and configuration .................................................................................................................................... 20
5. Connexion diagram .............................................................................................................................................. 21
6. Set up and update your content media support ............................................................................................... 22
6.1. First setup of removable content support 22
6.2. Update content on removable content support 22
6.3. Update content directly from your local network 22
7. First steps with your player EVP380 .................................................................................................................. 23
7.1. Autoplay 23
7.2. Using input contacts of your player EVP380 23
7.3. Identify the player on your local network 24
8. Control the player with folders and files ............................................................................................................. 25
8.1. Arrangement of folders 25
8.2. Add tags to the name of folders to build your scenario 27
8.2.1. [Jxxx] - Jump to folder xxx at the end of the playback of the folder 28
8.2.2. [LOOP] - Play the folder in loop without the tags at each loop. 28
8.2.3. [RESUME] - Save the reading position of the files when returning to the folder 28
8.2.4. [RET] - Return to the previous folder at the end of the playback of the folder 29
8.2.5. [RND] or [SEQ] - Sequential or random playback mode 29
8.2.6. [Vx] - Adjust the absolute volume of the folder 29
8.2.7. [V+x] ou [V-x] - Relative volume of the folder 30
8.2.8. [NT] - Disable the command events during the playback of the folder 30
8.2.9. [NRST] or [NORESTART] - Disable retriggering of a folder when being played 31
8.2.10. [WHL] - Play the folder while the assigned input combination remains activated 31
8.2.11. [NXTxxx] - Play the next xxx media files each time the folder is played 31
8.2.12. [SUBS x] and [SUBE x] - Define the settings to display subtitles at the beginning or at the end of the playback 32
8.2.13. [WEBS x] and [WEBE x] - Open a webpage at the beginning or at the end of the folder playback 32
8.2.14. [WEBS OFF] and [WEBE OFF] - Close a webpage at the beginning or at the end of the folder playback 32
8.2.15. [PROJS ON], [PROJE ON], [PROJS OFF] and [PROJE OFF] 33
8.2.16. [RESxxxxxxxx] and [REExxxxxxxx] - Activate or deactivate output contacts 33
8.2.17. [RSSxxx] or [RSExxx] - Send bytes through the RS-232 output 33
8.2.18. Description of folder SYSTEM (optional) 35
8.2.19. Description of folder WWW (optional) 35
8.3. Arrangement of files inside folders 35
8.4. Add tags to the name of files to build your scenario 36
8.4.1. [Jxxx] - Jump to folder xxx at the end of the playback of the file 37
8.4.2. [NT]: Disable the command events during the playback of the file 37
8.4.3. [DUR x] or [DURATION x] - Define the duration of playback of a picture 37
8.4.4. [SUBS x] and [SUBE x] - Define the settings to display subtitles at the beginning or at the end of the playback 37
8.4.5. [SYNCHRO] - Synchronize players to start playback simultaneously 38

4
8.4.5. [SYNCHRO] - Synchronize players to start playback simultaneously 38
8.4.6. [WEBS x] and [WEBE x] - Open a webpage at the beginning or at the end of the file playback 38
8.4.7. [WEBS OFF] and [WEBE OFF] - Close a webpage at the beginning or at the end of the file playback 38
8.4.8. [PROJS ON], [PROJE ON], [PROJS OFF] and [PROJE OFF] 38
8.5. Adding subtitles to videos 38
8.5.1. Naming subtitles in separated files 39
8.5.2. Encapsulated subtitles 39
8.5.3. Select one subtitle on the fly 39
8.6. Playback a slideshow 39
8.7. Playback of audio files 39
8.8. Modification of background image when player is in state "STOP" 39
8.9. Using RS-232 serial link 40
8.10. Using TCP/IP link 40
9. Synchronize players to start playback simultaneously .................................................................................... 41
10. Control the player with a scheduler ................................................................................................................. 43
10.1. Introduction 43
10.2. Principle 43
11. Control the player using the HTML5 engine ................................................................................................... 45
12. Show control ....................................................................................................................................................... 46
12.1. Create a project with Show control Editor 46
12.1.1. Record a DMX or an Art-Net show 46
12.1.1.1. First record 46
12.1.1.2. Show control files playback and player control 47
13. Settings on front panel ...................................................................................................................................... 49
13.1. Clickable knob 49
14. Infrared remote control ...................................................................................................................................... 50
15. Advanced configuration .................................................................................................................................... 51
15.1. System info 51
15.2. System settings 51
15.2.1. Playback engine 51
15.2.2. Log 51
15.2.3. Network 52
15.2.3.1. IP settings 52
15.2.4. Display 52
15.2.4.1. Resolution 52
15.2.4.2. Display aspect 52
15.2.4.3. Dynamic range 52
15.2.4.4. Custom video display area 52
15.2.5. HDMI CEC 52
15.2.6. Video projector 52
15.2.7. Sound 53
15.2.8. Subtitles 53
15.2.9. Serial port 53
15.2.10. Input contacts 53
15.2.11. Printer 53
15.2.12. FTP server 53
15.2.13. Web browser 54
15.2.14. Date and time 54

5
15.2.14. Date and time 54
15.2.15. Language 54
15.2.16. Device identification 54
15.2.17. Boot sequence 54
15.2.18. System update 54
15.3. Scenario settings 54
15.3.1. Startup volume 54
15.3.2. Autoplay folder 54
15.3.3. Sources blocked by [NT] 55
15.3.4. Input contacts 55
15.3.5. Remote control 55
15.3.6. Playback start synchronisation 55
15.3.7. Volume notifications 55
15.3.8. Websites 55
15.4. System control 55
15.4.1. Video playback 55
15.4.2. Power state 56
15.4.3. Neighborhood 56
15.4.4. Console 56
15.4.5. File manager 56
16. RS-232 & TCP/IP communication protocol .................................................................................................... 57
16.1. Player control commands 58
16.1.1. Jump to a folder 58
16.1.2. Play and standby 59
16.1.3. Set the volume 60
16.1.4. Request information 60
16.2. Update the clock 61
16.2.1. Update the local time 61
16.2.2. Update the local date 61
16.2.3. Update the local date and time 62
16.2.4. Update the UTC/GMT date and time (epoch version) 62
16.2.5. Update the UTC/GMT date and time (complete version) 63
16.2.6. NTP activation/deactivation 63
16.3. Command to select subtitles 64
16.3.1. Generic command to select subtitles 64
16.3.2. Select a subtitle track with language code 65
16.3.3. Select a subtitle track using track index 65
16.3.4. List all subtitle tracks 65
16.4. Unitary transmission mode and daisy chain 66

Welcome
EVP380
6Oct 2021 Version : 2.1 (for firmware 1.11 or higher)
Welcome
EVP380 is a show control player to synchronise
audio, 4k video and DMX/Art-Net. This player is
ideal for multisensorial scenographies and light
shows.
With our Show Control Editor is free software, you
create and visualize DMX events synchronized
with audio and video. Connect directly a DMX
console or your computer with a light show
software to the DMX input or throughArt-Net
network. records the show directly to EVP380
replay them in perfect synchronisation.
The player adapts its content when receiving
events coming from DMX input, GPI, scheduler ,
RS-232, TCP/IP requests and HTTP requests.
The player embeds a 4go internal memory and
amplified audio. You save time and money by
programming easily the player.
From a webbrowser: .https://waves-system.com/
From the menu de la of Documentation utilisateur remote administration
.EVP380
Refer to chapter of user guide.Safety instructions [p.7]
EVP380
Refer to the user guide
Safety

EVP380
Safety instructions
Oct 2021 Version : 2.1 (for firmware 1.11 or higher) 7
1. Safety instructions
CAUTION! DO NOT EXPOSE THE PRODUCT TO HUMIDITY NOR DUST!
Unplug the power supply cable before any servicing
FOR YOUR SAFETY, PLEASE READ CAREFULY THE USER'S GUIDE BEFORE OPERATING
YOUR PLAYER .EVP380
CE marking
The CE marking is placed on the nameplate, at the rear side of the device. It attests to compliance of the
device with low voltage CE directive according to EN 55022 standard, and the Electromagnetic
Compatibility Directive 61000-4-x.
Overview
• The user manual is an integral part of the product. It must always be kept handy & close by. Proper
usage involves strict compliance with the instructions given in this manual.
In the event of return of the equipment, the user manual should be handed over to the new purchaser.
The staff should receive instructions concerning the proper usage of the device.
• Only the use of genuine parts ensures perfect safety for the user and correct operation of the device.
Moreover, only accessories mentioned in the technical documentation or explicitly approved by the
manufacturer must be used. If accessories or consumable products from other brands are used, the
manufacturer cannot stand guarantee for the correct and safe operation of the device.
• Damages caused through the use of accessories or consumable products from other brands will not
entail right to any benefit under the terms of warranty.
• The manufacturer will be liable for the safety, reliability and functioning of the product as long as the
assembly, settings, modifications, extensions and repairs have been carried out by the manufacturer or a
company approved by the manufacturer, and if the device is used in accordance with the instructions
mentioned in this manual.
• The player complies with the technical safety standards in force at the date of print of this manual. All
rights reserved for the electrical diagrams, procedures, names and devices mentioned herein.
• Any reproduction of the technical documentation, even partially, without the written authorization from
is prohibited.Waves System
General safety instructions
This device has been shipped out from our facilities in perfect working condition. In order to preserve
these conditions, for safety and to avoid any risk of accidental bodily injury, the user must imperatively
follow the safety instructions and read the ‘Caution!' messages included in this manual.
This device, made by , has been designed in a way that practically eliminates any risk if it Waves System
is used in accordance witj its intended purpose. Nevertheless, for the sake of safety, we would like to
Warning

Safety instructions
EVP380
8Oct 2021 Version : 2.1 (for firmware 1.11 or higher)
is used in accordance witj its intended purpose. Nevertheless, for the sake of safety, we would like to
draw your attention to the following instructions:
• When using the device, comply with all local rules and regulations in force. Any modification or
conversion of the device automatically entails loss of the certification. The operation of a modified device
is liable to a penalty. In the interests of occupational safety, the operator and the user are held
responsible for complying with the regulations.
• Keep the original packing for a possible product reshipment. Also ensure that the packing material is
kept out of the reach of children. Only this original packing ensures optimal protection for the product
during transportation. If a product reshipment appears to be necessary during the guarantee period,
is not liable for any ensuing damages arising during the transportation and attributable to Waves System
a defective packing.
• This device should be used only by persons whose training or knowledge ensures proper handling.
• Before each use, the operator must check that the device is in perfect working condition.
• This product must not be used in places where there is a potential explosion risk. Besides, it must
neither be used in an environment favoring combustion nor in a humid or excessively hot or cold location.
• Maximal temperature of use: +45°C
• Storage temperature: from 0°C up to +60°C
Safety instructions against risks due to electric currents
• The device must be connected to a grounded AC power outlet or a European standard outlet installed
as per good professional practices.
• Disconnecting means of primary supply: Power outlet is used as the disconnecting means of primary
supply, it shall remain accessible.
• Power supply: 12V DC - 3,45 A
• Before connecting the device, check that the mains voltage and frequency match the specifications
indicated on the mains adapter.
• Before powering, check that the device and cables are not damaged. Damaged cables and
connections must immediately be replaced.
• Never allow the power cords to come in contact with other cables. Handle the mains adapter cable as
well as all other cables connected to the mains with extreme care.
• Always connect the power cord to the device first, then to the mains. The power outlet must remain
accessible after the installation.
• Check the device and its mains adapter cable from time to time. Disconnect the device from the mains
when it is no longer used or for the purpose of maintenance.
• Handle the power cord by using only the plug. Never remove the plug by pulling the power cord.
• Electrical connections, repairs, and maintenance must be carried out by qualified personnel.
• Do not switch the device on or off within a short period of time as this reduces its lifespan.

EVP380
Safety instructions
Oct 2021 Version : 2.1 (for firmware 1.11 or higher) 9
THE LIGHTNING FLASH WITH ARROWHEAD SYMBOL, WITHIN AN
EQUILATERAL TRIANGLE, IS INTENDED TO ALERT THE USER TO
THE PRESENCE OF UNINSULATED “DANGEROUS VOLTAGE”
WITHIN THE PRODUCT'S ENCLOSURE THAT MAY BE OF
SUFFICIENT MAGNITUDE TO CONSTITUTE A RISK OF ELECTRIC
SHOCK TO PERSONS
THE EXCLAMATION POINT WITHIN AN EQUILATERAL TRIANGLE IS
INTENDED TO ALERT THE USER TO THE PRESENCE OF
IMPORTANT OPERATING AND MAINTENANCE (SERVICING)
INSTRUCTIONS IN THE LITERATURE ACCOMPANYING THE
APPLIANCE.
Warning, the user's guide must be red each time the symbol is written.
Direct current
WEEE
User's guide must be red each time this symbol is written.
Positive electric polarity
Terms uf use
• This product has been designed for indoor use only.
• The device must be attached under 2m high from the ground.
• If this device has been exposed to very high temperature fluctuations (e.g.: after transportation), do not
connect it immediately. The condensation formed inside the device could damage it. Allow the device to
reach ambient temperature before connecting it.
• Do not shake the device. Avoid sudden movements during its installation or handling.
• When selecting the spot for installation of the player, ensure that it is not exposed to a high source of
heat, moisture, or dust. There
should not be any cables lying around as they might jeopardize your and others' safety.

Content of the box
EVP380
10 Oct 2021 Version : 2.1 (for firmware 1.11 or higher)
2. Content of the box
Box
What's inside the box
1 Event Video Player
EVP380.
2 Remote control
You can use the remote control to configure the player through the screen or to change the playback.
3 Power supply
Power cord

EVP380
Content of the box
Oct 2021 Version : 2.1 (for firmware 1.11 or higher) 11
4 Power cord
The power cord is adapted to the country of destination.
5 Quick start manual
6 Primary batteries
2 primary batteries are supplied with the remote control.
Description of the player
EVP380
12 Oct 2021 Version : 2.1 (for firmware 1.11 or higher)
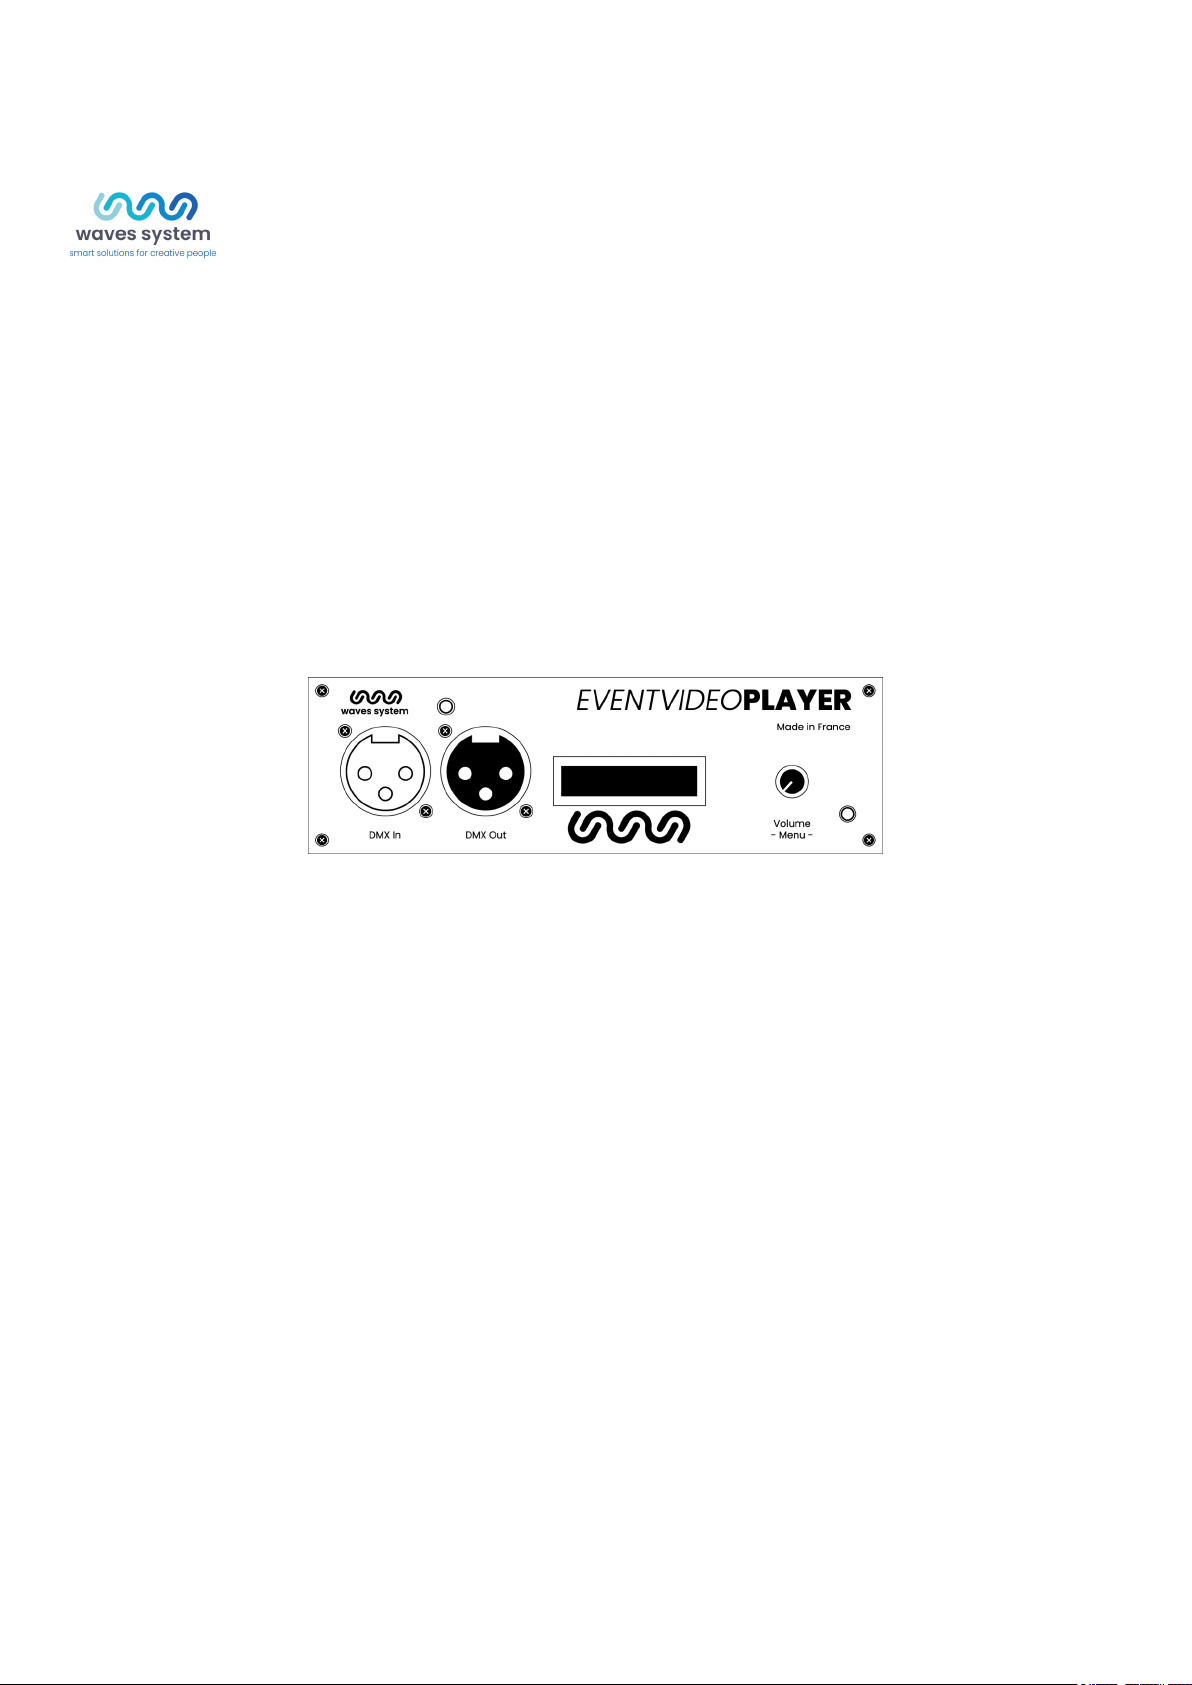
3. Description of the player
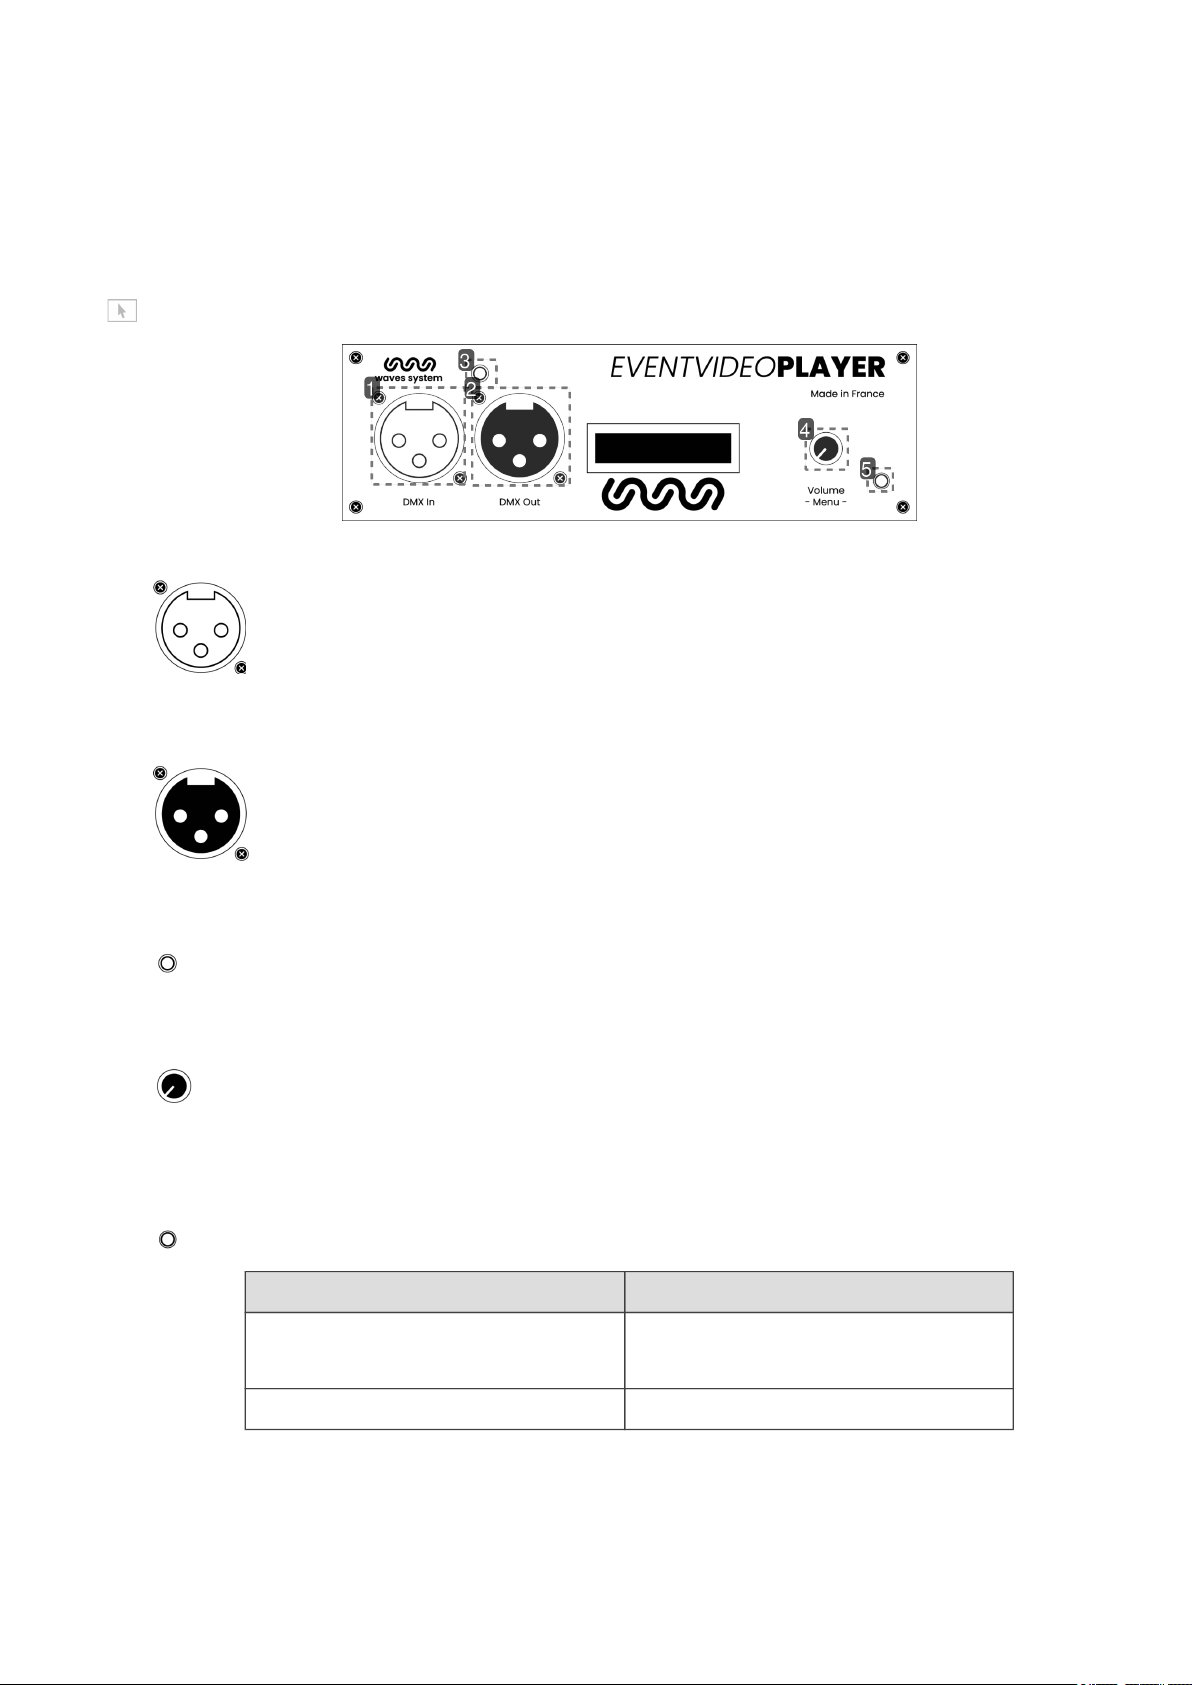
Front panel of the player EVP380
Introduction of player EVP380
1 DMX input
2 DMX output
3 Infrared sensor for the remote control
4 Volume knob
Adjust the volume through the button.
5 Activity LED
Interaction Function
green Steady green: ready, stop
Blinking green: ready, reading
red standby
EVP380
Description of the player
Oct 2021 Version : 2.1 (for firmware 1.11 or higher) 13
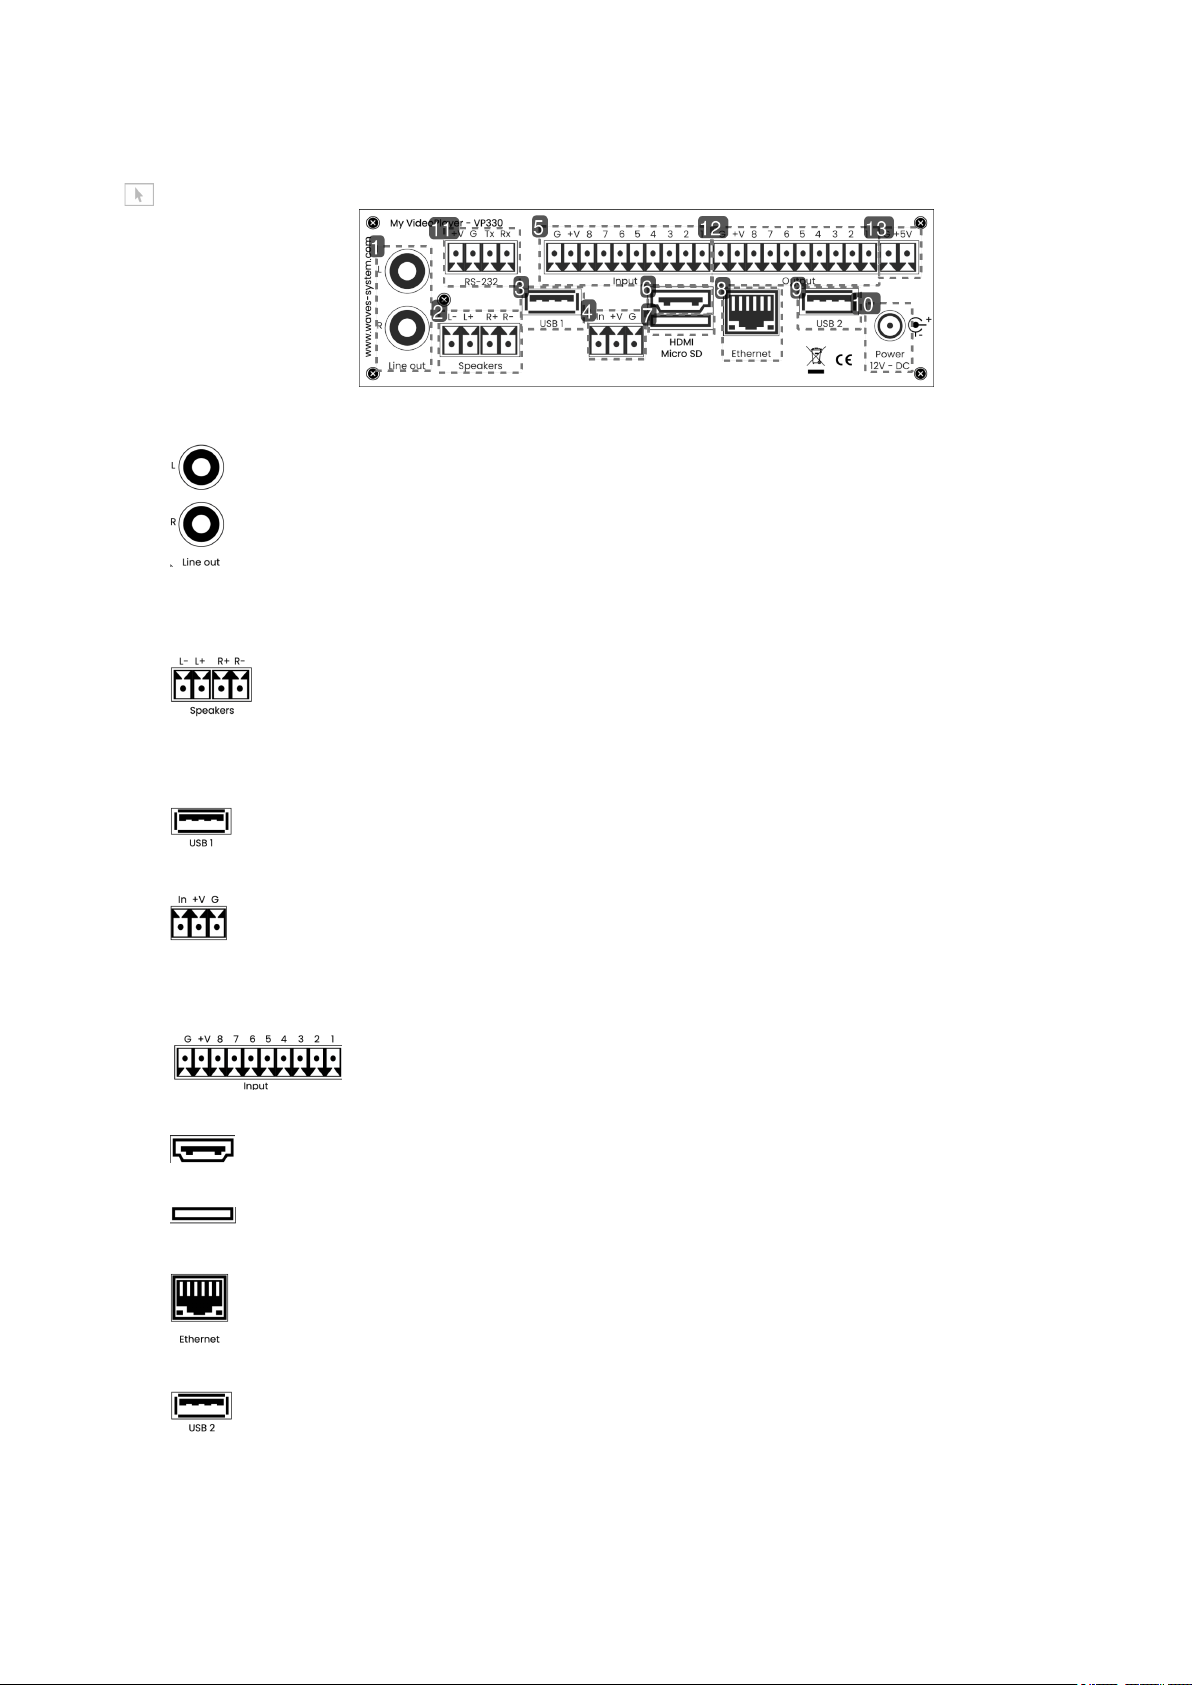
Rear panel of the player EVP380
1 Analog audio output to connect an amplifier
2 Amplified audio output to connect loudspeakers
3 USB 1 port to connect a storage medium or a pointing device
4 Entry contact coupled with a 12V power supply
5 8 entry contacts
6 HDMI audio/video output
7 Micro SD
8 Ethernet connector 10/100 Mbit/s
9 USB 2 port
Power supply

Description of the player
EVP380
14 Oct 2021 Version : 2.1 (for firmware 1.11 or higher)
10 Power supply
11 RS232 serial link
12 8 Mosfet ouput
13 5V power output
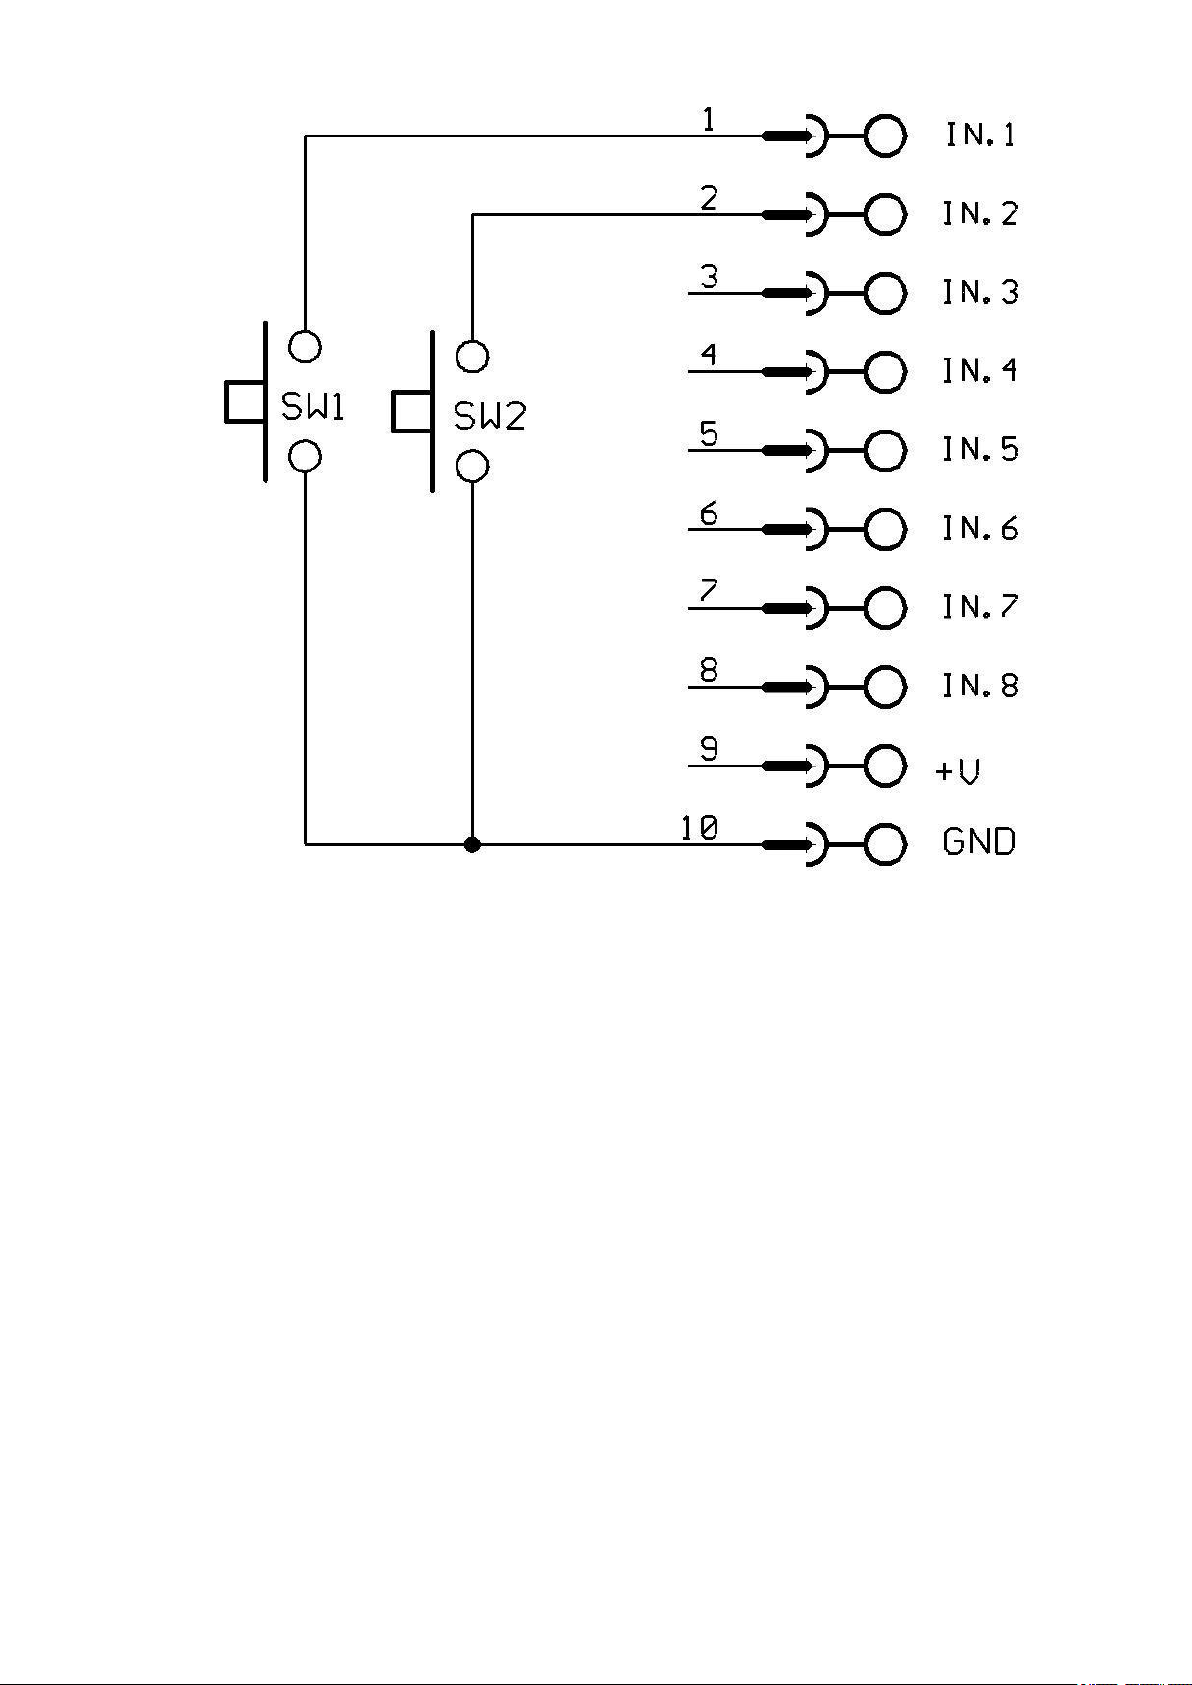
3.1. Input contacts
The player has 8 input contacts. Input 1 est doubled. Each input. Connect directly each input to a push
button or a sensor from Waves System portfolio. An input contact is defined by:
- In: trigger
- +V: 12V output power to power the sensor
- G: Ground
The contact is triggered when In is connected to Ground G.
The 8 input contacts can be extended by one or 2 extension boards (Ext15In). Each board converts 4
inputs into 15 inputs.
EVP380
Description of the player
Oct 2021 Version : 2.1 (for firmware 1.11 or higher) 15
Play folder001 with push button SW1. Play folder 002 with push button SW2.

Description of the player
EVP380
16 Oct 2021 Version : 2.1 (for firmware 1.11 or higher)
Combination of inputs to play folder 021.

EVP380
Description of the player
Oct 2021 Version : 2.1 (for firmware 1.11 or higher) 17
SensoPad connected the player to play folder 001.
+V is directly coming from input voltage. with a 12V voltage, output voltage will be also 12V. Output
current will not exceed 500mA.
3.2. Output contacts
The player can actuate output contacts to drive differents devices. You can swith on leds, EVP380
relays, motors .... Output contacts are actuated through tags added to the name of folders. Output
contacts are electronically generated by «MOSFET». (refer to scheme below). Max output power is 20V
/500mA per output; overall current limitation is 2A. Output cannot actuate powerfull devices but only low
power equipement such as LED or small relays. You shall use an interface between output and the
device in case of high power equipments. For example, you can use a relay or an external switch box.

Description of the player
EVP380
18 Oct 2021 Version : 2.1 (for firmware 1.11 or higher)
Scheme of one output.
Scheme to switch a LED or a relay with an external power supply.

EVP380
Description of the player
Oct 2021 Version : 2.1 (for firmware 1.11 or higher) 19
+V is directly coming from input voltage. with a 12V voltage, output voltage will be also 12V.+Output
current will not exceed 1A.
You can also use the 5V output to power a peripheral. Output 5V regulated - Max 1A

Startup and configuration
EVP380
20 Oct 2021 Version : 2.1 (for firmware 1.11 or higher)
4. Startup and configuration
This procedure explains how to start and configure your player for the first time.EVP380
Prérequis
Electric power shall be unplugged.
1Connect the player to the local network.
2Insert your prepared USB key in one of the two USB port at the back of the player.
3Connect a screen, speakers or a sound system on audio line out.
4Power the player by plugging the power connector.
Résultat
Your player is now ready to be used.EVP380
Table of contents
Other waves system DVD Player manuals


-2 manual")

