Wavespan Stratum 100 Product manual

Stratum 100
Wireless Ethernet Bridge
Installation
and
Maintenance
Guide

Copyright © 1999 Wavespan Corporation. All rights reserved.
No part of this publication (whether in hardcopy or electronic form) may be reproduced or
transmitted, in any form or by any means, electronic, mechanical, photocopying, recording, or
otherwise, without the prior written consent of the publisher. Any information referred to
herein is furnished under license with Wavespan Corporation and may only be used, copied,
transmitted, stored, or printed in accordance with the terms of such license.
This publication and the information herein is furnished AS IS, is subject to change without
notice, and should not be construed as a commitment by Wavespan Corporation. Wavespan
Corporation assumes no responsibility or liability for any errors or inaccuracies, makes no
warranty of any kind (express, implied, or statutory) with respect to this publication, and
expressly disclaims any and all warranties of merchantability, fitness for particular purposes,
and noninfringement of third party rights.
Wavespan is a trademark of Wavespan Corporation. Other brand or product names are the
trademarks or registered trademarks of their respective holders.
FCC Regulatory Compliance
This device complies with Part 15 of the FCC Rules. Operation is subject to the following
two conditions: (1) This device may not cause harmful interference, and (2) this device must
accept any interference received, including interference that may cause undesired operation.
This equipment has been tested and found to comply with the limits for a Class A digital
device pursuant to Part 15 of the FCC Rules. These limits are designed to provide reasonable
protection against harmful interference when the equipment is operated in a commercial
environment. This equipment generates, uses, and can radiate radio frequency energy and, if
not installed and used in accordance with the instruction manuals, may cause harmful
interference to radio communications. Operation of this equipment in a residential area is
likely to cause harmful interference in which case the user will be required to correct the
interference at his own expense.
The following information is for FCC compliance of unlicensed, intentional radiators. This
equipment complies with FCC Regulation 15.407 as relating to point-to-point wireless
communication.
Modifications to this product not expressly approved by Wavespan Corporation could void
the FCC approval and the user’s right to operate the product.
Wavespan Corporation
500 N. Bernardo Avenue
Mountain View, CA 94043
+1 650 919-0190
http://www.wavespan.com
Printed in the United States of America
10 9 8 7 6 5 4 3 2 1 031699

Safety Warning
Before aiming the antenna or working near the antenna, read all of this manual and
follow the instructions carefully.
DO NOT STAND IN FRONT OF THE ANTENNA WHILE POWER IS
ON.
Be sure to provide adequate grounding and lightning protection. Do not install the
Outdoor Unit near overhead electrical wires.
This unit is intended for point-to-point operation over an unobstructed line-of-sight path. It is
the responsibility of the installer to ensure the unit is properly installed in compliance with the
FCC’s guidelines for maximum permissible radio frequency exposure outlined in CFR 47
Section 1.1307(b)(1), preventing excess exposure to all persons. The installed radiating
device should be inaccessible to unauthorized personnel. The installed unit should be
positioned to guarantee no direct continuous exposure to people within 5 feet of the antenna.
During installation use caution to avoid excess exposures to directed antenna radiation within
3 feet of the front of the antenna.
The transmit power output from the Stratum 100 is less than 15 milliwatts. However, after the
gain of the standard 18-inch square antenna, the Effective Radiated Power is approximately
5.2 watts. Microwave radiation can cause tissue heating, potentially affecting the eyes,
causing permanent damage to vision.

Precautions when Rack Mounting the
Stratum 100
When rack mounting your Stratum 100, you should the following precautions for safety and
to ensure proper operation of the equipment:
The maximum ambient temperature for the Stratum 100 IDU is 50degrees C. Care should be
taken that when installed in a rack, whether closed or open, the ambient temperature within
the rack should not exceed 50 degrees C.
Stratum 100 IDUs have fans and ventilation holes to ensure proper air flow and maintain
correct internal temperature. Do not block the fans or ventilation holes.
When mounting any equipment in racks, you must take into account mechanical loading of
the rack. Heavier equipment should be placed near the bottom of the rack and equipment
should not be mounted in such a way as to cause instability. Special precautions should be
taken with mountings that slide out for easier access to equipment. Such mountings can cause
instability of the rack resulting in unsafe conditions and possible tipping of the rack.
Ensure that the power source, wiring and over-current protection to rack mounted equipment
is rated such that it can support the cumulative load of all equipment. Do not exceed the
capacity of the wiring or over-current protection.
Reliable grounding of the Stratum 100 is required.
The rack should also be grounded. If power distribution strips are used, ensure that they are
properly grounded.

Stratum 100 Installation and Maintenance Guide Contents •• i
Contents
About this Manual.............................................................................................................1
Whom This Manual is Intended For 1
Additional Reading 1
How This Manual Is Organized 1
Conventions 1
Introduction.......................................................................................................................3
Some Definitions 3
Standard Configuration 3
Installation .........................................................................................................................5
Installation Overview 5
Preliminary Preparation: The Path Survey & Cable Installation 5
Step 1. Installing and Mounting the ODUs 5
Step 2. Installing the Cabling from the IDUs to the ODUs 5
Step 3. Installing the IDUs 5
Step 4. Aiming the Antennas 5
Step 5. Connecting to Ethernet 6
Step 6. Verifying Correct System Operation 6
Step 7. (Optional) Connecting a Modem to the AUX Port 6
Step 8. Connecting to a PBX or other T1 device. 6
Assembling Tools and Cables Before You Begin 6
For installing the ODUs 6
For the cabling between each IDU and associated ODU unit 6
For installing the IDUs 6
Step 1. Installing and Mounting the ODUs 7
Setting Antenna Polarization 7
Attaching the Antenna Mount 7
Antenna Mast Requirements 7
Attaching Mount On Mast 7
Grounding the ODU and Mast 8
Lightning Protection 8
Step 2. Installing the Cabling from the IDUs to the ODUs 9
Routing Cables 9
Attaching the Cables 9
Weatherproofing the Outdoor Connectors 9
Step 3. Installing the IDUs 10
Environmental Requirements 10
Unpacking and Installing the Hardware 10
Attaching the Power Cable 10
Accessing the User Interface Software 12
Setting up the Second IDU 16

ii •• Contents Stratum 100 Installation and Maintenance Guide
Step 4. Aiming the Antennas 17
Modulation Level 17
Transmit (Tx) Power 17
Understanding the Built-in Aiming LED Indicator 17
Aiming the First Antenna 18
Aiming the Second Antenna 18
Verifying the Aim and Path Quality 18
Canceling Antenna Aiming Mode 19
Bringing the Link Up 20
If there are Problems… 21
Step 5. Connecting to Ethernet 22
Connecting the Hardware 22
Setting the Ethernet Parameters 22
Connecting Ethernet to the Other IDU 22
Verifying Ethernet Connectivity 23
Step 6. Verifying Correct System Operation 24
Clearing Old Alarms and Events 24
Checking that Packets are Transmitting 24
Step 7. (Optional) Installing a Modem or other Device on the AUX Port 26
Configuring the Modem Settings for Administrators Dialing In 26
Configuring Dialing Out to Send SNMP Traps 26
Setting PPP Configuration for Other Devices 26
Step 8. Connecting to a PBX 27
Maintaining and Monitoring the Stratum 100.............................................................29
Understanding the LEDs on the Front Panel 29
Connecting to the Stratum 100 29
Using the Console Port 29
Using Telnet and a VT100 Terminal Emulator 31
Using Telnet and a Web Browser 32
Remote Access through the Modem on the AUX Port 33
PPP Access Through the AUX Port 34
Accessing a Stratum 100 From its Remote Companion Stratum 100 (Through the Wireless Link) 35
Using SNMP 36
Dialing Out with Alarms using SNMP 36
Navigating in the VT100 User Interface 38
Moving the Cursor 38
Selecting Menu Choices and Commands 38
Read-Only Fields 38
Editable Fields 38
Toggle Fields 38
Applying Changes 38
Exit to Previous Screen 38
Navigating in the HTML Interface 39
Viewing Alarms and Events 39
Clearing Old Alarms and Events 39
Performance Monitoring 39
Checking that Packets are Going Over the Wireless Link 40
Checking that Packets are Being Bridged to/from the Ethernet Link 41
Checking the Status of the T1 Link 43
Setting Security Parameters 45
Setting Passwords for Access 45
Changing the Automatic Logout Timer 45
Checking Incoming Calls on the AUX Port 46
Adjusting T1 Settings 46
Adjusting the PPP Parameters for Directly Connected Devices on the AUX Port 47
Changing the Communication Settings on the Console Port 47

Stratum 100 Installation and Maintenance Guide Contents •• iii
Troubleshooting..............................................................................................................49
Troubleshooting Strategies 49
Diagnosing Problems using the LEDs on the Front Panel 50
Understanding Alarms and Events 50
Viewing Alarms and Events 50
Clearing Old Alarms and Events 51
Understanding the Different Alarm and Event Messages 52
Running Diagnostics 53
Running Diagnostic Tests 53
Checking Software Versions and Configuration 54
Installation Problems 54
Other Common Problems 54
Contacting Technical Support 55
… Through Your Reseller or Dealer 55
… Through Wavespan 55
Appendix A: Technical Specifications ........................................................................57
Index.................................................................................................................................59


Stratum 100 Installation and Maintenance Guide About this Manual •• 1
About this Manual
Thank you for purchasing a Wavespan Stratum 100 wireless Ethernet bridge.
Whom This Manual is Intended For
Additional Reading
How This Manual Is Organized
Conventions


Stratum 100 Installation and Maintenance Guide Introduction •• 3
Introduction
The Stratum 100 is a wireless Ethernet bridge designed to deliver dedicated full-duplex 100
Mbps connectivity with fiber reliability. The Stratum 100 transports all Ethernet traffic types
in addition to providing connection for two T1 channels.
A standard configuration Stratum 100 link is shipped with a pair of Indoor Units (IDUs) and
Outdoor Units (ODUs). The standard configuration ODUs include integrated 18-inch square
flat antennas and two-axis adjustable antenna mounts. The 18-inch flat antennas will support
a full-reliability link over distances from across the street to up to 5 miles.
Some Definitions
The Stratum 100 consists of two units:
•The Indoor Unit (IDU) is a rack-mounted unit which contains the electronic
bridging components. The IDU can be located in any convenient climate-
controlled location inside your building.
•The Outdoor Unit (ODU) consists of an antenna integrated with other system
components. The ODU must be mounted within line of sight of another
Stratum 100 (typically on the roof) in order for communications to occur.
In addition, the IDU and ODU communicate via two multi-mode fibers, one each for transmit
and receive. An additional twisted pair connection is required to supply power from the IDU
to the ODU.
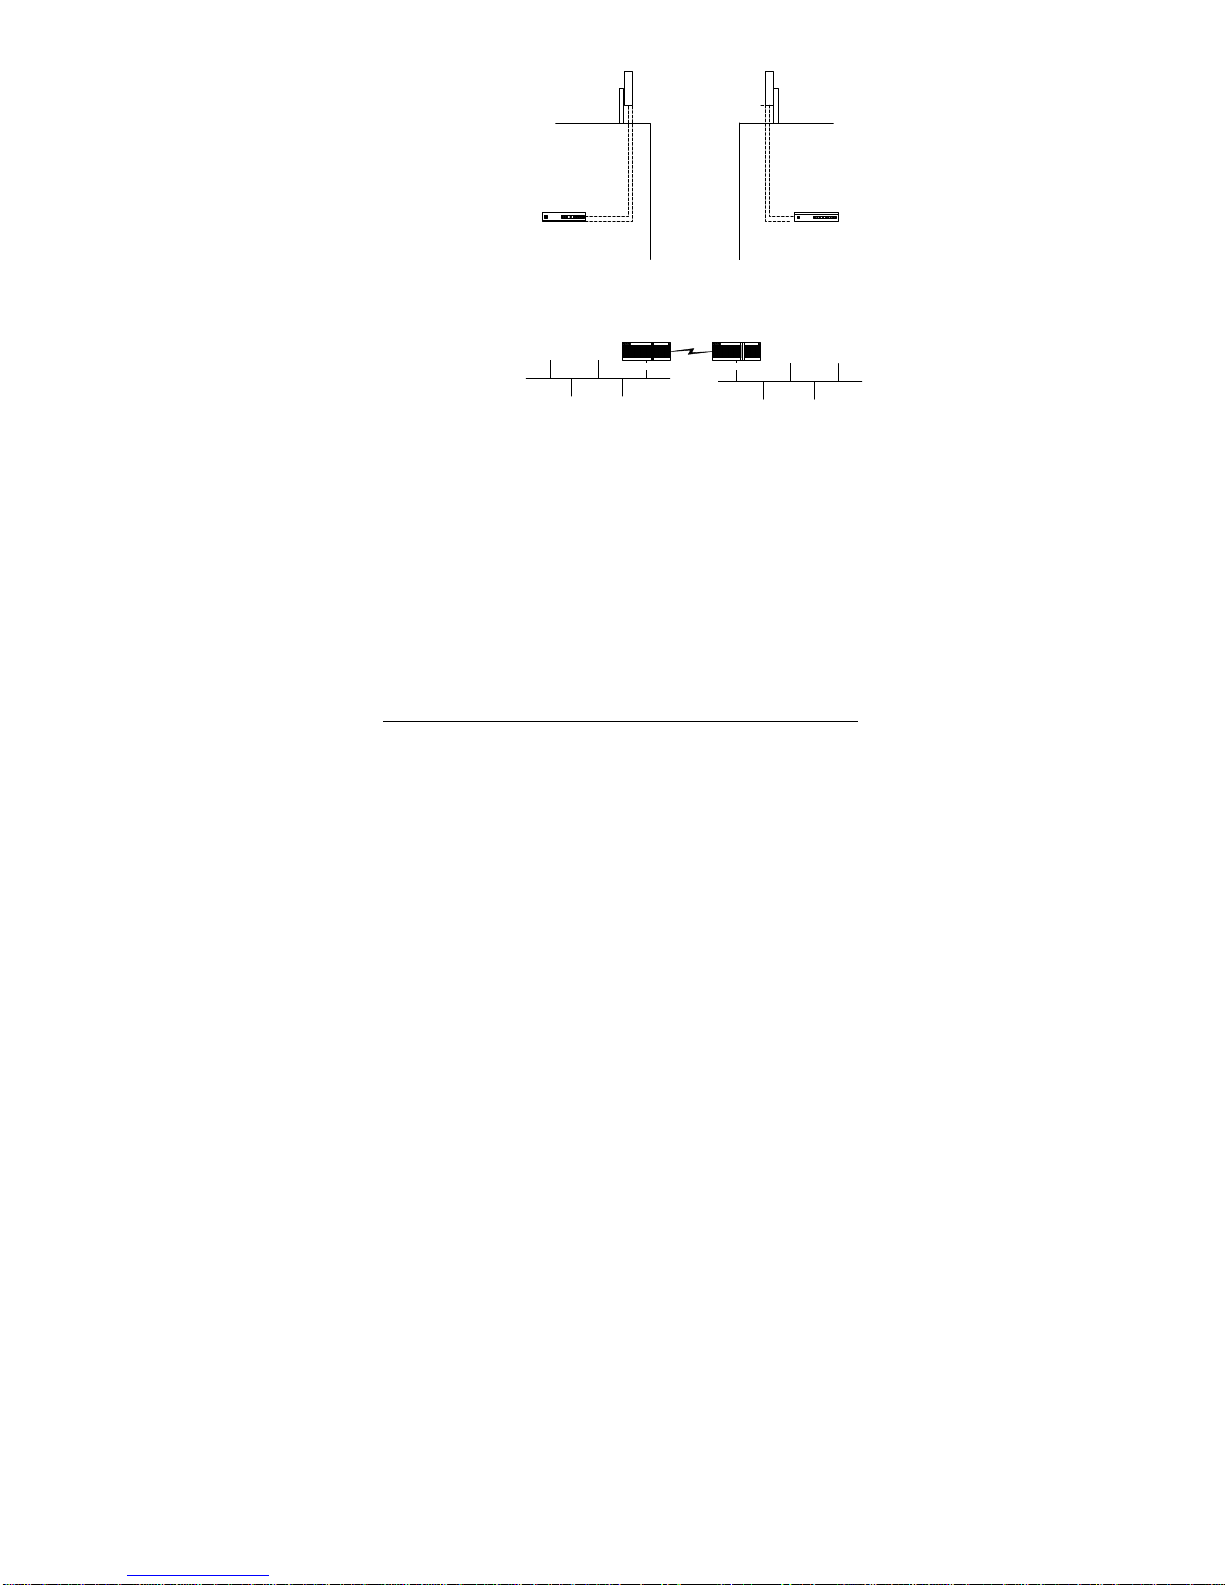
Standard Configuration
The diagram below shows the standard configuration, which has two buildings, each with
their own roof-mounted ODU and the IDU inside the building bridging the traffic to the
Ethernet.
4•• Introduction Stratum 100 Installation and Maintenance Guide
Indoor Unit (IDU)
Outdoor Unit (ODU)
mounted on pole
Indoor Unit (IDU)
Outdoor Unit (ODU)
mounted on pole
power
and
multi-mode fiber
cables
Typical system configuration, showing the two ODUs, mounted on the roofs of two adjacent buildings
and the associated IDUs located inside the buildings.
In topological (logical) terms, the Stratum 100 is simply a bridge between two subnets of your
network as shown in the diagram below.
Stratum 100 Stratum 100
LAN subnet in building #1 LAN subnet in building #2

Stratum 100 Installation and Maintenance Guide Installation •• 5
Installation
Installation Overview
The steps required to install the Stratum 100 are described below. The first step requires
engineering experience and knowledge that is beyond the scope of this book.
Preliminary Preparation: The Path Survey & Cable
Installation
Before beginning installation, you must have a path survey completed, including line-of-sight
path planning, antenna supports, and pre-installation preparation. The path survey should also
specify the expected signal strength between the two antennas. The path survey is typically
done by your engineering staff or by your reseller. The process of doing a path survey is
beyond the scope of this book. If you have questions or problems about the path survey,
contact your reseller or Wavespan sales/technical support. The remainder of this manual
assumes that you have completed the path survey and chosen locations for the IDUs and
ODUs.
Step 1. Installing and Mounting the ODUs
As part of your path survey, an appropriate site must be selected for the two ODUs. Typically
each ODU is attached to a pole on the roof, or in some cases, a tower. Installation of the
appropriate pole or tower is not covered in this manual. Instead, installation should be in
accordance with the findings of the Path Survey.
Note that your antenna supports require an earth ground for lightning and static protection.
Step 2. Installing the Cabling from the IDUs to the ODUs
After the ODU location has been chosen, you must run a multi-mode fiber cable and a twisted
pair (DC power) cable from the ODU location to the IDU location.
Step 3. Installing the IDUs
Each IDU must be installed in either a rack or on a tabletop. Unpacking and setting up the
IDU is described in detail below. Each IDU unit requires a controlled environment and an AC
power outlet (3-prong, with ground).
Step 4. Aiming the Antennas
The next step requires you to aim the antennas so that they are correctly aligned and the signal
strength is maximized.

6•• Installation Stratum 100 Installation and Maintenance Guide
Step 5. Connecting to Ethernet
Once the antennas have been correctly aimed, you can connect the IDUs to the network and
allow data transmission to begin.
Step 6. Verifying Correct System Operation
When all of the other steps are complete, you must check that data transmission is occurring
correctly.
Step 7. (Optional) Connecting a Modem to the AUX Port
A modem can be connected to the AUX port to allow remote dial-in management for the
Stratum 100. This is an optional feature.
Step 8. Connecting to a PBX or other T1 device.
The Stratum 100 can be used to provide two high-speed T1 connections between buildings.
These T1 channels can be used to interconnect PBXs, channel banks, video codecs or other T1
devices, channelized or unchannelized. The T1 interface is industry standard DSX-1.
Assembling Tools and Cables Before You Begin
You will need the following tools before beginning the installation:
For installing the ODUs
•½” socket and/or open-end wrenches
•Philips screwdriver
For the cabling between each IDU and associated ODU
unit
•62.5 micron fiber, multi-mode 850 nanometer cable (for data transmission)
Two cables are required.
•Twisted pair cable (for DC power connection) 2 pairs of 18 AWG
Note that the cable length will be different for each IDU/ODU pair, depending on the distance
between them.
For installing the IDUs
•100Base-TX or 10Base-T cable suitable for connecting the Stratum 100 to your
Ethernet network.
OR
•Media Independent Interface Adpater suitable for connecting the Stratum 100
to your Ethernet network via another media such as fiber.
•PC or laptop running HyperTerminal, or an equivalent VT-100 emulator. The
PC or laptop must have a serial port with DB-9 male connector or adapter to
accept the DB-9 female connector on the supplied serial cable.

Stratum 100 Installation and Maintenance Guide Installation •• 7
Step 1. Installing and Mounting the ODUs
The instructions below describe how to assemble and mount a single IDU. You must repeat
the installation for each ODU.
Remove the ODU, pre-assembled Antenna Mount and Accessory Kit from their shipping
cartons. Save all packing materials in case you need them later.
Using the foam packing material to protect the painted surfaces of the antenna, carefully
place the ODU on a tabletop with the antenna facing down. The paint provides an important
extra barrier to UV from sunlight.
Set aside the accessory kit. You will use this hardware to attach the antenna mount to the
ODU, and to attach the complete ODU to a supporting mast.
Setting Antenna Polarization
Antenna polarization must be the same at both ends of any link. For single links, vertical
polarization is a good default. There is no performance difference. For multiple links
located on the same rooftop, alternating the antenna polarization of independent links is
recommended.
If the coaxial connectors are facing down the antennas operate with vertical polarization.
Connectors facing right or left produces horizontal polarization.
Attaching the Antenna Mount
Slightly loosen the six 5/16-18 bolts on the Antenna Mount slotted elevation arms and angle
brackets so that they can be positioned for the next step.
Position the Antenna Mount on the ODU so that the angle bracket attached to the two
elevation arms is along the edge with the coax connectors (vertical polarization). The other
angle bracket is bolted to the opposite edge.
Use 5/16-20x1” hex-head bolts, flat washers and lock nuts at three corners of the ODU as
shown. The next step describes the corner with the ground wire.
Locate the ground wire, which has #10 and 5/16” lugs on its ends.
Place a 1x5/16” hex head bolt through the 5/16” lug of the ground wire, followed by a 5/16”
flat washer. Place this bolt, ground lug and flat washer through the angle bracket and ODU
corner hole nearest to the #10 ground stud on the back plate of the ODU. Secure with a flat
washer and lock nut as shown.
Tighten all four corner bolts securely.
Place a #10 flat washer over the #10 ground stud, followed by the ground wire and a #10 lock
washer. Tighten this nut, but do not over-torque.
Note: Avoid scratching the painted surfaces of the ODU during antenna mount installation.
Antenna Mast Requirements
The ODU must be mounted on a tubular steel or aluminum mast 1.9 to 3.9 inches in
diameter using the remaining hardware supplied in the antenna mount accessory kit.
The mast must be stable, not able to bend or rotate under extreme weather conditions, and
must provide a line-of-sight path to the other end of your link.
Attaching Mount On Mast
This section illustrates installation on a vertical mast. A horizontal support is perfectly
acceptable.
Cut the length of rubber collar material (using a sharp knife) so that it wraps around your mast
with a small gap (.10 - .25 inch) between the ends.
Select the proper size hose clamp and install the rubber collar securely on the mast. This
collar is used to hold the weight of the ODU during installation and antenna alignment.

8•• Installation Stratum 100 Installation and Maintenance Guide
For masts 1.9 to 2.5 inches in diameter use 3.5 inch long hex-head bolts for each yoke. For
masts 2.5 to 3.9 inches in diameter use the 4.5 inch long hex-head bolts.
Use a safety rope, or second person to hold the ODU in position on the mast, resting on the
rubber collar as shown. Install the top clamping yoke first. Install the bottom yoke last.
Note: Be careful not to drop the ODU. The weather seals protecting the antenna and microwave
transceiver can be damaged.
Visually aim the antenna as precisely as possible in azimuth and elevation. Use a map and
compass to set the correct direction. Tighten both yokes and elevation arms securely until you
are ready for antenna aiming.
Position mount on clamp, install top yoke first
Install bottom yoke last
Grounding the ODU and Mast
In Section 7.1 you connected the ODU’s ground stud to the antenna mount, which in turn must
be grounded through the metallic mast. These important ground connections provide a short
circuit path for static that could build up on the ODU, potentially damaging the microwave
transceiver or degrading performance. This protection depends on the metallic mast or
antenna support being properly connected to an earth ground.
A building’s electrical system ground is typically not a good earth ground because it can have
high currents flowing through it that result from an imbalance in the distribution of the single-
phase load throughout a building. Ground loops can result if two pieces of equipment are
grounded to the electrical system ground and if there is a voltage difference between the
ground points. For electrical protection it is important that the Stratum 100 Indoor and ODUs
are grounded to an earth ground that does not have a voltage difference between the Indoor
and ODUs.
Lightning Protection
Damage to your Stratum 100 Indoor or ODUs caused directly or indirectly by lightning
is not covered under the manufacturer’s warranty.
If your ODU is located where nearby or direct lightning strikes are possible, especially on the
top of a tall building, a lightning rod and grounding system installed by a licensed
professional are highly recommended. In addition, the use of lightning arrestors in the two
coaxial cables (located in-line at the cable entry point to the building or at the rear of the IDU)
with an earth ground is highly recommended. Wavespan and its authorized resellers can
recommend suppliers of suitable coaxial lightning arrestors with Type-N connectors and
ground posts.
The purpose of in-line lightning arrestors in the coaxial cables is to protect the IDU from high
voltages induced by nearby lightning or a direct lightning strike at the ODU. The ideal
location for in-line lightning arrestors would be at the point where the coaxial cables enter the
building. This involves separate cables from the ODU to the point of entry, and additional
cables from there to the IDU. The next best approach is to locate in-line lightning arrestors at
the rear of the IDU, with a separate heavy-guage (#10 or #8) earth ground running directly
from the lightning arrestors to a proper grounding system.

Stratum 100 Installation and Maintenance Guide Installation •• 9
Step 2. Installing the Cabling from the IDUs to the ODUs
Routing Cables
Label both ends of each cable, one cable for Tx (transmit) and one for Rx (receive), before
you route them.
Run cables through existing roof vents if possible. Weatherproof the entry point and protect
the cable from sharp metal edges. Secure the cable to prevent abrasion due to movement in
the wind.
Attaching the Cables
Be sure that the IDU power switch is OFF before connecting the cables to the ODU.
Attach the Tx and Rx cables to their respective connectors on the Indoor and ODUs. Hand-
tighten all connectors firmly.
Weatherproofing the Outdoor Connectors
Wrap the outdoor Tx and Rx coaxial connectors using CoaxSeal or similar weatherproofing
tape to create a sealed moisture barrier around the connectors after they are tightened on the
ODU.

10 •• Installation Stratum 100 Installation and Maintenance Guide
Step 3. Installing the IDUs
Environmental Requirements
The IDU requires a protected environment with its temperature maintained between 00and 550
C (320– 1310F), and less than 95% relative humidity, non-condensing. The environment
should be free from extremes in temperature, dust, humidity, shock, vibration and RF fields to
ensure the IDU’s operation within published specifications.
Because the IDUs have cooling fans, they can be rack mounted or stacked without spaces
between them. A clearance of at least one inch on both sides is required for ventilation.
Be sure that the ventilating perforations on the sides and rear (near connectors) are not
blocked by cables or other equipment. Better ventilation, resulting from air space around the
IDU, improves equipment reliability.
Unpacking and Installing the Hardware
1. Remove the IDU from its shipping carton.
2. Locate and set aside the accessory kit (with cables and mounting hardware)
supplied in this carton. Save all packing materials in case you need them later.
3. Read the FCC Regulatory Compliance notice and Safety Warnings at the
beginning of this manual.
IDU Accessory Kit Packing List
The IDU Kit contains
•rack mounting brackets and hardware,
•rubber mounting feet, (for tabletop use only)
•AC line cord,
•RJ-45 console cable (straight-through CAT-5 cable),
•RJ-45-to-DB-9 console adapter, and
•clamp-on ferrite filter for the 10Base-T cable.
Rack Mounting the IDU
Three sets of rack mounting bracket hole patterns allow the IDU to be mounted with its
connectors facing the rear or front. A center pattern also allows the IDU to be mounted in
center rail racks or on the surface of a wall if the brackets are installed facing down as shown.
Attach the two rack mounting brackets on each side of the IDU as shown. Use four #8-
32x1/2” Pan Head screws and #8 lock washers (under the screw head) for each bracket.
Tighten the screws securely.
Mount the IDU in an equipment rack near your networking equipment (hub, server, switch, or
router) to which it will be connected. Use two #12-24x3/4” screws in each rack bracket to
mount the unit.
Tabletop Installation of the IDU
If you are installing the unit on a tabletop, attach the (4) self-adhesive rubber feet to the
bottom of the unit near the corners. The rubber feet are not used if you rack mount the
IDU.
Attaching the Power Cable
Make sure the ON/OFF switch is OFF or “0”. Attach the AC power cord to the rear of the
unit and plug it into a grounded AC outlet. Do not turn the power on until you have
connected the management console (described below).

Stratum 100 Installation and Maintenance Guide Installation •• 11

12 •• Installation Stratum 100 Installation and Maintenance Guide
Accessing the User Interface Software
Connecting the Management Console
Note: A straight-through data cable is provided for connecting your PC or laptop as a setup or
management console.
Locate the data cable supplied in the accessory kit. Attach one end to the RJ-45 CONSOLE
port connector on the rear of the Indoor Unit.
Install the RJ-45 to DB-9 adapter on the other end of this console cable.
Connect the DB-9 adapter to your PC or laptop COM port.
Note: It is important to use the DB-9 adapter supplied by Wavespan, even if you use a DB-9
to DB-25 adapter to match your PC or laptop COM port. The adapter supplied by Wavespan
converts the RJ-45 CONSOLE port wiring to standard COM port wiring.
To perform the initial setup of the Stratum 100, you must connect a PC system running a VT-
100 terminal emulator such as the HyperTerminal utility. The communications settings for
the console terminal must be:
•9600 baud
•8 bits
•no parity
•1 stop bit
•no flow control
Turning on the IDU
After you have finished mounting the IDU, connect the AC power cable to the back of the
unit and turn on the power switch. Once the PC is attached to the console port and the power
is turned on, you will see the following introductory screen:
Stratum 100 Wireless Broadband Communication System
Software Version 00.01c
Copyright (c) 1996 - 1998
Access Level: [? ]
Password: [? ]
Entering the Password
When it is configured at the factory, the Stratum 100 is preset to have the following:
Access Level: superuser
Password: wavespan
After you enter these two fields, the Main Menu screen will appear as shown below.
Table of contents


