Weather X FR6817DT User manual

FR6817DT
Multi-Purpose Light
with Weather Radio
INSTRUCTION MANUAL

TO PREVENT FIRE OR SHOCK HAZARDS, DO NOT EXPOSE
THIS UNIT TO RAIN OR MOISTURE.
The unit generates the same potentially lethal AC power as a normal
household wall outlet. Do not insert foreign objects into the AC Outlet,
the DC Power Socket and Cable Port, or the ventilation holes.
This symbol, located on back or bottom of the unit, is intended to alert the user to the
presence of uninsulated “dangerous voltage” within the product’s enclosure that may
be of sufcient magnitude to constitute a risk of electric shock to persons.
This symbol, located on back or bottom of the unit, is intended to alert the user to
the presence of important operating and maintenance (servicing) instructions in the
literature accompanying the appliance.
CAUTION: TO PREVENT ELECTRIC SHOCK, MATCH WIDE
BLADE OF PLUG TO WIDE SLOT, FULLY INSERT.
To reduce the risk of electric shock, do not remove cover (or back). There are no user-ser-
viceable parts inside. Please refer any servicing to qualied service personnel.
WARNING: Changes or modications to this unit not expressly approved by the party
responsible for compliance could void the user’s authority to operate the equipment.
NOTE: This equipment has been tested and found to comply with the limits for a Class B
digital device, pursuant to Part 15 of the FCC Rules. These limits are designed to provide
reasonable protection against harmful interference in a residential installation. This equip-
ment generates, uses, and can radiate radio frequency energy and, if not installed and used
in accordance with the instructions, may cause harmful interference to radio communica-
tions. However, there is no guarantee that interference will not occur in a particular instal-
lation. If this equipment does cause harmful interference to radio or television reception,
which can be determined by turning the equipment off and on, the user is encouraged to
try to correct the interference by one or more of the following measures:
• Reorient or relocate the receiving antenna.
• Increase the separation between the equipment and receiver.
• Connect the equipment into an outlet on a circuit different from that to which the re-
ceiver is connected.
• Consult the dealer or an experienced radio/TV technician for help.
Warnings and Precautions
2

3
4
5
6
3
2
1
9
10
14
FUNCTION DISPLAY MEM/ALERT
TORCH
15
16
7
8
17
18
19
11
12
13
Features
31
32

Features
29
30
4
RESET
20
21
22
23
26
27
31
28
24
25

Features Dened
continued
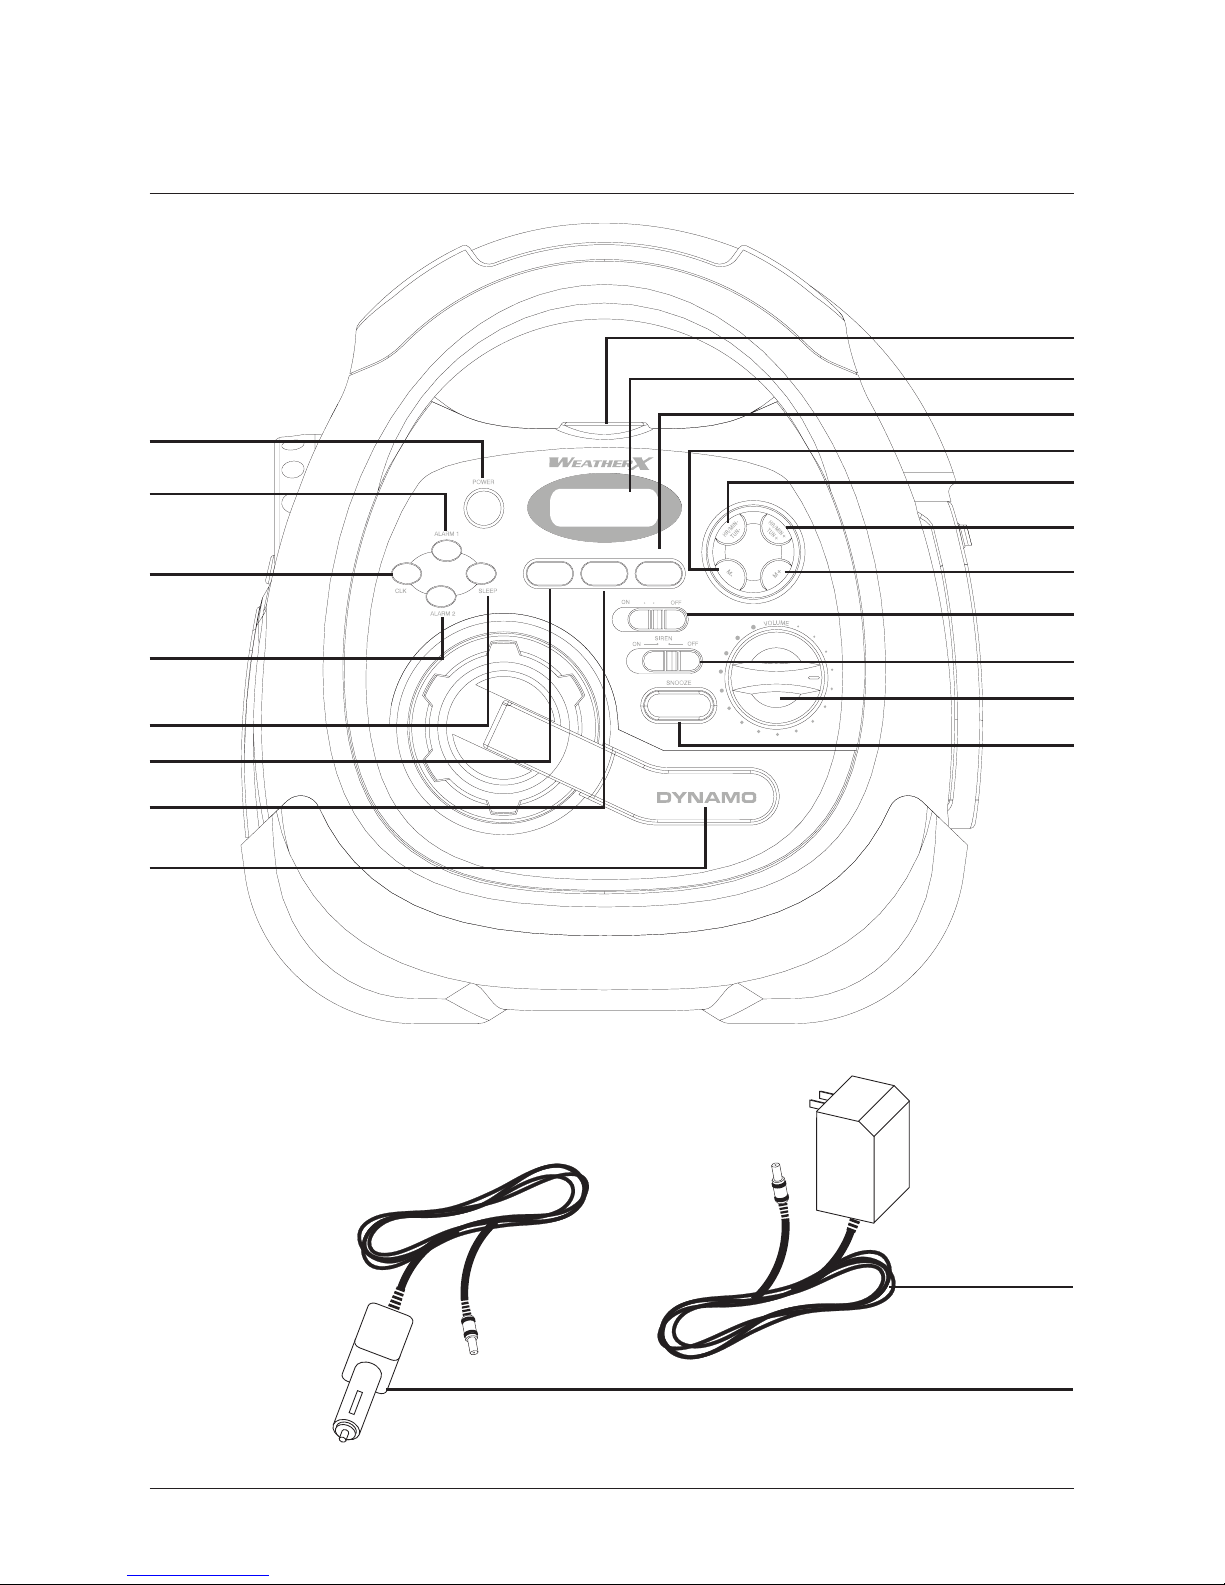
1 POWER Press the POWER button to turn the unit on and off.
2 ALARM 1 Press the ALARM 1 button to activate the alarm to buzzer or radio, or deactivate the alarm.
3 CLK (Clock) Press the CLK button to adjust the clock, alarm 1, and alarm 2.
4 ALARM 2 Press the ALARM 2 button to activate the alarm to buzzer or radio, or deactivate the alarm.
5 SLEEP Press the SLEEP button to set the unit to power off in 10 - 90 minutes.
6 FUNCTION Press the FUNCTION button to cycle through AM radio, FM radio, WB (weatherband)
radio, or AUX mode.
7 DISPLAY Press the DISPLAY button to cycle through the current function, the clock, alarm 1, and alarm
2 display modes.
8 Dynamo Hand Crank Turn the Dynamo Hand Crank counter-clockwise to give the unit a temporary
charge.
9 Compass Standard navigational compass.
10 LCD Display View the Time, AM Indicator, PM Indicator, Alarm Indicator, and Radio Frequency through
this Liquid Crystal Display.
11 MEM/ALERT Press the MEM button to save a radio station to one of the player’s 10 presets. While
powered off, press the ALERT button to activate/deactivate the alert feature, which sounds an alarm when
emergency weather information is being broadcast through the weatherband.
12 M - Press the M (memory) - button to cycle down through the preset radio stations.
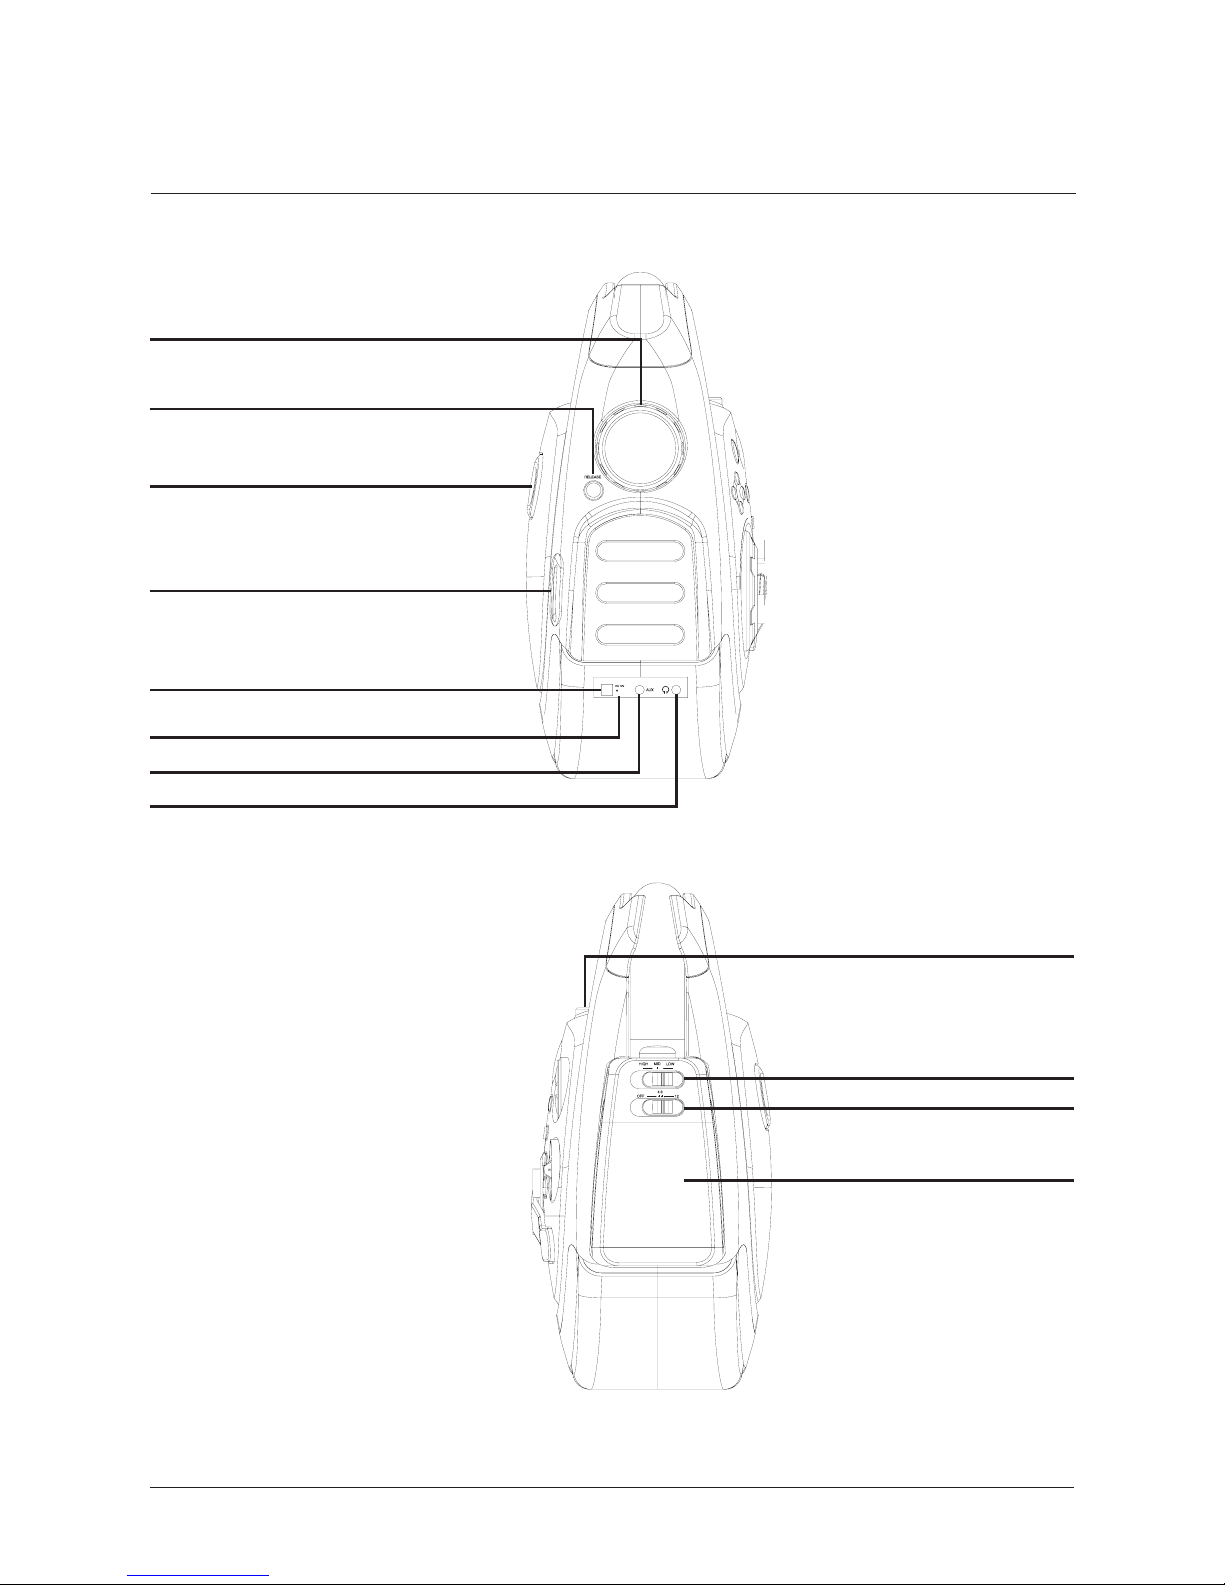
13 HR/MIN -, TUN - Press the TUN - button to cycle down through AM, FM, or WB stations. Press the
HR/MIN button to cycle down through the hour and minute when setting the clock.
14 HR/MIN +,TUN + Press the TUN + button to cycle up through AM, FM, or WB stations. Press the
HR/MIN button to cycle up through the hour and minute when setting the clock.
15 M + Press the M (memory) + button to cycle up through the preset radio stations.
16 FLASHLIGHT Toggle this switch to turn the ashlight on and off while it is docked into the unit.
17 SIREN Toggle the SIREN switch to ON to activate an emergency siren. When the siren is activated the
ashlight will blink.
18 VOLUME Turn the Volume dial clockwise to increase the volume and counter-clockwise to decrease the
volume.
19 SNOOZE Press the SNOOZE button, after the alarm sounds, to delay the alarm for 5 minutes.
20 Flashlight The inset ashlight can be removed from the power generator by pressing the RELEASE but-
ton.
21 RELEASE Press the Release button to release the docked ashlight from it’s compartment.
22 Storage Compartment Use the Storage Compartment to hold any necessities.
23 Thermometer Use the thermometer to view the temperature in Fahrenheit or Celsius.
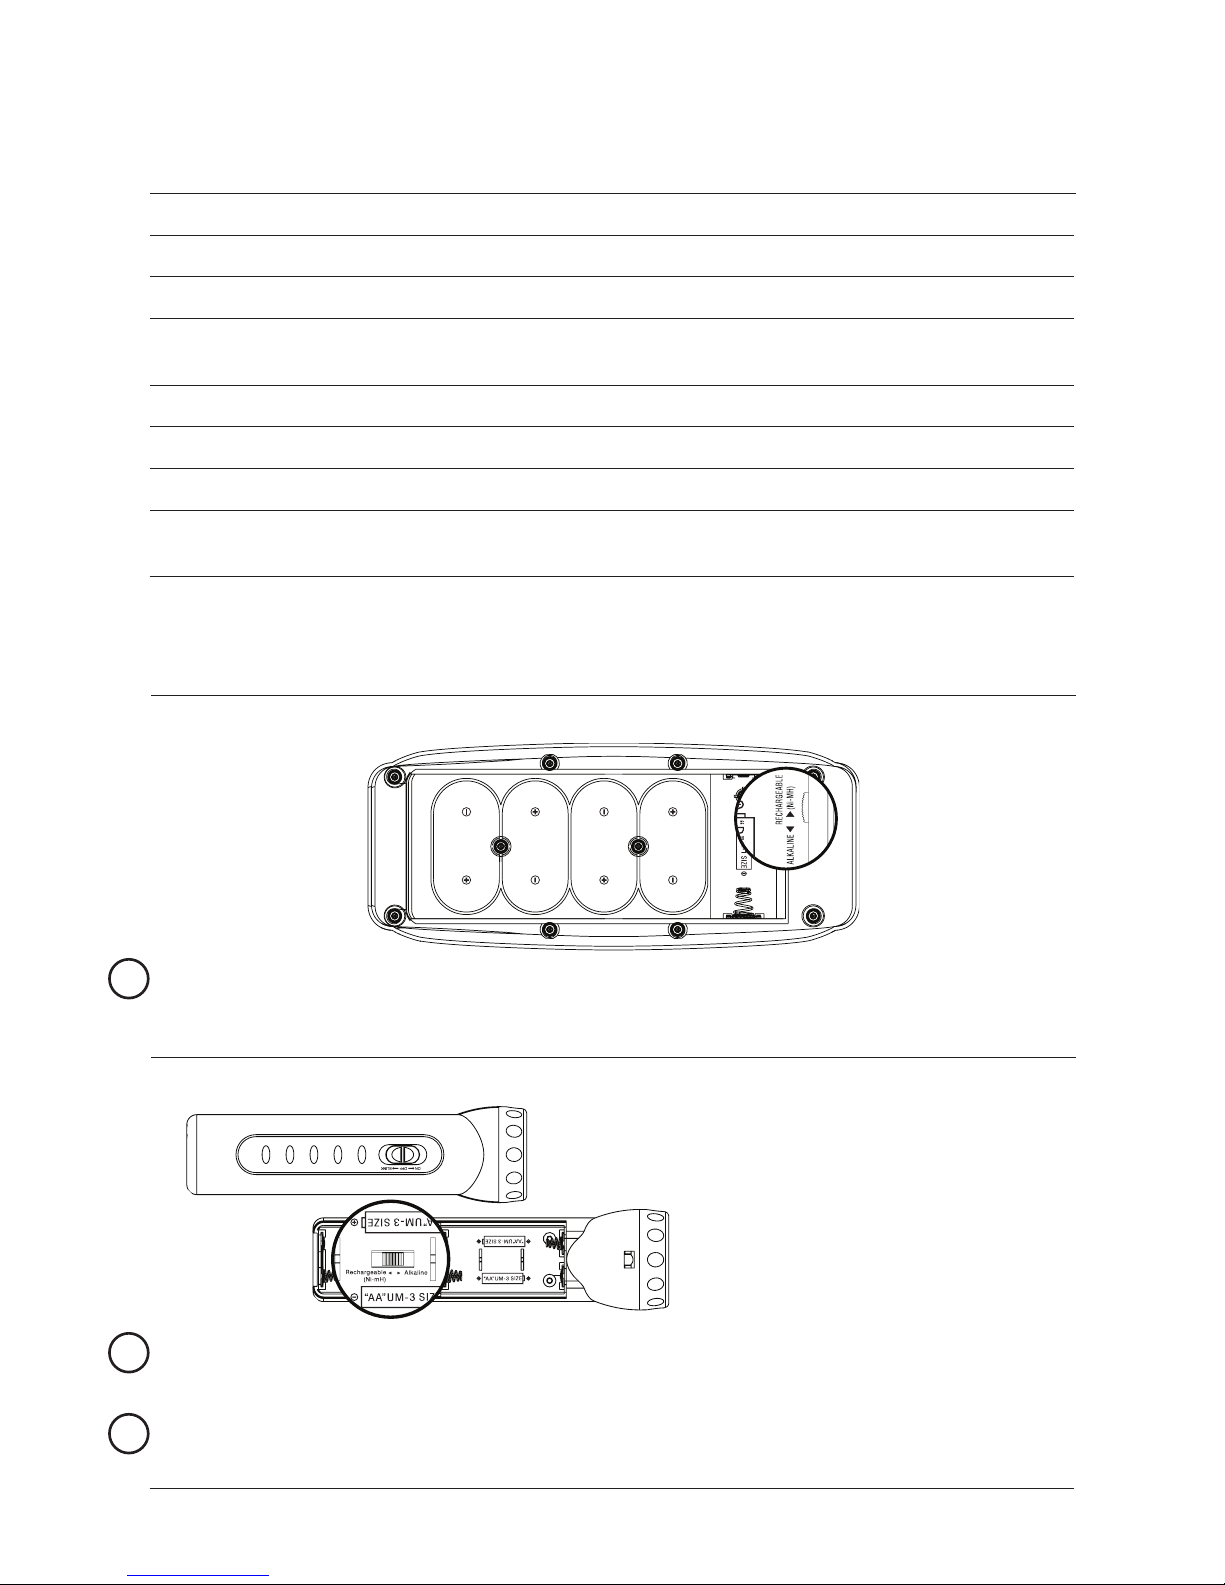
24 DC In (12V) Use the DC IN jack to power and charge the unit.
5

Features Dened
6
continued
25 RESET Using a paperclip, press the reset button to restore all default factory settings on the unit.
26 AUX Use the AUX (auxiliary) jack to connect other audio devices to the unit.
27 Headphone Jack Use the Headphone Jack to connect standard headphones to the unit.
28 FM Antenna The FM extendable antenna provides exibility and range when adjusting the FM
reception. An AM Antenna is built into the player.
29 OFF, LOW, MED, HIGH Toggle the switch to turn the Lamp on to LOW, MED, or HIGH.
30 4, 8, 12 Toggle the switch to turn 4, 8, or 12 LEDs on in the Lamp.
31 LAMP Use the Lamp’s adjustable head and neck to direct the light
32 AC Adaptor Use the AC Adapter to connect the unit to a standard electrical outlet for powering and charg-
ing.
32 DC Adaptor Use the DC Adapter to connect the unit to a car lighter outlet for powering and charging.
The docked ashlight detaches and can be used independently of the unit.
The Flashlight will run off of 4 stan-
dard AA batteries, or 4 AA recharge-
able batteries. Rechargeable batteries
can be set to recharge inside the unit.
The switch inside the ashlight battery compartment allows you to turn charging feature on
or off.
There is a danger of explosion if you attempt to charge standard AA batteries. Only use
rechargeable AA Alkaline batteries.
Special Features
!
The unit can run off of the built in rechargeable NiMH Battery or standard Alkaline Batteries.
The switch inside the battery compartment allows you to turn charging feature on or off.
Turn to ALK to use standard non-rechargeable Alkaline batteries. Turn to NiMH to use the
rechargeable NiMH battery.
!
!

Operations
Setting the Clock & Alarms
a. Press the CLK button, the clock hour blinks
b. Press the HR + or HR - button to change the clock hour
c. Press the CLK button
d. Press MIN + or MIN - button to change the clock minute
e. Press the CLK button again to set ALM 1
f. Press the HR + or HR - button to change the ALM 1 hour
g. Press the CLK button
h. Press the MIN + or MIN - button to change the ALM 1 minute
i. Press the CLK button again to set ALM 2
j. Press the HR + or HR - button to change the ALM 2 hour
k. Press the CLK button
l. Press the MIN + or MIN - button to change the ALM 2 minute
m. Press the CLK button
After the alarms are set, press the ALARM 1 and/or the ALARM 2 button to
turn one or both alarms on to either buzzer or radio.
7
Weatherband
National Oceanic and Atmospheric Agency (NOAA) 7 band
weatherband alerts you to the latest news and weather, specic to
the largest nearby city. In addition, you can tune into other local
broadcasts with the AM/FM radio.

Service Information
Address 2116 Carr Street, St. Louis MO, 63106
Phone 1-314-621-2881
Fax 1-314-588-1805
Email [email protected]
Website www.weather-x.net
To download this Instruction Man-
ual in English, Spanish, or French
visit the Support section at
www.weather-x.net.
Para descargar este manual de
instrucción en inglés, español, o
francés visite la sección de la ayu-
da en www.weather-x.net.
Pour télécharger ce manuel
d’instruction en anglais, espagnol,
ou le Français visitez la section de
soutien à www.weather-x.net.
© 2007 DPI, Inc. All NOAA related logos and references are trademarked or registered trademarks of the National Oceanic
and Atmospheric Administration (NOAA), U.S. Department of Commerce
Other manuals for FR6817DT
1
Table of contents
Other Weather X Weather Radio manuals