WeeKett KE4071TF-GS User manual

SMART WIFI KETTLE
GET CONNECTED
MODEL: KE4071TF-GS
Read this manual thoroughly before using and save it for future reference
More technical setup guide availiable on the “Support & Help” page on our website
www.weekett.com as well as our YouTube channel. For further customer support and
product feedbacks, please send us a direct message on social media or email us at


CONTENTS
1. Know your kettle………………………………………………………….………..……..1
2. Create a Smart Life account ……………………………………………….………..........1
3. Connect the kettle to Wi-Fi ……………………………………………….………..…….2
3.1 Checklist
3.2 Bluetooth method (automatic recognition)
3.3 Slow connecting mode
4. Smart speaker integration……………………………………….……………...…..….....4
4.1 Linking kettle with your smart speaker
4.2 Controlling kettle via your smart speaker
5. Key feature explained ………………………………………………………….………...6
5.1 Temperature control
5.2 Baby bottle programme
5.3 Add kettle to home screen
5.4 Change the name of kettle
5.5 Share the control
5.6 App notifications and alerts

1
1. KNOW YOUR KETTLE
2. CREATE A SMART LIFE ACCOUNT
Scan below QR code to download the Smart Life app.
iOS Android
Alternatively, search “Smart Life” in the iOS App Store or Google Play on your mobile
phone. Then tap open the Smart Life app and follow on-screen instruction to create an
account.

2
3. CONNECT THE KETTLE TO WI-FI
3.1 Checklist:
(1) The kettle body is on the base.
(2) The Bluetooth is turned on on your mobile phone.
(3) Your mobile phone is connected to the Wi-Fi and it is not connected to any Wi-Fi
extender or dongle.
(4) Disable any VPN if possible.
(5) The 2.4ghz frequency is present in the router setting.
Quick tip: if you have any other working smart devices e.g. Amazon Alexa, it
means the 2.4ghz is present and the smart kettle should work too.
Note: The kettle can still connect to the Wi-Fi if you have both 5ghz and 2.4ghz
enabled in the router setting. But if you only have 5ghz enabled, it will not work.
If you wish to check the router setting, this can normally be found in the
Advanced setting in your broadband online account.
(6) You have the correct Wi-Fi password
3.2 Bluetooth method (automatic recognition)
1. Turn on Bluetooth on your mobile phone if you have not done so.
2. Connect the kettle to the power source. The Wi-Fi indicator should start blinking.
If the Wi-Fi indicator is not blinking, press and hold 100℃ preset button for over 3
seconds until beeping sound.
3. The Smart Life app should be able to detect the kettle momentarily and a window
will pop up in the app per below screenshot. Follow the on-screen instruction to
proceed to adding the kettle to the app.

3
3.3 Slow connecting method
If the Bluetooth method did not work, most likely it is because there is 5ghz frequency
present along side the 2.4ghz. Don’t worry, we should still be able to set the kettle up via
the slow connecting method. Scan below QR code to watch our latest step by step guide
using the slow connecting mode.
Vimeo video - Slow connecting method
Alternatively, follow below steps to connect the kettle:
1. Please go to the Smar
t
Life app > tap “+”
b
utton on the top righ
t
corner > Selec
t
“Ad
d
Device” > Select Kitchen Appliances > Brewing > Smart kettle (Wi-Fi) > Select your
network and enter your Wi-Fi password > tap Next.
YouTube video - Slow connecting method from 1:15

4
2. Tap “Confirm the indicator is
b
linking rapidly > Tap lef
t
“Blink Slowly” > Tap "Go
to Connect" then the app should direct you to the Setting page of the phone.
3. Tap into the lis
t
of Wi-Fi > Selec
t
the one starting with "SmartLife" and wai
t
until i
t
is connected. It may show "No Internet Connection" - it is fine and please don’t
worry about it.
NOTE: If you don’t see any network name starting with “SmartLife”, long press the
On/Off button on the kettle for over 3 seconds until the beeping sound, then the
network should appear momentarily.
4.
N
ow return to the Smart Life app an
d
the kettle will
b
e connecte
d
momentarily. Once
added successfully, tap on “Done”.
NOTE:
(1) If the kettle is no
t
connected to Wi-Fi within 15 minutes, the Wi-Fi indicato
r
will
be switched off. To turn on/off Wi-Fi indicator, press and hold 100℃ preset
button for over 3 seconds until beeping sound.
(2) Once connected, in very rare occasions the kettle may show as “offline” on the
Smart Life app when the Wi-Fi in the environment drops off. The kettle should
automatically re-connect to the same Wi-Fi momentarily once the Wi-Fi is
available. In the very rare case of it doesn’t reconnect automatically, please press
and hold 100℃ preset button for over 3 seconds until beeping sound.
4. SMART SPEAKER INTERGRATION
You need to first set up the kettle on Smart Life before proceeding. You also need to
have either an Amazon Alexa or a Google Home and have downloaded the
corresponding mobile app to use this feature.
4.1 Linking kettle with your smart speaker
4.1.1 Linking kettle with Alexa or Google Home
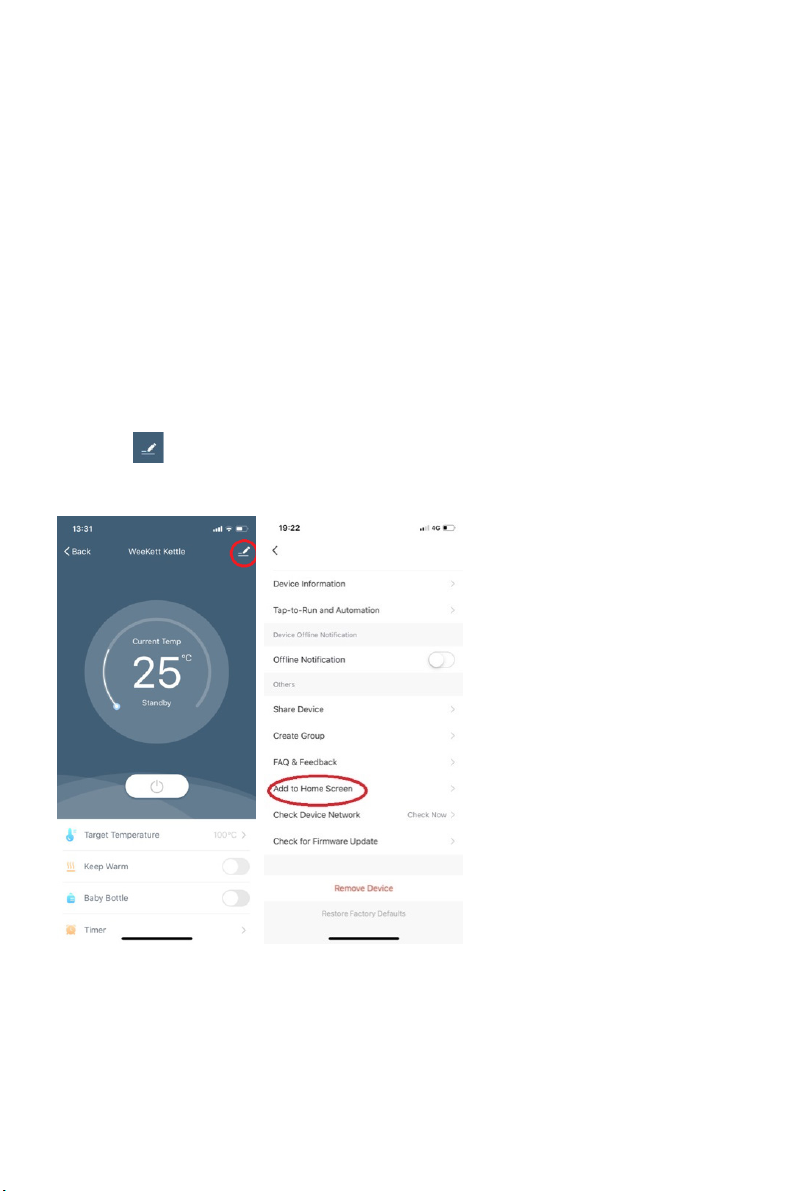
On Smart Life app, go to the kettle page and click“ ”at the top right corner and
then click “Alexa” or “Google Assistant” icon. Follow the app instructionsto
integrate with smart speaker.
Note: for Alexa users, you can simply say “Alexa, enabled Smart Life” and it should
set the kettle up with Alexa.

5
YouTube video – integrate with smart speakers
4.1.2 Siri integration via shortcuts
Scan QR code below to watch video guide on setting up Siri via Shortcuts.
YouTube video – set up Siri via Shortcuts
4.2 Controlling kettle via your smart speaker
NOTE: After linking your Smart Life account with your smart speaker account, the
product name for your smart speaker will by default be the same as the name in the
Smart Life app. For example, if you name your kettle after “Smart Kettle” in the
Smart Life app, then you should ask your smart speaker to turn on “Smart Kettle”,
not “kettle”. In the instruction below, we have named the kettle “kettle.”
4.2.1 Switch on/off
To turn on your kettle remotely, just say to your smart speaker “Alexa/Ok Google,
turn on the kettle”. The target temperature will be the temperature settingfromthe
last use. Upon reaching target temperature, the kettle will switch off automatically.
You can also turn the kettle off remotely via your smart speaker.

6
4.2.2 Set the temperature
To set the temperature, just say “Alexa/Ok Google, set the kettle to 70 degrees” and
the kettle will heat up directly to the target temperature after the command.
5. KEY FEATURES EXPLAINED
5.1 Temperature control
5.1.1 Temperature measurement conversion
After the kettle is connected to Wi-Fi, the default temperature can be adjusted on the
app between 40℃ and 100℃. Click “℃” or “℉” at the upper right corner to switch
between “℃” and “℉” per below.
5.1.2 Keep-warm function on the App
The keep-warm function can be turned on or turned off on the app at any time, and the
maximum keep-warm temperature allowed on the Smart Life app is 95℃.

7
5.2 Baby bottle programme
To use the baby bottle programme, tap on the switch in the “Baby Bottle” bar. Under
this mode, the kettle will enter heating mode automatically and change the keep-warm
switch to on and the target temperature will be set to 70℃. Under this mode, the water
will be heated to 100℃ first, cooled down to 70℃ naturally and then keep warm for 1
hour. Please cool down the baby milk afterwards and ensure it is not too hot for the baby.
NOTE: Always follow the preparation guides on your baby food packaging and choose
the recommended temperatures.
5.3 Add kettle to home screen
NOTE: This feature is for iOS only and allows you to enter the kettle control interface
in one tap from your mobile phone home screen like opening an app.
Click“ ”at the upper right corner and then click “Add to Home Screen”. Follow the
instruction of app to operate per screenshots below.

8
5.4 Change the name of kettle
NOTE: This is an important setting for section 5.2 later on to ensure you can control
your kettle effortlessly via your smart speaker.
Click“ ”at the upper right corner and then tap on the first bar stating the name of
your kettle, then select “Name” to input a new name, then click “Confirm” perbelow
screenshot.

9

10
5.5 Share the control
The other person you are sharing the control with should download the Smart Life App
and create an account via the mobile phone number first before you can share the
control. Scan below QR code to watch the video on how to share the control.
YouTube video – share control
5.6 App notifications and alerts
NOTE:
(1) For safety reasons an
d
the
b
es
t
use
r
experiences, i
t
is important tha
t
on your
mobile phone system setting, you will allow the Smart Life App to send you push
notifications, especially for the dry boiling alert.
(2) To manage notifications within the app,
p
lease go to “Me” in the Smart Life app,
tap on the setting icon on the top right corner and customize notifications
accordingly.
(3) For your
b
es
t
experience,
p
lease enable automatic firmware updates in the Smart
Life app. You could do so by going to the kettle control panel on Smart Life app,
tapping on the setting icon on the top right corner, tapping on “Device Update”
and toggling on “Automatic updates”.
5.6.1 Boil-dry Alert
The kettle will enter the boil-dry protection mode if the kettle is operated without
water. Upon dry boiling, the kettle will be shut off automatically and on the power
base, all indicators will keep blinking. The app will show “No water” and send out
push notification to your mobile phone. At that time, the kettle cannot be operated
by the Smart Life app and you need to manually hold and press the 100℃ preset
button for more than 3 seconds and refill the kettle with cool water and then the
kettle can be operated normally again. Scan the QR code below to watch how to
reset the kettle after dry boiling protection programme kicks in
NOTE: Please be very careful not to touch the hot surface during this operation.

11
YouTube video – reset kettle after drying boiling protection programme kicks in


Table of contents
Other WeeKett Kettle manuals