Wesco asador 86 User manual


2
CONTENTS
O
Accessible parts of the grill can be very hot. Keep children away.
o
Do not store or use petrol or other flammable vapour or liquids in the vicinity.
Assembly and Operating Instructions
PRIOR TO ASSEMBLY:
Read the instructions before using the appliance.
Only to be used outdoors.
Do not move the appliance during use. Any modification of
the appliance may be dangerous. Parts sealed by the
manufacturer or his agent must not be altered by the user.
Do not modify the appliance.
DANGER
If you smell gas:
1. Shut off gas supply to appliance.
2. Extinguish any open flame, avoid using any electrical appliance.
3. Open lid and ventilate the area.
4. Check gas connections with soap solution.
5.If odour still exists, immediately contact your gas supplier or fire
department.
IMPORTANT NOTE:
Failure to follow these instructions can result in hazardous fires
or explosions.
It is the user’s responsibility to see that this barbecue is properly
assembled, installed, and taken care of. Failure to follow instructions in
this manual could result in serious bodily injury and/or property
damage.
Any modification of the appliance, misuse, or failure to follow the
instructions may be dangerous and will invalidate your warranty.
WARRANTY
WARNING

3
1. Product Information........................................................................................................................................................................... 4
2. Safety Instructions ........................................................................................................................................................................... 5
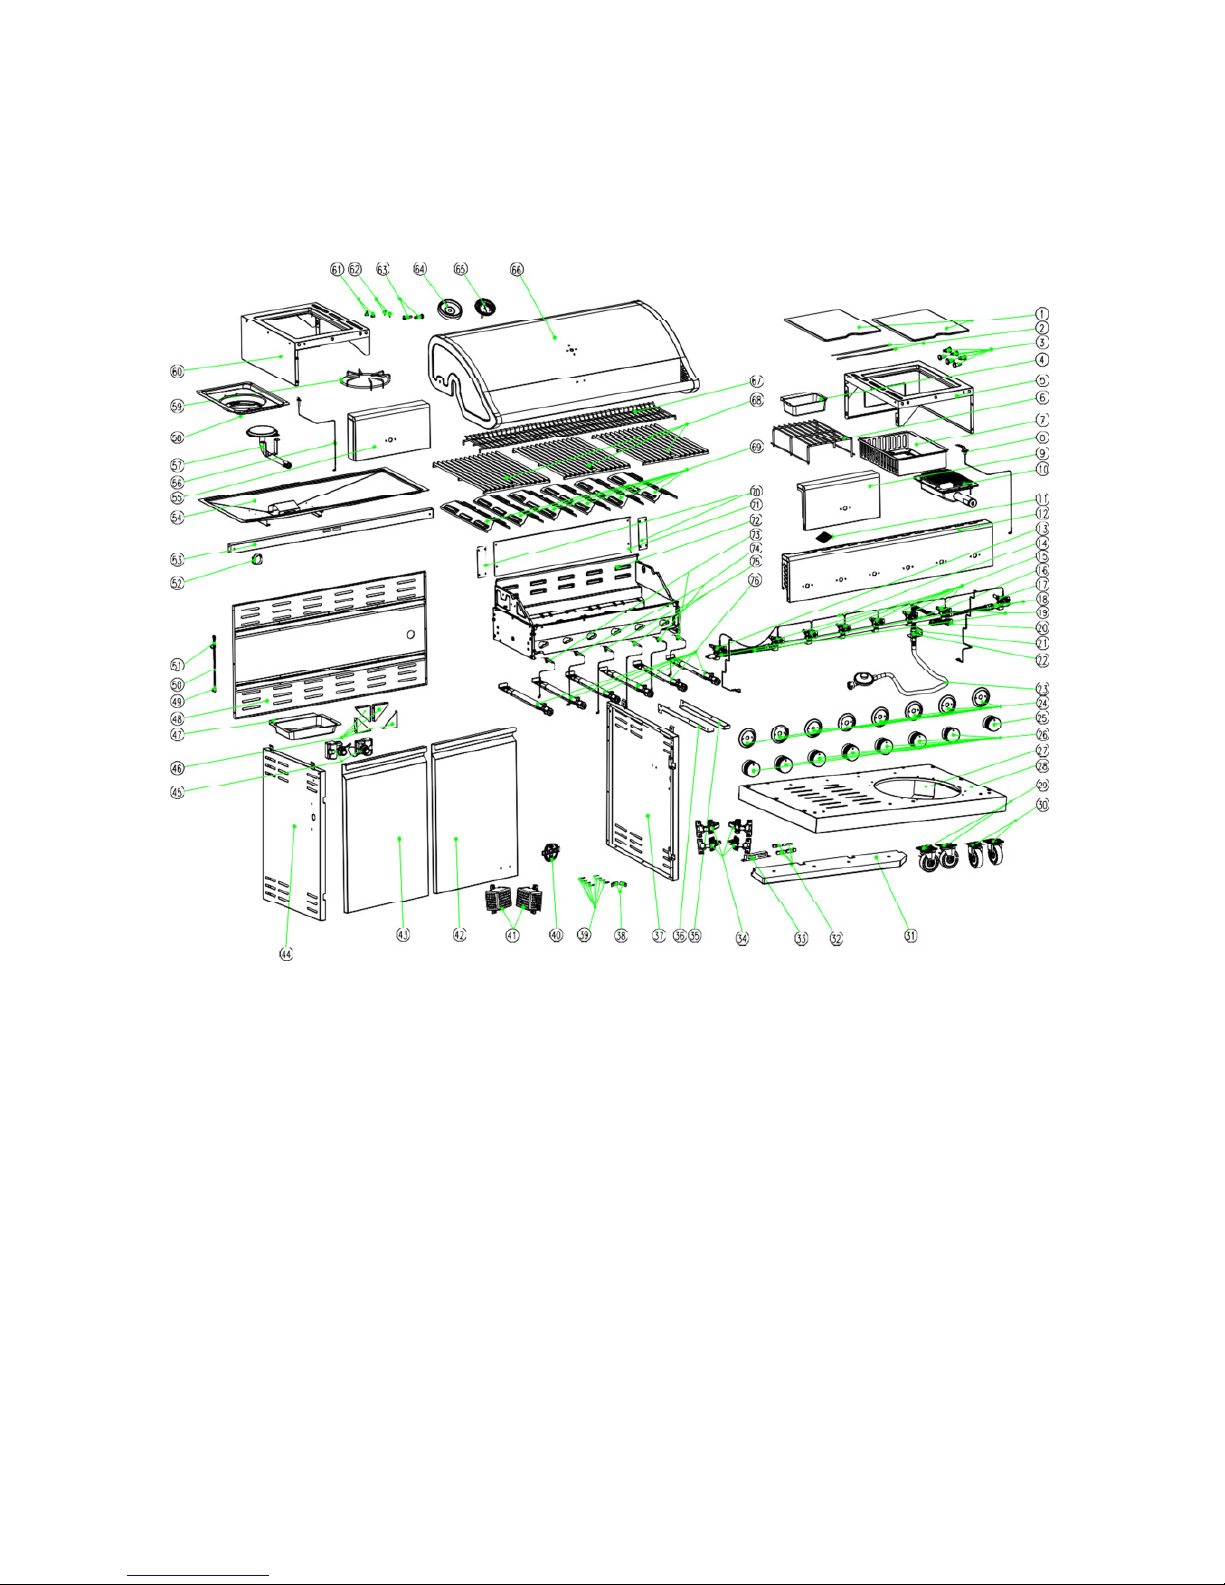
3. Parts List and Explode View.............................................................................................................................................................. 7
4. Prior to Assembly............................................................................................................................................................................ 10
5. Assembly Instructions ..................................................................................................................................................................... 12
5.1 Gas cylinder bracket .................................................................................................................................................................. 13
5.2 Left side shelf............................................................................................................................................................................. 14
5.3 Right side shelf .......................................................................................................................................................................... 15
5.4 Left side burner.......................................................................................................................................................................... 16
5.5 Right side burner........................................................................................................................................................................ 17
5.6 Grease tray and grease cup....................................................................................................................................................... 19
5.7 Heat diffusors, cooking grate and warming rack......................................................................................................................... 20
5.8 Locking the brakes..................................................................................................................................................................... 21
6. Connecting the Gas Cylinder .......................................................................................................................................................... 22
6.1 Disconnecting the gas cylinder................................................................................................................................................... 23
6.2 Leak testing ............................................................................................................................................................................... 23
7. Instructions for Use......................................................................................................................................................................... 24
7.1 Burner lighting............................................................................................................................................................................ 25
7.2 Burner flame check .................................................................................................................................................................... 26
7.3 Turning the grill off ..................................................................................................................................................................... 26
7.4 Igniter check .............................................................................................................................................................................. 26
7.5 Valve check ............................................................................................................................................................................... 26
7.6 Valve check ............................................................................................................................................................................... 26
8. Cleaning and Maintenance ............................................................................................................................................................. 27
8.1 Storing your grill......................................................................................................................................................................... 27
8.2 Burner tubes .............................................................................................................................................................................. 28
9. Troubleshooting .............................................................................................................................................................................. 29
9.1 Electronic ignition unit ................................................................................................................................................................ 30

4
1.
Product Information

5
2.
Safety Instructions
DANGER
• NEVER store a spare gas cylinder under or near the appliance or in an enclosed area.
• Never fill a cylinder beyond 80%.
•Failure to strictly observe the information under the above two items may result in a fire resulting in death or serious injuries.
•An overfilled or improperly stored cylinder is a hazard due to possible gas release from the safety relief valve. This could cause an
intense fire with risk of property damage, serious injury or death.
• If you see, smell or hear gas escaping, immediately get away from the gas cylinder and appliance and call your fire department.
• Do not store or use gasoline or other flammable liquids or vapours within 25 ft. from the appliance.
• Do not move the appliance during use.
• Turn off the gas supply at the gas container after use.
• Never obstruct the ventilation openings of the container compartment.
WARNING
For safe use of your grill and to avoid serious injury:
• Do not let children operate or play near grill.
• Keep the grill area clear and free from materials that burn.
• Do not block holes in sides or back of the grill.
• Use the grill only in a well-ventilated space. NEVER use it in an enclosed space such as a carport, garage, porch, covered patio, or under
an overhead structure of any kind.
• Do not use charcoal or ceramic briquettes in a gas grill.
• Use the grill at least 3 ft. from any wall or surface. Maintain 10 ft. clearance to objects that can catch fire or sources of ignition such as pilot
lights on water heaters, live electrical appliances, etc.
Apartment dwellers:
Check with the management to learn the requirements and fire codes for using a gas grill in your apartment complex. If allowed, use outside on
the ground floor with a 3 ft. clearance from walls or rails. Do not use on or under balconies.
• NEVER attempt to light the burner with lid closed. A build-up of non-ignited gas inside a closed grill is hazardous.
• Never operate the grill with gas cylinder out of correct position specified in assembly instructions.
• Always close the gas cylinder valve and remove the coupling nut before moving the gas cylinder from specified operation position.

6
3.
Parts List and Explode View
Parts list
No. Description Quantity No. Description Quantity
1 Side burner lid 2 39 Cotter pin 8
2 Side burner lid axle 2 40 Asador logo 1
3 Hooks for grill tools 6 41 Module box 2
4 Grease tray, ceramic burner 1 42 Right door 1
5 Right side shelf 1 43 Left door 1
6 Grate, ceramic burner 1 44 Left side shelf 1
7 Base, ceramic burner 1 45 Electronic ignition unit 2
8 Double ignition cable 1 46 Cart support angle bar 4
9 Fascia, right side shelf 1 47 Grease cup 1
10 Ceramic burner 1 48 Back cover 1
11 Wesco logo 1 49 Match holder 1
12 Control panel 1 50 Match holder chain 1
13 Gas valve, side burner 1 51 Match holder clip 1
14 Ignition cable 1 52 Bushing 1
15 Gas valve, main burner 6 53 Door bracket 1
16 Main burner gas distributor 1 54 Grease tray 1
17 Gas valve, side burner 1 55 Fascia, left side shelf 1
18 Side burner gas distributor 2 56 Side burner ignition cable 1
19 Side burner gas hose 2 57 Side burner 1
20 Corrugated pipe 1 58 Side burner base 1
21 Regulator bracket 1 59 Side burner grate 1
22 Connector B 1 60 Left side shelf 1
23 Regulator 1 61 Silicone rubber bumper, front 2

7
24 Control knob bezel 8 62 Silicone rubber bumper, back 2
25 Control knob, ceramic burner 1 63 Lid pivot 2
26 Control knob 7 64 Fascia thermometer 1
27 Gas cylinder bracket 2 65 Thermometer 1
28 Bottom plate 1 66 Lid 1
29 Caster with brake 2 67 Warming rack 1
30 Caster 2 68 Cooking grate 3
31 Counterweight 1 69 Heat diffusers 6
32 Door magnet 4 70 Connecting plate for back panel 2
33 Door magnet box 1 71 Back panel 1
34 Soft close hinge 4 72 Fire box 1
35 Grease tray, right bracket 1 73 Ignition cable for 1st and 6th burner 2
36 Grease tray, left bracket 1 74 Ignition cable for 2nd and 5th burner 2
37 Right side shelf 1 75 Ignition cable for 3rd and 4th burner 2
38 Hose retaining clip 2 76 Main burner 6
Not pictured:
Instructions for use 1
Blister packaging with accessories 1

8
EXPLODE VIEW

10
Step 2
:
Open the grill lid and remove the packaging material. Then remove the small boxes, cooking grates and the grease tray below.
Remove the packaging from the objects.
O
4.
Prior to Assembly
Read and follow the instructions below to properly remove the parts of the grill from the shipping box.
Step 1: Carefully open the top of the shipping box with a suitable knife. Remove the packaging material and the warming rack above the grill with
care. Lift the entire box from bottom to top and remove the remaining packing material from the grill.

11
Please note: To remove the cooking grates, first remove the middle grate and then push the side grates one after the other into the middle position to
be able to remove them there as well.

12
Step
3
:
Open the doors of the grill cart and remove the side shelves and the side burners as well as the accessories from the boxes inside.
Lift the grill off the bottom of the shipping box.

13
5.
Assembly Instructions
Carefully read and follow the assembly instructions on the following pages.
Necessary tools:
•Screwdriver
•Spanner for M5 nuts
The following accessories are provided in the blister pack:
M6*13 screw 16 pcs.
M5*10 screw 4 pcs.
Battery 2 pcs.
M4*12 screw 2 pcs.
Washer 6 pcs.
M5 screw 4 pcs.

14
5.1
Gas cylinder bracket
•Attach the gas cylinder bracket to the bottom with (8) M6 * 13 screws.
•Connect the two support plates with (4) M5*10 screws and secure the connection with (4) M5 nuts.
M6*13 screw 8 pcs. M5*10 screw 4 pcs. M5 nut 4 pcs.
5.2
Left side shelf
•Attach the side shelf to the 2 pre-installed M6*13 screws on the left side of the fire box.
•Secure the side shelf to the fire box from the inside with (3) M6*13 screws and (3) M6 washers.
•Secure the side shelf to the fire box from the outside with (1) M6*13 screw on the rear and (1) M6 washer on the front.
•Tighten the (2) M6*13 screws pre-installed on the fire box with the screwdriver.

15
M6*13 screw 4 pcs. M4*12 screw 1 pc. M6 washer 3 pcs.
1 2
5.3
Right side shelf
•Attach the side shelf to the 2 pre-installed M6*13 screws on the right side of the fire box.
•Secure the side shelf to the fire box from the inside with (3) M6*13 screws and (3) M6 washers.
•Secure the side shelf to the fire box from the outside with (1) M6*13 screw on the rear and (1) M4*12 screw on the front.
•Tighten the (2) M6*13 screws pre-installed on the fire box with the screwdriver.

16
M6*13 screw 4 pcs. M4*12 screw 1 pc. M6*12 washer 3 pcs.
1 2
5.4
Left side burner
•Remove the packaging material from the side burner valve. Remove the grate in the side burner.
•Loosen the side burner to insert the gas valve. To loosen, unscrew and remove two screws on the inner bottom plate of the side and
place them aside.
•Connect the flat plug of the ignition cable to the pin on the gas valve (B & C).
•Remove the 2 pre-installed screws from the valve stem and place them aside (D).
•Push the gas valve into the side burner and place the regulator through the opening of the fascia along the valve stem (E).
•Fasten the side burner with the 2 previously loosened screws (F).

17
•Push the bezel of the control knob over the regulator of the valve and tighten the valve through the bezel and the fascia on the valve
stem (G).
•Attach the control knob to the regulator of the valve (H).
•Place the grate back in the intended position in the side burner (I).
•Connect the round plug of the ignition cable to the pin on the white electrode that protrudes below the side burner (J).
5.5
Right side burner
•Remove the packaging material from the side burner valve. Remove the grate in the side burner.
•Connect the flat plug of the ignition cable to the pin on the gas valve (A).
•Remove the 2 pre-installed screws from the valve stem and place them aside (B).
•Loosen the side burner to insert the gas valve. To loosen, remove the screw on the electrode (C) and the two screws holding the side
burner in position (D). Place all parts aside.
•Push the gas valve into the side burner and place the regulator through the opening of the fascia along the valve stem (E).
•First attach the side burner with the 2 previously unscrewed screws and then the electrode (F, G).
•Push the bezel of the control knob over the regulator of the valve and tighten the valve through the bezel and the fascia on the valve
stem (H).

18
•Attach the control knob to the regulator of the valve (I).
•Place the grate back in the intended position in the side burner (J).
•Connect the round plug of the ignition cable to the pin on the white electrode that protrudes below the side burner (K).
•Push the grease cup into the grease cup clip (L).
•Open the battery compartment on the left side of the grill and insert an AAA battery with positive pole (+) pointing outwards. Then
close the battery compartment again (M). Repeat the step on the right side.

19
5.6
Grease tray and grease cup
•Push the grease tray into the bracket under the fire box. Ensure that the opening of the grease tray is on the right side from the rear
and that the tray is placed securely in the holder.
•Then push the grease cup into the grease tray bracket as shown in the picture.

20
5.7
Heat diffusors, cooking grate and warming rack
•Place the heat diffusers over the burners. The diffusers fit in both directions into the provided slots in the fire box.
•Place the cooking grates on the brackets in the fire box. Place the grates in the middle and slide them to the left and right. Insert the
middle grate first.
•Place the warming rack in the openings at the top of the fire box.

21
5.8
Locking the brakes
•For safe handling of the grill, roll it to the desired position and lock the brakes as shown below.
Table of contents