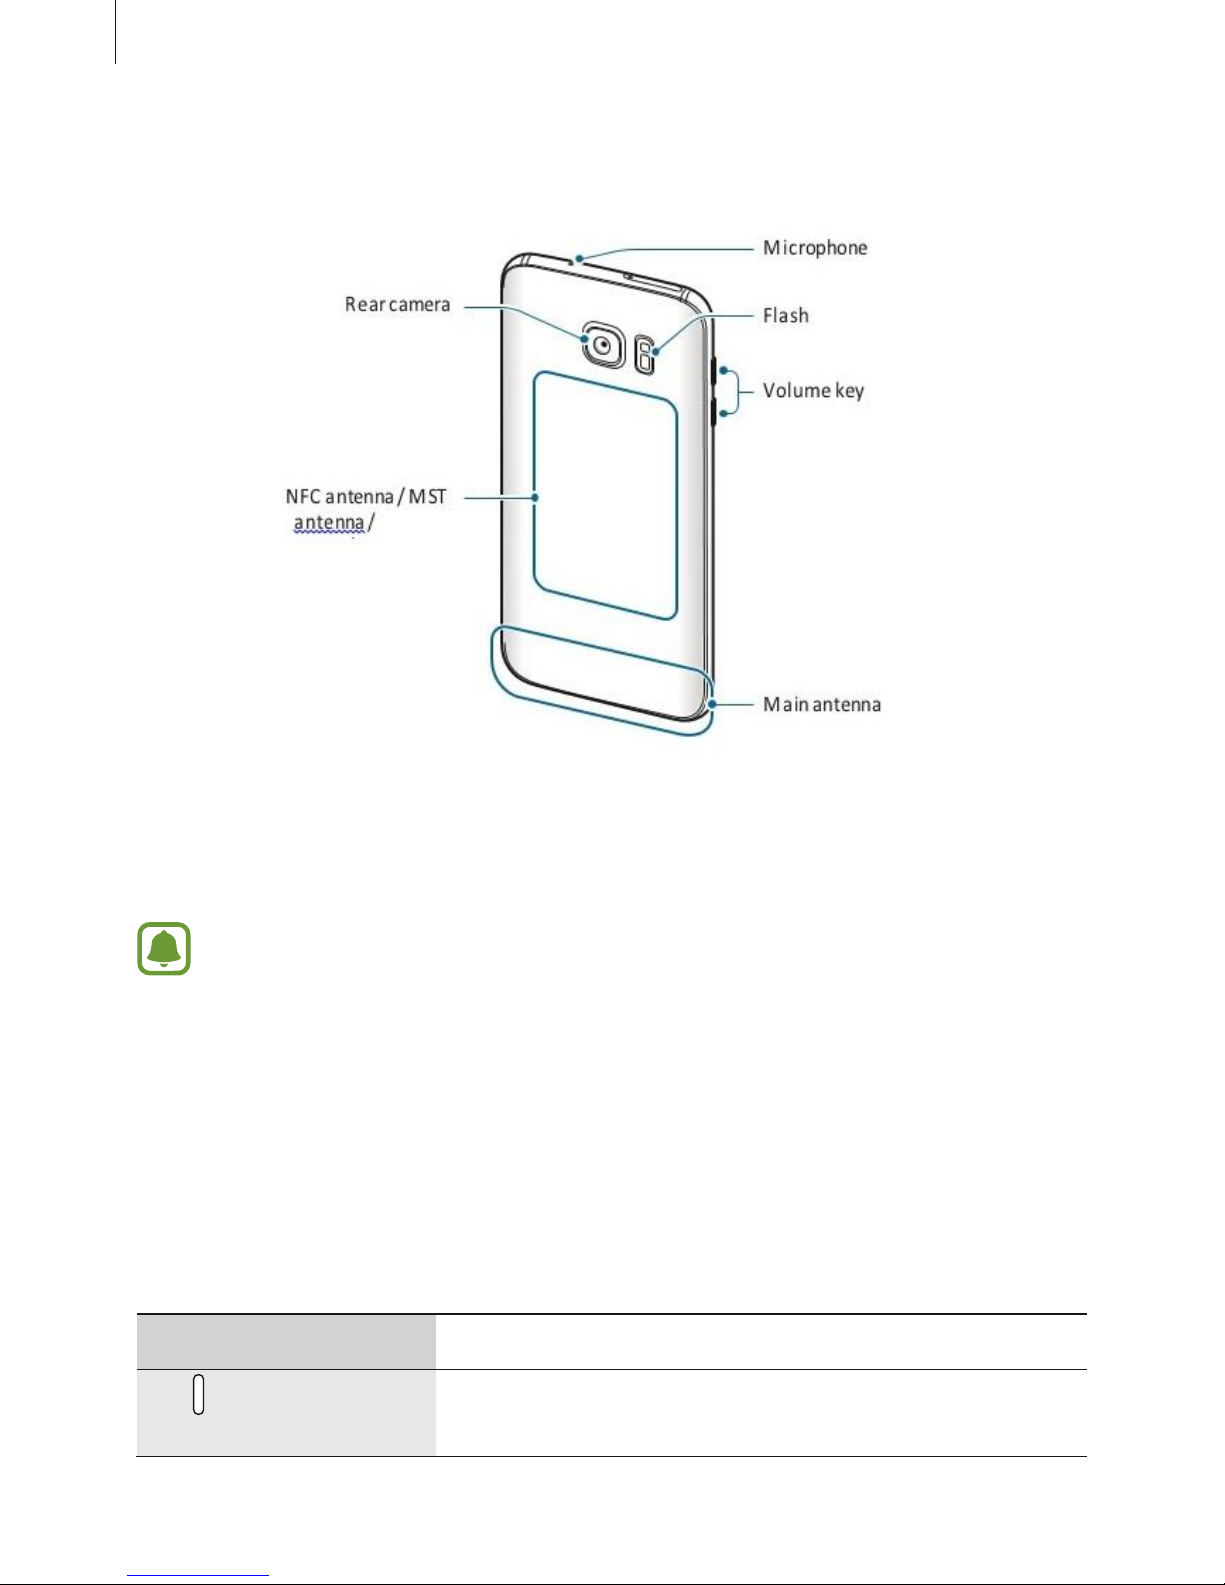
WESTECH S7 User manual

WESTECH S7
ANDROID SMART PHONE
User Manual
Copyright © 2015 WESTECH Media Technologies Ltd. WESTECH Media Technologies Ltd, 27
Old Gloucester Street, London, WC1N 3AX Registered Company Number: 08757885
This user manual that can be downloaded for free from the WESTECH
website:
www.westech.media/user-manuals
If you would like any advice or assistance with regard to any part of your
device please contact WESTECH via their website or by email:
All WESTECH products come with a 1 year warranty. This means that if your
product becomes faulty within one year of purchase we will repair or replace
your product. Full details of our warranty can be found on our website:
www.westech.media/termsandconditions

1
Table of
Contents
Basics
4 Read me first
6Package contents
7Device layout
9 Battery
15 SIM or USIM card (nano-SIM card)
21 Memory card (microSD card)
24 USB connector
25 Turning the device on and off
25 Touchscreen
28 Home screen
34 Lock screen
36 Notification panel
38 Entering text
41 Screen capture
42 Opening apps
42 Multi window
46 WESTECH account
48 Transferring data from your
previous device
51 Device and data management
53 Quick connect
57 Sharing features
58 Emergency mode
Applications
59 Installing or uninstalling apps
61 Phone
65 Contacts
68 Messages
71 Internet
73 Email
74 Camera
95 Gallery
94 Blank
101 WESTECH Gear
102 Game Launcher
105 S Planner
106 S Health
109 S Voice
111 Voice Recorder
113 My Files
113 Memo
114 Clock
115 Calculator
116 Google apps
Table of Contents
Settings
118 Introduction
118 Wi-Fi
120 Bluetooth
122 Flight mode
122 Mobile hotspot and
tethering

2
123 Data usage
124 SIM card manager (dual SIM
models)
125 Mobile networks
125 Blank
128 More connection settings
130 Smart Manager
132 Applications
133 Sounds and vibration
134 Notifications
134 Do not disturb
135 Display
136 Advanced features
137 Wallpaper
138 Themes
138 Home screen
138 Lock screen and security
143 Privacy and safety
147 Easy mode
147 Accessibility
148 Accounts
148 Backup and reset
149 Language and input
150 Battery
150 Storage
151 Date and time
151 User manual
151 About device
Appendix
152 Accessibility
167 Troubleshooting

3
Basics
Read me first
Please read this manual before using the device to ensure safe and proper use.
•Descriptions are based on the device’s default settings.
•Parts of this manual may not apply directly to the phone you have purchased and
may be dependent on additional hardware and software not supplied by WESTECH.
•Some content may differ from your device depending on the region, service
provider, model specifications, or device’s software.
•Content (high quality content) that requires high CPU and RAM usage will affect the
overall performance of the device. Apps related to the content may not work
properly depending on the device’s specifications and the environment that it is
used in.
•WESTECH is not liable for performance issues caused by apps supplied by providers
other than WESTECH.
•WESTECH is not liable for performance issues or incompatibilities caused by edited
registry settings or modified operating system software. Attempting to customise
the operating system may cause the device or apps to work improperly.
•Software, sound sources, wallpapers, images, and other media provided with this
device are licensed for limited use. Extracting and using these materials for
commercial or other purposes is an infringement of copyright laws. Users are
entirely responsible for illegal use of media.
•You may incur additional charges for data services, such as messaging, uploading
and downloading, auto-syncing, or using location services depending on your data
plan. For large data transfers, it is recommended to use the Wi-Fi feature.
•Default apps that come with the device are subject to updates and may no longer be
supported without prior notice. If you have questions about an app provided with
the device, contact a WESTECH. For user-installed apps, contact service providers.
•Modifying the device’s operating system or installing softwares from unofficial
sources may result in device malfunctions and data corruption or loss. These actions
are violations of your WESTECH licence agreement and will void your warranty.

Basics
4
Instructional icons
Warning: situations that could cause injury to yourself or others
Caution: situations that could cause damage to your device or other equipment
Notice: notes, usage tips, or additional information
Package contents
Check the product box for the following items:
•Device
•Quick start guide
•The items supplied with the device and any available accessories may vary
depending on the region or service provider.
•The supplied items are designed only for this device and may not be
compatible with other devices.
•Appearances and specifications are subject to change without prior notice.
•You can purchase additional accessories from your local WESTECH retailer.
Make sure they are compatible with the device before purchase.
•Use only WESTECH-approved accessories. Using unapproved accessories may
cause the performance problems and malfunctions that are not covered by
the warranty.
•Availability of all accessories is subject to change depending entirely on
manufacturing companies. For more information about available accessories,
refer to the WESTECH website.

Basics
5

Basics
6
•Connectivity problems and battery drain may occur in the following situations:
–If you attach metallic stickers on the antenna area of the device
–If you attach a device cover made with metallic material to the device
–If you cover the device’s antenna area with your hands or other objects
while using certain features, such as calls or the mobile data connection
•Using a WESTECH-approved screen protector is recommended. Unapproved
screen protectors may cause the sensors to malfunction.
Keys
Key
Function
Power
•Press and hold to turn the device on or off.
•Press to turn on or lock the screen.

Basics
7
Recents
•Tap to open the list of recent apps.
•Tap and hold to launch the split screen view.
Home
•Press to turn on the screen while the screen is locked.
•Press to return to the Home screen.
•Press and hold to launch Google.
Back
•Tap to return to the previous screen.
•Tap and hold to access additional options for the
current screen.
Volume
•Press to adjust the device volume.
Battery
Charging the battery
Charge the battery before using it for the first time or when it has been unused for
extended periods.
Use only WESTECH-approved chargers, batteries, and cables. Unapproved
chargers or cables can cause the battery to explode or damage the device.
1 Connect the USB cable to the USB power adaptor, and then plug the end of the USB
cable into the multipurpose jack.
Connecting the charger improperly may cause serious damage to the device. Any
damage caused by misuse is not covered by the warranty.

Basics
8
2 Plug the USB power adaptor into an electric socket.
3 After fully charging, disconnect the device from the charger. First unplug the charger
from the device, and then unplug it from the electric socket.
To save energy, unplug the charger when not in use. The charger does not have a
power switch, so you must unplug the charger from the electric socket when not
in use to avoid wasting power. The charger should remain close to the electric socket
and easily accessible while charging.
Viewing the remaining charging time
While charging, open the Home screen and tap Apps →Settings →Battery.
The actual charging time may vary depending on the status of your device and the
charging conditions. The remaining charging time may not be displayed when you
charge the device in very cold or very hot conditions.
Reducing the battery consumption
Your device provides various options that help you conserve battery power.
•Optimise the device using the Smart manager.
•When you are not using the device, switch to sleep mode by pressing the Power key.
•Activate power saving mode.
•Close unnecessary apps.
•Deactivate the Bluetooth feature when not in use.
•Deactivate the Wi-Fi feature when not in use.
•Deactivate auto-syncing of apps that need to be synced, such as emails.
•Decrease the backlight time.
•Decrease the screen brightness.
Battery charging tips and precautions
•When the battery power is low, the battery icon appears empty.
•If the battery is completely discharged, the device cannot be turned on immediately
when the charger is connected. Allow a depleted battery to charge for a few
minutes before turning on the device.

Basics
9
•If you use multiple apps at once, network apps, or apps that need a connection to
another device, the battery will drain quickly. To avoid losing power during a data
transfer, always use these apps after fully charging the battery.
•Using a power source other than the charger, such as a computer, may result in a
slower charging speed due to a lower electric current.
•The device can be used while it is charging, but it may take longer to fully charge the
battery.
•If the device receives an unstable power supply while charging, the touchscreen
may not function. If this happens, unplug the charger from the device.
•While charging, the device and the charger may heat up. This is normal and should
not affect the device’s lifespan or performance. If the battery gets hotter than usual,
the charger may stop charging.
•If you charge the device while the multipurpose jack is wet, the device may be
damaged.
Thoroughly dry the multipurpose jack before charging the device.
•If the device is not charging properly, contact WESTECH.
•While charging the battery when the device is turned off, the icon appears on the
screen.
•You cannot use the built-in fast charging feature when you charge the
battery using a standard battery charger.
•If the device heats up or the ambient air temperature rises, the charging speed may
decrease automatically. This is a normal operating condition to prevent damage to
the device.
Power saving mode
Save the battery power by limiting the device’s functions.
On the Home screen, tap Apps →Settings →Battery →Power saving mode, and then
tap the switch to activate it.
To automatically activate power saving mode when the remaining battery power
reaches the preset level, tap Start power saving and select an option.
Ultra power saving mode
Use this mode to extend the device’s battery power. In ultra power saving mode, the
device performs the following:

Basics
10
•Displays colours on the screen as grey tones.
•Restricts the available apps to essential and selected apps only.
•Deactivates the mobile data connection when the screen turns off.
•Deactivates the Wi-Fi and Bluetooth features.
On the Home screen, tap Apps →Settings →Battery →Ultra power saving mode, and
then tap the switch to activate it.
To deactivate ultra power saving mode, tap MORE →Disable Ultra power saving mode.
The usage time left shows the time remaining before the battery power runs
out. Usage time left may vary depending on your device settings and
operating conditions.
SIM or USIM card (nano-SIM card)
Installing the SIM or USIM card
Insert the SIM or USIM card provided by the mobile telephone service provider.
Use caution not to lose or let others use the SIM or USIM card. WESTECH is not
responsible for any damages or inconveniences caused by lost or stolen cards.
•Dual SIM models: In some areas, data transfer speeds may be slower if two
SIM cards are inserted in the device than when one SIM card is inserted.
•Some LTE services may not be available depending on the service provider.
For more information about service availability, contact your service provider.
►Single SIM models:

Basics
11
►Dual SIM models:

Basics
12
1 Insert the ejection pin into the hole on the tray to loosen the tray.
Ensure that the ejection pin is perpendicular to the hole. Otherwise, the device
may be damaged.
2 Pull out the tray gently from the tray slot.
3 ►Single SIM models: Place the SIM or USIM card on the tray with the gold-
coloured contacts facing downwards.
►Dual SIM models: Place the SIM or USIM card on the tray with the gold-coloured
contacts facing downwards.
Place the primary SIM or USIM card on the tray 1 ( 1 ) and the secondary SIM or
USIM card on the tray 2 ( 2 ).

Basics
13
4 Gently press the SIM or USIM card into the tray to secure it.
If the card is not fixed firmly into the tray, the SIM card may leave or fall out of
the tray. 5 Insert the tray back into the tray slot.
•If you insert the tray into your device while the tray is wet, your device may
be damaged. Always make sure the tray is dry.
•Fully insert the tray into the tray slot to prevent liquid from entering your device.
Correct card installation
►Single SIM models:
Nano-SIM
card
microSD card
►
•Use only a nano-SIM card.
•You cannot insert a nano-SIM card and a microSD card in tray 2 at the same
time.
•If you have any trouble inserting your Nano SIM or Memory card contact WESTECH.
Damage to this mechanism is not covered by warranty.

Basics
14
Removing the SIM or USIM card
1 Insert the ejection pin into the hole on
the tray to loosen the tray.
2 Pull out the tray gently from the tray
slot. 3 Remove the SIM or USIM
card. ►Single SIM models:
►Dual SIM models:

Basics
15
4 Insert the tray back into the tray slot.
Activating SIM or USIM cards
On the Home screen, tap Apps →Settings →SIM card manager. Select a SIM or USIM
card and tap the switch to activate it.
Customising SIM or USIM cards
On the Home screen, tap Apps →Settings →SIM card manager and select a SIM or
USIM card to access the following options:
•Icon: Change the icon of the SIM or USIM card.
•Name: Change the display name of the SIM or USIM card.
•Network mode: Select a network type to use with the SIM or USIM card.
Setting preferred SIM or USIM cards
When two cards are activated, you can assign voice calls, messaging, and data services
to specific cards.
On the Home screen, tap Apps →Settings →SIM card manager and set the feature
preferences for your cards in Preferred SIM card.
Memory card (microSD card)
Installing a memory card
Your device accepts memory cards with maximum capacities of 200 GB. Depending on
the memory card manufacturer and type, some memory cards may not be compatible
with your device.
•Some memory cards may not be fully compatible with the device. Using an
incompatible card may damage the device or the memory card, or corrupt the
data stored in it.
•Use caution to insert the memory card right-side up.
•The device supports the FAT and the exFAT file systems for memory cards.
When inserting a card formatted in a different file system, the device asks to
reformat the memory card.
•Frequent writing and erasing of data shortens the lifespan of memory cards.

Basics
16
•When inserting a memory card into the device, the memory card’s file
directory appears in the My Files →SD card folder.

Basics
17
1 Insert the ejection pin into the hole on the tray to loosen the tray.
Ensure that the ejection pin is perpendicular to the hole. Otherwise, the
device may be damaged. 2 Pull out the tray gently from the tray slot.
When you remove the tray from the device, the mobile data connection will be
disabled.
3 Place a memory card on the tray 2 with the gold-
coloured contacts facing downwards.

Basics
18
4 Gently press the memory card into the tray to secure
it. 5 Insert the tray back into the tray slot.
•If you insert the tray into your device while the tray is wet, your device
may be damaged. Always make sure the tray is dry.
•Fully insert the tray into the tray slot to prevent liquid from entering your device.
Removing the memory card
Before removing the memory card, first unmount it for safe removal.
On the Home screen, tap Apps →Settings →Storage →SD card →
Unmount. 1 Insert the ejection pin into the hole on the tray to loosen the
tray.
2 Pull out the tray gently from the tray slot.
3 Remove the memory card.
4 Insert the tray back into the tray slot.
Do not remove the memory card while the device is transferring or accessing
information. Doing so can cause data to be lost or corrupted or damage to the
memory card or device. WESTECH is not responsible for losses that result from the
misuse of damaged memory cards, including the loss of data.
Formatting the memory card
A memory card formatted on a computer may not be compatible with the device.
Format the memory card on the device.

Basics
19
On the Home screen, tap Apps →Settings →Storage →SD card →Format →
FORMAT.
Before formatting the memory card, remember to make backup copies of all
important data stored in the memory card. The manufacturer’s warranty does
not cover loss of data resulting from user actions.
USB connector
With the supplied USB connector (On-The-Go Adaptor), you can transfer data from
other mobile devices or connect USB peripheral devices, such as a mouse and keyboard,
to your device.
Transferring data from your previous device
You can connect your previous device to your device with the USB connector and a USB
cable to easily and quickly transfer data without installing an app in the previous device.
Refer to Transferring data via a USB connection for more information.
Connecting a USB peripheral device
Plug the USB connector into the multipurpose jack of your device and connect the USB
peripheral device to the USB connector.
Some USB peripheral devices may not be compatible with your device.
Turning the device on and off
Press and hold the Power key for a few seconds to turn on the device.
When you turn on your device for the first time or after performing a data reset, follow
the onscreen instructions to set up your device.
To turn off the device, press and hold the Power key, and then tap Power off.
Follow all posted warnings and directions from authorised personnel in areas
where the use of wireless devices is restricted, such as aeroplanes and hospitals.
Restarting the device
If your device is frozen and unresponsive, press and hold the Power key and the Volume
Down key simultaneously for more than 7 seconds to restart it.
Table of contents
Other WESTECH Cell Phone manuals