Western Digital My Book Studio User manual

External Desktop
My Book™
for Mac
User Manual
My Book for Mac User Manual

ii
WD Service and Support
Should you encounter any problem, please give us an opportunity to address it before returning
this product. Most technical support questions can be answered through our knowledge base
or email support service at http://support.wdc.com. If the answer is not available or if you prefer,
please contact WD™ at the best telephone number shown below.
Your product includes 30 days of free telephone support during the warranty period. This 30-
day period starts on the date of your first telephone contact with WD Technical Support. Email
support is free for the entire warranty period and our extensive knowledge base is available 24/
7. To help us keep you informed of new features and services, remember to register your
product online at http://register.wd.com.
Accessing Online Support
Visit our product support website at http://support.wdc.com and choose from these topics:
Downloads—Download drivers, software, and updates for your WD product.
Registration—Register your WD product to get the latest updates and special offers.
Warranty & RMA Services—Get warranty, product replacement (RMA), RMA status, and
data recovery information.
Knowledge Base—Search by keyword, phrase, or Answer ID.
Installation—Get online installation help for your WD product or software.
WD Community—Share your thoughts and connect with other WD users.
Contacting WD Technical Support
When contacting WD for support, have your WD product serial number, system hardware, and
system software versions available
North America Europe (toll free)* 00800 ASK4 WDEU
English 800.ASK.4WDC (00800 27549338)
(800.275.4932) Europe +31 880062100
Spanish 800.832.4778 Middle East +31 880062100
Africa +31 880062100
Mexico 001 8002754932 Russia 8 10 8002 335 5011
South America Asia Pacific
Chile 1230 020 5871 Australia 1800 429 861 / 0011 800 2275 4932
Colombia 009 800 83247788 China 800 820 6682 / 400 627 6682
Venezuela 0800 100 2855 Hong Kong 3057 9031
Peru 0800 54003 India 1800 200 5789 / 1800 419 5591
Uruguay 000 413 598 3787 Indonesia 001 803 852 3993
Argentina 0800 4440839 Japan 0800 805 7293
Brazil 0800 7704932 Korea 02 2120 3415
0021 800 83247788 Malaysia 1800 817 477
New Zealand 0508 555 639 / 00800 2275 4932
Philippines 1800 1855 0277
Singapore 1800 608 6008
Taiwan 0800 225 593
Thailand 00 1800 852 5913
Other countries +86 21 2603 7560
* Toll free number available in the following countries: Austria, Belgium, Czech Republic, Denmark, France, Germany,
Ireland, Italy, Netherlands, Norway, Poland, Slovakia, Spain, Sweden, Switzerland, United Kingdom.

MY BOOK FOR MAC
USER MANUAL
TABLE OF CONTENTS – iii
Table of Contents
WD Service and Support . . . . . . . . . . . . . . . . . . . . . . . . . . . . . . . . . . . . . . . . . . . . . . . . . . . ii
Accessing Online Support . . . . . . . . . . . . . . . . . . . . . . . . . . . . . . . . . . . . . . . . . . . . . . . . . . . . . ii
Contacting WD Technical Support. . . . . . . . . . . . . . . . . . . . . . . . . . . . . . . . . . . . . . . . . . . . . . . ii
1 About Your WD Drive . . . . . . . . . . . . . . . . . . . . . . . . . . . . . . . . . . . . . . . . 1
Kit Contents . . . . . . . . . . . . . . . . . . . . . . . . . . . . . . . . . . . . . . . . . . . . . . . . . . . . . . . . . . . . . 1
Optional Accessories . . . . . . . . . . . . . . . . . . . . . . . . . . . . . . . . . . . . . . . . . . . . . . . . . . . . . . 1
Operating System Compatibility . . . . . . . . . . . . . . . . . . . . . . . . . . . . . . . . . . . . . . . . . . . . . 2
Disk Drive Format . . . . . . . . . . . . . . . . . . . . . . . . . . . . . . . . . . . . . . . . . . . . . . . . . . . . . . . . . 2
Physical Description . . . . . . . . . . . . . . . . . . . . . . . . . . . . . . . . . . . . . . . . . . . . . . . . . . . . . . . 2
Power/Activity LED. . . . . . . . . . . . . . . . . . . . . . . . . . . . . . . . . . . . . . . . . . . . . . . . . . . . . . . . . . . 3
USB 3.0 Interface . . . . . . . . . . . . . . . . . . . . . . . . . . . . . . . . . . . . . . . . . . . . . . . . . . . . . . . . . . . . 3
Kensington® Security Slot . . . . . . . . . . . . . . . . . . . . . . . . . . . . . . . . . . . . . . . . . . . . . . . . . . . . . 3
Registering the Drive . . . . . . . . . . . . . . . . . . . . . . . . . . . . . . . . . . . . . . . . . . . . . . . . . . . . . . 3
Handling Precautions . . . . . . . . . . . . . . . . . . . . . . . . . . . . . . . . . . . . . . . . . . . . . . . . . . . . . . 3
2 Connecting the Drive and Getting Started . . . . . . . . . . . . . . . . . . . . . . . 4
Connecting the Drive . . . . . . . . . . . . . . . . . . . . . . . . . . . . . . . . . . . . . . . . . . . . . . . . . . . . . . 4
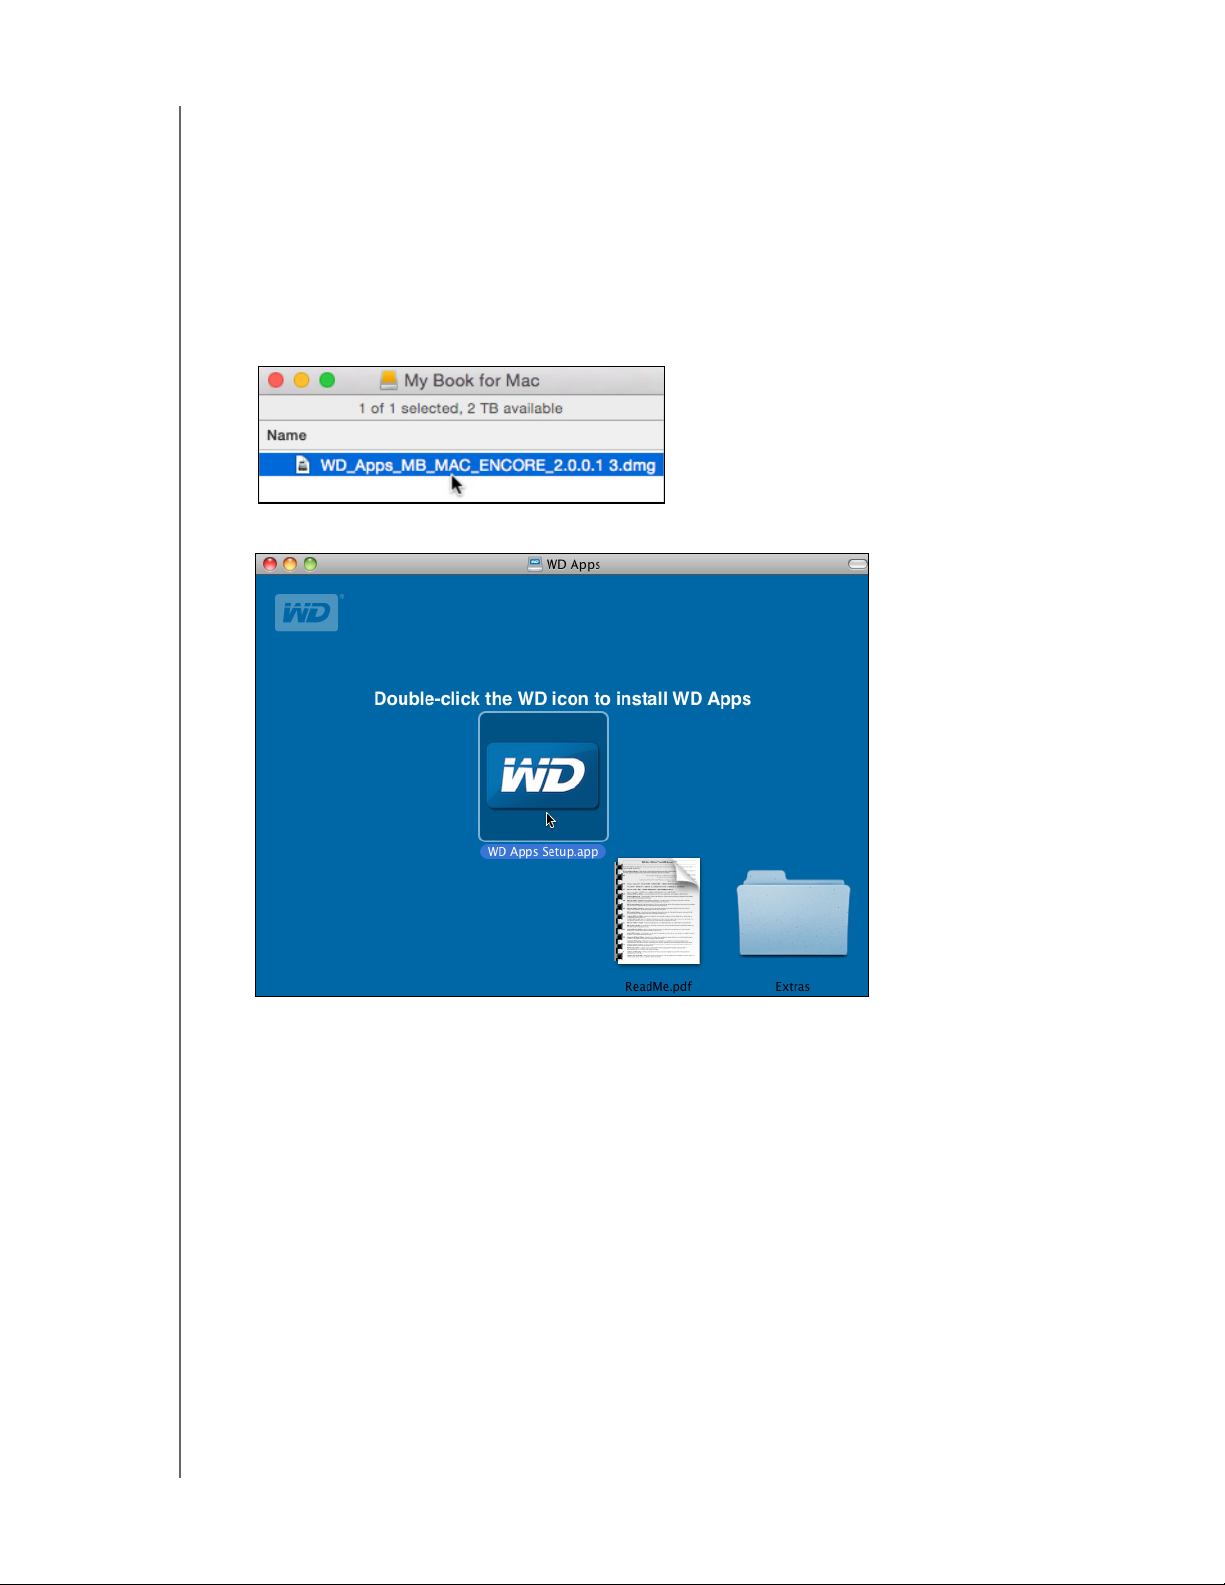
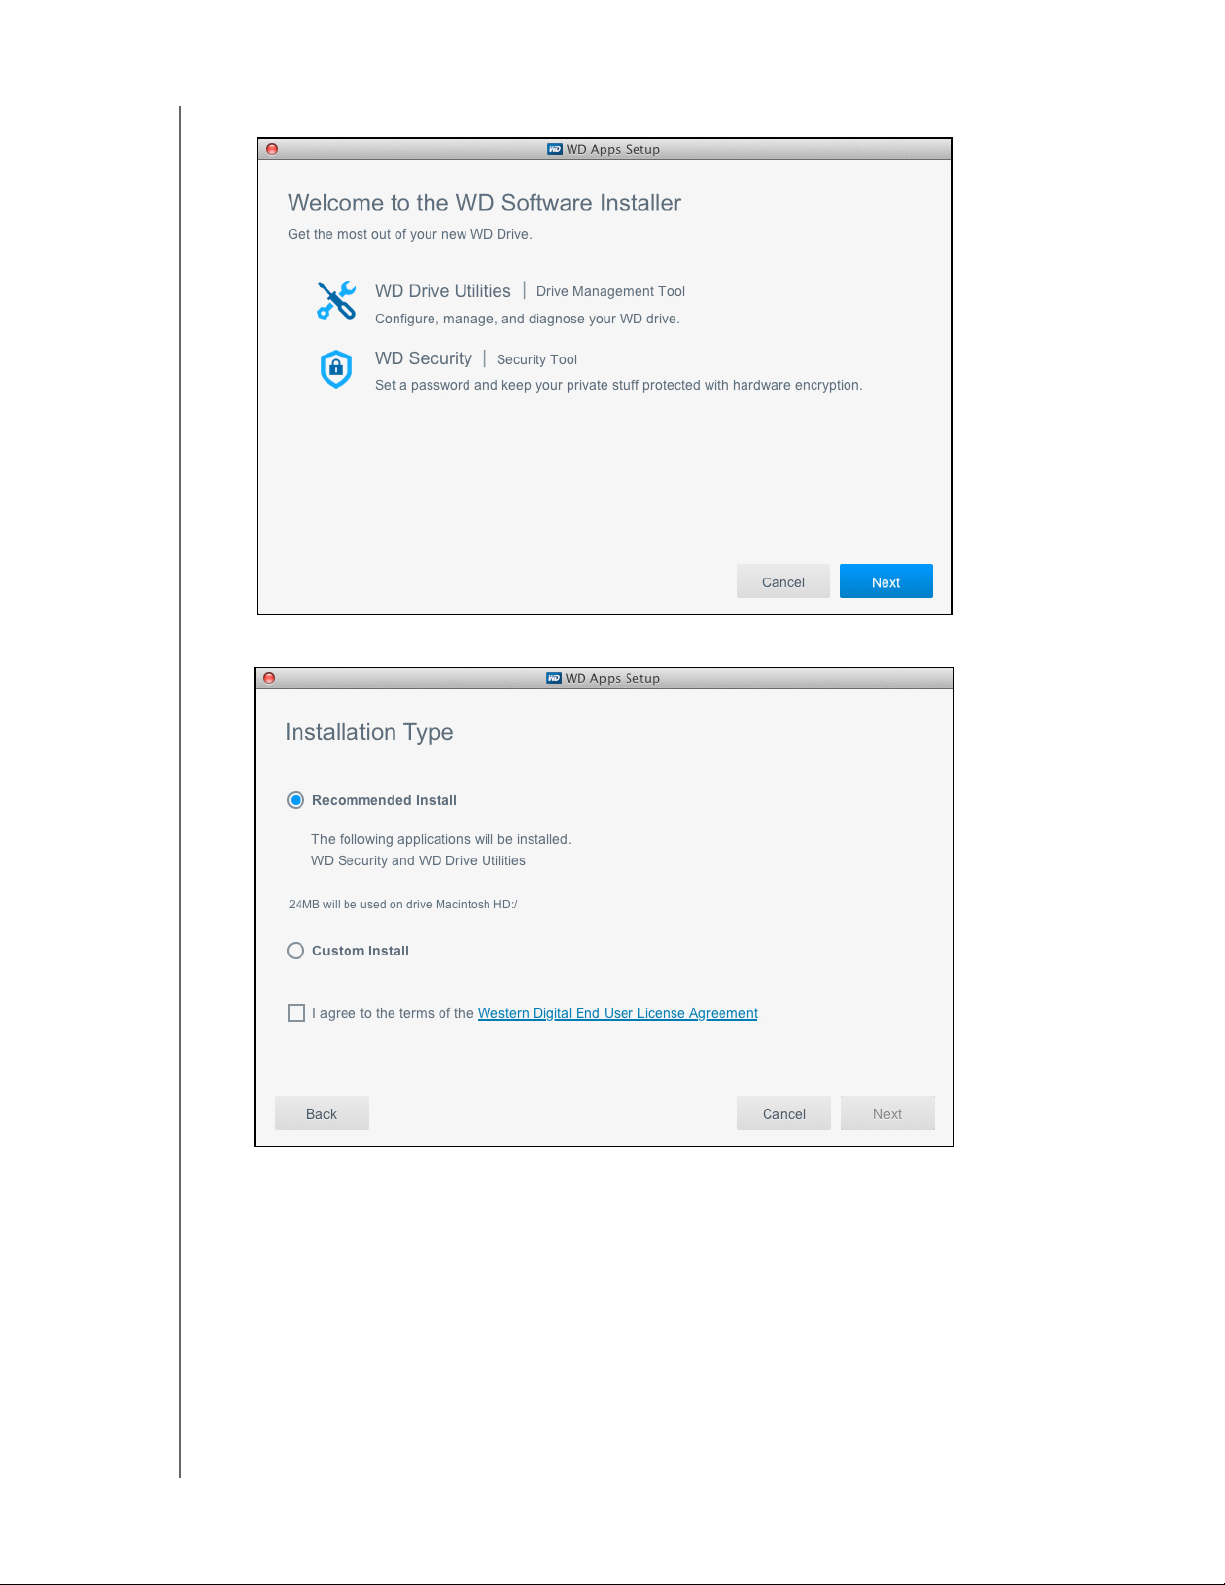
Getting Started with the WD Software . . . . . . . . . . . . . . . . . . . . . . . . . . . . . . . . . . . . . . . . . 5
3 Locking and Unlocking the Drive . . . . . . . . . . . . . . . . . . . . . . . . . . . . . 10
Password Protecting the Drive . . . . . . . . . . . . . . . . . . . . . . . . . . . . . . . . . . . . . . . . . . . . . . 10
Unlocking the Drive. . . . . . . . . . . . . . . . . . . . . . . . . . . . . . . . . . . . . . . . . . . . . . . . . . . . . . . 11
With the WD Security or WD Drive Utilities Software. . . . . . . . . . . . . . . . . . . . . . . . . . . . . . . . 11
Changing Your Password . . . . . . . . . . . . . . . . . . . . . . . . . . . . . . . . . . . . . . . . . . . . . . . . . . 12
Turning Off the Drive Lock Feature. . . . . . . . . . . . . . . . . . . . . . . . . . . . . . . . . . . . . . . . . . . 13
4 Managing and Customizing the Drive . . . . . . . . . . . . . . . . . . . . . . . . . 14
Checking Drive Health . . . . . . . . . . . . . . . . . . . . . . . . . . . . . . . . . . . . . . . . . . . . . . . . . . . . 14
Erasing the Drive. . . . . . . . . . . . . . . . . . . . . . . . . . . . . . . . . . . . . . . . . . . . . . . . . . . . . . . . . 15
Using the Drive Erase Function . . . . . . . . . . . . . . . . . . . . . . . . . . . . . . . . . . . . . . . . . . . . . . . . 15
Using Five Invalid Passwords. . . . . . . . . . . . . . . . . . . . . . . . . . . . . . . . . . . . . . . . . . . . . . . . . . 16
Registering the Drive . . . . . . . . . . . . . . . . . . . . . . . . . . . . . . . . . . . . . . . . . . . . . . . . . . . . . 17
Restoring the WD Software and Disk Image . . . . . . . . . . . . . . . . . . . . . . . . . . . . . . . . . . . 18
Safely Disconnecting the Drive. . . . . . . . . . . . . . . . . . . . . . . . . . . . . . . . . . . . . . . . . . . . . . 18
Setting the Drive Sleep Timer . . . . . . . . . . . . . . . . . . . . . . . . . . . . . . . . . . . . . . . . . . . . . . . 19
5 Using the Drive with Windows . . . . . . . . . . . . . . . . . . . . . . . . . . . . . . . 20
Reformatting the Drive . . . . . . . . . . . . . . . . . . . . . . . . . . . . . . . . . . . . . . . . . . . . . . . . . . . . 20
Restoring the WD Software and Disk Image . . . . . . . . . . . . . . . . . . . . . . . . . . . . . . . . . . . 20
6 Troubleshooting . . . . . . . . . . . . . . . . . . . . . . . . . . . . . . . . . . . . . . . . . . . 21
Installing, Partitioning, and Formatting the Drive . . . . . . . . . . . . . . . . . . . . . . . . . . . . . . . . 21
Frequently Asked Questions. . . . . . . . . . . . . . . . . . . . . . . . . . . . . . . . . . . . . . . . . . . . . . . . 21
A Compliance and Warranty Information . . . . . . . . . . . . . . . . . . . . . . . . . 23
Regulatory Compliance . . . . . . . . . . . . . . . . . . . . . . . . . . . . . . . . . . . . . . . . . . . . . . . . . . . 23
FCC Class B Information . . . . . . . . . . . . . . . . . . . . . . . . . . . . . . . . . . . . . . . . . . . . . . . . . . . . .23
ICES/NMB-003 Compliance. . . . . . . . . . . . . . . . . . . . . . . . . . . . . . . . . . . . . . . . . . . . . . . . . . . 23

MY BOOK FOR MAC
USER MANUAL
TABLE OF CONTENTS – iv
Safety Compliance . . . . . . . . . . . . . . . . . . . . . . . . . . . . . . . . . . . . . . . . . . . . . . . . . . . . . . . . . . 23
CE Compliance for Europe. . . . . . . . . . . . . . . . . . . . . . . . . . . . . . . . . . . . . . . . . . . . . . . . . . . . 24
GS Mark (Germany only) . . . . . . . . . . . . . . . . . . . . . . . . . . . . . . . . . . . . . . . . . . . . . . . . . . . . .24
KC Notice (Republic of Korea only) . . . . . . . . . . . . . . . . . . . . . . . . . . . . . . . . . . . . . . . . . . . . . 24
Environmental Compliance (China). . . . . . . . . . . . . . . . . . . . . . . . . . . . . . . . . . . . . . . . . . . 24
Warranty Information (All Regions Except Australia/New Zealand) . . . . . . . . . . . . . . . . . . 25
Obtaining Service . . . . . . . . . . . . . . . . . . . . . . . . . . . . . . . . . . . . . . . . . . . . . . . . . . . . . . . . . . . 25
Limited Warranty . . . . . . . . . . . . . . . . . . . . . . . . . . . . . . . . . . . . . . . . . . . . . . . . . . . . . . . . . . . 25
Warranty Information (Australia/New Zealand) . . . . . . . . . . . . . . . . . . . . . . . . . . . . . . . . . . 26
Obtaining Service . . . . . . . . . . . . . . . . . . . . . . . . . . . . . . . . . . . . . . . . . . . . . . . . . . . . . . . . . . . 26
Warranty . . . . . . . . . . . . . . . . . . . . . . . . . . . . . . . . . . . . . . . . . . . . . . . . . . . . . . . . . . . . . . . . . . 27
GNU General Public License (“GPL”) . . . . . . . . . . . . . . . . . . . . . . . . . . . . . . . . . . . . . . . . . 28
Index. . . . . . . . . . . . . . . . . . . . . . . . . . . . . . . . . . . . . . . . . . . . . . . . . . . . . . 29

1
1
MY BOOK FOR MAC
USER MANUAL
ABOUT YOUR WD DRIVE – 1
About Your WD Drive
This chapter includes the following topics:
Kit Contents
Optional Accessories
Operating System Compatibility
Disk Drive Format
Physical Description
Registering the Drive
Handling Precautions
Kit Contents
As shown in Figure 1, your My Book for Mac disk drive kit includes:
My Book for Mac external hard drive, with the WD Security and WD Drive Utilities
software
USB 3.0 cable
AC adapter
Quick Install Guide
Optional Accessories
For information about optional accessories for WD products, visit:
Figure 1. My Book for Mac Drive Kit Components
US www.wdstore.com
Canada www.wdstore.ca
Europe www.wdstore.eu
Australia www.wdstore.com.au
Singapore www.wdstore.sg
All others Contact WD Technical Support in your region. For a list of Technical Support
contacts, visit http://support.wdc.com and see Knowledge Base Answer
ID 1048.
My Book for Mac Drive AC Adapter
Quick Install Guide
USB 3.0 Cable

MY BOOK FOR MAC
USER MANUAL
ABOUT YOUR WD DRIVE – 2
Operating System Compatibility
Your My Book for Mac drive and the WD Drive Utilities and WD Security software are
compatible with the following operating systems:
Compatibility can vary, depending on hardware configuration and operating system.
For highest performance and reliability, always install the latest software update and
service pack (SP). For Mac computers, go to the Apple menu and select Software
Update or App Store. For Windows computers, go to the Start menu and select
Windows Update.
Disk Drive Format
Your My Book for Mac drive is formatted as a single HFS+J partition for Mac OS X
operating systems. If you want to use this drive with a Windows system, see
“Reformatting the Drive” on page 20 and “Troubleshooting” on page 21.
Physical Description
As shown in Figure 2, the My Book for Mac drive has:
A power/activity indicator on the front
The power connector, interface port, and a security slot on the back.
Mac OS X Windows
Mountain Lion
Mavericks
Yosemite
El Capitan
Windows 7®
Windows 8
Windows 8.1
Windows 10
Figure 2. My Book for Mac Drive
Power/Activity LED
Security Slot
USB 3.0
Power Connector

MY BOOK FOR MAC
USER MANUAL
ABOUT YOUR WD DRIVE – 3
Power/Activity LED
The power/activity LED shows the drive’s power state and activity as follows:
USB 3.0 Interface
SuperSpeed USB 3.0 supports data transfer rates up to 5 Gb/s. USB 3.0 is backward-
compatible with USB 2.0. Connection to a USB 2.0 port transfers data at the port
speed—up to 480 Mb/s.
Kensington® Security Slot
For physical drive security, the Kensington security slot accepts a standard Kensington
security cable (sold separately). For more information about the Kensington security slot
and available products, visit www.kensington.com.
Registering the Drive
Always register your My Book for Mac drive to get the latest updates and special offers.
You can easily register your drive using the WD Drive Utilities software, as described in
“Registering the Drive” on page 17. Another way is to register online at
http://register.wd.com.
Handling Precautions
WD products are precision instruments and must be handled with care during unpacking
and installation. Drives may be damaged by rough handling, shock, or vibration. Always
observe the following precautions when unpacking and installing your external storage
product:
Do not drop or jolt the drive.
Do not move the drive during activity.
Do not use this product as a portable drive.
To allow proper ventilation, do not block any of the drive enclosure’s air slots.
LED Appearance Power State/Activity
On steady Idle
Fast flashing, approximately 3 times per second Activity
Slow flashing, approximately every 2.5 seconds System standby

MY BOOK FOR MAC
USER MANUAL
CONNECTING THE DRIVE AND GETTING STARTED – 4
Connecting the Drive and Getting Started
1
2This chapter provides instructions for connecting the drive and installing the WD
software on your computer. It includes the following topics:
Connecting the Drive
Getting Started with the WD Software
Connecting the Drive
1. Turn on your computer.
2. Connect the drive to your computer as shown in Figure 3.
3. Verify that the drive appears under DEVICES in the Sidebar area of your Finder
display:
4. If the External disks check box is selected on your Finder Preferences dialog, the
drive icon displays on your desktop:
Figure 3. Connecting the Drive
2
1
3
4

MY BOOK FOR MAC
USER MANUAL
CONNECTING THE DRIVE AND GETTING STARTED – 5
Your drive is now ready to use as an external storage device. You can enhance its
capabilities by installing the WD software that is on the drive:
WD Drive Utilities
WD Security
Getting Started with the WD Software
1. Double-click the drive Finder listing or desktop icon, and then double-click the DMG
file on the screen that displays:
2. On the WD Apps screen, double-click with WD icon:

MY BOOK FOR MAC
USER MANUAL
CONNECTING THE DRIVE AND GETTING STARTED – 6
3. Click Next on the WD Apps Setup wizard, Software Installer dialog:
4. On the Installation Type dialog:
a. Select the option to specify the WD software that you want to install:
Recommended Install installs both the WD Drive Utilities and the
WD Security software
Custom Install installs the WD software that you select on the next screen
b. Click the Western Digital End User License Agreement link and read the
agreement.
c. Select the I agree... check box to signify that you accept the agreement and
activate the Next button.
d. Click Next.

MY BOOK FOR MAC
USER MANUAL
CONNECTING THE DRIVE AND GETTING STARTED – 7
5. The dialog that appears depends on the installation option you selected at Step 4:
IF you selected the . . . option THEN . . .
Recommended Install Type your computer logon password in the
Password box and click OK:
Custom Install a. Select the check box for the application that
you want to install and click Next:
b. Type your computer logon password in the
Password box and click OK:

MY BOOK FOR MAC
USER MANUAL
CONNECTING THE DRIVE AND GETTING STARTED – 8
6. The Installing Applications dialog:
Shows the progress of the software installation
Displays a brief description of each application
Activates the Next button when the installation completes
7. Click Next to display the Installation Complete dialog:
On the Installation Complete dialog, click:
Manage your drive... to open the WD Drive Utilities software. (See Figure 4 on
page 9 and “Managing and Customizing the Drive” on page 14.)
Set security... to open the WD Drive Security software. (See Figure 5 on page 9
and “Locking and Unlocking the Drive” on page 10.)
The Register your product link to access the WD Support Portal web page.
Finish to close the Installation Complete dialog.

MY BOOK FOR MAC
USER MANUAL
CONNECTING THE DRIVE AND GETTING STARTED – 9
Figure 4. WD Drive Utilities Screen
Figure 5. WD Security Screen
Note: The displayed capacity
matches the capacity of the
connected drive.
Note: The displayed capacity
matches the capacity of the
connected drive.

MY BOOK FOR MAC
USER MANUAL
LOCKING AND UNLOCKING THE DRIVE – 10
Locking and Unlocking the Drive
1
3This chapter includes the following topics:
Password Protecting the Drive
Unlocking the Drive
Changing Your Password
Turning Off the Drive Lock Feature
Password Protecting the Drive
You should password protect your drive if you are worried that someone else will gain
access to your drive and you do not want them to see your files on the drive.
1. Click Go > Applications >WD Security to display the WD Security screen, Set
Security dialog (see Figure 5 on page 9).
2. If you have more than one supported device connected to your computer, select the
one that you want to create a password for.
3. Read the warning about the possibility of data loss if you forget your password.
4. Type your password in the Password box, using up to 25 characters.
5. Retype your password in the Verify Password box.
6. Type a hint to help remember your password in the Password Hint box.
7. Select the Enable auto unlock for this computer... check box if you want the
WD Security software to remember your password for the selected drive on this
computer.
Important: If you select the Enable auto unlock for this computer... check box,
the first time you restart your computer or disconnect and reconnect the drive after
creating a password, your operating system requests permission to allow the
WD Security software to access your password:
Click Always Allow to avoid this dialog in the future.
8. Click Set Password to save your password and enable hardware encryption for your
drive.
CAUTION! The WD Security software uses your password to electronically lock and
unlock your drive. If you forget your password, you will not be able to access the data
that is on your drive or write new data to it. You will have to erase the drive before you
can use it again.

MY BOOK FOR MAC
USER MANUAL
LOCKING AND UNLOCKING THE DRIVE – 11
Unlocking the Drive
After you have created a password to keep others from accessing the files on your drive,
unless you selected the Enable auto unlock for this computer... check box, you will
have to type your password to unlock the drive whenever:
You shut down and restart your computer
You disconnect and reconnect the drive to your computer
Your computer exits the sleep mode
With the WD Security or WD Drive Utilities Software
Whenever you shut down and restart your computer or disconnect and reconnect the
drive to your computer, starting either the WD Security or WD Drive Utilities software
displays the Unlock Drive dialog:
This happens either:
Automatically if you only have the one locked drive connected to your computer
When you select the locked drive on either the WD Security or WD Drive Utilities
screen if you have more than one supported drive connected to your computer
To unlock the drive:
1. If you do not see the Unlock Drive dialog, click either:
Go > Applications > WD Security
Go > Applications > WD Drive Utilities
CAUTION! After creating a password, the drive remains unlocked for as long as you
continue your current work session. Then the WD Security software:
Locks the drive when you shut down your computer, disconnect your drive, or your
computer goes into the sleep mode
Requires you to type your password to unlock the drive when you restart your
computer or reconnect your drive, UNLESS you selected the Enable auto unlock
for this computer... check box when you created your password

MY BOOK FOR MAC
USER MANUAL
LOCKING AND UNLOCKING THE DRIVE – 12
2. If you have more than one supported device connected to your computer, select the
one that is locked to display the Unlock Drive dialog.
3. On the Unlock Drive dialog:
a. Type your password in the Password box.
b. Click Unlock Drive.
Changing Your Password
1. Click Go > Applications >WD Security to display the WD Security screen (see
Figure 5 on page 9).
2. If you have more than one supported device connected to your computer, select the
one with the password that you want to change to display the Edit security settings
dialog:
3. On the Edit security settings dialog, select the Change password option to display
the change password dialog:
4. On the change password dialog:
a. Type your current password in the Current Password box.
b. Type your new password in the New Password box, using up to 25 characters.
c. Retype your new password in the Verify Password box.
d. Type a hint to help remember your new password in the Password Hint box.
e. Select or clear the Enable auto unlock for this computer... check box to signify
whether you want the WD Security software to remember your new password for
the selected drive on this computer.

MY BOOK FOR MAC
USER MANUAL
LOCKING AND UNLOCKING THE DRIVE – 13
f. Click Update Security Settings.
Turning Off the Drive Lock Feature
1. Click Go > Applications >WD Security to display the WD Security screen (see
Figure 5 on page 9).
2. If you have more than one supported device connected to your computer, select the
one with the password that you want to remove to display the Edit security settings
dialog:
3. On the Edit security settings dialog, the Remove password option is selected by
default:
a. Type your password in the Password box.
b. Click Update Security Settings.
CAUTION! After changing a password, the drive remains unlocked for as long as you
continue your current work session. Then the WD Security software:
Locks the drive when you shut down your computer, disconnect your drive, or your
computer goes into the sleep mode
Requires you to type your password to unlock the drive when you restart your
computer or reconnect your drive, UNLESS you selected the Enable auto unlock
for this computer... check box when you changed your password

MY BOOK FOR MAC
USER MANUAL
MANAGING AND CUSTOMIZING THE DRIVE – 14
Managing and Customizing the Drive
1
4This chapter includes the following topics:
Checking Drive Health
Erasing the Drive
Registering the Drive
Restoring the WD Software and Disk Image
Safely Disconnecting the Drive
Setting the Drive Sleep Timer
The WD Drive Utilities software (see Figure 4 on page 9) makes it easy for you to manage
and customize your drive for the best possible performance:
Diagnose—Run diagnostics and status checks to make sure your drive is working
properly.
Sleep Timer—Turn your drive off during extended periods of inactivity to conserve
power and extend the life of the drive.
Drive Erase—Erase all of the data on the drive, including your password if you have
one.
About—See the installed software version, check for software updates, and register
your drive to receive free technical support during the warranty period and find out
about product enhancements and price discount opportunities.
Checking Drive Health
The WD Drive Utilities software provides three diagnostic tools to help make sure that
your drive is performing well. Run the following tests if you are concerned that your drive
is not operating properly:
Drive status check
The drive status check is a failure-prediction function that continuously monitors key
internal performance attributes of the drive. A detected increase in drive
temperature, noise, or read/write errors, for example, can provide an indication that
the drive is approaching a serious failure condition. With advanced warning, you
could take precautionary measures, like moving your data to another drive, before a
failure occurs.
The result of a drive status check is a pass or fail evaluation of the drive’s condition.
Quick drive test
Your drive has a built-in Data Lifeguard™diagnostic utility that tests the drive for error
conditions. The quick drive test checks the drive for major performance problems.
The result of a quick drive test is a pass or fail evaluation of the drive’s condition.
Complete drive test
The most comprehensive drive diagnostic is the complete drive test. It tests every
sector for error conditions and inserts bad sector markers as required.
The best time to run the drive diagnostics and status checks is on a regular basis, before
you encounter any problems with your drive. And, because they are so fast, running the
drive status check and the quick drive test provides a high level of assurance with

MY BOOK FOR MAC
USER MANUAL
MANAGING AND CUSTOMIZING THE DRIVE – 15
minimal inconvenience. Then, run all three whenever you encounter disk error conditions
when writing or accessing files.
1. Click Go > Applications >WD Drive Utilities to display the WD Drive Utilities screen,
Diagnose dialog (see Figure 4 on page 9).
2. If you have more than one supported device connected to your computer, select the
one that you want to check.
3. On the Diagnose dialog, click the button for the test that you want to run:
Run Drive Status Check
Run Quick Drive Test
Run Complete Drive Test
Erasing the Drive
Note: Erasing your drive also deletes the WD software and all of the support files,
utilities, and user manual files. You can download these to restore your to
its original configuration after erasing the drive.
Erasing your drive does not erase the WD Drive Unlock utility software
files that are on the drive’s virtual CD. They remain, even after erasing or
reformatting the drive.
The WD Drive Utilities software provides two ways to erase your drive, depending on
whether it is locked or not:
Using the Drive Erase Function
To erase your drive when it is not locked:
1. Click Go > Applications >WD Drive Utilities to display the WD Drive Utilities screen (see
Figure 4 on page 9).
2. If you have more than one supported device connected to your computer, select the
one that you want to erase.
CAUTION! Erasing your drive permanently deletes all of the data on the drive. Always
make sure that you no longer need any of the data on your drive before erasing it.
IF your drive is . . . AND you . . . THEN see . . .
Not locked Want to erase the drive “Using the Drive Erase Function”
Locked Have forgotten or lost your
password and must erase the
drive
“Using Five Invalid Passwords”
on page 16

MY BOOK FOR MAC
USER MANUAL
MANAGING AND CUSTOMIZING THE DRIVE – 16
3. On the WD Drive Utilities screen, click Drive Erase to display the drive erase dialog:
4. On the drive erase dialog:
a. If you want to change the volume name, type over the name in the Volume Name
box.
b. Use the Volume Format selector to specify the format for the new volume, either:
HFS+J
ExFat
c. Read the explanation of the loss of data if you erase your drive. If you want to
save any of the data that is on the drive, back it up to another device before
continuing with the drive erase.
d. Select the I understand... check box to signify that you accept the risk and
activate the Erase Drive button.
e. Click Erase Drive.
Go to http://support.wdc.com and see Knowledge Base Answer ID 7 for information
about downloading and restoring the WD software and disk image on your drive.
Note: Erasing your drive also removes your password. If you used a password to
protect your drive, you will need to re-create it after restoring the WD
software and disk image. (See “Password Protecting the Drive” on
page 10.)
Using Five Invalid Passwords
When you have forgotten or lost your password, you can erase the drive by entering five
invalid passwords on the Unlock Drive dialog. See:
“With the WD Security or WD Drive Utilities Software” on page 11
“Changing Your Password” on page 12
1. On the Unlock Drive dialog, make five attempts to unlock the drive by:
a. Typing a password in the Password box.
b. Clicking Unlock Drive.
2. Entering the fifth invalid password displays a too many password attempts dialog,
depending on the application you used to open the Unlock Drive dialog:
Other manuals for My Book Studio
15
Table of contents