WFM 2000 S User manual

coffee wakes up the world
User Manual
English
01.05.001
Coffee machine
Model Series 2000 Order number 33 2510 0010 Edition 03.2012

2
User Manual WMF2000S
Congratulations on the purchase of your
WMFcoffeemachine
The WMF2000S coffee machine is afully automatic
single cup machine for espresso, café crème, cappuccino,
milk coffee, latte macchiato, foamed milk and hot water.
Options include steam dispensing and the preparation
of hot Choc beverages, with two different types of Choc
(Twin Choc).
Using the optional decaf button, any coffee beverage can
be dispensed with decaffeinated beans from the second
grinder.
Each beverage is freshly brewed at the press of abutton
which guarantees ahigh quality beverage.
User guidance is provided by agraphical touch-screen
display on the coffee machine.
Please read the User Manual prior
to using the coffee machine.
Ensure that the staff has access to
the User Manual.
Important.
Follow chapter 1 w User Manual
Signs and Symbols, page 8.
Follow Safety chapter, starting on
page 58.
Observe the additional
instructions:
Cleaning instructions 2000S
In the event of failure to comply
with maintenance information
(w Maintenance), no liability
is accepted for any resultant
damage.

3
User Manual WMF2000S
Chapter 1 Introduction 6
1.1 Parts of the coffee machine 6
User Manual Signs and Symbols 8
Glossary 9
Chapter 2 Operation 10
2.1 Switch on coffee machine 10
2.2 Dispensing beverages 10
2.3 Decaf button (optional) 10
2.4 Shift button (optional) 11
2.5 Special buttons (optional) 11
2.6 Dispensing hot water 11
2.7 Milk or milk foam (optional) 12
2.7.1 Dispense milk or milk foam . . . . . . . . . . . . . . . . . . . . . . . . . . . . . . . . . . . . . . . . . . . 12
2.7.2 Connect up the milk .................................................12
With WMF Cooler, WMF Cup&Cool (optional) 12
Standard 12
2.8 Steam Milk (optional)/ DualMilk(optional) 13
2.9 Height adjustment of the combi spout 14
2.10 Bean hopper/product hopper 14
2.11 Twin Choc hopper (optional) 14
2.12 Manual insert (optional)/tablet insert 15
2.13 Grounds container 16
2.14 Grounds disposal through the counter (optional) 16
2.15 Drip tray 17
2.16 Switch off the coffee machine 17
Chapter 3 Software 18
3.1 An overview 18
3.2 Ready to operate 20
Standard display for normal operation. . . . . . . . . . . . . . . . . . . . . . . . . . . . . . . . . . . 20
Standard display for SB mode (self-service) . . . . . . . . . . . . . . . . . . . . . . . . . . . . . . 20
3.2.1 “Warm rinse” pad . . . . . . . . . . . . . . . . . . . . . . . . . . . . . . . . . . . . . . . . . . . . . . . . . . . 20
3.2.2 Barista pad . . . . . . . . . . . . . . . . . . . . . . . . . . . . . . . . . . . . . . . . . . . . . . . . . . . . . . . . 20
3.2.3 Information .......................................................20
Service 20
Care 21
Brew time 21
Journal 21
Timer 21
3.2.4 Main menu . . . . . . . . . . . . . . . . . . . . . . . . . . . . . . . . . . . . . . . . . . . . . . . . . . . . . . . . 21
3.3 Main menu 22
3.3.1 Milk and foam .....................................................22
Milk foam quality 22
Latte macchiato pause interval 22

4
User Manual WMF2000S
3.3.2 Timer program .....................................................23
Timer state 23
Set timer 23
Copy day 24
Timer overview 24
Delete timer 25
Timer information 25
3.3.3 Care .............................................................26
Cleaning program 26
Milk system rinsing 26
Mixer rinsing 27
Filter change (optional) 27
Customer Check-up (optional) 27
Brewer change (optional) 27
3.3.4 Settings ..........................................................28
Recipes and buttons 28
Selecting the beverage buttons when setting 28
Adjust values 28
Start apreparation test with the current values 28
Save setting 28
Cup volumes
Change recipes
Steam Milk settings (optional)
Set decaf (optional)
Sequence of ingredients additions
Button allocation
Select grinder for acoffee beverage
Select the portioner for the Choc beverage
Weigh grounds
Boiler temperature 32
Reset 32
Time and date 33
Display language 33
Display contrast 33
Warm-up rinsing 33
Foamer rinsing (optional) 33
Rinsing interval 33
Operating options 34
Illumination (optional) 34
Milk (optional) 35
3.3.5 PIN-entry display . . . . . . . . . . . . . . . . . . . . . . . . . . . . . . . . . . . . . . . . . . . . . . . . . . . 35
3.3.6 PIN rights, access control .............................................36
Cleaning level 36
Setting level 36
Accounting level 36
Delete PIN
3.3.7 Accounting numbers of beverages .....................................37
Chapter 4 Other settings 38
4.1 Mechanical settings 38
4.1.1 Set grinding degree .................................................38
4.2 Labelling of beverage buttons 39

5
User Manual WMF2000S
Chapter 5 Care 40
5.1 Cleaning intervals overview 40
For all cleaning instructions . . . . . . . . . . . . . . . . . . . . . . . . . . . . . . . . . . . . . . . . . . . 41
5.2 Daily cleaning 41
5.2.1 Cleaning program . . . . . . . . . . . . . . . . . . . . . . . . . . . . . . . . . . . . . . . . . . . . . . . . . . . 41
5.2.2 Milk system cleaning . . . . . . . . . . . . . . . . . . . . . . . . . . . . . . . . . . . . . . . . . . . . . . . . 41
Milk system cleaning Standard 41
Milk system cleaning, Plug&Clean 42
5.2.3 Mixer rinsing ......................................................42
5.2.4 Combi spout cleaning ...............................................42
5.2.5 General cleaning ...................................................42
5.3 Weekly cleaning 43
5.3.1 Choc mixer cleaning (optional) ........................................43
5.4 Steam Milk outlet cleaning 44
5.5 Regular cleaning 45
5.5.1 Brewing unit cleaning ...............................................45
5.5.2 Bean hopper cleaning ...............................................47
5.5.3 Choc hopper cleaning (optional) .......................................47
Chapter 6 HACCP schedule 49
Recommendation for Choc (optional) 50
Chapter 7 Maintenance 51
7.1 Coffee machine maintenance 51
7.2 WMFService 52
Chapter 8 Messages and instructions 53
8.1 Messages for operation 53
8.2 Error messages and malfunctions 54
8.3 Errors without error message 56
Chapter 9 Safety 58
9.1 Hazards to the operator 58
9.2 Hazards to the coffee machine 60
9.3 Intended use 60
9.4 Directives 61
9.5 Duties of the owner/operator 62
9.6 Warranty claims 63
No warranty is provided: 63
Appendix: Cleaning instructions (Standard) 64
Appendix: Technical data 65
Technical data for coffee machine 65
Conditions for usage and installation 65
Appendix: Accessories and spare parts 68
Index 70

6
User Manual WMF2000S
We 31.03.2010 08:16
23
24
26
4
21
22
1 12
4
13
12
7
17
18
10
19
3
1
3
14
15 9
6
5
8
25
16
9
11
Introduction
Chapter 1 Introduction
1.1 Parts of the coffee machine
20

7
User Manual WMF2000S
Introduction
1Bean hopper (optional 1 or2)
2Choc hopper/Twin Choc hopper (depending on the model)
3Manual insert/tablet insert (depending on the model)
4Touch-screen display
5Beverage buttons
6Shift button (second level)
7Decaf button (optional)
8Hot water button
9Plug&Clean (optional)
10 Hot water spout
11 Grounds container
12 Removable drip tray with drip grid
13 ON/OFF button
14 Special buttons
15 Steam Milk buttons (optional)
16 Adjustable screen
17 Height-adjustable combi spout with integrated milk foamer
18 Steam Milk outlet (optional)
19 Brewing unit
20 Active Milk (optional)
21 “Warm rinse” pad
22 Barista pad
23 Timer and clock display
24 Information pad
25 Messages/error messages
26 Menu pad (opens main menu)

8
User Manual WMF2000S
Introduction
User Manual Signs and Symbols
Caution.
Risk to the machine.
Caution.
Risk to the user.
Follow the manual. Observe the Safety chapter.
Caution.
Hot liquid.
Caution.
Hot surface.
Observe the Safety chapter. Observe the Safety chapter.
Caution.
Hot steam.
Caution.
Bruising or crushing
hazard.
Observe the Safety chapter. Observe the Safety chapter.
Tip
Instructions Cross reference
Start position
Main menu
If the menu symbol is shown in this User Manual, the
description starts at the main menu start position.
Call up the main menu
Touch
The main menu is displayed.
There are other display options w Main menu.
We 31.03.2010 08:16
main menu
Main menu

9
User Manual WMF2000S
Introduction
Glossary
Term Explanation
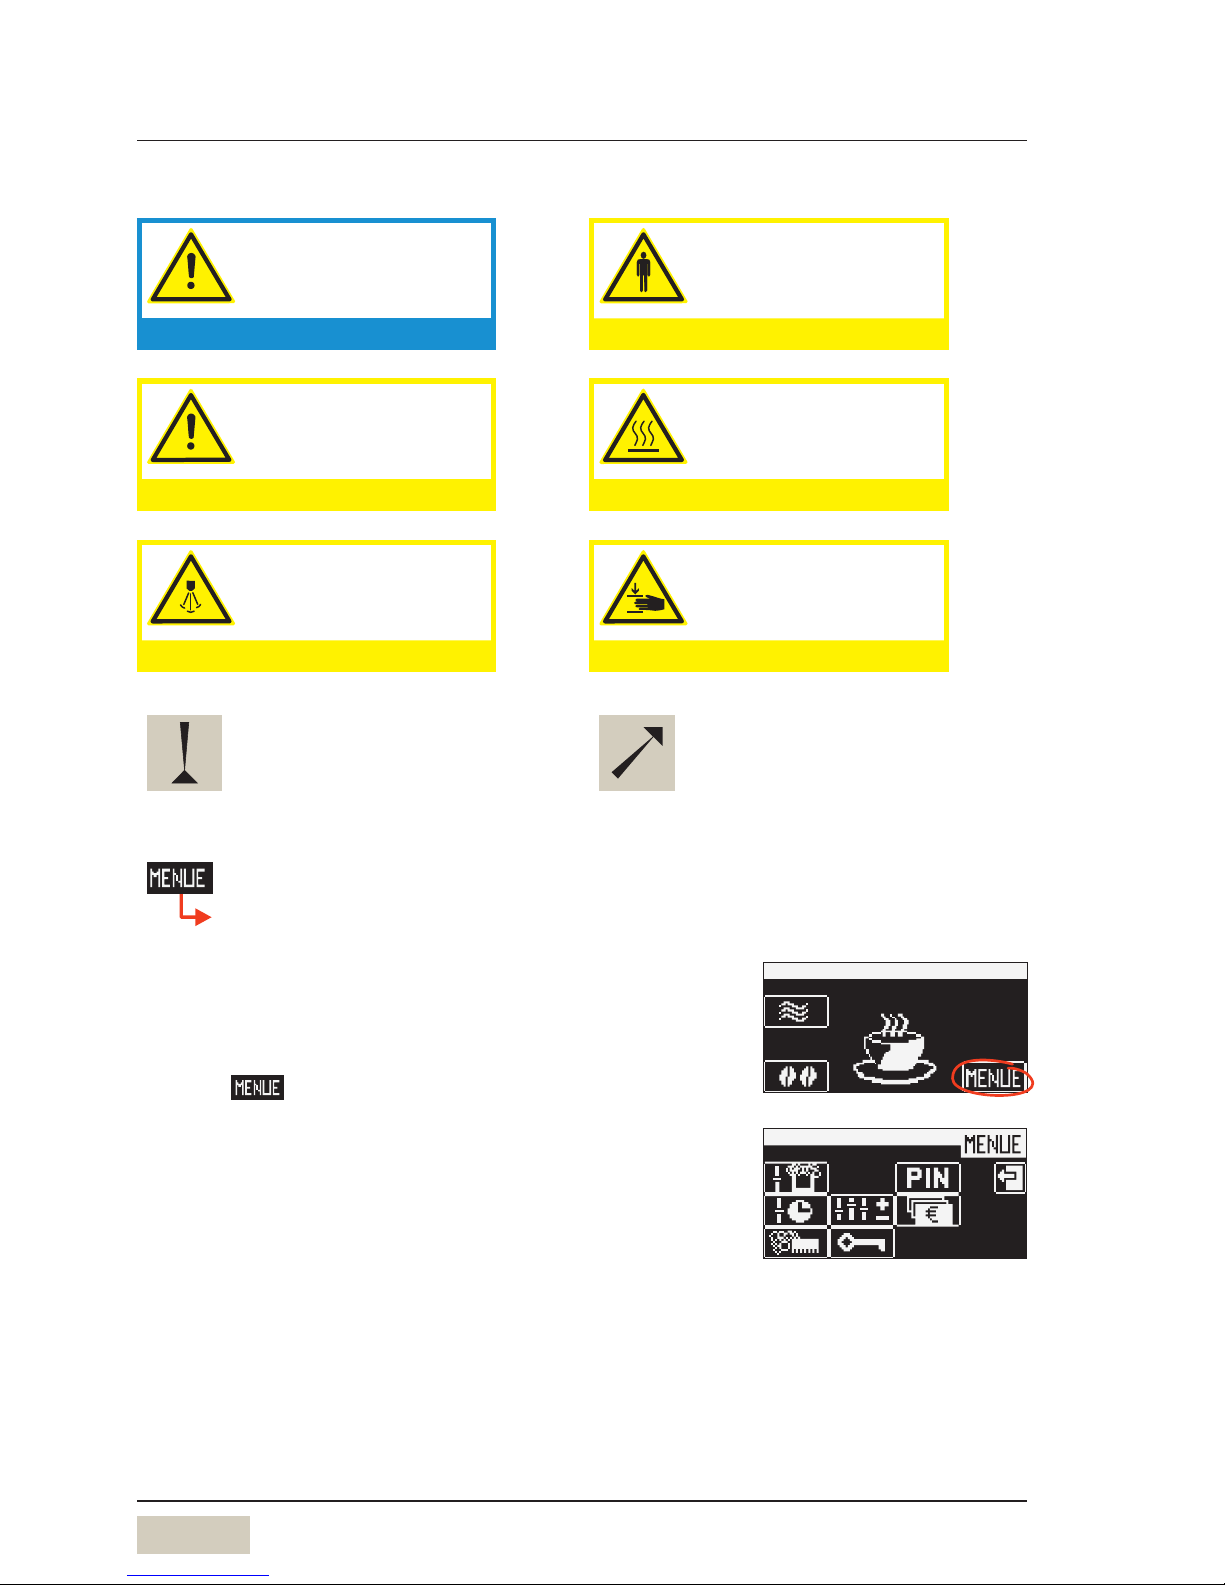
• • Listings, selection options
Individual steps
Text in italics Description of coffee machine state and/or explanations of
automatic steps.
Steam Milk Automatic steam dispensing through the steam milk spout for
heating or foaming milk.
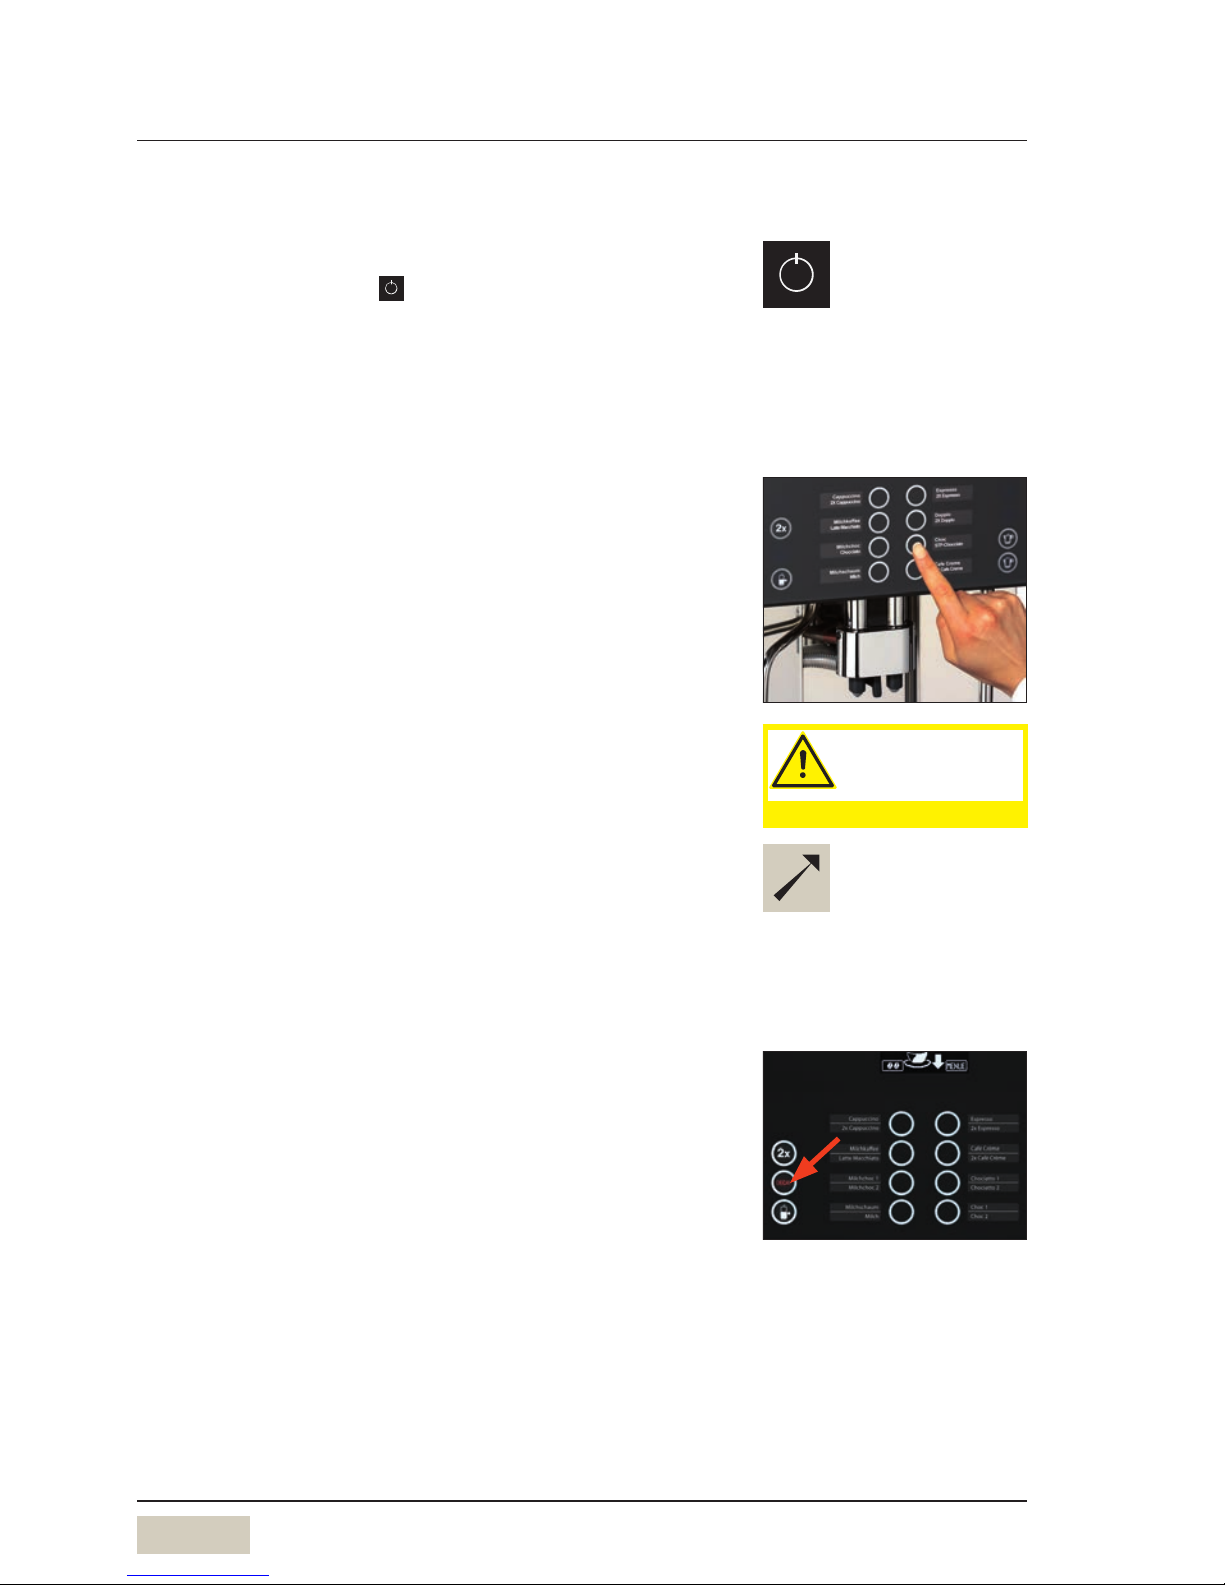
1-Step Beverages are dispensed and ready to drink with one push of
abutton.
2-Step In the first step, the Steam Milk outlet is used to make milk and
milk foam. In the second step, coffee and chocolate beverages are
dispensed with apush of abutton, and the beverage components
are mixed manually.
Dual Milk In the optional Dual Milk version, 1-Step and 2-Step beverages
can be made with just one coffee machine.
Override function Milk can be heated or foamed without automatic shut-off, up to
amaximum milk or foam temperature of 90°C.
Additions Components of arecipe for abeverage, in addition to coffee,
such as milk, milk foam, Choc.
Barista Professional coffee server
Beverage dispensing Dispensing coffee, hot water or Choc beverages
Carbonate hardness Quoted in gpg (°dKH). The water hardness is ameasure of the
calcium dissolved in the water.
Capacity For example the capacity of the water filter in litres of water it
can filter
Choc Hot chocolate
Decaf Decaffeinated coffee
Dispensing options Start-Stop: Dispensing runs up to the set amount and can be
stopped by pressing the button again.
Free-flow: Dispensing runs for as long as the button is held.
Metered: the set volume is dispensed.
Grounds chute w Grounds disposal through counter, page 16
Main tap Water stop cock, angle valve
Milk system Combi spout, milk nozzle and milk hose
Mixer system Complete module, mixer with portion controller for Choc
O-rings Seals
Preinfusion Prior to brewing, coffee is briefly infused in order to ensure
amore intense release of its aromatic substances.
Pressing Automatic pressing of ground coffee prior to brewing.
Rinsing Intermediate cleaning
Self-service Self-service customer operation
Twin Choc Divided hopper for two types of Choc.

10
User Manual WMF2000S
Operation
Chapter 2 Operation
2.1 Switch on coffee machine
Press ON/OFF button and hold for more than 2
seconds
Coffee machine switches on and heats up.
When the machine is ready to dispense beverages, the
“Ready to operate” display appears.
2.2 Dispensing beverages
Pressing the beverage button triggers dispensing of the
beverage selected.
• Lit up button =ready to dispense
• Flashing button =beverage dispensing
• Unlit button =not ready to dispense/
button disabled
Place asuitably sized cup below the combi spout
Press the desired beverage button
Desired beverage and progress of dispensing are indicated
on the display.
2.3 Decaf button (optional)
Preparation of adecaffeinated coffee beverage from the
decaf grinder:
Press the Decaf button
Press the desired beverage button
PIN access control
w Software
w Settings
w Operating options
page 34
w Timer program
page 23
Caution.
Hot liquids in the
dispensing area.
Observe the Safety chapter.
Button allocation
w Software w Settings
w Recipes and buttons
page 28

11
User Manual WMF2000S
Operation
2.4 Shift button (optional)
Each beverage button may be doubly assigned.
Level 1 always active.
Press the shift button
Level 2 activated.
Press the desired beverage button
Level 1 is active again after dispensing abeverage at
Level2.
2.5 Special buttons (optional)
Special buttons for beverage sizes S and L are optionally
available on the operator panel. These are preselection
buttons which establish the desired amount of the
beverage before selection of the beverage.
M= amount of the beverage set, no preselection
S= approx. 25 % less than M
L= approx. 25 % more than M
2.6 Dispensing hot water
Press the hot water button
Dispensing occurs.
If less water is required than the pre-set dispense amount,
dispensing can be stopped by pressing the button again.
2x
Shift button (active/inactive)
w Software w Settings
w Operating options
page 34

12
User Manual WMF2000S
Operation
2.7 Milk or milk foam (optional)
2.7.1 Dispense milk or milk foam
Press the beverage button assigned to milk or milk foam
Dispensing occurs. Dispensing continues for as long as the
button is held.
2.7.2 Connect up the milk
Use asuitable milk nozzle on the combi spout.
Milk nozzle 3kW * 5.5kW *
• for cooled milk green brown
• for uncooled milk white natural
*Nominal power rating, see Technical data.
With WMF Cooler, WMF Cup&Cool (optional)
Insert the milk nozzle for cooled milk into the milk
connection on the combi spout
Pull the milk container out of the cooler
Push the lid of the milk container back
Pour milk into the milk container
Place the lid back on the container
Insert the adapter on the milk hose into the connection
in the milk container lid
Push the milk container back in carefully
The milk hose is inserted into the adapter.
Standard
Insert the suitable milk nozzle into the milk connection
on the combi spout
Open the milk packaging and place on the left next to
the coffee machine
Open the milk cover
Insert the milk hose through the opening
Insert the milk hose with the beige milk nozzle into the
milk pack
The hose must not be under tension or bent when
adjusting the height of the combi spout.
Close milk cover
Standard: stick milk nozzle on
Cooler adapter
Run the milk hose through
Active Milk
w Additional instructions Active
Milk
Cooler milk container

13
User Manual WMF2000S
Operation
2.8 Steam Milk (optional)/
DualMilk(optional)
The milk is automatically heated or foamed.
The Steam Milk buttons can be assigned to up to four milk
foam quality levels, or to hot milk.
The Steam Milk buttons are assigned at the factory to
three foam quality levels (superfine, fine, standard) and hot
milk.
A beverage can be dispensed via the combi spout at the
same time.
Heat milk or foam milk
Fill atall, narrow container with the desired milk
quantity
Do not fill the container above the halfway point, so that
the milk will not run over when it foams.
Insert the steam nozzle deep into the milk
Briefly press the desired Steam Milk button
Steam is discharged, depending on the Steam Milk button
assignment.
Steam dispensing ends after reaching the set temperature,
or when the Steam Milk button is pressed again.
Wipe steam outlet with adamp cloth
Override function (optional)
Function is adjusted upon request by WMFService.
Milk and foam can boil over if the temperature is set to
90°C, or when the override function is used.
Press and hold the desired Steam Milk button
Steam is dispensed for as long as the button is held.
Wipe steam outlet with adamp cloth
The maximum temperature setting is 90°C.
Steam Milk buttons
Button allocation
w Software w Settings
w Recipes and buttons
page 28
w Change recipes
page 29
Caution.
Hot surfaces.
Burn hazard.
Scalding hazard.
Observe the Safety chapter.
Do not overheat milk when
foaming, otherwise foam volume
decreases.

14
User Manual WMF2000S
Operation
2.9 Height adjustment of the combi spout
The combi spout height is adjustable.
Take hold of the combi spout from the front and push
to the desired height
Height adjustment range of the combi spout
with Choc 70mm-180mm
2.10 Bean hopper/product hopper
If possible, replenish product hopper in advance.
Fill the hoppers no more than the amount needed for one
day, in order to maintain the freshness of the products.
2.11 Twin Choc hopper (optional)
Divided hopper for two types of Choc.
• Left side: Choc 1
• Right side: Choc 2
Coffee beans into bean hopper,
Choc powder into
Choc hopper.

15
User Manual WMF2000S
Operation
2.12 Manual insert (optional)/tablet insert
Coffee machines with three product hoppers have only
atablet insert. Ground coffee must not be inserted into
the tablet insert.
The manual/tablet insert is located in the centre of the
coffee machine cover.
Tablet insert is used:
• for inserting cleaning tablets
Manual insert is used:
• for inserting cleaning tablets
• when using an additional coffee variety, such as
decaffeinated coffee
• for acoffee trial
Add ground coffee or cleaning tablet only when display
shows amessage.
Preparation of ground coffee using the manual insert
Open manual insert lid
Insert ground coffee (max. 16g)
Close manual insert lid
Press the desired beverage button
For beverages on level two, press the shift button before
opening the manual insert lid.
Follow the manual.
Observe the Safety chapter.
Tablet insert
Follow the manual.
Observe the Safety chapter.
Manual insert

16
User Manual WMF2000S
Operation
2.13 Grounds container
The coffee grounds container receives the used coffee
grounds. It has enough capacity to store coffee grounds
from approx. 50 brewing cycles.
The display shows amessage as soon as the coffee grounds
container needs to be emptied.
Beverage dispensing is blocked for as long as the grounds
container is removed.
Push combi spout all the way up
Push up adjustable screen over coffee grounds
container
Remove the coffee grounds container
Empty and replace grounds container
Confirm process on the display
Clean daily w Care
If coffee grounds container cannot be replaced, check
chute for coffee residues and remove.
Always empty grounds container before reinserting.
Replacing without emptying results in the coffee grounds
container being overfilled. The coffee machine will
be soiled. This may cause subsequent damage to the
machine.
2.14 Grounds disposal through the counter
(optional)
The coffee machine can be fitted with through-counter
coffee grounds disposal. In this case, both the coffee
grounds container and the coffee machine base have an
opening that passes through the counter on which the
machine is placed. The spent coffee grounds are collected
in alarge container under the counter.
Adjustable screen
Grounds container
Caution.
Bruising or crushing
hazard.
Observe the Safety chapter.
Follow the manual.
Observe the Safety chapter.
Through-counter feature cannot
be retrofitted.
Clean coffee grounds chute daily
w Care
page 42

17
User Manual WMF2000S
Operation
2.15 Drip tray
Carefully pull out the drip tray for cleaning
Replace carefully so that no water accidentally drips
down.
Clean drip tray daily w Care
2.16 Switch off the coffee machine
The coffee machine must be cleaned daily prior to
switching it off.
Press and hold ON/OFF button until coffee machine
switches off
Disconnect mains plug
Turn off mains water supply
If this is not observed, the warranty is invalidated in the
event of any resultant damage.
Caution.
Hot liquids.
Move the drip tray
carefully.
Observe the Safety chapter.
PIN access control
w Software
w Settings
w Operating options
page 34
Follow the manual.
Observe the Safety chapter.

18
User Manual WMF2000S
Software, An overview
Chapter 3 Software
3.1 An overview
Ready to operate
We 31.03.2010 08:16
Touch clear area on the “Ready to operate” display
Additional pads are activated.
We 31.03.2010 08:16
There are various options for the “Ready to operate” display.
We 31.03.2010 08:16
If there are errors, the relevant pad is displayed.
If Cleaning , Descaling or Filter change are required,
this is displayed.
Other display options w Settings w Operating options.
“Ready to operate” display pads Chapter 3.2
Warm rinsing
Chapter 3.2.1
Barista (strength of the coffee)
Chapter 3.2.2
Information
Chapter 3.2.3
Main menu
Chapter 3.2.4
Error message
Touching the pad calls up the error message.
Care message
Touching the pad leads directly to the menu.
Cleaning required.
Descaling required.
Self-service and operating
options
w Settings
page 34

19
User Manual WMF2000S
Software, An overview
Main menu functions (pads) Chapter 3.3
Milk and foam
Chapter 3.3.1
Timer program
Chapter 3.3.2
Care
Chapter 3.3.3
Settings
Chapter 3.3.4
PIN entry
Chapter 3.3.5
PIN rights, access control
Chapter 3.3.6
Accounting
Chapter 3.3.7
Menu control pads
Save settings
start
continue
Start or confirm astep
Back to the higher menu level
Cancel/leave without saving (Exit)
Clear or reset
Start preparation test/coffee trial
Increase or reduce setting values
Forward or back one step in listings

20
User Manual WMF2000S
Software, Ready to operate
3.2 Ready to operate
Standard display for normal operation
• “Warm rinse” pad
• Barista pad
• Menu
• Information
Standard display for SB mode (self-service)
All pads that allow changes to be made are not available.
The “warm rinse” pad, Barista pad, menu pad and messages
are inactive. If there are errors, the relevant pad is
displayed.
3.2.1 “Warm rinse” pad
Touch the “warm rinse” pad
A rinse of the pipes with hot water begins. The water
warms the brewing system and guarantees an optimum
coffee temperature.
3.2.2 Barista pad
Touch the Barista pad
The coffee strength will be altered for the next brew only.
3.2.3 Information
Touch the pad on the “Ready to operate” display
The Information menu appears.
The main “Information” menu contains the following
selection options.
Service
• Service location
• Start-up data
• Next maintenance date
• Software version
We 31.03.2010 08:16
We 31.03.2010 08:16
Recommended after alonger
brewing pause, especially before
dispensing acup of espresso.
“Warm rinse” pad (active/inactive)
w Settings w Operating options
page 34
weaker (-15 %)
normal, as per setting
stronger (+15 %)
Barista pad (active/inactive)
w Settings w Operating options
page 34
brewtime
service
information
customer care
Table of contents
Other WFM Coffee Maker manuals