manuals.online logo
Brands
  1. Home
  2. •
  3. Brands
  4. •
  5. WheelsBridge
  6. •
  7. Digital Camera
  8. •
  9. WheelsBridge TiVi701 User manual

WheelsBridge TiVi701 User manual

Popular Digital Camera manuals by other brands

Canon WP-DC35 user guide

Canon

Canon WP-DC35 user guide

Xiaomi 70mai Dash Cam Lite user manual

Xiaomi

Xiaomi 70mai Dash Cam Lite user manual

Samsung PL70 Quick start manual

Samsung

Samsung PL70 Quick start manual

GE E1680W user manual

GE

GE E1680W user manual

Canon EOS 1200D instruction manual

Canon

Canon EOS 1200D instruction manual

Tevion MD 86497 user guide

Tevion

Tevion MD 86497 user guide

Exakta VX Features

Exakta

Exakta VX Features

Kodak Digital Science DC120 user guide

Kodak

Kodak Digital Science DC120 user guide

Nikon FM3A Specifications

Nikon

Nikon FM3A Specifications

Vectra Fitness H1 Quick reference guide

Vectra Fitness

Vectra Fitness H1 Quick reference guide

Nikon COOLPIX 775 quick start guide

Nikon

Nikon COOLPIX 775 quick start guide

Olympus IR 500 - 4MP Digital Solutions Camera Manuel de Référence

Olympus

Olympus IR 500 - 4MP Digital Solutions Camera Manuel de Référence

Samsung EC-L100ZBBA brochure

Samsung

Samsung EC-L100ZBBA brochure

FujiFilm FINEPIX BL01124-201 owner's manual

FujiFilm

FujiFilm FINEPIX BL01124-201 owner's manual

Panasonic DMC-L10KPP Service manual

Panasonic

Panasonic DMC-L10KPP Service manual

Hyundai Electric HYU-CC-CHBF12001 Quick installation guide

Hyundai Electric

Hyundai Electric HYU-CC-CHBF12001 Quick installation guide

Sony DSC-WX80 specification

Sony

Sony DSC-WX80 specification

Nikon Nuvis S - Point & Shoot instruction manual

Nikon

Nikon Nuvis S - Point & Shoot instruction manual

manuals.online logo
manuals.online logoBrands
  • About & Mission
  • Contact us
  • Privacy Policy
  • Terms and Conditions

Copyright 2025 Manuals.Online. All Rights Reserved.

TiVi701 Camera Manual
TiVi701Camera ver1.5 Page 1
W
WW
W
W
WW
W
h
hh
h
h
hh
h
eels
eelseels
eels
eels
eelseels
eels
B
BB
B
B
BB
B
ridge
ridge ridge
ridge
ridge
ridge ridge
ridge
W
WW
W
W
WW
W
h
hh
h
h
hh
h
eels
eelseels
eels
eels
eelseels
eels
B
BB
B
B
BB
B
ridge
ridge ridge
ridge
ridge
ridge ridge
ridge
W
WW
W
W
WW
W
h
hh
h
h
hh
h
eels
eelseels
eels
eels
eelseels
eels
B
BB
B
B
BB
B
ridge
ridge ridge
ridge
ridge
ridge ridge
ridge
W
WW
W
W
WW
W
h
hh
h
h
hh
h
eels
eelseels
eels
eels
eelseels
eels
B
BB
B
B
BB
B
ridge
ridge ridge
ridge
ridge
ridge ridge
ridge
TiVi701 Camera Manual
User Manual 1.6
February 2019
TISSUE VIABILITY IMAGER
TiVi701 Camera Manual
TiVi701Camera ver1.5 Page 2
Information in this document is subject to change without notice and does not represent a
commitment on the part of WheelsBridge AB. No part of this manual may be reproduced or
transmitted in any form or by any means, electronically or mechanically, including
photocopying and recording, for any purpose without the express written permission of
WheelsBridge AB.
Any use or application of WheelsBridge AB products must be performed by properly trained
and qualified personnel. WheelsBridge AB takes no responsibility for action taken on the
basis of information derived from the use of the product described in this manual or from
consequential damages in connection with the furnishing, performance or use of this material.
Licensee’s limited rights are governed by the license agreement between WheelsBridge AB
and MathWorks. Licensee may not modify or remove any license agreement file
(MarthWorks or third party) that is included with the MCR Libraries (“MCR Library
License”). Licensee of this Application accepts the terms of the MCR Library License.
The TiVi700 Tissue Viability Imager is patented and/or patents are pending in several
countries.
The TiVi700 Tissue Viability Imager is not registered as a Medical Device. It is intended for
research applications only.
WheelsBridge is a registered trade mark.
TiVi701 Camera Manual
TiVi701Camera ver1.5 Page 3
CONTENT
Part I Setting up the camera
Part II Camera controls setting
Part III Attaching the Illuminator
Part IV Selecting co – or cross-polarization
Part V Battery operation
Part VI Capturing photos
Part VII The TiVi 01 Camera software
Part VIII The Positioner
Part IX Live View and TiVi Video
Part X Software Installation Procedure
Part XI Working with two cameras (optional)
Part XII Calibrating the length scale in mm
Part XII Using a Reference photo for alignment
TiVi701 Camera Manual
TiVi701Camera ver1.5 Page 4
Part I Setting up the camera
1. Fix the swivel end-plate to the camera.
2. Insert the battery eliminator connector (open the door at the bottom of the camera
housing).
3. Attach the camera to the swivel.
Part II Camera controls setting
1. Set the camera wheel to the “Av” position.
2. Set the Auto-Focus control to AF and the Stabilizer control to ON.
TiVi701 Camera Manual
TiVi701Camera ver1.5 Page 5
3. Set the Zoom-in by manually rotating the lens.
Part III Attaching the Illuminator
1. Screw on the Illuminator to the camera lens (fine thread).
2. Connect Illuminator power adapter to the Illuminator.
TiVi701 Camera Manual
TiVi701Camera ver1.5 Page 6
3. Connect the power adapter to the mains supply.
4. Switch on the Illuminator. 96 light emitting diodes illuminate the object.
Part IV Selecting co – or cross-polarization
1. The Illuminator is switched between the co- and cross-polarized mode by turning the
Illuminator 90 degrees. When the red lock is next to the metal-coloured magnet, the
Illuminator is in cross-polarized mode. When the black lock is next to the magnet, the
Illuminator is in co-polarized mode. The Illuminator can be locked in position by
turning the red or the black lock.
Part V Battery operation
1. Both the camera and the Illuminator can be operated in battery mode.
2. After charging the camera battery, remove the battery eliminator connector from the
camera housing and insert the battery.
TiVi701 Camera Manual
TiVi701Camera ver1.5 Page 7
3. After charging the Illuminator battery, replace the battery-illuminator connector with
the battery cable connector. When not in use switch off the Illuminator by use of the
switch on the battery eliminator cable.
Part VI Capturing photos
To capture good quality photos always
1. Switch off the ambient light in the room.
2. Place the object on a green coloured background.
To prepare the camera for capturing photos remotely and disconnected from the computer,
disconnect the camera from the computer and set the Camera Dial to “Av”. Click the Menu
button until the information page becomes visible on the camera display (the text “Av”
should be visible in the top left corner of the display). Click the “WB” button on the camera
several times until the “Shade” symbol appear marked. Then click the SET button. The white
balance is now set to “Shade”.
TiVi701 Camera Manual
TiVi701Camera ver1.5 Page 8
Part VII The TiVi 01 Camera software
The camera must be connected to the computer before the TiVi701 Camera software is
started because the unique serial number of the camera is verified in the TiVi701
Camera software startup phase.
1. Start the
TiVi701 Camera
software from inside the
TiVi700 Analyzer
window
(File

Camera) or directly from Windows 7 Start (WheelsBridge

TiVi700 1.1
Tissue Viability Imager

Launch TiVi701Camera.exe).
2. Menu Panel
a.
Shutter
– to set the Av-value (shutter aperture) in steps of 5.6, 8.0, 10 or 20).
A low Av-value corresponds to a large shutter aperture. If a low Av-value is
selected, the focal depth becomes shallow while the shutter opening time
becomes short. A low Av-value is to be selected if the shutter opening time
must be short (as is the case when capturing photos of moving objects and
large magnification) to avoid blurring of the photo due to movement artifacts.
A large Av-value is to be selected if a large focal depth is needed (at for
instance investigation of sweat drop activity using the camera adapter macro
lens system).
b.
Size Reduction
– this pull-down menu contains three items (
No Size
Reduction
,
Minor Size Reduction
(default),
Major Size Reduction
). In
No
Size Reduction
the entire photo is utilized. In
Minor Size Reduction
(default)
the 10% of the photo closest to the borders is cut off. In
Major Size
Reduction
the 20% of the photo closest to the borders is cut off. Utilizing
Size
Reduction
eliminates possible shadow effects along the borders of the photo
caused by the limited field of view illumination by Camera Illuminator, which
TiVi701 Camera Manual
TiVi701Camera ver1.5 Page 9
may cause
image
distortion. This is achieved at the expense of a more
extensive
image
field view. The optimal distance between the camera head and
the object is about 10 - 30 cm or more. It is generally better to increase the
number of pixels in the images (
Photo Size
), increase the camera-object
distance and use
Minor
or
Major Size Reduction
to obtain a specific
image
resolution than to work with a lower number of pixels and use
No Size
Reduction
.
c.
Camera Supported
– displays a window with the serial numbers of the
cameras supported. The camera serial number can be found on the camera
label.
d.
Download Photos
– to download photos from camera memory to file. If
photos are capture with the camera disconnected from the computer the photos
must be downloaded by clicking the
Download Photos
button and selecting a
folder into which the photos are to be saved, otherwise the photos will not be
tagged as TiVi-photos and cannot be analyzed by the
TiVi700 Analyzer
.
e.
Register
– to register the camera zoom-setting, polarization mode and distance
to object.
i.
Register Zoom Settings
– This feature is used to register the zoom
setting. Check one of the alternatives (18, 24, 35 or 55) and manually
adjust the zoom-lens accordingly. This information is saved as meta-
data with the photo and displayed in the
TiVi701 Camera
window
when the
Reference Photo
is uploaded or in the
TiVi700 Analyzer
window when the photo is uploaded as the
Actual Photo.
Rotate the zoom lens to adjust the Zoom. The actual setting
corresponds to the number next to the white bar on the camera housing.
ii.
Register Polarization Mode
– This feature is used to register the
setting of the polarization filter in front of the lens system by clicking
either the CR or CO radio-button. The CR-setting (crossed polarized)
is used for the investigation of sub-surface features such as RBC
concentration. Manually turning the Illuminator filter 90 degrees, sets
the camera system to co-polarization mode, i.e. the polarization planes
TiVi701 Camera Manual
TiVi701Camera ver1.5 Page 10
of the filter in front of the Illuminator LEDs and the lens system are in
parallel. This setting is used for the investigation of direct surface
reflections. CR and CO information is saved as meta-data with the
photo and displayed in the
TiVi701 Camera
window when the
Reference Photo
is uploaded or in the
TiVi700 Analyzer
window
when the photo is uploaded as the
Actual Photo.
iii.
Register Distance
– This feature is used to register the distance from
the edge of the Illuminator to the object. Measure the camera – object
distance manually and insert the distance (in mm) in the edit box. The
distance value is saved as meta-data with the photo and is retrieved and
displayed when the photo is uploaded as a
Reference Photo
(in the
TiVi701 Camera
window) or as the
Actual Photo
in the
TiVi700
Analyzer
window
.
This information can later be used to adjust the
camera – object distance.
f.
Calibrate
– to calibrate the length-scale in mm (see Part XI).
g.
Language
– to select Language.
h.
Manual
– displays the on-line
TiVi701Camera
manual.
i.
About
– to display the
About
window.
j.
Background Paper
– select this option to display and print out a suitable
background paper for the object to be investigated. The green colour of the
background paper implies that it will automatically be classified as
“background” by the TiVi-system (negative TiVi-values). The raster pattern of
the background papers makes it possible for the camera to automatically focus
without any object placed on the background paper. If the camera is aimed to
capture a picture from a uniformly coloured object or object background, the
auto-focus feature may not work and the camera can go into a “freeze” mode
locking the software from further operation. If this happens the camera can be
released from the “freeze” mode by setting the switch on the camera housing to
OFF and then back to ON (restarting the camera).
k.
Demo Assistant
– interactive Demo Assistant to display how to capture photos
and use the Live View.
l.
ToolTips
– displays (ON) or hides (OFF) tooltips associated with the different
controls.
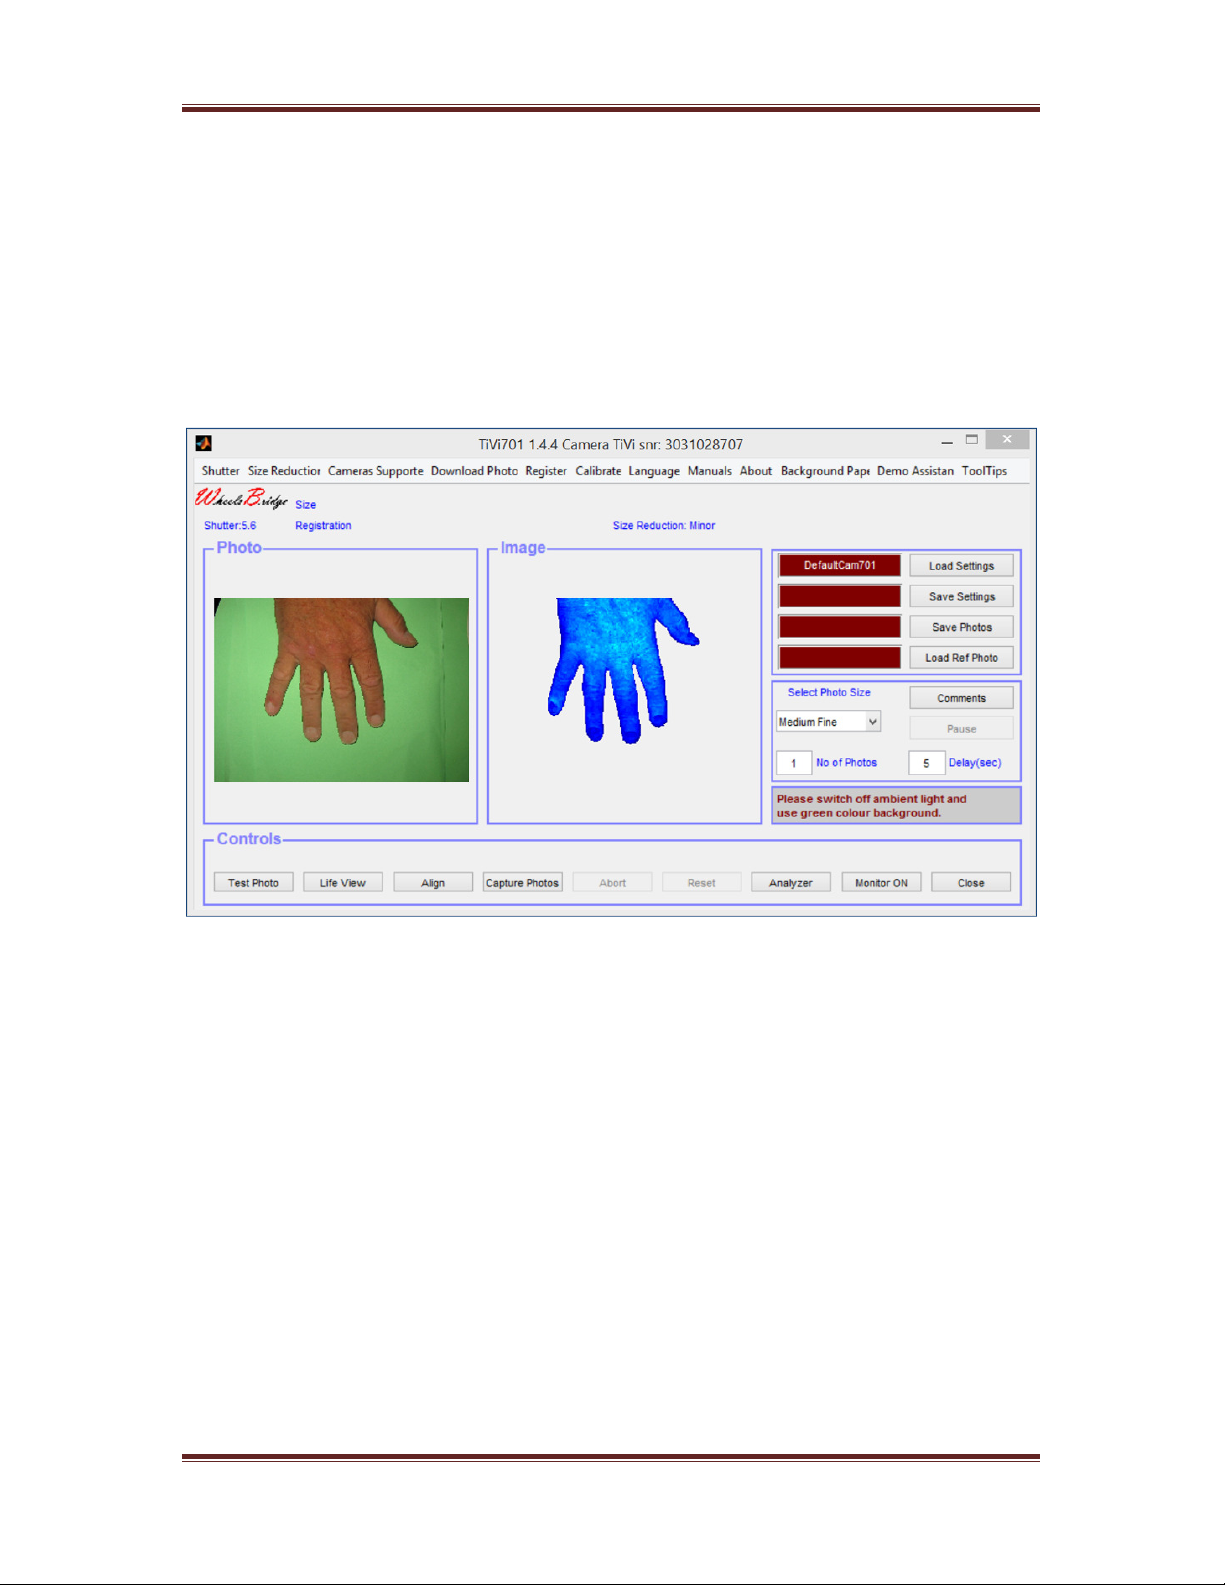
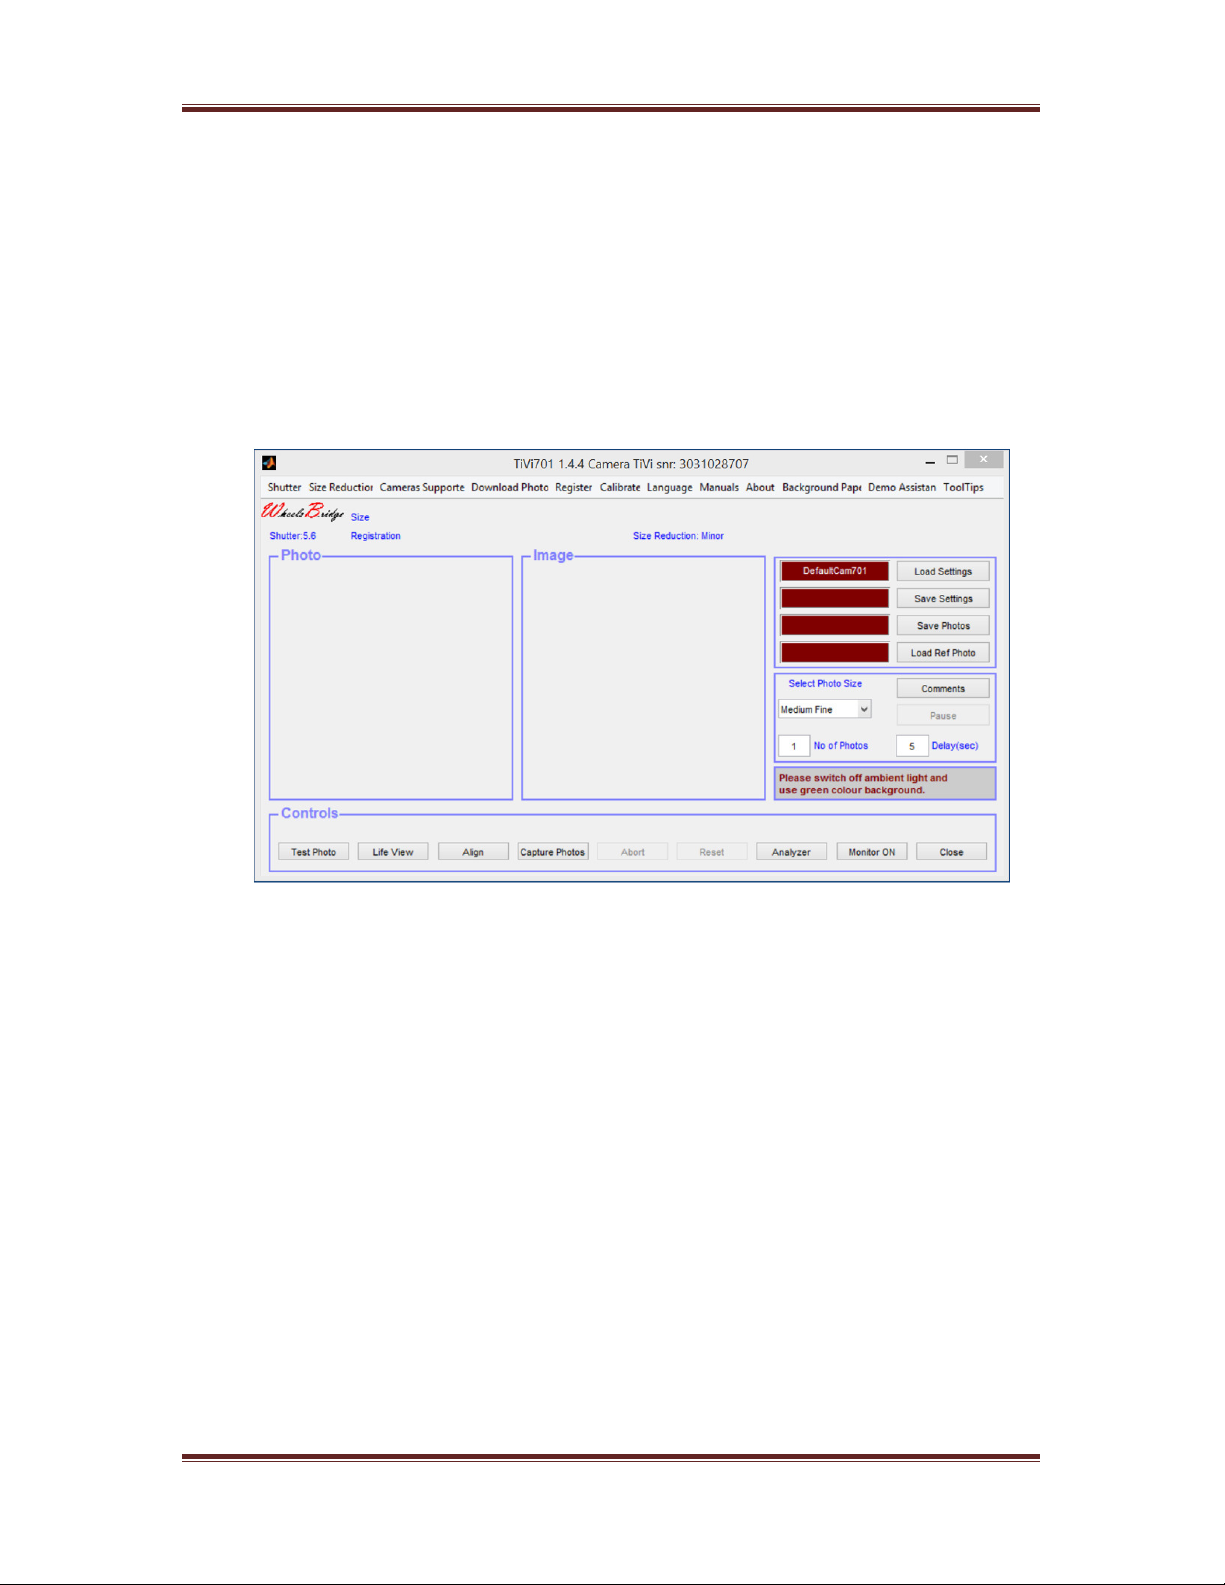
3. Photo / Image information
a. Size – shows the size of the photo displayed.
b. Registration – displays the value of the registered parameters.
c. Number – display the number of the photo displayed in a sequence of photos.