White Knight WK 270-1703A User manual

WK 270-1703A
WK 310-1703A
FRIDGE/FREEZER
Instruction manual

2
IMPORTANT NOTE
REMOVAL OF TRANSIT PACKAGING
BEFORE USING FOR THE FIRST TIME,REMOVE BLANKING PLUG "A
TAKE OFF ALL PACKING PIECES ''B'', AND THEN REPLACE IN HOLE ''C''
GENERAL INFORMATION
These fri ge-freezer mo els are compressor base " ouble - oor"
appliances
term storage of chille pro ucts in the refrigerating chamber
as well as for prolonge
frozen pro ucts an the pro uction of ice in the freezing chamber.
These class “N" appliances are inten e to be use un er
omestic
temperature of +16 to +32 °C an air moisture not higher than 70% the
manu
trouble-free operation. These appliances meet all up-to-
ate requirements for
pro ucts an electrical evices.
The appliances are environmentally frien ly, they o not
contain ozone layer e
The appliance uses refrigerant R600a.
All preventive maintenance operations an repairs shoul be carrie out by an expert in this kin
of equipment.
! CAREFULLY READ THE INSTRUCTION MANUAL. If instructi ns are n t f l
risk f injury, damage t the appliance, and l ss f the right t free warranty service.
recommen to keep the Instruction manual the whole time you have the appliance.
NOMINAL TECHNICAL DATA
M del
WK
270
-
1703A
Name of appl
iance
Fri ge/freezer
Energy efficiency class
in accor ance with
irective 94/2 EC
A
Energy consumption:
kWh/24 h
kWh/per year
0,79
288
Actual c nsu
mpti n will depend n h w the appliance is used and
Total gross volume, L
261
Fresh foo volume , L
170
Freezing chamber gross volume, L
83
Frozen foo volume , L
61
Powercut safe,
h
17
Freezing capacity, kg/24h
5
Temperature in eep freezer compartment, °C
minus 18
Overall imensions ,mm
1450x600x600
Storage shelves area, m
2
105
Weight, kg
51
Voltage use ,
V
/
Frequency, Hz
220
-
2
40
Rate input, W
140
Current, A
1,0
Insulation foaming
C
5
H
",
appliances
esigne for short-
as well as for prolonge
storage of
omestic
con itions. At ambient
manu
facturer guarantees its
ate requirements for
househol refrigeration
contain ozone layer e
pleting materials.
All preventive maintenance operations an repairs shoul be carrie out by an expert in this kin
! CAREFULLY READ THE INSTRUCTION MANUAL. If instructi ns are n t f l
l wed, there is a
risk f injury, damage t the appliance, and l ss f the right t free warranty service.
We
recommen to keep the Instruction manual the whole time you have the appliance.
WK
310
-
1703A
Fri ge/freezer
A
0,89
324
mpti n will depend n h w the appliance is used and
where it is l cated.
309
193
114
92
17
12
minus 18
1730x600x600
140
55
40
/
50
140
1,0
H
10

3
SAFETY REQUIREMENTS
•Prior to connecting the fri ge freezer to the mains, make sure that the power cor is not amage .
•The plug of refrigerator shoul be connecte to a properly fixe , stationary socket.
•The socket must have a reliable earth connection.
•This fri ge freezer is supplie with a special supply cor . It shoul only be exchange for an
i entical special supply cor an this replacement shoul only be carrie out by the manufacturer or
the manufacturer’s appointe agent.
•Maintain your appliance carefully. Don’t allow the hole in the gutter for water running out to block,
because water insi e the cabinet an on oor seals may cause corrosion, seals pulling out an other
efects.
•Clean parts locate at the refrigerator rear wall from ust accumulate there with a ry brush or a
vacuum-cleaner at least once a year.
•Protect plastic surfaces of the foo storage compartment from any fat, oils, sauces because they
can cause amage to the compartment. In case of uninten e spill imme iately clean the surface
with ish washing liqui .
•Do not place vessels containing liqui on top of the fri ge freezer as these coul spill onto electrical
components. Do not place heating appliances (electric stoves, irons, grills an others) on the top
cover of the fri ge freezer.
In case of scrapping the appliance national requirements must be consi ere with reference to the
recycling of the refrigerant an insulation gas. Contact your local authority before scrapping.
WARNING!
•Keep ventilati n penings in the appliance encl sure r in the built in structure, clear
f bstructi n.
•D n t use mechanical devices r ther means t accelerate the defr sting pr cess.
•D n t damage the refrigerant circuit.
•D n t use electrical appliances inside the f d st rage c mpartments f the appliance.
•D n t leave running (c nnected t the mains) with pened ( r inc mpletely cl sed)
d r l nger than it is needed f r taking ut r putting in f dstuffs.
•AFTER SWITCHING THE APPLIANCE OFF (WHILE CLEANING, MOVING TO ANOTHER
PLACE AND SO ON), IT CAN BE SWITCHED ON AGAIN ONLY AFTER 15 MINUTES.
•While efrosting or cleaning the fri ge-freezer o not forget to isconnect it from the mains.
•Do not store glass bottles containing liqui s capable of freezing an also carbonate bottle
beverages in cappe bottles or cans in the freezing chambers as they may explo e.
•It is not a visable to use foo stuffs in a col state straight from the freezing chamber.
Inf rmati n:
- leave the oors of refrigerator open if it is switche off for a long time;
-if selling or transferring this freezer inform the new user, that it contains insulation - cyclopentane
an refrigerant R600a.

4
REFRIGERATOR DESIGN
! Before stu ying the text escribe below, pay attention to the figures.
WARNING!
THE APPLIANCE ACCESSORIES LISTED BELOW MAY DIFFER FROM THE ACCESSORIES
OF THE APPLIANCE YOU HAVE BOUGHT IN QUANTITY AND IN DESIGN.
This escription is a apte
for entire group of two–compartment refrigerator-freezer combinations.
The refrigerator is fitte with two chambers - ”freezing chamber A”
an
chamber B” .
The freezer chamber is fitte with "freezing" area that is marke .
1
-
2
Interior li
ghting lamp, interior lighting lamp cover
13
Fast
-
freeze section
3
Thermostat
-
temperature regulator
14
Frozen pro ucts section(s)
4
Thermostat position in icator
15
Thaw water channel
5
Electric supply in icator (green light)
19
Door trays
6
A justable height shelves
20
Egg tray
9
Thaw water channel cleaner (re colour)
2
5
Con enser
10
Shelf (glass)
2
6
Thaw water rip tray
12
Fruit an vegetable boxes
27
Compressor
THE APPLIANCE ACCESSORIES LISTED BELOW MAY DIFFER FROM THE ACCESSORIES
This escription is a apte
an
"fresh f d st rage
freeze section
Frozen pro ucts section(s)
Thaw water channel
Door trays
Con enser
Thaw water rip tray
Compressor

5
CHANGING THE OPENING DIRECTION OF THE DOORS
It is recommen e that changing the opening irection of the oors shoul be one with a helper.
You will nee two spanners No. 8 an No. 10 an a Philips hea screw river.
! When changing the opening irection of the oors, YOU CAN NOT lay the refrigerator horizontally.
Do the actions below in the or er they are liste :
WARNING! Turn ff the
appliance and pull the plug
ut f the electricity supply
s cket
.
1. remove the bottom cover 15;
2. unscrew two screws 12 an
remove the bottom bracket 13
together with the washers 11 on
the axle an the spacer 10;
3. remove the bottom oor 9;
4. unscrew the fixing screws 7 of
the mi le bracket 6;
5. remove the mi le bracket 6
together with washers on the axle
an the spacer 5;
6. remove the top oor 4;
7. unscrew the axle 2 together
with the nut 1 an the washers 3
from the upper bracket an screw
all this set on the left si e of the
oor;
8. isplace the plug 21 the upper
oor an the plug 19 from the
bottom oor on the right si e;
9. take out the pins 20 from the
cabinet in the zone of the cross
element an isplace the to the
right si e;
10. hang the upper oor on the
axle 2;
11. prior to screwing the mi le
bracket 6 with washers an
spacers on the left si e of the
cabinet, insert the bracket axle
into the upper oor;
12. hang the bottom oor on the
mi le bracket axle;
13. prior to unscrewing the
bracket 16 an exchanging it with
the bottom bracket 13 (together with the set of washers an spacers), insert the bracket axle
into the bottom oor. The brackets 14 which are un er the brackets 13 an 16 remain in their
places;
14. unscrew fixing screws 17 from oors, remove han les 18 an screw it on the eight si e of the
oor therefore taken out plugs. Cover the holes in which the han le was screwe with taken out
plugs. Put on the bottom cover 15.

6
PREPARATION FOR USE
The transportation boar is ma e from expan e polystyrene. Remove the a hesive tapes from
si es, lift the refrigerator up an take out the boar .
When positioning the appliance in chosen location, it will move more easily into position if you lift the
front a little an incline it backwar , allowing it to roll on its casters.
Strip sticky tape off an open the oors. Remove the re transportation hol ers from the shelves.
◄ If your appliance is supplie complete with
glass shelves, pull a shelf in the irection 1 an
remove each re transportation hol er in the
irection 2.
Take two supports 1 from the pack an insert
them into the gui es 2 in the back part of the
table top. ►
A justing the feet, mount the refrigerator with a slight backwar s incline to provi e a self closing oor
effect. It is very imp rtant that all the feet are unif rmly t uching the fl r.
LOCATION
•The fri ge freezer shoul be place in a ry, well ventilate room.
•The fri ge freezer must be kept from exposure to irect sun rays.
•It is not a visable to locate it near the heat sources (boilers, ra iators an so
on). If it is not possible to select another place, use an insulating panel.
•The appliance must n t t uch heating, gas r ther pipes r heating
devices.
Overall space required in use f the refigerat r. ►
If the appliance is place in a corner, a gap of at least 1 cm must be left between
the appliance bo y an the wall so that the freezer compartment oor can be
opene enough to pull out the frozen pro uct rawer.
VENTILATION
IMPORTANT! Keep ventilati n penings in the appliance enclosure or in
the built - in structure, clear of obstruction.
◄ Do not cover the ventilation holes at the top of the appliances– it must be a
goo air circulation aroun the appliance. There shoul be a gap of at least 10
cm between the top of the appliance bo y an any furniture that may be above
it. If this requirement is not followe , the appliance consumes more electrical
energy an its compressor may overheat.
If oors of the appliance close ba ly, it is necessary to change the oor gasket.
If the oor oes not close correctly, the temperature in the appliance rises an
energy consumption increases.

7
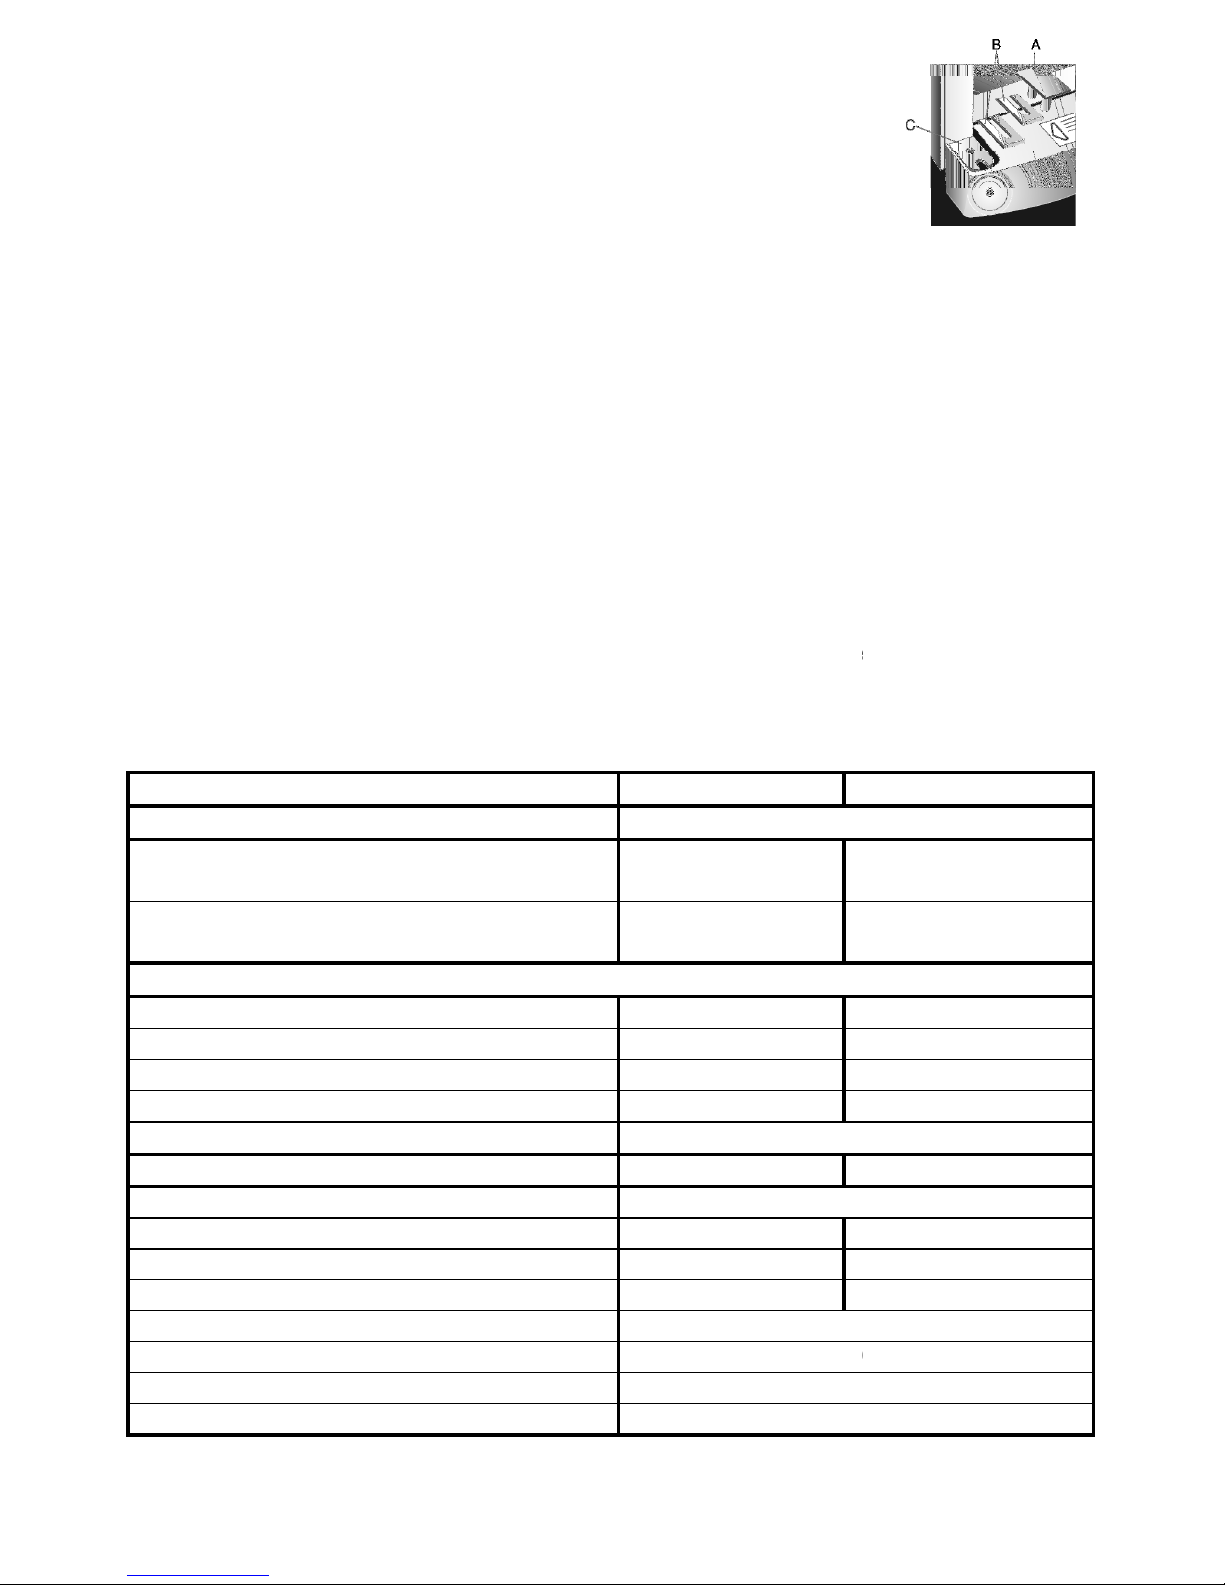
CONTROLS AND WARNING LIGHTS (Fig. 1)
The fri ge-freezer is switche on by connecting it to the mains. By isconnecting it, the appliance
is switche off.
Imp rtant N te: After switching the therm stat ff nly the c mpress r is switched ff.
The temperature in the refrigerating chamber is a juste by the temperature control knob 3.
The temperature controller is switche off when the knob shows a "0" mark in the temperature
control scale win ow. If the temperature control knob is turne clockwise, the temperature in the
chamber re uces.
The temperature of the refrigerator chamber is set by turning the thermostat wheel 4 which is
connecte to a thermostat. Temperature is in icate in the thermostat win ow 3 of the top cover
panel an on the wheel – below the top cover.
The thermostat is switche off when the thermostat knob an the wheel are turne to the position
“O”. Turning the thermostat wheel clockwise temperature of the refrigerator chamber ecreases.
A green illuminating lamp 5 in icates that the refrigerator is connecte to the mains.
CHANGING THE INTERIOR LIGHT BULB
When changing the interior light bulb, o the actions below in the or er
they are liste :
1. isconnect the refrigerator from the mains;
2. press the ome light cover clip to the right an pull it ownwar s to
remove the cover;
3. replace the lamp: lamp type - 15 W, lamp hol er - E 14;
4. reverse removal to replace the cover;
5. reconnect the refrigerator to the mains.
FREEZING AND STORAGE OF THE FOOD STUFFS (Fig.1)
Temperature in the freezing an fresh foo storage chambers epen s on the ambient temperature,
position of the temperature control knob an the number of fresh foo pro ucts store therein.
•DO NOT EXCEED THE INDICATED MAXIMUM AMOUNT OF FOOD FOR FREEZING:
FOR MODELS WK 270 IT IS 5 KG PER 24 HOURS,
FOR MODELS WK 310 IT IS 12 KG PER 24 HOURS.
Initially set the temperature controller knob to position “3”. If this causes excessive cooling of the
foo s in the chamber – a just the setting to between “1” & “3” an if the cooling is insufficient, a just
the setting to between “3” & “5”.
! IF THE ROOM IS COOL, THE APPLIANCE COOLS LESS. THE TEMPERATURE IN THE APPLIANCE MAY
THEREFORE RISE. Use the thermostat wheel to set a lower temperature.
Fresh foo stuffs prepare for freezing shoul be place in one or two layers in the fast-freeze
section (fig. 1). The thermostat knob shoul be set to 5. After 24 hours, the frozen foo pro ucts
shoul be replaces from the fast-freeze section to the storage section rawer(s). When the pro ucts
are frozen, the thermostat wheel shoul be set at its earlier p siti n.
◄Leave a gap of not less than 3 cm between the foo stuffs being frozen
an the upper partition.
•Do not place unwrappe foo stuffs in the freezer sections.
•Fresh foo for freezing shoul not touch alrea y frozen foo stuffs.
•Do not freeze foo stuffs that are warmer than the room temperature.
•Do not freeze liqui foo stuffs in glass vessels or bottles. Do not freeze
carbonate beverages.

8
•Strictly observe the frozen foo pro uct vali ity ates in icate by the manufacturer on the pro uct
packaging.
•WE RECOMMEND THAT FROZEN FISH AND SAUSAGE SHOULD BE STORED IN THE FREEZER
COMPARTMENT NOT LONGER THAN 6 MONTHS; CHEESE, POULTRY, PORK, LAMB – NOT MORE
THAN 8 MONTHS; BEEF, FRUIT AND VEGETABLES – NOT LONGER THAN 12 MONTHS.
PRACTICAL TIPS AND OBSERVATIONS
•Do not keep bananas in the refrigerator – these fruits are sensitive to col .
•Do not keep prepare foo an rea y-to-cook (“heat an eat”) foo in the same container.
•Store in an airtight container in the appliance any foo stuffs that have a strong o our (e.g. fresh
fish, pâté e foie gras goose liver pâté, an cheese).
•Frozen foo stuffs shoul be thawe in the refrigerator compartment. Foo that thaws slowly retains
better flavour properties an sprea col will help to maintain the set temperature in the
refrigeration compartment. Do not consume ice ma e in the freezer chamber straight away.
•Pro ucts will freeze more quickly if they are ivi e up an packe in small portions.
ICE MAKING
Ice-cubes are prepare in a tray 16 (fig .1) for making ice-cubes. Fill each space in the ice cube tray
¾ full of rinking water. Place the ice-cube tray in the fast-freeze section. When you want to remove
the ice-cubes from the ice-cube tray, leave it for 5 min at room temperature an then shake the cubes
into the special ish for them.
REFRIGERATOR DEFROSTING
The freezer compartment shoul be thawe not less than twice a year or when a layer of ice thicker
than 5 mm forms in it. Do the actions below in the or er they are liste :
WARNING! Turn the appliance ff and pull the plug ut f the electrical s cket.
•Remove foo stuffs from freezer compartment. The frozen foo stuffs will not warm up too much
while you are thawing the freezer compartment if you cover them with a thick cloth an keep them
in a cool place.
◄Remove bottom cover. Place a ish un er the thaw water
channels.
•Leave oor of freezer compartment open.
•When the ice melts, clean an wipe ry the surfaces an fixtures of
the freezer compartment.
•Close the freezer compartment oor. Plug in an turn on the
appliance
After efrosting, wash the refrigerator with hot water or with su s or so a solution, WIPE DRY AND
AIR IT.
•Clean the channel gutter with the help of the cleaner 9 (Fig.1);
•Do not clean with liqui s containing alcohol;
•Refrigerators pro uce from a stainless steel shoul be cleane only with cleansers for those
surfaces
Remarks n the appliance perating n ise
As the appliance operates an goes through the freezing cycle, various noises will be emitte . This is
normal an is not a sign of any malfunction.
•As the refrigerant circulates aroun the refrigeration system, it causes soun s like murmuring,
bubbling, or rustling.
•Lou er soun s like popping or clicking may be hear for a short time as the refrigerator’s
compressor switches on.

9
If problems occur use the troubleshooting chart below:
N te. If your fri ge freezer is not working an it is not
possible to repair
troubleshooting charts, switch it off, open the appliance oors an call
a service agent
FAILURE REMOVAL BY THE USER
Trouble Way of reme y
Fri ge
-
freezer
is
connecte
but
the
green lamp oes not light up.
No voltage in the mains or no contact betw
an socket. Check
plug fuse, try in an alternative socket
An unusual noise arises uring
operation of the refrigerator.
Check if the appliance is pla
ce correctly, as follows:
Stan s level on a smooth an
firm
any vibrating evices or furniture next to it.
While opening the oor the gasket
comes off.
Insert the gasket into
position by
pressing the inner part
of the gasket. If the gasket
has been contaminate
oily liqui s, it is necessary to clean the gasket an the
groove in the oor with ish washing agent an wip
ry before re-fitting.
Water at the bottom of the fresh foo
storage chamber.
Defrost water isposal
system is clogge .
channel in the gutter
with the help of
High temperature in the appliance.
A lot of warm foo stuffs l
oa e ; oors have been
opene or a long time or too often.
Surface of the appliance ews.
High r
elative humi ity (over 70 %).
The refrigerator must only be carrie in the upright position.
Secure the refrigerator uring transit in or er to avoi amage.
When requesting a repair to your
appliance, always quote the
information given on the label
shown below.
The symbol on the pro uct or on its packaging in icates that
this pro uct may not be treate
as househol waste. Instea it shall
be han e over to the applicable collection point for the rec
of electrical an electronic equipment. By ensuring this pro uct is
ispose of correctly, you will help
prevent potential negative
consequences for the environment an human health, which coul
otherwise be cause by inappropriate waste han ling of this
pro uct. For more etaile information
about recycling of this pro uct, please contact your local authority
office, your househol
isposal service or the shop where you purchase the pro uct.
possible to repair
it by means of these
a service agent
.
No voltage in the mains or no contact betw
een the plug
plug fuse, try in an alternative socket
.
ce correctly, as follows:
firm
base; oesn’t touch
any vibrating evices or furniture next to it.
pressing the inner part
has been contaminate
with
oily liqui s, it is necessary to clean the gasket an the
groove in the oor with ish washing agent an wip
e it
system is clogge .
Clean
the
with the help of
the cleaner 9.
oa e ; oors have been
this pro uct may not be treate
be han e over to the applicable collection point for the rec
ycling
ispose of correctly, you will help
consequences for the environment an human health, which coul
pro uct. For more etaile information
office, your househol
waste
This manual suits for next models
1
Table of contents
Other White Knight Refrigerator manuals