White Knight WK 245-1704A User manual

W
WW
W
W
WW
WK
KK
K
K
KK
K
2
22
2
2
22
24
44
4
4
44
45
55
5
5
55
5-
--
-
-
--
-1
11
1
1
11
17
77
7
7
77
70
00
0
0
00
04
44
4
4
44
4A
AA
A
A
AA
A
FREEZER
FREEZERFREEZER
FREEZER
Instruction manual
Instruction manualInstruction manual
Instruction manual

IMPORTANT NOTE
REMOVAL OF TRANSIT PACKAGING
BEFORE USING FOR THE FIRST TIME, REMOVE BLANKING PLUG "A",
TAKE OFF ALL PACKING PIECES ''B'',
AND THEN REPLACE IN HOLE ''C''
GENERAL
Vertical freezer WK 245 is a compressor based upright freezer designed for freezing and prolonged
storage of foodstuffs and for making ice
Freezers are of the temperate climatic class "N" and are intended to be used under domestic
conditions in installations with ambient temperature of between +16°C and +32°C
This freezer meets all up-to-date requirements for household refrigerators and electrical devices
The refrigerant and the blowing agent are environmentally friendly - they don't contain ozone layer
depleting components
The a liance uses refrigerant R600a.
Since the construction of our freezer range is continuously being improved, minor changes may be
introduced without special notice in these instructions
ATTENTION! THE FREEZING MODE (YELLOW LAMP LIGHTS IN THE FREEZER DISPLAY)
CAN OPERATE FOR NO MORE THAN THREE DAYS. DISREGARDING THIS MAY CAUSE THE
COMPRESSOR MOTOR TO BURN OUT.
! CAREFULLY READ THE INSTRUCTION MANUAL. If instructions are not followed, there is a
risk of injury, damage to the a liance, and loss of the right to free warranty service. We
recommend to keep the Instruction manual the whole time you have the appliance
NOMINAL TECHNICAL DATA
Model
WK
245
-
1704A
Energy efficiency clas
s in accordance with directive
94/2 E
A
Energy consumption:
kWh/24 h
kWh/ er year
0,73
266
A
ctual consum tion
will
de end on how the a liance is used and where it is located
Total gross volume, L
243
Net
volume , L
205
Powercut safe, h
19
Freezing capacity, kg/24h
24
Tem erature in the freezer com artment,
o
C minus 18
Overall dimensions, mm
1450 x 600 x 615
Storage
area, dm
2
105
Weight, kg
51
Voltage used, V
/
Frequency, Hz
220
-
2
4
0
/
50
Rat
ed input, W
165
Current, A
1,4
Foaming agent
C
5
H
10

SAFETY PRECAUTIONS
•Prior to connecting the freezer to the mains make sure that the power cord is not damaged
• The plug of the freezer should be connected to a properly fixed, stationary socket providing
good contact The socket must have a reliable earth connection
•This freezer is su lied with a s ecial su ly cord. It should only be exchanged
for an identical s ecial su ly cord and this re lacement should only be carried out by
the manufacturer or the manufacturer’s a ointed agent.
•After installing the a liance the ower su ly lug must be accessible.
•Keep the rear of the freezer free from dust using a soft brush or a vacuum cleaner at least once a
year
•Do not place vessels containing liquid on top of the refrigerator as these could spill onto electrical
component
•Do not place electrical heating appliances (electric fires, irons, grills and others) on the top cover of
the freezer
•In case of scrapping the appliance national requirements must be considered with reference to the
recycling of the refrigerant and insulation gas Contact your local authority before scrapping
WARNING !
•Kee ventilation o enings in the a liance enclosure or in the built - in structure, clear
of obstruction.
•Do not use mechanical devices or other means to accelerate the defrosting rocess.
•Do not damage the refrigerant circuit.
•Do not use electrical a liances inside the food storage com artments of the a liance.
•After switching the a liance off (while cleaning, removing to another lace and so on),
it can be switched on again only after 15 minutes.
•Do not touch the lug ins after switching the a liance off.
While defrosting or cleaning the freezer, don't forget to disconnect it from the mains
Do not store glass utensils (capped bottles or jars) containing liquids containing carbon dioxide (eg
fizzy drinks) in the freezer as they can explode
•It is not advisable to use foodstuffs in a cold state straight from the freezer.
Information:
•leave the door of freezer o en if it is switched off for a long time.
•if selling or transferring this freezer, inform the new user that it contains
insulation – cyclo entane and refrigerant R600a.

CONSTRUCTION OF THE FREEZER (fig. 1)
There are two areas inside the compartment of the freezer: "fast freezing" and "storage"
The "fast freezing" area is marked and the "storage" is marked
REVIEW OF MECHANICAL CONTROL (fig. 1)
CONTROL PANEL — DESCRIPTION OF SYMBOLS AND OPERATIONS
2 ― FAST-FREEZE INDICATOR, marked with the symbol When the fast-freeze mode is turned
on, the yellow indicator light is illuminated Instructions on how to use the fast-freeze function
are in the section entitled "Freezing of food stuffs in the freezer compartment"
ATTENTION!
The fast-freeze function does not turn off automatically — it needs to be switched off!
When the fast-freeze mode is on, the a liance's com ressor works non-sto .
3 ― THERMOSTAT POSITION INDICATOR, marked with the symbol The thermostat position
is seen on the thermostat position indicator
2 Fast-freeze indicator 7 Fast-freeze section (s)
3 Thermostat position indicator 8 Frozen products section(s)
4 Electric supply indicator (green light) 9 Condenser
5 Thermostat - temperature regulator 10 Compressor
6 Temperature rise indicator 11 Cold accumulator

4 ― ELECTRICITY SUPPLY INDICATOR, marked with the symbol When the appliance is
connected to the electricity supply, the green indicator light is illuminated Simultaneously also the
the tem erature rise indicator lights u It indicates that the freezer was switched off for a
longer time, i e the freezer is switched on for the first time, after defrosting or after losing of
voltage When the temperature in the compartment again falls below -9 ºC, the indicator light will
go out
6 ― THE TEMPERATURE RISE INDICATOR is marked with the symbol When the temperature
in the freezer compartment rises above -14 ºC, the red indicator light is illuminated
It indicates that:
•The freezer was switched off for a longer time, i e the freezer is switched on for the first time,
after defrosting or after losing of voltage
•The door of the freezer is opened or is being opened too frequently
•It is loaded a large amount of unfrozen foodstuffs
•The freezing system is failed, i.e. the indicator does not go out longer 6 hours and it
is heard running com ressor or the com ressor does not switch on. In this case you
should a ly to your service agent (at first make sure that three above items were
taken into account).
CHANGING THE OPENING DIRECTION OF THE DOORS (fig.6)
It is recommended that changing the opening direction of the doors should be done with a helper
You will need two spanners No 8 and No 10 and a Philips head screwdriver
! When changing the opening direction of the doors, YOU CAN NOT lay the refrigerator horizontally
Do the actions below in the order they are
listed:
WARNING! Turn off the a liance and
ull the lug out of the electricity su ly
socket.
1 Remove bottom bracket 1 Remove bottom
bracket 2 together with the washers on
the axle and the plastic spacer Remove
compartment door
2 Remove cap 4 from the refrigerator door
and press it in on the opposite side
3 Unscrew axle 5 by turning it counter-
clockwise Remove it together with the bolt
and washers
4 On the opposite side, screw in axle 5 in a
clockwise direction together with the bolt
and washers
5 Turn bracket 2, together with the nuts on
the axle and the plastic spacer, around a
full 180°, replacing the nuts on the axle
and tightening them on the opposite side
6 Screw bottom bracket 4 together with the
washers on the axle and the plastic spacer
into the place for bracket 2 Screw bracket
2 into the place for bracket 4 Remove bolt
caps (a) and plugs (b) Unscrew the bolts
holding the handles in place Move the
handles to the other side Screw on
Press plugs into the remaining apertures in
the door and cover bolts with caps a
7 Replace bottom lid 1

PREPARING THE APPLIANCE FOR OPERATION
! It is recommended to re are the a liance for o eration with a hel er.
•Remove package Lift the appliance away from foamed polystyrene base Do not rise or ush it
taking by handles. Handles may break. Tear off adhesive tapes
•When positioning the appliance in chosen location, it will move more easily into position if you lift
the front a little and incline it backward, allowing it to roll on its casters
•Remove the support from the bottom cover Tear away the red-coloured
adhesive tapes from the door trays – they are intended only for the
transport of the appliance
•Suitably dispose the packaging material
◄Take two supports from the bag and insert them
into the guides at the top back part of the appliance
•ATTENTION!
In order to fix the upper small door
when closing, the upper corners of the door till a click ►
POSITIONING.
VENTILATION
•Place the appliance in a dry, well ventilated room
•ATTENTION!
The appliance should not be operated in an unheated room or porch Place the
appliance away from heat sources such as kitchen stove/oven, radiators, or direct sunlight
•ATTENTION!
The a liance must not touch any i es for heating, gas or water su ly,
or any other electrical devices.
•Do not cover the ventilation holes at the top of the appliances– it must be a good
air circulation body and any furniture that may be above it If this requirement is
not followed, the appliance consumes more electrical energy and its compressor
may overheat ►
◄Overall s ace required in use of the freezer. If the
appliance is placed in a corner, a gap of at least 1 cm must be left
between the appliance body and the wall so that the freezer
compartment door can be opened enough to pull out the frozen
product drawer
•The appliance must stand on a level surface and must not touch
the wall If necessary, regulate the height of the appliance by adjusting the
levelling feet: by turning them clockwise – the front of the appliance rises, by
turning them counter clockwise – it comes down If the appliance is tilted slightly
backward – the doors will close by themselves
TEMPERATURE REGULATION
! Temperature set in the freezer by the manufacturer is -18
0
C
The temperature in the appliance is controlled using the thermostat knob 5 (fig. 1) by turning it to
one side or the other The temperature indication in digits is shown beside the thermostat knob When
the appliance door is closed, the thermostat position is seen on the thermostat position indicator 3
(fig. 1) The temperature is regulated on the scale of five digits
0 = Compressor is switched off WARNING! Electric current is not switched off.
1 = highest temperature (lowest cooling) 5 = lowest temperature (highest cooling)
! Please set the desired temperature in the appliance according to your own requirements
! THE TEMPERATURE IN THE REFRIGERATOR COMPARTMENT MAY VARY DEPENDING ON AMBIENT
TEMPERATURE, THE AMOUNT OF FOODSTUFFS, THE TEMPERATURE OF THE FOODSTUFFS, AND
HOW OFTEN THE APPLIANCE DOOR IS OPENED AND CLOSED
Therefore we recommend:
•locate the appliance away from heat sources,
•food placed in the appliance should not be warmer than the room temperature,

•the appliance door must not to be left open, the appliance door should not be open longer than it is
necessary to take out or put in foodstuffs
! IF THE ROOM IS COOL, THE APPLIANCE COOLS LESS THE TEMPERATURE IN THE APPLIANCE MAY
THEREFORE RISE Use the thermostat wheel to set a lower temperature
FREEZING OF FOOD STUFFS IN THE FREEZER COMPARTMENT
In the freezer compartment, the fast-freeze section is marked with the symbol
The storage section is marked with the symbol
In order to freeze fresh food products turn on the fast-freeze function: turn the thermostat knob to
the setting S When the fast-freeze mode is turned on, the yellow indicator light is illuminated After
24 hours, place the fresh food products to be frozen in one or two rows in the fast-freeze section
When the food products are frozen after 24 hours should be removed from the fast-freeze section and
placed in the storage section drawer(s) When the food products are frozen, return the thermostat
knob to its initial setting The fast-freeze mode yellow indicator light will cease to be illuminated
ATTENTION!
The fast-freeze function does not turn off automatically — it needs to be
switched off!
ATTENTION!
The a liance cannot o erate in fast-freeze mode for more than 72 hours.
Failing to heed this requirement will damage the a liance's com ressor.
•DO NOT EXCEED THE INDICATED MAXIMUM AMOUNT OF FOOD FOR FREEZING- IT IS 24 KG PER
24 HOURS.
◄Leave a gap of not less than 2,5 cm between the foodstuffs being frozen and
the upper partition
•Do not place unwrapped foodstuffs in the freezer sections
•Fresh food for freezing should not touch already frozen foodstuffs
•Do not freeze foodstuffs that are warmer than the room temperature
•Do not freeze liquid foodstuffs in glass vessels or bottles. Do not
freeze carbonated beverages.
•Strictly observe the frozen food product validity dates indicated by the manufacturer on the product
packaging
•WE RECOMMEND THAT FROZEN FISH AND SAUSAGE SHOULD BE STORED IN THE FREEZER
COMPARTMENT NOT LONGER THAN 6 MONTHS; CHEESE, POULTRY, PORK, LAMB – NOT MORE
THAN 8 MONTHS; BEEF, FRUIT AND VEGETABLES – NOT LONGER THAN 12 MONTHS
MAKING ICE-CUBES
Ice-cubes are prepared in a tray for making ice-cubes Fill each space in the ice cube tray ¾ full of
drinking water Place the ice-cube tray in the fast-freeze section When you want to remove the ice-
cubes from the ice-cube tray, leave it for 5 min at room temperature and then shake the cubes into
the special dish for them
DEFROSTING THE FREEZER COMPARTMENT
The freezer compartment should be thawed not less than twice a year or when a layer of ice thicker
than 5 mm forms in it Do the actions below in the order they are listed:
WARNING! Turn the a liance off and ull the lug out of the electrical socket.
•To remove foodstuffs, to place them into containers, to cover them with
a heavy cloth and to leave them in a cold place
◄To pull out the plug on the bottom of the freezer The plug will be
pulled out easier after 10 - 20 minutes
•To leave the door of the compartment open
•When the ice melts, clean and wipe dry the surfaces and fixtures of the
freezer compartment
•Close the freezer compartment door Plug in and turn on the appliance

CLEANING AND CARE
! REGULARLY CLEAN THE APPLIANCE
! Remember that before defrosting the freezer com artment and cleaning the back art of
the a liance body you must disconnect the a liance from the electrical energy su ly
socket by ulling the lug out of the electricity outlet.
•Protect the appliance inner surfaces and plastic parts from fats, acids and sauces In case of
accidental spills – immediately clean with warm soapy water or dishwashing detergent Wipe dry
•Clean the appliance inner surfaces with warm soapy water Dishwashing detergent may also be
used
•Wipe dry inner and outer surfaces
•Regularly clean the hermetic gaskets of the doors Wipe dry
•At least once a year clean dust away from the back part of the appliance body and the compressor
A soft brush, electrostatic cloth or vacuum cleaner may be used for cleaning
•DO NOT use detergents containing abrasive particles, acid, alcohol or benzene for cleaning the
appliance inner and outer surfaces
•DO NOT use for cleaning cloths or sponges that have coarse surfaces intended for scrubbing
Practical ti s and observations.
•Frozen foodstuffs should be thawed in the refrigerator compartment Food that thaws slowly retains
better flavour properties and spread cold will help to maintain the set temperature in the
refrigeration compartment Do not consume ice made in the freezer chamber straight away
•Products will freeze more quickly if they are divided up and packed in small portions
•IF THE APPLIANCE IS TO BE LEFT SWITCHED OFF FOR AN EXTENDED PERIOD, LEAVE ITS DOORS
OPEN
Remarks on the a liance o erating noise
As the appliance operates and goes through the freezing cycle, various noises will be emitted This is
normal and is not a sign of any malfunction
•As the refrigerant circulates around the refrigeration system, it causes sounds like murmuring,
bubbling, or rustling
•Louder sounds like popping or clicking may be heard for a short time as the refrigerator’s
compressor switches on
OPERATION PROBLEMS AND THEIR SOLUTIONS (TROUBLESHOOTING)
What if …
•The a liance is lugged in to the mains but it does not work and the electricity su ly
voltage indicator is not illuminated. Check that your house electricity supply installations are in order
Check that the plug is correctly inserted into the electricity supply socket
•The noise has become louder. Check that the appliance is standing stable, on a level place To make it
level, regulate the front feet Check if the appliance is not touching any furniture, and that no part of the
refrigeration system at the back part of the appliance body is touching the wall Pull the appliance away
from any furniture or walls Check that the cause of increased noise isn’t due to bottles, cans or dishes in
the appliance that might be touching each other
•When the a liance door is o ened, the rubber sealing gasket ulls out. The gasket is smeared
with sticky foodstuffs (fat, syrup) Clean the sealing gasket and the groove for it with warm water
containing soap or dishwashing detergent and wipe dry Put the rubber sealing gasket back into the
place

•The tem erature rise indicator light is illuminated red. This means the appliance is being
connected to the electricity supply for the first time or it was disconnected for a significant period (for
thawing or during an interruption to the electricity supply), the freezer compartment door is not closed or
is being frequently opened and closed, or a large amount of fresh food has been put in, and therefore the
temperature in the compartment has risen above -9 ºC When the temperature in the compartment
again falls below -9 ºC, the indicator light will go out
ATTENTION! If the tem erature indicator light does not go out (for reasons other than those
listed above) for longer than six hours, the com ressor is either working constantly or is not
functioning. You need to consult service eo le.
•High tem erature in a liance, the com ressor o eration auses are short. Ascertain whether
the appliance door is shutting tightly, whether the door wasn’t kept open longer than necessary when
taking out or putting in foodstuffs, or whether a large amount of warm food was placed in the appliance
•The to of the a liance has condensation on it. The ambient relative air humidity is above 70 %
Ventilate the room where the appliance stands, and if possible remove the cause of the humidity
TRANSPORT
! THE MANUFACTURER WILL NOT BE RESPONSIBLE FOR ANY DAMAGE TO THE APPLIANCE THAT
RESULTS FROM NON-COMPLIANCE WITH THE INSTRUCTIONS FOR TRANSPORTATION
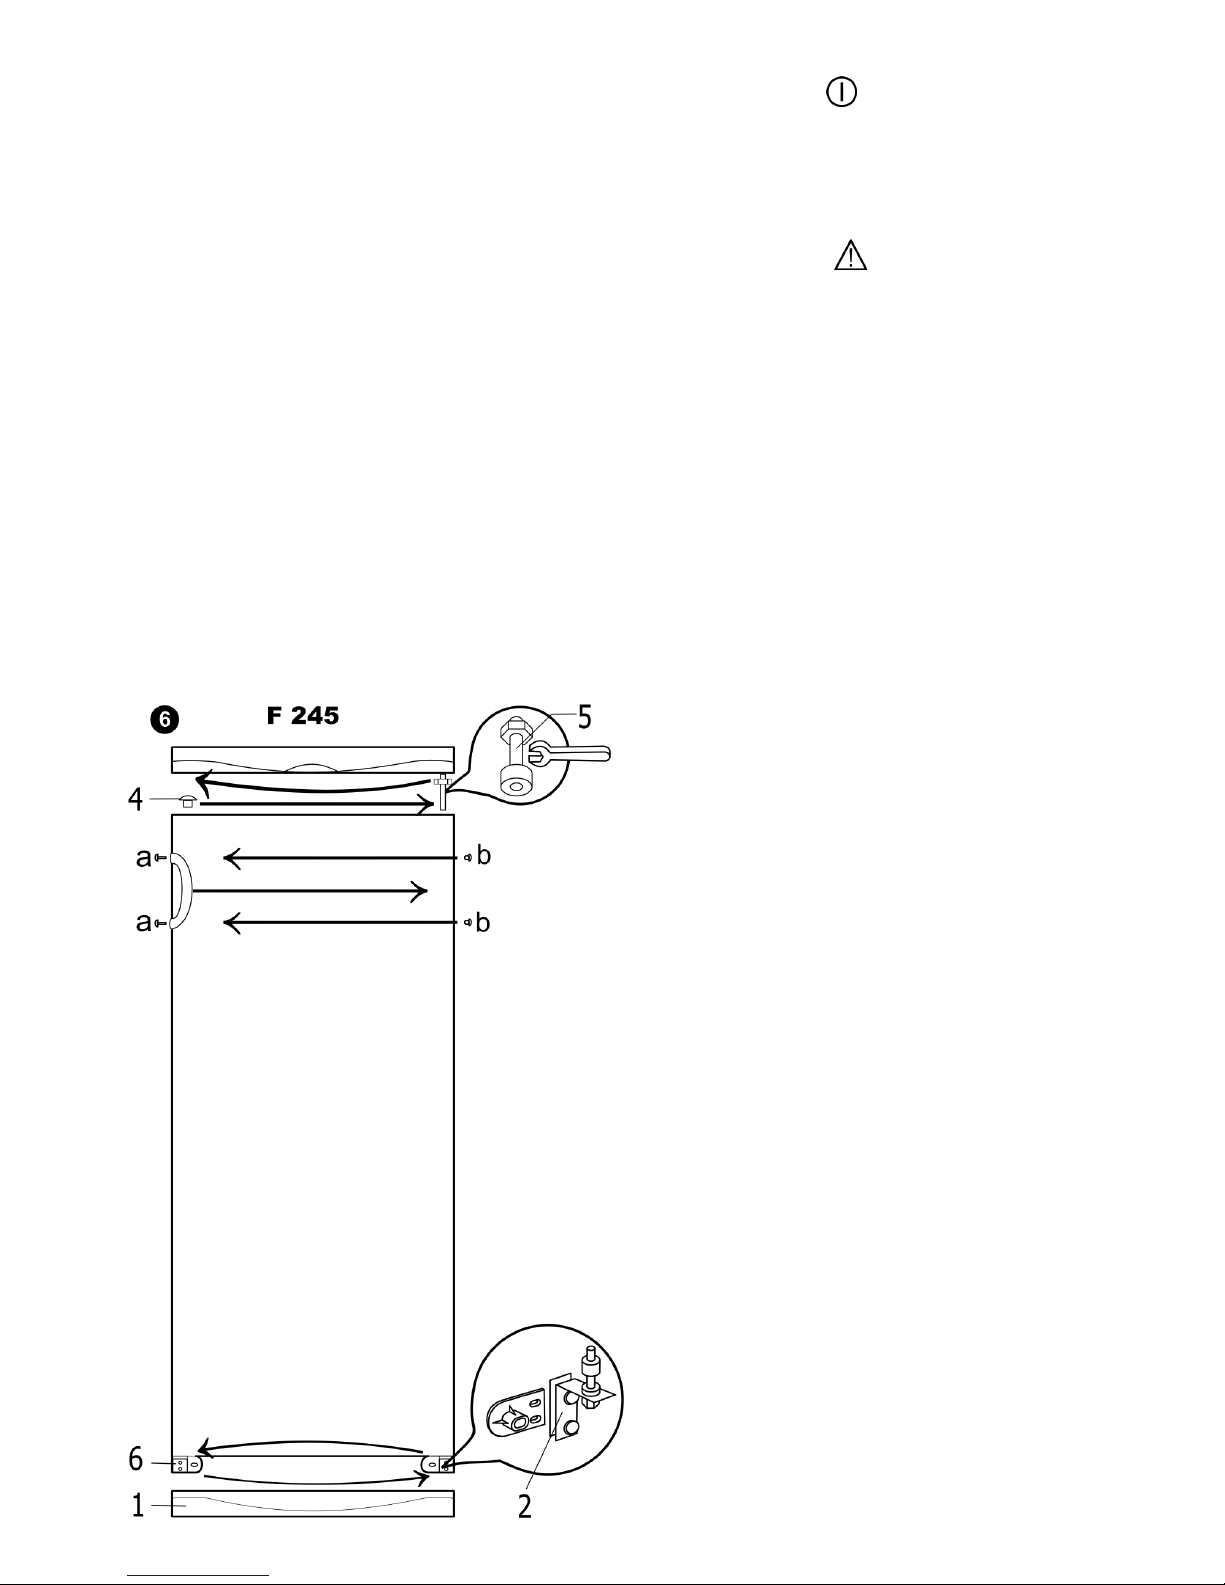
•The appliance should be transported only in the vertical position
•When being transported, the appliance should be protected from atmospheric conditions (rain,
snow, dampness)
•The appliance should be firmly secured in place while being transported, to avoid slippage or any
shocks in the transport vehicle
•If the appliance was transported not vertically, it may be connected to the mains after 4 hours at
least If this is not done, the appliance compressor may fail
! IF YOUR APPLIANCE IS NOT WORKING
PROPERLY, ASCERTAIN WHETHER YOU CAN
REMEDY THE CAUSE OF THE FAULTY
FUNCTIONING OF THE APPLIANCE YOURSELF
If you cannot solve the problem yourself,
contact the nearest refrigerator service
representative by telephone or in writing
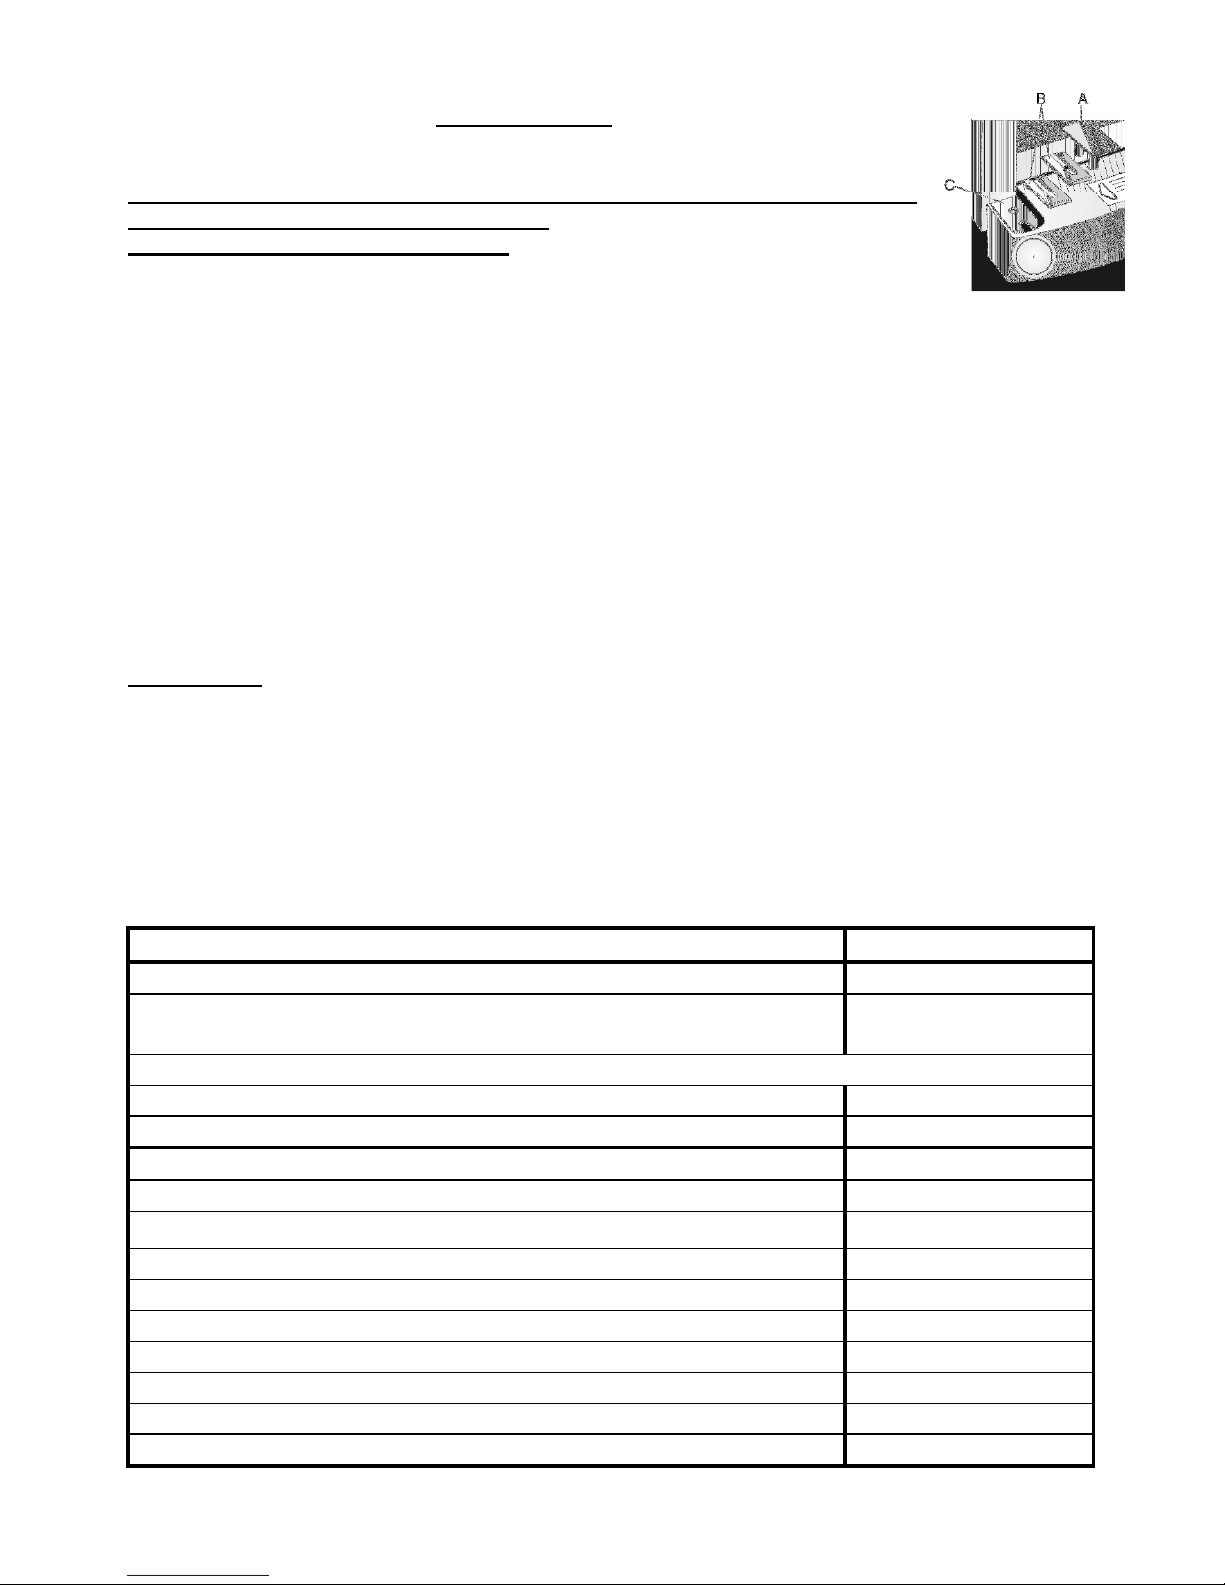
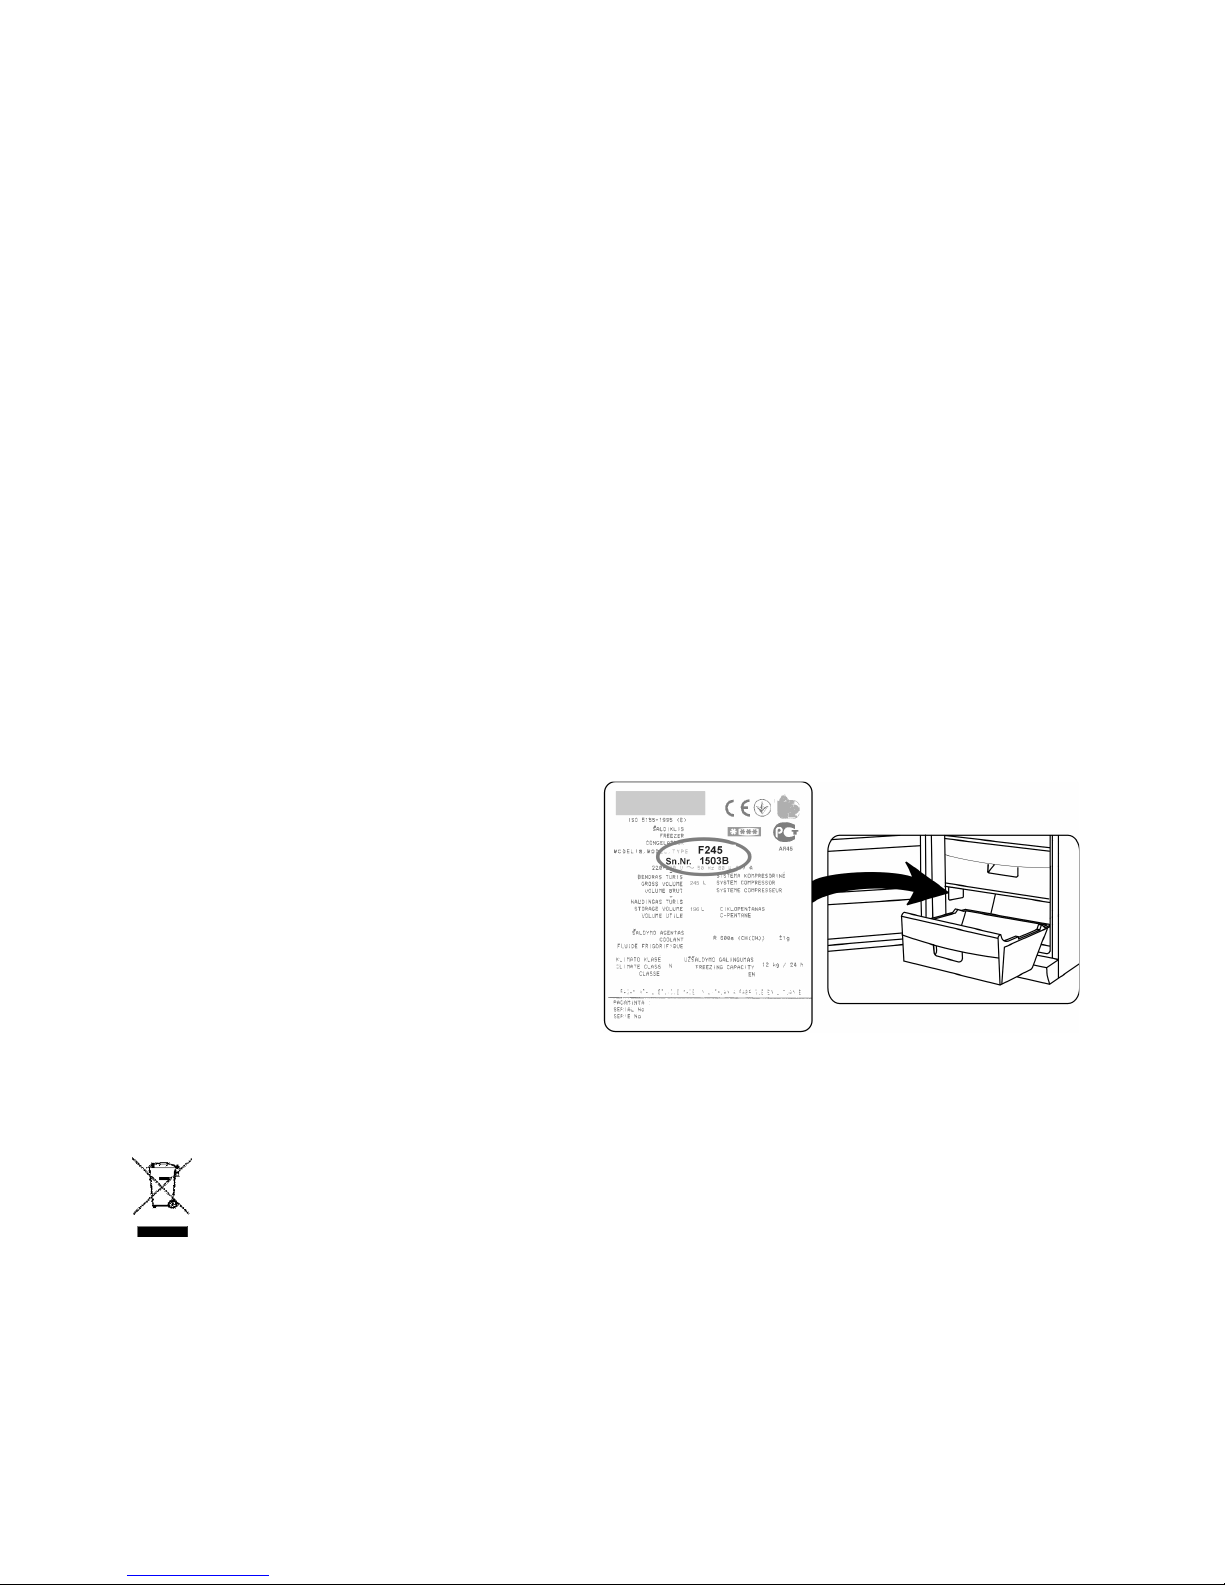
When making contact, necessarily indicate the
refrigerator model and number You will find
this data on the product label, which is glued to
the left wall of the refrigerator compartment,
near the fruit and vegetable trays
ENVIRONMENTAL PROTECTION INFORMATION
This symbol indicates that once the appliance is no longer needed, it cannot be disposed together
with other miscellaneous municipal waste It should be collected and eliminated separately, i e in
containers specially marked with this symbol in large-dimension rubbish collection areas
Full information on where to submit the old appliance safety can be obtained from local
government authorities, the shop where you bought the appliance, or the manufacturer’s representatives
If you decided to scrap the appliance, make it impossible to use in order to prevent possible misadventure
Pull out the electric plug from the electricity supply socket and then cut off the cord Tear off the gasket
Break the door lock if any
WARNING! Do not dismantle the a liance yourself. Pass it on to recycling com anies.
Table of contents
Other White Knight Refrigerator manuals