Wildgame R12I20-9 User manual

Battery Installation
1. Open the door on the right
of the camera and PULL the
tabtowards you.
2. With the camera facing up,
open the compartment door.
Push the battery latch up to
unlock. At the same time grab the
battery compartment out.
BATTERY
UNLOCK
Page 1

3. Make sure to insert the
AA-cell batteries based on
the direction labeled on the
inside of each compartment.
Match minus “-” sign with
the marked negative on the
battery and the plus “+” sign
with the marked plus sign on
the battery.
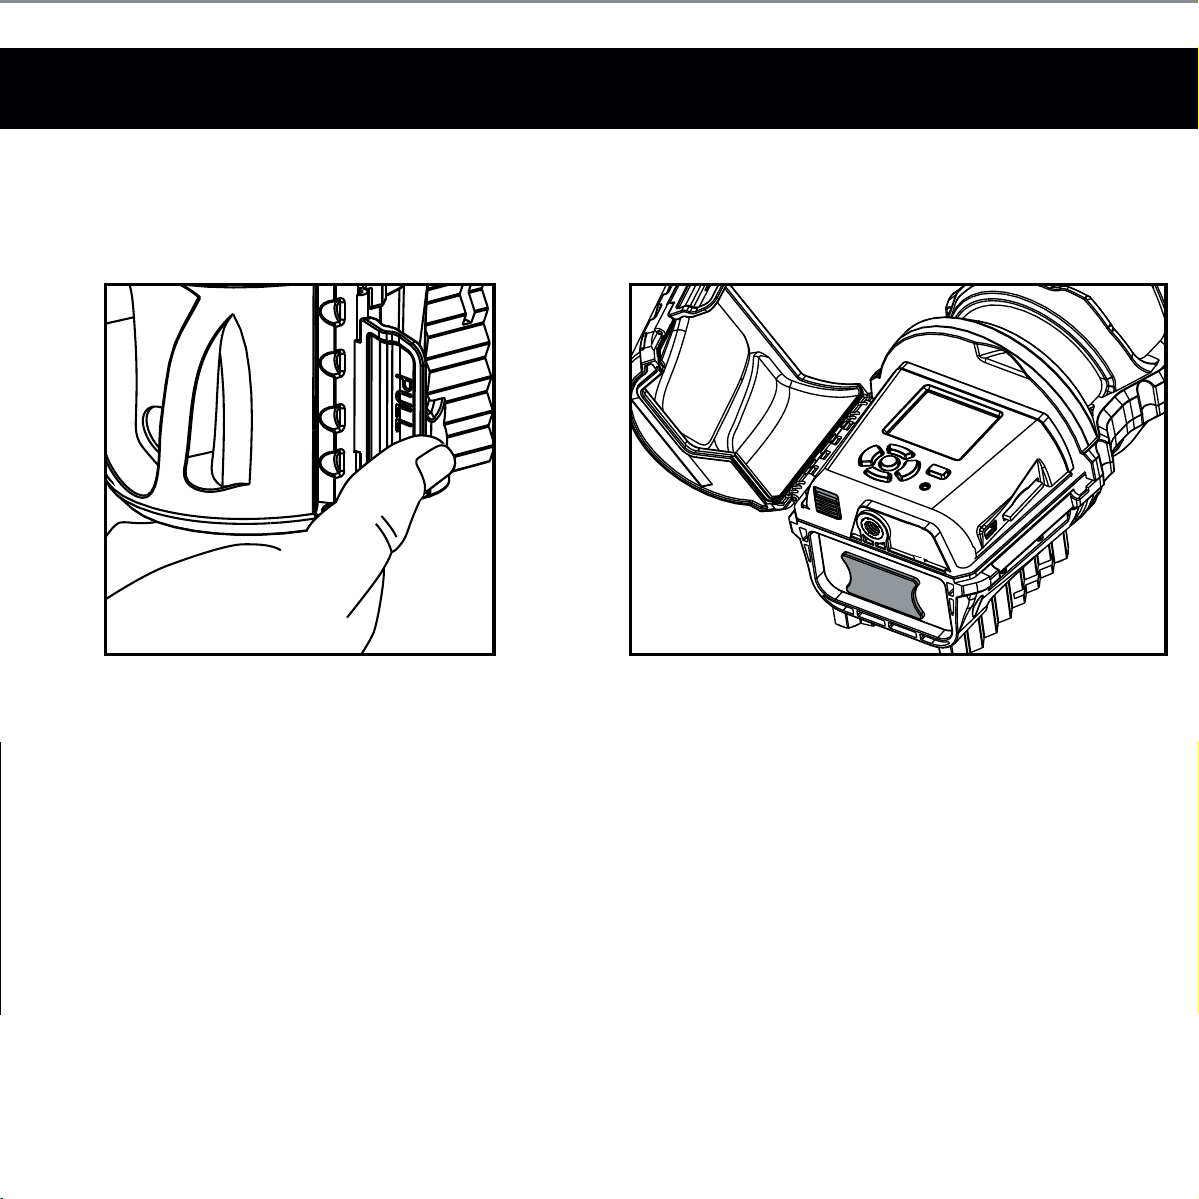
4. Load SD memory card (up to
32GB) into the SD CARD slot
with the connectors facing
down.
IMPORTANT:
Make sure the camera is powered off
before removing or installing an SD card.
If you are using an SD card from other
cameras, please make sure to format the
SD card in your computer prior to use in
your camera. New cards are ok to use
straight from the package.
Once the batteries are in the
appropriate spot, return battery
compartment.
Page 2

Power
1. To turn the unit ON press and
release the power button. 1. To turn the unit off, first wake
up the LCD screen and then
depress and hold the power
button until the LCD turns off.
2. Check the battery level icon
to ensure the batteries just
installed contain the proper
charge level. If so, you are ok
to proceed with camera use.
ON: OFF:
NOTE:
LCD cycle through camera information.
Time > PIR picture number > Remaining
pictures > Temperature
RESET
POWER
OK
RESET
POWER
OK
Page 3

Reset
Reset button located next to the battery compartment. Push button to reset settings
back to factory settings.
RESET
POWER
OK
Page 4

Test Mode
2. PIR LED Status Light: During the first 2 minutes of Ready Mode, the red light
will illuminate when a PIR event is triggered. The red light will blink for 2-3
seconds when photo is taken during this first 2 minutes. After 2 minutes all
indicator lights will turn off until a button is pressed.
1. LCD Ready Mode: The camera will automatically enter Ready Mode if a button is
not pressed for greater than 30 seconds. The status lights will illuminate for a
total of 2 minutes.
Page 5

Power Save
1. After 30 seconds without any buttons being pushed, the LCD will turn off
and camera enters into Power Save or Ready Mode.
2. The LCD screen can be awakened by pressing the Power button briefly.
NOTE:
The LCD will not “wake up” when camera is writing to memory.
RESET
POWER
OK
Page 6

Setting Time
1. To change date and time, start by pressing and release the OK button to set the hour.
2. Press the up or down navigation button to go up or down in sequence.
3. When the hour is set, repeat steps 1 and 2 to set the minutes.
OK
OK
Page 7

Setting Date
1. Press the OK button after setting the minute to change the Day.
2. Press the up or down navigation button to go up or down in sequence.
3. When the DAY is set, repeat steps 1 and 2 to set the Month and Year.
OK
OK
Page 8

Location
1. Press the OK button while
LOCATION is selected.
The first character will be
blinking.
2. Press the UP or DOWN
navigation button to go up
or down in sequence. Press
the OK button or the Left and
Right navigation button when
the character shown is what
you want and move to the
next character.
3. Repeat steps 1 and 2 to set
the rest of the characters.
Press the right navigation
button to skip spaces and
save the location name.
Save the location of the area the
camera was installed. This is for
your reference and is optional. If you
do not wish to name your location
skip to the next step.
OK
OK
Page 9

PIR Mode PIR Active
1. Press the OK button while
PIR Mode is selected. The
highlighted option will be
blinking.
1. Press the OK button while
PIR Active is selected. The
highlighted option will be
blinking.
2. Press the left or right
navigation button to move to
different options. Press the
OK button to save the setting.
2. Press the left or right
navigation button to move to
different options. Press the
OK button to save the setting.
OK
OK
PIR ACTIVE:
24 HR: The PIR can be active at all times.
DAY: The PIR can be active in daylight
hours only.
NIGHT: The PIR can be active in nighttime
hours only.
OK
OK
Page 10

PIR Sensitivity Exposure
1. Press the OK button while
PIR Sense is selected. The
highlighted option will be
blinking.
1. Press the OK button while
Exposure is selected. The
highlighted option will be
blinking.
2. Press the left or right
navigation button to move to
different options. Press the
OK button to save the setting.
2. Press the left or right
navigation button to move to
different options. Press the
OK button to save the setting.
PIR SENSE:
HI: The PIR detects the smallest movement.
MED: (Default) The PIR detects most
common size movements.
LO: The PIR detects only larger movements.
EXPOSURE:
HI: Greatest distance with some motion blur.
MED: (Default) Long distance with little
motion blur.
LO: Average distance with very little motion
blur.
OK
OK
OK
OK
Page 11

Still Res. Video Res.
1. Press the OK button while
Resolution is selected. The
highlighted option will be
blinking.
1. Press the OK button while
Picture is selected. The
highlighted option will be
blinking.
2. Press the left or right
navigation button to move to
different options. Press the
OK button to save the setting.
2. Press the left or right
navigation button to move to
different options. Press the
OK button to save the setting.
RESOLUTION:
HI: Images will be at the highest
resolution but take up the most space.
MED: Images will be at medium
resolution and take up average space.
LO: Images will be at the lowest
resolution and take up the least space.
VIDEO:
REGULAR: Videos taken will be in 480p
resolution.
HD: Videos taken will be in 720p
resolution.
OK
OK
OK
OK
Page 12

Delay Image Stamp
1. Press the OK button while
Delay is selected. The
highlighted option will be
blinking.
2. Press the left or right
navigation button to move to
different options. Press the
OK button to save the setting.
DELAY:
The time before the camera is able to
take another picture.
PIR Mode: minimum 2s
OK
OK
PICTURES DISPLAY:
087°F 08:15PM 11-12-2011 T08 0200
A- Temperature
B- Time
C- Date
D- Moon Phase
E- Location
F- Photo Count
A B C D E F
Page 13

Mounting
1. When mounting to a tree, first
remove the clip from one end
of the strap so you can slide
the strap through the slots
located on the back of the
camera. Once the camera is
attached place the clip back
on to the strap. Then, wrap
the strap around the tree and
clip the two ends together.
Pull the excess material so
that the camera is strapped
tightly to the tree.
1. When mounting to a T-Post,
first attach the T-Post
bracket to the camera.
2. Once the camera is attached
connect the T-Post bracket to
your T-Post.
Page 14

There is also a standard 1/4”-20
tripod connector.
Page 15

Important
The directions as contained herein assume that you are using a Microsoft operating system and not
Linux or a Mac-based operating system. Even said, there may be slight variations in your process
based on the specific version of the operation system that you are using as well as the predefined
user preference for each computer. The below listed steps are to serve as a guideline and may have
to be slightly modified based on the specific operating system and preference as on your personal
computer.
TIPS:
Recommended distance from target area is 25-30 feet for optimal imaging quality.
To improve the quality of your images, try not to mount the unit facing the rising or the setting sun
in order to avoid direct sunlight into the camera lens.
If mounting to a feeder unit or dusty environment, be sure to clean the camera lens cover, incan-
descent flash cover, and the PIR sensor cover on a regular basis.
Periodically check the mounting of the camera to insure it is not loose.
Make sure that you securely latch the door closed each and every time you use the unit, as the
moisture seal will not be activated unless closed properly.
Check batteries frequently to insure no corrosive build-up, as this may cause harm to the camera.
Page 16

Retrieving Images (SD Card Reader)
Remove SD card and use card reader
A. First, remove the SD Card from the
camera unit itself by pressing on it to where
it automatically ejects.
B. Next, insert the SD card into your SD
card reader.
C. Once inserted into your computer it may
automatically launch “AutoPlay”, a window
recognizing a new Secure Digital Storage
Device (the SD Card).
D. If so, it should list several options for
the next steps (not limited to the following):
1. Picture Options
a. Import pictures
b. View pictures
c. Copy Disc
d. Transfer pictures
2. General Options
a. Open folder to view files
E. Select the method from the list provided
that best suits your requirements. If the
selection is made to “View pictures”, you
can then view the images located on the SD
Card and manipulate them as needed.
F. If your computer does not automatically
launch the AutoPlay window recognizing the
Removable Disk (the SD Card), then you will
need to go to the “Start Menu” at the bottom
left of your screen and select “Computer”.
The summary view will then be illustrated
on the right hand side of the window where
by the “Devices with Removable Storage”
will be listed. The computer will recognize
the reader as “Secure Digital Storage
Device”. Please select “Secure Digital
Storage Device” from this menu (or double
click on the graphical icon).
G. This will then direct you into the SD Card
file folder. Images are in the MEDIA folder.
H. Once open, you will then see all of the
photo files that are located on the SD Card.
Select each image individually to view. The
default viewing browser for your computer
will then automatically launch.
I. Repeat for viewing all or other photos.
J. If you determine that you want to delete
the image, select the image by placing
your cursor on it and clicking your mouse
only once. Right click on your mouse and
select delete. This will delete the image
permanently, so be absolutely sure you
want to do this before selecting delete.
Page 17

Format SD Card
SDXC CARDS ARE NOT SUPPORTED
Having trouble with your SD card? Try this.
1. Connect the SD card to your computer. If
your computer has an SD card slot you can insert the SD card directly into the port.
NOTE: If you are using a MicroSD card, you will need an adapter to allow it to fit into
standard SD card ports. If your computer does not have an SD card port built-in, you can
use an external USB card reader that plugs into any USB port
on your computer.
2. Click the Start or Windows menu and select Computer (Windows Vista/7) or My
Computer (Windows XP). For Windows 8 users, type “computer” and click the Computer
icon in the Apps search results.
3. Right-click the drive letter associated with your memory device, then select “Format”
4. Ensure FAT32 is selected under “File System”
5. Ensure ”Quick Format” is checked
6. Click “Start”
Page 18
Check out the collection of hunting & shooting products we offer.
Table of contents
Popular Digital Camera manuals by other brands

Samsung
Samsung L210 - Digital Camera - Compact quick start guide

Niceboy
Niceboy VEGA X PRO manual

Pentax
Pentax Optio - Z10 Digital Camera operating manual

Graflex
Graflex ANNIVERSARY SPEED GRAPHICS Instruction and reference manual

Olympus
Olympus StLtlU5 850 SW instruction manual

Ezviz
Ezviz C2 MINI quick start guide

ADS Technologies
ADS Technologies IntraOral Camera AdvanceCAM Operation and installation manual

Sony
Sony DSC S730 - Cyber-shot Digital Camera instruction manual

Samsung
Samsung WISENET SMARTCAM quick start guide

C*Pix
C*Pix SDC2000 user manual

AIDA
AIDA UHD-200A Operation guide

Manhattan
Manhattan 551359 user manual