Wimius L3 User manual

1234
5 6 7 8 9 10 11 12
13 14 15 16 17 18 19 20
21 22 23 24 25 26 27 28
29 30 31 32 33 34 35 36
37 38
L
3
Ultra HD
Waterproof 30m
2.45”LCD Screen Gyro Stabilization
Touch Screen

1234
5 6 7 8 9 10 11 12
13 14 15 16 17 18 19 20
21 22 23 24 25 26 27 28
29 30 31 32 33 34 35 36
37 38

Any problem,please feel free to contact us:
Email:[email protected]
Website:http://www.wimius.com/support.html
Facebook:https://www.facebook.com/wimiusocial/
Allen Probleme bezüglich des Produkts können Sie uns kontaktieren:
Email: [email protected]
Website: http://www.wimius.com/support.html
Facebook: https://www.facebook.com/wimiusocial/
Si vous avez le souci sur le produit, n’hésitez pas à nous contacter :
E-mail: [email protected]
Site Internet: http://www.wimius.com/support.html
Facebook: https://www.facebook.com/wimiusocial/
なにか不明な点などがございましたら、お気軽にお問い合わせ下さい:
Eメ ー ル: [email protected]
ウェ ブ サ イ ト: http://www.wimius.com/support.html
Facebook: https://www.facebook.com/wimiusocial/
Contact us
1

Notes
1. Please do not use in > 65 ℃high temperature / < - 20 ℃low temperature
environment.
2. Keep it away from any strong magnetic interference objects like electrical machine
or image quality.
3. Do not contact the liquid or wipe directly with wet cloth.
4. Pay attention to fasten the waterproof case when used underwater.
5. Please keep the camera and accessories in a dry, cool and clean environment.
6. Do not place the camera down or contact the rough surface to prevent scratches.
7. Do not remove the machine without authorization.
8. Please do not use the camera and accessories for children under 5 years of age.
9. Please charge in a place where children are not accessible.
10. We recommend using high quality Micro SD Card for the best results.
11. Don’t place your Micro SD card near strong magnetic objects to avoid data error.
2

Introduction
Thank you so much for purchasing our touch screen action camera of L3. The camera is a
wide variety of the leading features for digital video recording, photo shooting, audio recording
with touch screen and detachable battery. Best suitable for vehicle recording, outdoor sports, home
security, diving and more related activities, allowing you to enjoy the moments while capturing
every scene anytime and anywhere.
To obtain the best performance, please read this manual carefully before using. The information
contained in this manual, including pictures and words, is subject to change without notice.
Product Features
2. 2.45 inch HD touch widescreen display for convenient capture and image playback.
3. 1000mAh removable battery for easy replacement to a longer life.
4. 170 degrees wide angle lens in 12 megapixels.
5. 6 axis gyroscope anti shake technology.
6. HDMI Output.
7. Proprietary underwater shooting mode.
8. Supports Micro SD card, up to 64GB. (Please make sure that 64GB memory card has been
formatted on the camera before use.)
9. Kinds of video recording resolution: 4K, 2K, 1080P, 720P, VGA.
10. MP4 format video recording, H.264 compression format.
11. Supports WIFI connection.
EnglishEnglish

Accessories
English
1 3 4
5 6 7 8 9 10 11 12
13 14 15 16 17 18 19 20
21 22 23 24 25 26 27 28
29 30 31 32 33 34 35 36
37 38
L
3
Ultra HD
Waterproof30m
2.45”LCDScreen GyroStabilization
TouchScreen
4

Camera Schematic
1.Shutter/Power Button 2. Video Indicator 3. Speaker
4. Working / Charging Indicator 5. MIC 6. Lens
7. Touch Screen 8. Micro USB Interface 9.HDMI Interface
10. MIC 11. Battery Cover Switch
12. Micro SD Card Slot (need to open the battery cover) 13. 1/4”Screw Hole
English
1 2 4
5 6 7 8 9 10 11 12
13 14 15 16 17 18 19 20
21 22 23 24 25 26 27 28
29 30 31 32 33 34 35 36
37 38
5

Start your motion DV
1. Insert an SD card in the slot (it is recommended to adopt the high-speed Micro SD
card with class 10 or above).
2. Insert the battery in the belt and close the battery cover
3. Long press Power/Mode key 3s, the motion DV screen will appear
4. Recommend to format the Micro SD card in camera (note that this operation will
result in loss of all information in SD card)
English

Basic Operation
1. Inserting Micro SD Card
A. Push the battery cover switch in accordance with the
direction of the arrow to open it. You will see the Micro SD
card slot and then insert the card as the picture shown.
B. Note: Please choose a branded Micro SD card, and then
format it with the computer before use. We suggest a
high quality memory card for the perfect result.
2. Charging the Battery
A. You can recharge the camera by connecting it directly to the computer (Not including) or with the
power adapter (Not in the package).
B. The camera can record the video and take photos while charging.
C. The camera can be charge even the power is o.
D. When charging, the charging indicator will be on. And the indicator will be o when it is full charged.
3. Power on / o
A. Press the Power button for 1 second to turn it on.
B. Press and hold the Power button to switch o.
4. Capture Videos and Photos
A. In the video mode, press the Shutter button to record videos and press it again to stop. The video
indicator will be ash while the video is recording.
B. In the photo mode, press the Shutter button to take a photo.
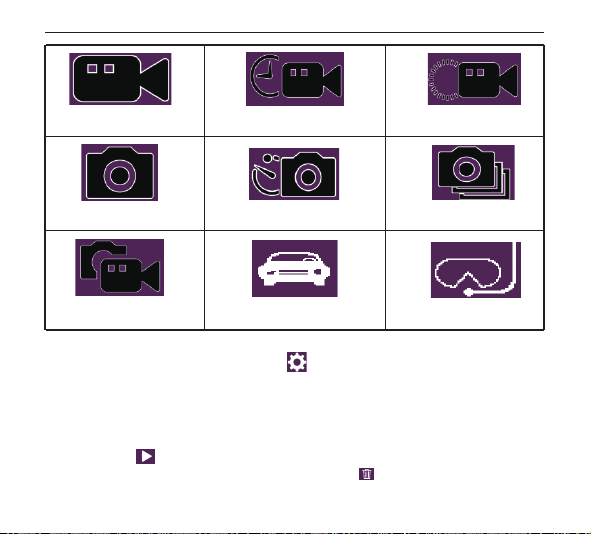
5. Switching Mode
Power on the camera, there are 9 shooting modes can be selected by touching the middle of the
bottom screen.
Video + Photo: With Photo Lapse Time setting, press the Shutter button to start recording video. In
the meanwhile, the camera will take a photo automatically according to the interval until video
recording is stopped.
English
1 2 3
5 6 7 8 9 10 11 12
13 14 15 16 17 18 19 20
21 22 23 24 25 26 27 28
29 30 31 32 33 34 35 36
37 38
7

6. Settings
A. Turn the camera on and click on settings icon in the lower-right corner of the screen to enter
the settings menu.
B. In the settings menu, you can set in the dierent shooting mode and the submenu will dier.
C. Shooting mode setting: includes resolution, white balance, color, ISO and exposure, etc.
D. System setting: includes date/time, language, format and screen save, etc.
7. Playback
Click on the icon in the bottom-left corner of the screen and you can go into the playback
mode. Also, you can delete the current le by clicking the icon .
Normal Video
Normal Photo
Video + Photo Car mode Aqua mode
Photo lapse Sequence
Time-lapse record Slow motion
English
1234
6 7 8 9 10 11 12
13 14 15 16 17 18 19 20
21 22 23 24 25 26 27 28
29 30 31 32 33 34 35 36
37 38
8

8. Data Storage
A. It can be connected to a computer with a Micro USB cable. The screen will show“Mass Storage”
and“PC Camera”. Select the Mass Storage mode and enter into the removable disk, then you can
copy or delete les on the computer.
B. You can also take the Micro SD card out, and use the card reader to replay or operate les.
9. Shortcut Key
In the shooting mode interface, there will be a shortcut menu coming out by sliding down from the
upper screen with your nger.
10. WIFI Connection
Step 1: Download and install the APP named“WIMIUS CAM Pro” on the phone or tablet (Android
system can be searched on the Google Play and IOS system can be searched from the APP Store.)
Step 2: Power on the camera and turn on WIFI. The camera screen will display the WIFI icon
and then the SSID and password will show as following:
SSID: WIMIUS
Password: 123456789
WIFI OFF / ON: Click to turn on WIFI.You will see the icon on the screen and wait
for a few seconds, the SSID and password will show.
Remote Controller (Not in the package) Connection: By default, the remote controller
is disconnected. Click to connect with the camera.
Screen Lock: Click to lock screen and the screen will be o. Press the Power button to
wake up the screen and click the icon to unlock.
Shutdown: Click and select to power o the camera.
English
1234
57 8 9 10 11 12
13 14 15 16 17 18 19 20
21 22 23 24 25 26 27 28
29 30 31 32 33 34 35 36
37 38
9

Specications
Step 3: Turn on WIFI search on your phone or table PC. Search the camera’s WIFI account and input
the initial password. Then click to link. After the connection is successful, it comes back to the
interface of shooting mode and the WIFI icon will be show inthe lower-leftcorner.
Step 4: After successful connection, open the APP "WIMIUS CAM Pro" on your phone for the
corresponding operation or image sharing.
WIMIUS L3
Sony IMX078, 12 mega pixels
170°A+ high resolution wide angle lens
2.45 inch LCD touch screen
4K (3840*2160) 24FPS
2K (2560*1440)30FPS
1080P (1920*1080) 60/30FPS
720P (1280*720) 120/60/30FPS
VGA (640*480) 240FPS
16M / 14M / 12M / 10M / 8M / 5M
Normal video / Time-lapse record / Slow motion
1s / 5s / 10s / 30s / 1min
-2X / -4X / -8X
Normal Photo / Photo Lapse / Sequence
2s timer / 5s timer / 10s timer / 20s timer
Burst 3 / Burst 5 / Burst 10
Model
Sensor
Lens
Screen
Photo Resolution
Video Mode
Time-lapse Record
Slow Motion
Photo Mode
Self Timer
Burst
Video Resolution
English
1234
5 6 8 9 10 11 12
13 14 15 16 17 18 19 20
21 22 23 24 25 26 27 28
29 30 31 32 33 34 35 36
37 38
10

5s / 10s / 30s / 1min
MP4 / H.264
JPG
Wide / Medium / Narrow
Micro SD card, up to 64GB (Must format 64GB memory
card on the camera before use.)
50 Hz / 60 Hz
Auto / Daylight / Cloudy / Tungsten / Fluorescent
Color / Black & White / Sepia
Auto / 100 / 200 / 400 / 800 / 1600
-2.0,-5/3,-4/3,-1.0,-2/3,-1/3,+0.0,+1/3,
+2/3,+1.0,+4/3,+5/3,+2.0
Photo Lapse Time(Video + Photo)
Video / Compression Format
Picture Format
Loop Recording
Field of View
Motion Detection
Power On Record
RSC
WDR
Frequency
White Balance
Color
ISO
Screen Save
Image Rotation
Exposure
Storage
English

USB 2.0, 5 Pin USB
Support (The remote controller is option.)
English / French / German / Spanish / Italian /
Portuguese / Simple Chinese / Japanese / Traditional
Chinese / Russian
Waterproof 30M with waterproof case
Windows XP /Mac OS
3.7V 1000mAh rechargeable battery
USB
2.4G Remote Control
Waterproof Standard
Operating System
Battery
Language
English
1234
5678 10 11 12
13 14 15 16 17 18 19 20
21 22 23 24 25 26 27 28
29 30 31 32 33 34 35 36
37 38
12

FAQ(Frequently Asked Questions)
1. The camera cannot be turned on:
A. Long press power button 3s
B. Remove the battery, reload and restart
C. Format the SD card and restart it
D. Please charge the battery
2. Video cannot be recorded
A. Check the SD card has been inserted or not
B. Remove the battery, reload and restart
C. Format the SD card on the camera and restart it
3. Fast Battery power consumption
A. Check the battery for any apparent damage. If there is any damage or deformation,
please replace the battery.
B. When a camera works under water or in a high temperature/low temperature
environment, it is normal to consume electricity quickly due to pressure and
temperature.
English

4. The camera cannot identify the SD card
A. Check the SD card is damage or not
B. Remove the battery, reload and restart
C. Replace the SD card (recommended class10) and restart it
D. Format the SD card by computer
5. The camera WIFI can’t be connected to the phone
A. Check the camera WIFI function is enabled or not
B. Check the SSID or the password that connects to WIFI is correct or not
C. Replace your phone with WIFI
D. Try to connect to WIFI after you restart the camera
E. Resume to default setting
6. The camera can’t be connected to the phone APP
A. Check the APP is open or not
B. Update APP for the latest version
C. Try to connect the APP after you restart the camera
D. Resume to default setting
English

Deutsh
Kenntnisnahme
1. verwenden Sie nicht> 65 ℃hohe Temperatur / <- 20 ℃niedrige Temperatur
Umgebung.
2. Von starken Magnetfeldern (wie Motoren) fernhalten.
3. Halten Sie bitte die Kamera von der Flüssigkeit fern, wischen Sie sie nicht direkt mit
einem feuchten Tuch ab.
4.Stellen Sie bitte sicher, dass das wasserdichtes Gehäuse vor dem Tauchen oder
Schnorcheln fest zugeschlossen.
5. Lagern Sie die Kamera und deren Zubehör in einer trockenen, kühlen, staubfreien
Umgebung.
6. Lassen Sie bitte die Linse der Kamera nicht nach unten Legen, wodurch die Linse
sich aufgekratzt werden könnte.
7. Zerlegen Sie sich diese Kamera bitte nicht.
8. Kinder, die unter dem Alter von 5 sind, dürfe diese Kamera und die mitgelieferte
Zubehöre nicht verwenden.
9. Legen Sie die Kamera beim Auaden in einen Ort, in dem die Kindern die Kamera
nicht zu leicht erreichen können.
10. Eine hochwertige Micro SD Karte, die mindestens eine 10 Klass ist, ist sehr
empfehlenswert.
11. Verlassen Sie Ihre Micro SD-Karte nicht in einer starken magnetischen Umgebung,
um Datenfehler zu vermeiden.

Einführung
Vielen Dank dafür, dass Sie bei uns die L3 Action Kamera mit Touch Bildschirm gekauft haben. Die
beinhaltet viele führenden Funktionen, z.B, Videoaufnahme, Fotograf, Audioaufzeichnung mit Touch
Bildschirm und abnehmbarer Batterie. Unser Gerät ist geeignet für Verkehrsmittel-Rekorder,
Outdoor-Aktivitäten, Sicherheit beim Zuhause, Fahren und alle relativen Aktivitäten. Sie können
Ihre Zeit genießen, während Sie irgendwo und irgendwann Foto machen.
Um das beste Performance zu haben, bitte Lesen Sie diese Bedienungsanleitung vor dem Benutzen.
Die Information und die Zeichnungen können verändert werden.
Produkt Funktionen
1. Mit dem wasserdichten Gehäuse, können Sie Unterwasser 30 Metern aufnahmen.
2. 2.45 inch HD touch weiter Bildschirm für Wiedergabe.
3. 1000mAh abnehmbare Batterie für leicht Herausnehmen, um lange Zeit zu benutzen.
4. 170 Grad weit Winkel Linse in 12 Megapixel
5. 6 Achse Gyroskop gegen Schütteln.
6. HDMI Ausgang.
7. Geeignete Shooting Modus.
8. Unterstützt Micro SD Karte bis zu 64 GB(Max). (Wenn Sie 64GB Speicherkarte benutzen,
formatieren Sie vor dem Gebrauch die Karte auf die Kamera zuerst, sonst kann die Karte nicht
funktioniert werden.)
9. Sorte von Videoaufnahme Resolution: 4K, 2K, 1080P, 720P, VGA.
10. MP4 Format Videoaufnahme, H.264 Kompression Format.
Deutsh

Zubehör
Deutsh
1 2 3 4
5678910 12
13 14 15 16 17 18 19 20
21 22 23 24 25 26 27 28
29 30 31 32 33 34 35 36
37 38
L
3
Ultra HD
Waterproof30m
2.45”LCDScreen GyroStabilization
TouchScreen
17

Kamera Schaubild
1.Shutter/Power-Taste 2. Video Anzeige 3. Sprecher
4. Arbeit / Auaden Anzeige 5. MIC 6. Linsen
7. Touch Bildschirm 8. Micro USB Schnittstelle 9.HDMI Schnittstelle
10. MIC 11. Batterie Deckung Schalterhalle
12. Micro SD Karte Steckplatz (zuerst die Deckung der Batterie önen)
13. 1/4”Schraube Loch
Deutsh
1 2 3 4
5 6 7 8 9 10 11
13 14 15 16 17 18 19 20
21 22 23 24 25 26 27 28
29 30 31 32 33 34 35 36
37 38
18
Table of contents
Languages: