Wireless Sensor Networks Stargate Instruction Manual

Stargate Developer’s Guide
Rev. B, January 2006
Document 7430-0317-13

©2003-2005 Crossbow Technology, Inc. All rights reserved. Information in this document is subject to
change without notice.
Crossbow and SoftSensor are registered trademarks and DMU is a trademark of Crossbow Technology, Inc.
Other product and trade names are trademarks or registered trademarks of their respective holders.

Stargate Developer’s Guide Wireless Sensor Networks
Doc. # 7430-0317-13 Rev. B Page 1
Table of Contents
Table of Contents......................................................................................................................................................1
1Introduction .......................................................................................................................................................3
1.1 Stargate Features.............................................................................................................3
1.2 Software Environment ....................................................................................................4
1.3 Potential Applications.....................................................................................................4
2Getting Started...................................................................................................................................................5
2.1 Development Kit Overview ............................................................................................5
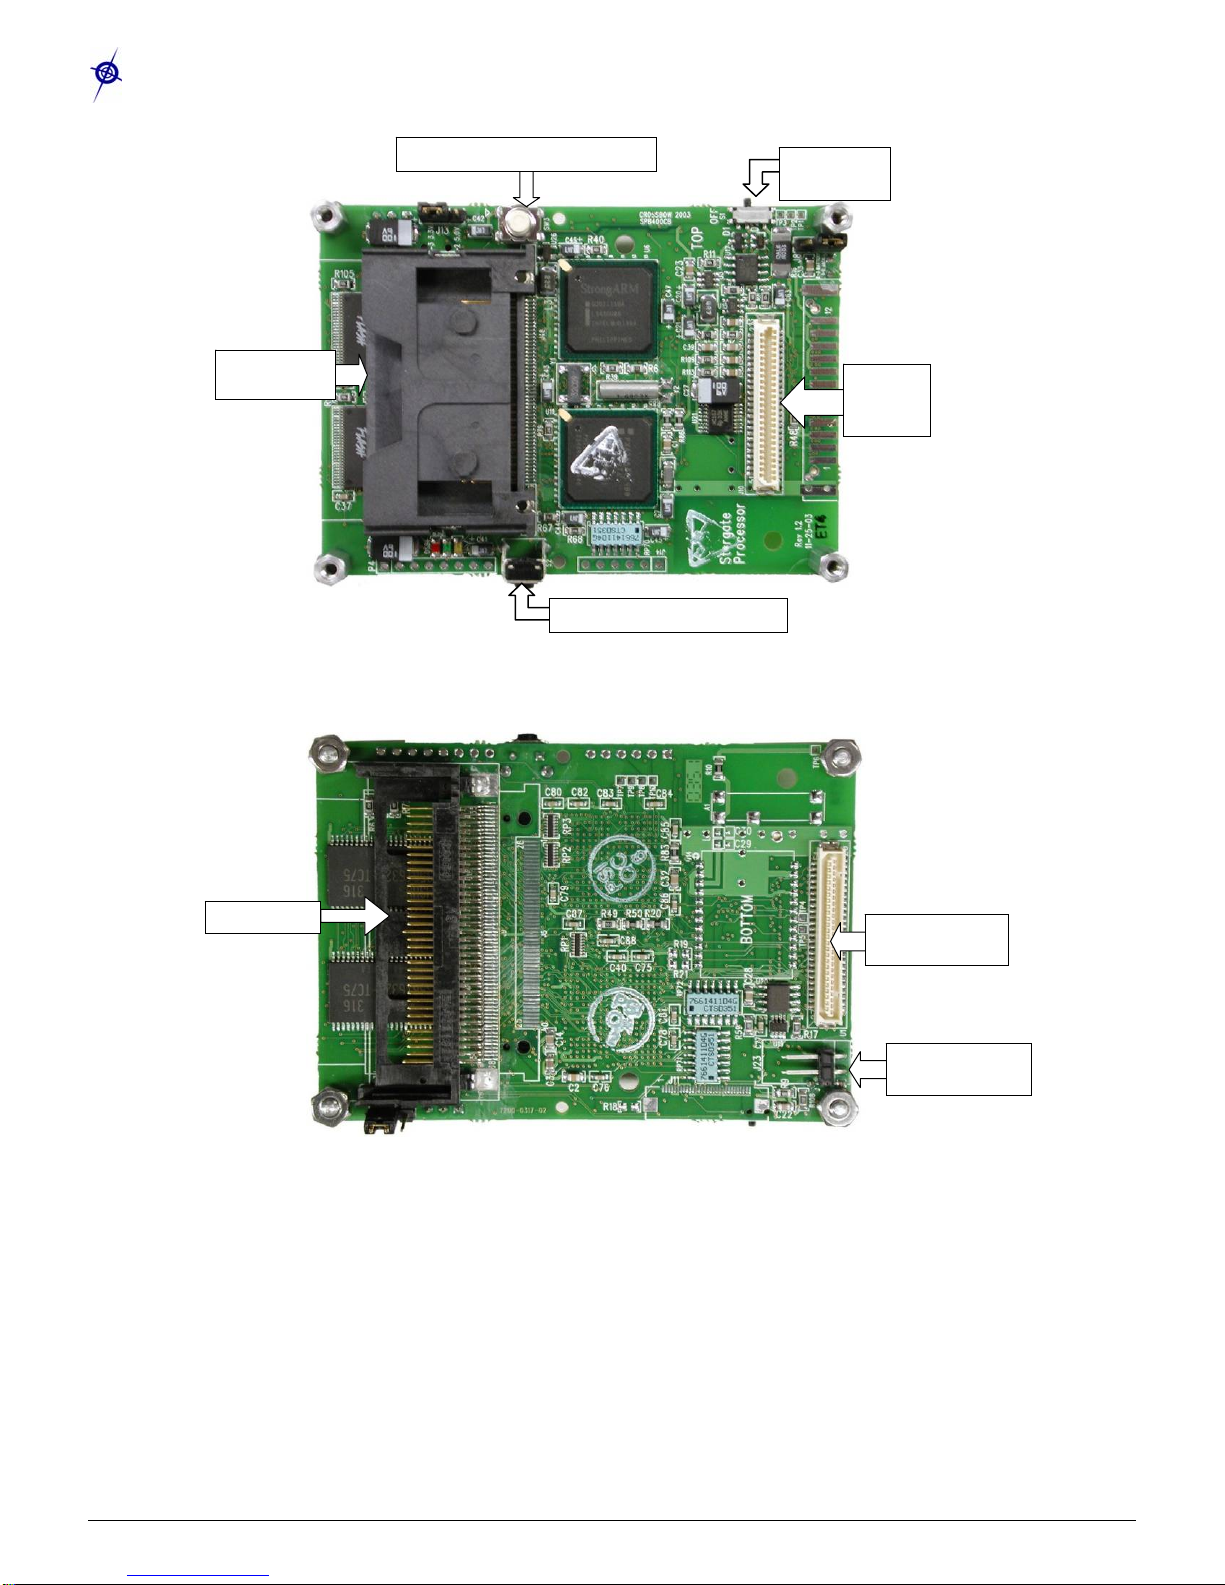
2.2 Hardware Layouts...........................................................................................................6
2.3 Assembling the Stargate Development Platform............................................................7
2.4 Verify successful setup on terminal console...................................................................7
3System Configuration......................................................................................................................................13
3.1 Networking Setup..........................................................................................................13
3.2 Application Server Configuration.................................................................................14
3.3 Starting Programs during System Boot-up ...................................................................23
3.4 Programming Motes......................................................................................................23
3.5 Setting the System Clock..............................................................................................24
4Developing and Running Applications on Stargate......................................................................................25
4.1 Installing and Using the GNU tool chain......................................................................25
4.2 Running Applications....................................................................................................25
5Creating a Linux boot image..........................................................................................................................27
5.1 How to build the Bootloader from Source....................................................................27
5.2 How to rebuild the Linux Kernel Image.......................................................................27
5.3 How to add new device driver modules........................................................................29
5.4 How to make a File System ..........................................................................................30
5.5 How to download images..............................................................................................30
6Linux Console Commands..............................................................................................................................37
6.1 cd – change directory (folder).......................................................................................37
6.2 ls – list files ...................................................................................................................37
6.3 pwd – print working directory (folder) .........................................................................37
6.4 scp – secure copy ..........................................................................................................37
6.5 ps – list current processes..............................................................................................37
6.6 kill – stop a current process...........................................................................................38

Wireless Sensor Networks Stargate Developer’s Guide
Page 2 Doc. # 7430-0317-13 Rev. B
6.7 date – set system date & time........................................................................................38
6.8 shutdown – perform an orderly system shutdown........................................................38
6.9 ifconfig – show the active network interfaces...............................................................38
6.10 iwconfig – show the active wireless network interfaces............................................38
6.11 pump – show the active wireless network interfaces.................................................39
7Appendix A. References..................................................................................................................................40
7.1 Hardware.......................................................................................................................40
7.2 Software ........................................................................................................................44
7.3 Community Resources..................................................................................................44
7.4 Mechanical Drawings....................................................................................................45
8Appendix B. Support and Warranty Information........................................................................................46
8.1 Customer Service..........................................................................................................46
8.2 Contact Directory..........................................................................................................46
8.3 Return Procedure...........................................................................................................46
8.4 Warranty........................................................................................................................47

Stargate Developer’s Guide Wireless Sensor Networks
Doc. # 7430-0317-13 Rev. B Page 3
1Introduction
Stargate is a powerful single board computer with enhanced communications and sensor signal
processing capabilities. The Stargate uses Intel’s latest generation 400 MHz XScale®processor
(PXA255). This product was designed within Intel’s Ubiquitous Computing Research Program, and
licensed to Crossbow for production. In addition to traditional single board computer applications, the
Stargate directly supports applications around Intel’s Open-Source Robotics initiative as well as
TinyOS based Wireless Sensor Networks and Smart Dust Technology.
1.1 Stargate Features
Figure 1. Stargate Development Platform (Processor Board and Daughter Card)
•Small form factor (3.5” × 2.5”)
•32-bit, 400 MHz Intel PXA255 XScale RISC processor.
•SA1111 StrongARM companion chip for multiple I/O access.
•32 MB of Intel StrataFlash.
•64 MB of SDRAM.
•1 Type II CompactFlash slot.
•1 PCMCIA lot
•Reset button
•Real time clock
•Lithium ion battery option
•MICA2 and MICAz Mote capability, GPIO/SSP and other signals via 51-pin expansion connector
•I2C connector via an installable header
•51-pin daughter card interface for:
oWired Ethernet via a 10 Base-T Ethernet port
oHost USB
oJTAG port
oExternal A/C power supply adapter
oRS-232 serial port via DB-9 connector

Wireless Sensor Networks Stargate Developer’s Guide
Page 4 Doc. # 7430-0317-13 Rev. B
1.2 Software Environment
The Stargate Development Platform is shipped with pre-installed software on the board and additional
software on the CDROM to enable application program development.
CDROM contents:
•An embedded Linux operating system (OS) kernel.
•A Linux board support package and file system.
•Additional drivers in source code with instructions on how to build and install them.
•A Bootloader for initial loading of the kernel and file system images.
•A flash programmer utility for programming the flash ROM.
•GNU cross platform development tools.
•System configuration support file archives.
1.3 Potential Applications
The Stargate processor board has a wide variety of applications such as:
•A single-board computer running embedded Linux OS
•Sensor network gateway
•Customizable 802.11a/b wireless gateway
•Cellular wireless gateway
•Robotics controller card
•Distributed computing platform
•Embedded sensor signal processing

Stargate Developer’s Guide Wireless Sensor Networks
Doc. # 7430-0317-13 Rev. B Page 5
2Getting Started
2.1 Development Kit Overview
2.1.1 The Basic Stargate Development Kit
This basic kit contains the following items:
•The Stargate processor board
•The Stargate daughter card
•A null modem cable for serial RS-232 connection
•A CDROM
•A wall power DC adaptor supply
•The Stargate Developer’s Manual
•Factory installed Linux image in flash with a number of driver modules for common devices
2.1.2 The Advanced Stargate Development Kit
This advanced kit contains the following items in addition to items in the basic Kit:
•A USB webcam
•A 802.11b wireless compact flash card

Wireless Sensor Networks Stargate Developer’s Guide
Page 6 Doc. # 7430-0317-13 Rev. B
2.2 Hardware Layouts
Figure 2. SPB400CB Processor Board (Top View)
Figure 3. SPB400CB Processor Board (Bottom View)
PCMCIA Slot
Li-Ion Battery
Connector
Daughter Card
Connecto
r
Compact Flash
Card Slot 51-pin
Mote, I/O
Connector
Software Reset Button (S2)
Power
Switch (S1)
Hardware Reset Button (SW3)

Stargate Developer’s Guide Wireless Sensor Networks
Doc. # 7430-0317-13 Rev. B Page 7
Figure 4. SDC400CA Daughter Card (Top View)
Figure 5. SDC400CA Daughter Card (Bottom View)
0ESD WARNING: The Stargate Processor Board and Daughter Card are electronic devices and
therefore can be damaged by Electrostatic Discharge (ESD). While handling these devices, follow ESD
prevention procedures and use an ESD wrist strap.
2.3 Assembling the Stargate Development Platform
Connect the Stargate Processor Board (SPB400CB) with the Stargate Daughter Card (SDC400CA) by
connecting the bottom of Stargate Processor Board (connector U1) to the bottom of Stargate Daughter
Card (connector U13).
Fasten the 2 boards using 2 nylon spacers, screws and nuts provided in a plastic bag.
2.4 Verify successful setup on terminal console
To configure and boot the Stargate platform, complete the following steps:
1. Connect the Stargate to the host machine (a Linux or Windows PC): Section 2.4.1.
Serial RS232
Connector
Li-ion Battery
Connecto
r
Power Su
pp
l
y
Jack
R
J
-4
5
E
t
h
e
rn
et
P
o
r
t
USB Port
JTAG Port
Processor Board Connector
Power Switch (S3)

Wireless Sensor Networks Stargate Developer’s Guide
Page 8 Doc. # 7430-0317-13 Rev. B
2. Configure and start a terminal emulation program on the host PC: For Linux hosts see Section 2.4.2;
for Windows hosts see Section 2.4.3.
3. Plug in the power to the Stargate and turn the two power switches (S1 and S3) to the “ON” position:
Section 2.4.4.
4. Recognize the boot prompt and boot the Linux Operating System.
2.4.1 Connecting Stargate to Host
Before you can begin, you need to connect your target board to your host machine (a Linux or
Windows PC). To connect your target board to the host, attach a null modem serial cable (provided
with your Development Kit) between J3 of the target and an available serial port on the development
host.
2.4.2 Configuring Minicom (for Linux Hosts)
Minicom is a terminal emulation and modem interface program included in most Linux distributions.
It is used to communicate with the Stargate board.
To configure Minicom, complete the following steps:
1. Log in as root on your Linux host machine.
2. Type minicom -s
The Minicom configuration menu appears.
3. Select Serial port setup. Configure Minicom to use the tty port that is connected to the
target, for example /dev/ttyS0 (com1), 115200 baud, 8data bits, No parity and 1stop bit
and flow control set to None.
A - Serial Device : /dev/ttyS0
B - Lockfile Location : /var/lock
C - Callin Program :
D - Callout Program :
E - Bps/Par/Bits : 115200 8N1
F - Hardware Flow Control : No
G - Software Flow Control : No
Change which setting?
4. Press Enter to return to the main configuration menu.
5. Select Save setup as dfl to save these as default settings.
6. Select Exit from Minicom.
You have now successfully configured Minicom to access the console port for Stargate.
1. When you need to enter Minicom again, you will be able to communicate with your target by
using the command minicom
2. To exit Minicom, use the command: Ctrl-AX

Stargate Developer’s Guide Wireless Sensor Networks
Doc. # 7430-0317-13 Rev. B Page 9
3. You will be prompted to confirm that you want to exit Minicom. Press Enter to exit.
4. For help using Minicom, use the command: Ctrl-AZ
2.4.3 Configuring HyperTerminal (for Windows hosts)
•To start HyperTerminal, choose
Start>Programs>Accessories>Communications>HyperTerminal.
•You will now see the HyperTerminal window come up, along with a dialog box for configuring
a New Connection.
•Type Stargate in the Name text box and click OK.
•The Connect To dialog box will then be displayed, select the COM port you wish to use from
the Connect using drop down list, then click OK.
•The COM Properties dialog box then opens up, choose the following parameters then click
OK:
Table 1. COM Port Settings.
Bits per second 115200
Data Bits 8
Parity 0
Stop bits 1
Flow Control None
•You have now successfully configured HyperTerminal to access the console port for Stargate.
2.4.4 Powering-Up the Stargate
If you are using an external power supply, you could use the power supply/adapter provided with the
Development kit. Connect the DC input of the AC wall power adapter to the J49 connecter on the
daughter card.
If you are using a Li-Ion battery pack, there are 2 usage models:
•If both Stargate Processor Board and the Daughter Card are used, then J8 must be jumpered on
1-2 position (JACK) and the battery plugged in at the J7 connector on the Daughter Card.
•If only Stargate Processor Board is used, the J8 must be jumpered on 2-3 position (BATTERY)
and the battery plugged in at J23.
2.4.5 Boot prompt
Once the target is powered up and properly connected to the host computer, the following message
is seen on the console. This verifies that the Stargate platform has booted up.
MAC address: 00:50:C2:2F:33:83FLASH_BASE=00000000
PXA: Evacuating 1MB of Flash to DRAM at: A3E00000
done
Map Flash virtual section to DRAM at: A3E00000
setting flashword=50000000
Flash style = 2x16
verify flash size...
btflash_init: mfrid=00890089
devid=00180018

Wireless Sensor Networks Stargate Developer’s Guide
Page 10 Doc. # 7430-0317-13 Rev. B
mfrid=00890089
deviceid=00180018
walking flash descriptors (2x16)
btflash_init: found flash 28F128J3A
flashDescriptor=0002DEC8
flashSectors=0002C6A4
nsectors=00000080
flash_size=02000000
flash_address_mask=01FFFFFF
mach_type ->0000012F
reset_partitions: partition_table = 0x00000000
reset_partitions: flashDescriptor = 0x0002DEC8
define_partition: base 0x00000000
define_partition: partition_table 0x00000000
allocated partition_table
defining partition: bootldr
define_partition: base 0x00040000
define_partition: partition_table 0xA3A00014
defining partition: root
initialize_by_mach_type done
probing ram
Probing bank0 memory size...
bank0 memory size=04000000
MDCNFG=00001ACB
Probing memory size bank=00000000
maybe mem_size=04000000
found=04000000
Probing memory size bank=00000001
seems to be no dram in bank=00000001
n_banks=00000001
dram_sizes[0]=04000000
dram_sizes[1]=00000000
SDRAM size: 0x04000000
in megs: 64M
>> Compaq OHH BootLoader ported to Stargate 7.1, Rev 2-21-13 [BIG_KERNEL] [MONO]
>> 04-06-04_15:58
>> Last link date: Fri Jun 4 15:58:22 PDT 2004
Cpu company: INTEL
Cpu Architecture: XScale
Cpu Part: PXA255
>> ARM Processor Rev=00050000
>> (c) 2000-2001 Compaq Computer Corporation, provided with NO WARRANTY under
the terms of the GNU General Public License.
>> See http://www.handhelds.org/bootldr/ for full license and sourcesPress
Return to start the OS now, any other key for monitor menu
found partition table in params sector
pt->npartitions=00000004
partition_table_size=000000B8
define_partition: base 0x00000000
define_partition: partition_table 0xA3A00014
defining partition: bootldr
define_partition: base 0x00040000
define_partition: partition_table 0xA3A00014
defining partition: params
define_partition: base 0x00080000
define_partition: partition_table 0xA3A00014
defining partition: kernel

Stargate Developer’s Guide Wireless Sensor Networks
Doc. # 7430-0317-13 Rev. B Page 11
define_partition: base 0x00140000
define_partition: partition_table 0xA3A00014
defining partition: root
+ set macaddr "00:50:C2:2F:33:83"
setting param <macaddr> to value <00:50:C2:2F:33:83>
+ set ipaddr "10.1.1.171"
setting param <ipaddr> to value <10.1.1.171>
+ set gateway "10.1.1.221"
setting param <gateway> to value <10.1.1.221>
+ set netmask "255.255.255.0"
setting param <netmask> to value <255.255.255.0>
+ set serverip "10.1.1.46"
setting param <serverip> to value <10.1.1.46>
+ set loadmethod "tftp"
setting param <loadmethod> to value <tftp>
+ set netcfg "manual"
setting param <netcfg> to value <manual>
+ set boot_flags 0x00000004
setting param <boot_flags> to value <0x00000004>
+ set enable_mmu 1
setting param <enable_mmu> to value <1>
Now you may press Enter, so as to start booting up the Linux OS. If no keys are pressed, after a
timeout of about 10 seconds, the Linux OS boots up automatically. Note that the configuration
parameters may be different for your board, due to unique assignment of the MAC address. The
following message is seen during Linux Bootup:
booting flash...
booting kernel from partition >kernel<
kernel partition base 50080000
kernel_magic=E1A00000
kernel_region_words[9]=016F2818
Linux ELF flash_imgstart=50080000 size=000C0000 dest=A0000000 offset=00008000
MMU Control=00000079
MMU PIDVAM=00000000
copying Linux kernel ... done
root_filesystem_name=initrd
Grabbed linuxargs, argc = 00000002
…
…
Starting PCMCIA services: cardmgr.
cardmgr[106]: starting, version is 3.1.22
cardmgr[106]: watching 2 sockets
cardmgr[106]: exiting
Starting BlueZ HCI server: hcid.
Starting OpenBSD Secure Shell server: sshd.
usb.c: registered new driver usbdevfs
usb.c: registered new driver hub
Pre-allocating 32 buffers for pool 0xc3eef5a0
Pre-allocating 32 buffers for pool 0xc3eef4e0
usb-ohci.c: USB OHCI at membase 0xf4000400, IRQ 149
usb.c: new USB bus registered, assigned bus number 1
hub.c: USB hub found
hub.c: 1 port detected
Enabling remote wakeup...
SCSI subsystem driver Revision: 1.00

Wireless Sensor Networks Stargate Developer’s Guide
Page 12 Doc. # 7430-0317-13 Rev. B
Initializing USB Mass Storage driver...
usb.c: registered new driver usb-storage
USB Mass Storage support registered.
stargate login:
At this point you are ready to log into the target system.
•For “login:” type root.
•For “Password:” type rootme.
login: root
Password:******
Linux stargate 2.4.19-rmk7-pxa2-star #1 Fri Aug 13 12:58:00 PDT 2004 armv5tel
unknown
login[150]: root login on `tts/0'
stargate:/root#
Now you are ready to use the Stargate platform!

Stargate Developer’s Guide Wireless Sensor Networks
Doc. # 7430-0317-13 Rev. B Page 13
3System Configuration
3.1 Networking Setup
To use the Stargate effectively it needs to be connected to a network. There are many options
available to physically connect the Stargate to a network. The quickest and easiest way is to use the
Ethernet port built into the daughter card.
3.1.1 Ethernet LAN - DHCP
The Stargate is pre-configured to connect to a LAN via the Ethernet port. If there is a DHCP service
running on the LAN the Stargate will automatically be assigned an IP address, Gateway address and
DNS server entries. If the LAN is configured for workstation Internet access (via Gateway and DNS
entries) the Stargate will have Internet access.
The disadvantage to DHCP is you need to determine the IP address of the Stargate after it boots up -
it could be different each time. Using a terminal program open a Stargate session and issue the
following command:
$ ifconfig eth0
eth0 Link encap:Ethernet HWaddr 00:50:C2:2F:3B:31
inet addr:192.168.2.3 Bcast:192.168.2.255 Mask:255.255.255.0
UP BROADCAST RUNNING MTU:1500 Metric:1
RX packets:39931 errors:0 dropped:14 overruns:0 frame:0
TX packets:1646 errors:0 dropped:0 overruns:0 carrier:0
collisions:10 txqueuelen:100
RX bytes:12777054 (12.1 MiB) TX bytes:0 (0.0 b)
Interrupt:26
The ifconfig command shows the current configuration of the ethernet port: eth0. The response
shows the IP address to be 192.168.2.3. You can then connect to the Stargate remotely using this
address.
3.1.2 Ethernet LAN – Fixed IP Address
A more convenient way to configure the Stargate is to assign a fixed IP address. There is file named
networking located in the /etc/init.d folder. To assign a fixed IP address on boot-up edit this file and
make sure the start section looks like the following:
start)
echo -n "Configuring network interfaces: "
ifup –a
# pump -i eth0
ifconfig eth0 192.168.2.3 up
route add default gw 192.168.2.1
ifconfig lo 127.0.0.1 up
echo "done."
;;
The key changes are to comment out the pump line and add the two additional lines below it – the
ifconfig and route commands. The pump command was used previously to request the dynamic IP

Wireless Sensor Networks Stargate Developer’s Guide
Page 14 Doc. # 7430-0317-13 Rev. B
address via the DHCP service. The ifconfig command assigns a fixed IP address and the route
command adds the default route back through the LAN gateway machine.
The next time the Stargate is booted it will be assigned a fixed IP address of 192.168.2.3 and the
default gateway will be 192.168.2.1. The addresses you choose are particular to the LAN you are
connecting to.
There is one other important file named resolv.conf located in the /etc folder. This file contains the
DNS entries for your LAN. The default DHCP configuration creates a valid resolv.conf file as a
result of the pump command. If you switch to a fixed IP address configuration the entries in this file
should still be valid. If you have problems resolving network names see your network administrator
for a list of valid DNS entries.
3.2 Application Server Configuration
One of the more interesting uses for the Stargate is as an application server. An application server is
a remotely deployed Stargate configured with software for local management of a Mote network.
The basic software installed for this purpose is the PostgreSQL database and Xlisten. Xlisten is a
Crossbow supplied program that attaches to the serial port attached through the Mote connector. Its
purpose is to listen for incoming sensor data messages and log them to the PostgreSQL database.
The application server can then be accessed remotely using MOTE-VIEW to view the sensor data.
Other server software that can be installed includes the Apache web server for web based
applications and a Java runtime.
3.2.1 Installing Compact Flash Card / PostgreSQL / Xlisten
In order to have sufficient storage space for the PostgreSQL database you need to add an external
compact flash (CF) memory card. These cards are available from various manufacturers such as
SanDisk, Kingston and sizes ranging from 64MB – 1GB. The recommended minimum size is
256MB. This size should provide a couple years worth of space to store sensor data.
Figure 6. Typical Compact Flash Memory Card
Once the Stargate is configured to use the external CF card there is an archive file that can be
downloaded and extracted onto the card to automatically install PostgreSQL and Xlisten.
Compact Flash Card Installation
Open Stargate console session using Windows HyperTerminal or Mincom on Linux (see instructions
above)
Insert Compact Flash Card, observe the device id in the error message, ex. /dev/hda1. The error
message indicates there is not yet a valid file system installed for the CF device.

Stargate Developer’s Guide Wireless Sensor Networks
Doc. # 7430-0317-13 Rev. B Page 15
(You need to create a valid file system on the CF card in order to mount and use it)
$ mkfs.ext2 /dev/hda1
( Mount CF card manually the first time – automatically mounted on subsequent reboots)
$ mount /dev/hda1 /mnt/cf1
PostgreSQL and Xlisten Installation
Locate the software update archive named StargateCFCard.tar.gz located in the <CDROM>\8160-
0025-14_A\config folder.
This archive contains an image of the PostgreSQL database and Xlisten tools in a plug-and-play
format. You simply expand the archive in the root of the CF card and reboot the Stargate.
Open Cygwin shell on PC –
$ scp StargateCFCard.tar.gz root@<Stargate IP Address>:/mnt/cf1
The <Stargate IP Address> can be determined using the ifconfig command at the Stargate console
prompt.
Open Stargate shell –
$ cd /mnt/cf1
$ tar zxvf StargateCFCard.tar.gz
$ rm StargateCFCard.tar.gz
The next time the Stargate is rebooted PostgreSQL and Xlisten will start up automatically. There is a
bootup script file named cfcardapps in the /etc/init.d folder that checks for the presence of the CF
card and automatically starts the applications if they are present on the card.
3.2.2 AmbiCom Wave2Net Wireless 802.11 Compact Flash Card
To provide a short-to-medium range, high speed remote access link to the Stargate the advanced
Stargate kit ships with the AmbiCom Wave2Net wireless 802.11 card. This card plugs into the
available PCMCIA slot using the PCMCIA adaptor module. Although this is a compact flash card
the CF slot is already allocated by the CF memory card thus the adaptor.
Figure 7. AmbiCom Wireless 802.11 Card (left) with PCMCIA adaptor (right)
The Stargate is preconfigured to recognize this card and to automatically load the required device
drivers. However, some additional configuration is required to allow this card to join a network
using the ad-hoc or access point based methods. There is a file named wireless.opts located in the
/etc/pcmcia folder that allows you to specify the settings for your wireless 802.11 network.

Wireless Sensor Networks Stargate Developer’s Guide
Page 16 Doc. # 7430-0317-13 Rev. B
Ad-Hoc Mode (Peer to Peer)
To enable ad-hoc mode, edit the /etc/pcmcia/wireless.opts file and include the following section:
# AmbiCom 802.11 Card
*,*,*,*)
INFO="AmbiCom"
ESSID="Id"
MODE="Ad-hoc"
CHANNEL="6"
RATE="11M"
KEY="1234-1234-12 open"
;;
Set the parameters according to your network settings. If encryption is not being used, comment out
the Key parameter using a # character at the start of the line.
The “*,*,*,*)” line matches a WiFi card plugged into PCMCIA slot 0, or CF slot 1 - this activates
the configuration.
Managed Mode (Access Point)
To enable managed mode make sure the wireless.opts file is as follows:
# AmbiCom 802.11 Card
*,*,*,*)
INFO="AmbiCom"
ESSID="Id"
MODE="Managed"
CHANNEL="6"
RATE="11M"
KEY="1234-1234-12 open"
;;
3.2.3 Sierra Wireless AirCard 555D PCMCIA Cellular Modem Card
To provide a low speed, long range remote access link to the Stargate you can purchase the Sierra
Wireless AirCard 555D PCMCIA Cellular Modem Card. This card is essentially a modem that
provides a PPP link across the Internet via the cellular network. In addition to purchasing the card
you need to purchase a data service plan – Verizon Wireless is the recommended cellular carrier.
When you purchase the plan from Verizon make sure you specify a fixed IP address when
connecting, this way you can easily locate and connect to the Stargate remotely.

Stargate Developer’s Guide Wireless Sensor Networks
Doc. # 7430-0317-13 Rev. B Page 17
Figure 8. AirCard 555D plugged into the Stargate
Sierra Wireless AirCard 555D Installation
Locate the Sierra Wireless AirCard 555D software update archive named CellModem.tar.gz in the
<CDROM>\8160-0025-14_A\config folder.
1. The software update archive adds several configuration files to the Stargate /etc folder tree.
You can download this file to your PC and then use scp (secure copy) to copy it to the
Stargate / folder as follows:
Open Cygwin shell on PC –
$ scp CellModem.tar.gz root@<Stargate IP address>:/
2. Open a console session on the Stargate and unarchive the support files as follows:
$ cd /
$ tar zxvf CellModem.tar.gz
etc/ppp/chap-secrets
etc/ppp/options
etc/ppp/pap-secrets
etc/ppp/peers/
etc/ppp/peers/ac555chat1x
etc/ppp/peers/ac555-1x
etc/ppp/peers/ac555qnc
etc/ppp/peers/ac555chatqnc
etc/ppp/resolv.conf
etc/pcmcia/aircard555.conf
etc/pcmcia/cis/aircard555.cis
etc/pcmcia/cis/aircard555.dat
etc/init.d/ppp
etc/init.d/xfer-driver.sh
3. Edit the /etc/ppp/chap-secrets, /etc/ppp/pap-secrets and /etc/ppp/peers/ac555-1x files and
make sure your dial up number is correct. Basically replace the 5555555555 placeholder with
your assigned number.
4. Insert the AirCard into the PCMCIA slot. Test the PPP dial-up connection using the
following command:
$ pppd call ac555-1x
Serial connection established.

Wireless Sensor Networks Stargate Developer’s Guide
Page 18 Doc. # 7430-0317-13 Rev. B
Using interface ppp0
Connect: ppp0 <--> /dev/modem
local IP address 166.139.23.78
remote IP address 66.174.217.7
primary DNS address 66.174.6.7
secondary DNS address 66.174.3.7
You should see a response from the pppd command similar to the above – this means the
AirCard has been configured properly and is connecting to the service. The Stargate IP
address is the local IP address, in this example 166.139.23.78. Make sure this is the same as
the fixed IP address you are assigned by your service provider.
5. There is a startup script named ppp located in the /etc/init.d folder. To automatically connect
to the PPP service on bootup, create a symbolic link to this file as follows:
$ ln –s /etc/init.d/ppp /etc/rc2.d/S99PPP
The /etc/ppp script will attempt to identify the AirCard and if found establish a connection to
the PPP service. If successful you will be able to see the connection status of the PPP service
using the following command:
$ ifconfig ppp0
ppp0 Link encap:Point-to-Point Protocol
inet addr:166.139.23.78 P-t-P:66.174.217.7
Mask:255.255.255.255
UP POINTOPOINT RUNNING NOARP MULTICAST MTU:1514 Metric:1
RX packets:4 errors:0 dropped:0 overruns:0 frame:0
TX packets:5 errors:0 dropped:0 overruns:0 carrier:0
collisions:0 txqueuelen:3
RX bytes:64 (64.0 b) TX bytes:94 (94.0 b)
3.2.4 MOTE-VIEW
MOTE-VIEW is a PC application Crossbow provides as a free download that allows you to view
sensor network data stored in the PostgreSQL database. The latest version of MOTE-VIEW can be
downloaded from the software download section of the Crossbow web site.
To connect MOTE-VIEW to a PostgreSQL database running on the Stargate use the following steps:
1. Start MOTE-VIEW and click on the icon to bring up the “Database Server
Configuration” dialog box.
2. Enter the IP address of the Stargate into the “Server” field and click “Connect”, this will
populate the “Table Name” drop down list with the available results tables.
3. Select the results table you wish to view from the “Table Name” drop down list and then click
on “Apply” to view the sensor data.
Table of contents
Popular Motherboard manuals by other brands

Avalue Technology
Avalue Technology EMX-945GSE-A1-DVIR user manual

Intel
Intel D2550DC2 Product guide

Texas Instruments
Texas Instruments TMUX7211 user guide

Mercury
Mercury KOB 630e CFSF user manual

VersaLogic
VersaLogic Iguana VL-EPIC-25 Reference manual

Texas Instruments
Texas Instruments TAS6421-Q1 EVM user guide