WOERLEIN DISC4550 User manual

ENGLISH
ENG 1
CLASS 1 LASER PRODUCT
KLASSE 1 LASER PRODUKT
LUOKAN 1 LASER LAITE
KLASS 1 LASER APPARAT
PRODUCTO LASER CLASE 1
CAUTION - INVISIBLE LASER RADIATION WHEN
OPENING THE COVER OR PRESSING THE SAFETY
INTERLOCK. AVOID EXPOSURE TO THE LASER BEAM.
This symbol indicates the presence of
dangerous voltage inside the enclosure,
sufficient enough to cause electric shock.
This symbol indicates the presence of
important operating and maintenance
instructions for the device.

ENGLISH
ENG 2
Safety, Environmental and Setup Instructions
•Use the device in dry indoor environments only.
•Protect the device from humidity.
•Do not open the device. RISK OF ELECTRIC SHOCK! Refer opening and
servicing to qualified personnel.
•Connect this device to a properly installed and earthed wall outlet only. Make sure
the mains voltage corresponds with the specifications on the rating plate.
•Make sure the mains cable stays dry during operation. Do not pinch or damage the
mains cable in any way.
•A damaged mains cable or plug must immediately be replaced by an authorized
service center.
•In case of lightning, immediately disconnect the device from the mains supply.
•Children should be supervised by parents when using the device.
•Clean the device with a dry cloth only.
Do NOT use CLEANING AGENTS or ABRASIVE CLOTHS!
•Do not expose the device to direct sunlight or other heat sources.
•Install the device at a location with sufficient ventilation in order to prevent heat
accumulation.
•Do not cover the ventilation openings!
•Install the device at a safe and vibration-free location.
•Install the device as far away as possible from computers and microwave units;
otherwise radio reception may be disturbed.
•Do not open or repair the enclosure. It is not safe to do so and will void your
warranty. Repairs only by authorized service/ customer center.
•The device is equipped with a “Class 1 Laser”. Avoid exposure to the laser beam
as this could cause eye injuries.
•Only use mercury and cadmium-free batteries.
•Used batteries are hazardous waste and NOT to be disposed of with the
household waste!!! Return the batteries to your dealer or to collection points in your
community.
•Keep batteries away from children. Children might swallow batteries. Contact a
physician immediately if a battery was swallowed.
•Check your batteries regularly to avoid battery leakage.

ENGLISH
ENG 3
Assembly Drawing of Unit and speaker

ENGLISH
ENG 4

ENGLISH
ENG 5
FEATURES AND CONTROLS

ENGLISH
ENG 6
FEATURES AND CONTROLS
1. SPEAKER
2. SPEAKER STAND
3. STANDBY LED INDICATOR
4. SD/MMC CARD IN SLOT
5. HEADPHONES JACK
6. USB DEVICE IN PORT
7. iPod OPEN/CLOSE BUTTON
8. POWER BUTTON
9. CD OPEN/CLOSE BUTTON
10. SLEEP BUTTON
11. ID3/MONO/ST. BUTTON
12. iPod/MEM/CLOCK-ADJ. BUTTON
13. TIMER BUTTON
14. RANDOM BUTTON
15. MUTE BUTTON
16. PRESET/FOLDER DOWN BUTTON
17. PRESET/FOLDER UP BUTTON
18. EQ TOUCH PLATE
19. STOP/MENU TOUCH PLATE
20. VOLUME DOWN TOUCH PLATE
21. SKIP/TUNE SEARCH DOWN TOUCH PLATE
22. VOLUME UP TOUCH PLATE
23. FUNCTION TOUCH PLATE
24. IR SENSOR
25. LCD DISPLAY WINDOW
26. CD DOOR
27. REPEAT TOUCH PLATE
28. 75 OHM ANTENNA JACK
29. PLAY/PAUSE/ENTER TOUCH PLATE
30. 75 OHM JACK
31. SPEAKER OUT “L”
32. MAIN UNIT STAND
33. DOCKING BRACKET
34 iPod ADJUSTING PAD KNOB
35. iPod CONNECTOR
36. SPEAKER OUT “R”
37. VIDEO OUT JACK
38. LINE IN JACK
39. HITCHING HOLE
40. MEMORY BACK-UP BATTERY DOOR
41. AC POWER SWITCH
42. AC POWER CORD
43. iPod PLAYER DOOR
44. SKIP/TUNE SEARCH UP TOUCH PLATE
REMOTE CONTROL
1. STANDBY BUTTON
2. MUTE BUTTON
3. PRESET/FOLDER UP BUTTON
4. PRESET/FOLDER DOWN BUTTON
5. SKIP/TUNE SEARCH DOWN BUTTON
6. INTRO BUTTON
7. ID3/MONO/ST. BUTTON
8. RANDOM BUTTON
9. VOLUME UP BUTTON
10. FUNCTION BUTTON
11. CD OPEN/CLOSE BUTTON
12. VOLUME DOWN BUTTON
13. iPod OPEN/CLOSE BUTTON
14. PLAY/PAUSE/ENTER BUTTON
15. EQ BUTTON
16. SKIP/TUNE SEARCH UP BUTTON
17. STOP/MENU BUTTON
18. SLEEP BUTTON
19. iPod/MEM/CLOCK-ADJ. BUTTON
20. TIMER BUTTON
21. NUMBER SEARCH BUTTON
22. REPEAT BUTTON

ENGLISH
ENG 7
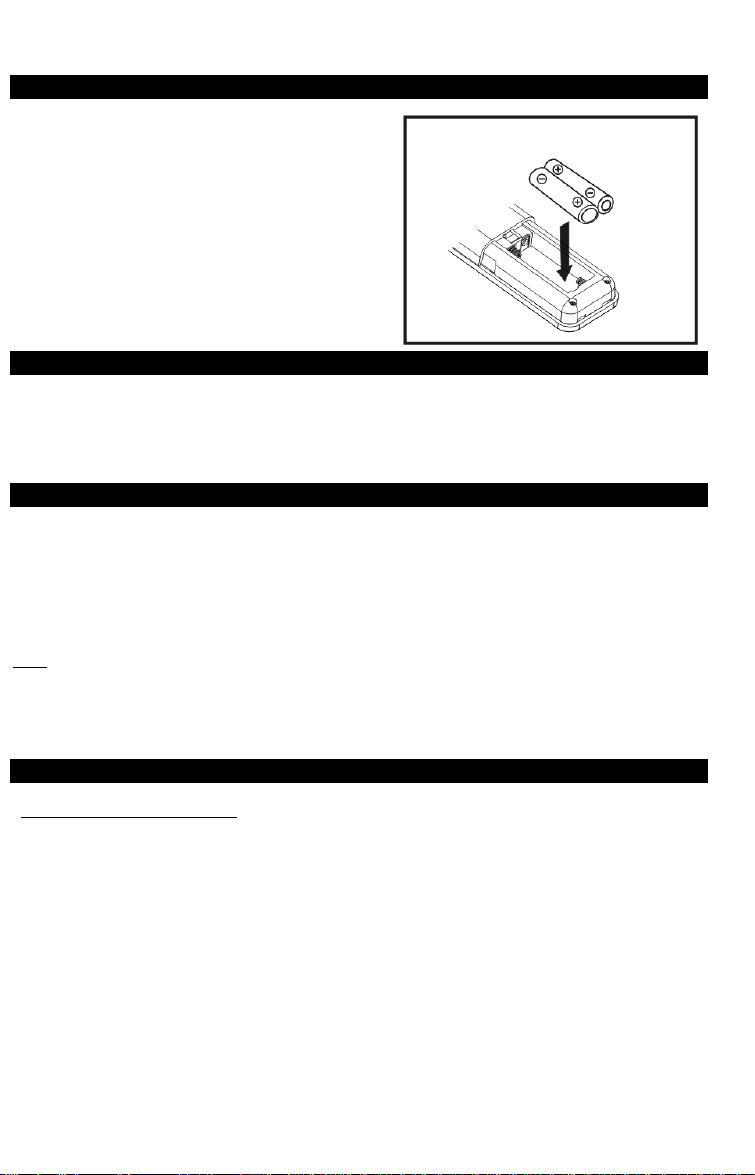
PUTTING THE BATTERIES INTO THE REMOTE CONTROL UNIT
Press down of the compartment cover, and slide the
cover off to open the compartment. Place the two
(UM4), (AAA), (R03) batteries in the remote control
according to the polarity markings ("+" and " - ") inside
the compartment and on the batteries. Close the cover.
NOTE: Remove the batteries from the remote control
if not in use for long period of the time. Do not mix
normal batteries with rechargeable batteries, when
the batteries become weak, remote control will not
function and replace with new batteries.
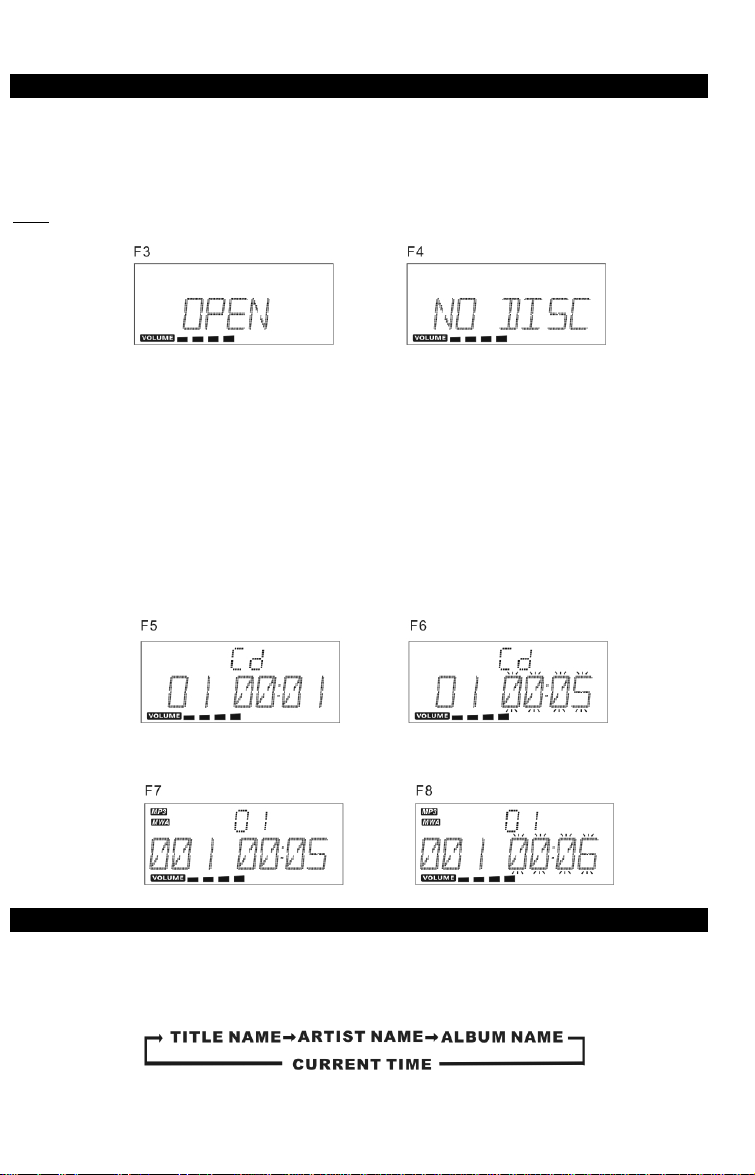
OPERATING THE UNIT
When you first plug the unit into theAC outlet, then press the power switch on the rear of the unit, the
unit will be in standby mode, the black light of standby is red. You can now press the POWER button
on the unit or press the STANDBY/ON on remote control to switch the unit ON. The black light of the
standby and multi function touch plate will light on blue.
POWER/STANDBY
1. Press the POWER button on the unit or press the STANDBY/ON on remote control to switch
the unit on.
2. Select the sound source (CD, USB, SD CARD, iPod, AUX or TUNER) by touch the FUNCTION
touch plate or press the FUNCTION on remote control. The corresponding display will light up.
3. Adjust the volume with the VOLUME (UP or DOWN) touch plate on the unit or the remote control.
4. Press the POWER button on the unit or press the STANDBY/ON button on the remote control
again to turn off the unit.
Note:
1. If there is no signal under the CD/USB DEVICES/ SD & MMC CARD/iPod mode, the main unit will
be switched off within 15 minutes automatically.
2. During in standby mode, press any button/key can make the display light for 10 seconds.
3. Please turn the main switch off to save energy, when you do not use the unit.
CLOCK SETTING
During in the STANDBY mode.
1.Press and hold the iPod/MEM/C-ADJ. button until the time displays will change to 24-hour digit
and flash.
2.Touch the SKIP/TUNE SEARCH(UP or DOWN) touch plate on the unit or press the SKIP/TUNE
SEARCH(UP or DOWN) button on the remote control to adjust 12-hour or 24-hour digit.
3.Press the iPod/MEM/C-ADJ. button again, the HOUR digit will flash on the display,
touch the SKIP/TUNE SEARCH(UP or DOWN) touch plate to adjust HOUR digit.
4. Press the iPod/MEM/C-ADJ. button once more, the MINUTE digit will flash on the display. Set the
minute as the same as hour set
5.Press the iPod/MEM/C-ADJ. button again to confirm the time.
6.Each enable state as shown above will be cleared if the key is not pushed in10 seconds.

ENGLISH
ENG 8
TIMER SETTING
1. After adjusting the clock, press the TIMER button for a few seconds, " ON" and "00:00" appears
on the display and the HOUR digit flashes.(F1)
2. Touch the SKIP/TUNE SEARCH (UP or DOWN) touch plate or press the SKIP/TUNE SEARCH
(UP or DOWN) button on the remote control to adjust it.
3. Press the TIMER button again, the MINUTE digit will start flashing, adjust it by touching the
SKIP/TUNE SEARCH (UP or DOWN) touch plate on the unit or press the SKIP/TUNE SEARCH
(UP or DOWN) button on the remote control.
4. Press the TIMER button once more to confirm and order TIMER ON time.
5. After adjusting "TIMER ON", " OFF" appears on the display and the HOUR digit flashes.(F2)
6. Repeat the above steps 2 to 3, and then press the TIMER button once more to confirm and order
TIMER OFF time.
7. Now the "TUNER" appears on the display with flashing, and then select the alarm mode of the
“TUNER, CD, USB, SD CARD" by touching the SKIP/TUNE SEARCH (UP or DOWN)
touch plate.
8. Press the TIMER button again, the timer "VOL" indicator appears on the display and flashes,
adjust the timer volume high or low by touching the SKIP/TUNE SEARCH (UP or DOWN) touch
plate or press the SKIP/TUNE SEARCH (UP or DOWN) button on the remote control.
9. Each enable state as shown above will be cleared if the button is not pushed in 10 seconds.
10.After adjusting "TIMER ON" and "TIMER OFF" ,press the TIMER button, " " appears on
the display.
11.The main unit will be switched on automatically at "TIMER ON" order and start playing, the main
unit will be switched off automatically at "TIMER OFF" order.
Note: If the display shows "ERROR" while you set the “TIMER ON” it means both “TIMER ON” and
“TIMER OFF” is the same. In this case, please go to “TIMER OFF” to set the off time first.
FUNCTION SELECT
Press functions knob on touch plate or remote control to change the mode as follows:
RADIO OPERATION
Touch the FUNCTION touch plate on the unit to the TUNER mode on the unit or press the FUNCTION
button on remote control, you can select the radio operation.
1.Touch the SKIP/TUNE SEARCH(UP or DOWN) touch plate on the unit or press the SKIP/TUNE
SEARCH(UP or DOWN) button on the remote control to tune the desired wave band range of
frequency.
Manual Tuning
To tune for weak stations, use manual tuning by touching the SKIP/TUNE SEARCH (UP or DOWN)
touch plate continuously until you read the correct frequency or the reception is at its best.

ENGLISH
ENG 9
Automatic Tuning
1.Touch the SKIP/TUNE SEARCH(UP or DOWN) touch plate on the unit or press the SKIP/TUNE
SEARCH(UP or DOWN) button on the remote control for a second or more, then release the button.
The tuner will automatically search the first station of sufficient signal strength.
2.Repeat above procedure if you wish to select another station.
Mono/stereo select
You can select the MONO/STEREO only in FM mode.
1.When you want to select FM stereo station, press the ID3/MONO/STEREO button.
When you receive a FM stereo station the " " indicator will appear on the display, you can
receive FM stereo transmission.
2.When you press the ID3/MONO/STEREO button again, the FM STEREO indicator will turn
off and switch to MONO FM status.
Programming preset stations
To store your selected broadcasting stations:
1.Tune to the required station.
2.Press the iPod/MEM/CLOCK-ADJ. button.
3.Press the PRESET/FOLDER (Up or DOWN) button for your desired station number.
4.Press the iPod/MEM/CLOCK-ADJ. button again to confirm your selection.
5.To program more stations into memory, repeat the above steps 1 to 4.
6.To change the stored preset stations, repeat the above steps 1 to 4.
Selecting the Preset Stations
1.Press the PRESET/FOLDER (UP or DOWN) button to select the desired preset station number.
2.The numeric location of that preset station is displayed along with the corresponding frequency.
75 OHM
1.Connect the 75 ohm antenna wire equipment from the 75 ohm antenna jack on the left side of the
main unit.(Fig. A)
2.Put it into the 75 ohm antenna socket on the wall of the living room that to listen the FM stations.
Note: If there is not provide the 75 ohm antenna socket on the wall of the living room. Please
connect the 75 ohm antenna wire (included) put it into the 75 ohm antenna jack on the left
side of the main unit.(Fig. B)

ENGLISH
ENG 10
CD/MP3/WMA OPERATION
Listening To Compact Disc (CD/MP3/WMA)
1. Press the CD OPEN/CLOSE button once to open the CD compartment F3)
2. Insert the CD/MP3 disc into the CD compartment; press the CD OPEN/CLOSE button to close the CD
compartment
3. Touch the FUNCTION touch plate on the unit or press the FUNCTION button on the remote control
is select to CD/MP3 mode. The unit will read the CD/MP3/WMA disc automatically.
Note: (1) This unit can play CD, CD-R, CD-RW, MP3 and WMA discs.
(2) If no disc or can’t read TOC, NO DISC will be displayed.(F4)
Playing the Entire CD
CD
1. Insert the CD disc into the CD compartment, the main unit will automatically read the total
number of the folders and tracks at the same time.
2. Touch the PLAY/PAUSE/ENTER touch plate on the unit or press the PLAY/PAUSE/ENTER button
on the remote control, the unit will play the first track of the CD disc automatically.(F5)
3. Touch the PLAY/PAUSE/ENTER touch plate on the unit or press the PLAY/PAUSE/ENTER button
on the remote control once again, the time elapsed indicator will flash.(F6)
4. Touch the SKIP/TUNE SEARCH(UP or DOWN) touch plate once to change Track NO., touch and
hold the SKIP/TUNE SEARCH (UP or DOWN) touch plate on the unit once or (on the remote
control) to skip fast forward or backward of each song.
5. To resume playback, touch the PLAY/PAUSE/ENTER touch plate on the unit or press the
PLAY/PAUSE/ENTER button on the remote control once more again.
6. To stop playback, touch the STOP/MENU touch plate on the unit or press the STOP/MENU button
on the remote control once.
MP3/WMA (F7 / F8)
1. Repeat the same setting as playing a CD
2. To change the ALBUM; press the PRESET/FOLDER UP or PRESET/FOLDER
ID3 OPERATION (on the remote control)
During in the MP3/WMA mode
1. Press the ID3/MONO/STEREO button on the unit (or remote control) once to open the ID3 function.
2. Press the ID3/MONO/STEREO button on the on the unit (or remote control) again. Then the unit will
resume to play normally.

ENGLISH
ENG 11
USB/CARD OPERATION
During in the STANDBY mode
1. Insert the USB DEVICE or SD/MMC CARD, and then press the STANDBY button on the main unit
(or remote control) to power "ON" the unit.
2. Touch the FUNCTION touch plate on the main unit (or remote control) to select the USB or SD/MMC
mode. The main unit will automatically read the total number of the folders and tracks at the same
time. (F9)
3. If the USB memory device more than one folder.
a. Press the PRESET/FOLDER (UP or DOWN) button to select each folder.
b.Touch the SKIP/TUNE SEARCH(UP or DOWN) touch plate to select current track in desired
folder.
Note: 1. This unit can support most of USB devices and SD/MMC cards. The memory capacity up-to
2GB. It can not access (or access a longer time) the memory capacity over 2GB. Otherwise,
make an others to access it.
2. It can support USB version 1.1 and 2.0.
3. The main unit does not support the WMA file which is protected “DRM FILE”.
REPEAT PLAY
CD (touch REPEAT on the touch plate or REPEAT on the remote control as follows)
Press 1x REPEAT ÆRepeat current track (F12)
Press 2x REPEAT ÆRepeat all tracks (F13)
Press 3x REPEAT ÆRepeat function will be off/delete
MP3/WMA/USB/SD
Press 1x REPEAT ÆRepeat current track (F14)
Press 2x REPEAT ÆRepeat all tracks (F15)
Press 3x REPEAT ÆRepeat current ALBUM (F16)
Press 4x REPEAT ÆRepeat function will be off/delete

ENGLISH
ENG 12
PROGRAM MODE
User can make the program up to 32 tracks in CD mode or 64 tracks in MP3/WMA/USB/SD CARD
mode in any desired order. Program mode is activated while in stop mode.
1. CD-PROGRAM
- CD
1. Press the iPod/MEM/C-ADJ. button, shift to MEMORY mode.(F17)
2. Touch the SKIP/TUNE SEARCH (UP or DOWN) touch plate on the unit or press the SKIP/TUNE
SEARCH (UP or DOWN) button on remote control, the track number will be changed.
3. Press the iPod/MEM/C-ADJ. button to confirm the track number.
- MP3/WMA
1. Press the iPod/MEM/C-ADJ. button, shift to MEMORY mode. The album number is
flashing. (F18)
2. Press the PRESET/FOLDER button on the unit or on the remote control, the album number
will be changed.
3. Press the iPod/MEM/C-ADJ. button, the first track number will be displayed.(F19)
4. Touch the SKIP/TUNE SEARCH(UP or DOWN) touch plate on the unit or press the SKIP/TUNE
SEARCH(UP or DOWN) button on remote control , the track number will be changed.
5. Press the iPod/MEM/C-ADJ. button to confirm the favorite track number.
2. PROGRAM PLAY
Touch the PLAY/PAUSE/ENTER touch plate on the unit or press the PLAY/PAUSE/ENTER button on
remote control. The unit will play the first track of the program.
3. CANCEL PROGRAM
1. Touch the STOP/MENU touch plate on the unit or press the STOP/MENU button on remote control
once, or open the CD tray door and close it again that the memory will be erased.
Note: During in the program mode:
1. Touch the REPEAT touch plate on the unit or press the REPEAT button on the remote control once,
the "REPEAT" indicator will light on the display. Then the unit will repeat the current track.
2. Touch the REPEAT touch plate on the unit or press the REPEAT button on the remote control twice,
the "REPEAT ALL" will l light on the display. Then the unit will repeat all the total number of tracks.
3. Touch the REPEAT touch plate on the unit or press the REPEAT button on the remote control once
more again. The unit will return to play the program in normally.

ENGLISH
ENG 13
RANDOM PLAY (on the remote control)
1. Press the RANDOM button on the unit (or remote control), then RANDOM is displayed.(F20)
2. Press the RANDOM button again, then the audio device unit will resume to normally play.
INTRO PLAY (on the remote control)
1. Press the INTRO button on the remote control, INTRO is displayed. INTRO will play the first 10
seconds of each track.(F21)
2. Press the INTRO button twice, then the audio device unit will resume to normally play.
iPod OPERATION
Note: To avoid damage the iPod, please make sure the iPod in standby mode to insert and take out.
During the unit in STANDBY mode:
1. Press the iPod OPEN/CLOSE button once on the unit first to open the iPod door.
2. Insert the iPod players in the iPod docking bracket on the front of the main unit fixedly.
3. Power on the main unit, and then Touch the FUNCTION touch plate on the unit or press the
FUNCTION button on remote control to the iPod mode, the iPod indicator will appear on the main
unit display. (F22)
During the unit in iPod mode:
1. Touch the PLAY/PAUSE/ENTER (only in iPod) touch plate or press the PLAY/PAUSE/ENTER button
on the remote control once to start the iPod playing.Adjust the volume control by touch the
VOLUME (UP or DOWN) button or press the VOLUME(UP or DOWN) button to stop the current
playing, touch the STOP/MENU(only in iPod ) touch plate once.
2. Touch the PLAY/PAUSE/ENTER (only in iPod) touch plate once to pause the current track. To
resume the playback, touch the PLAY/PAUSE/ENTER (only in iPod) touch plate once again.
3. To skip forwards or backwards, touch the SKIP/TUNE SEARCH (UP or DOWN) touch plate to
select the desired track.
4. Touch the REPEAT touch plate or press the RANDOM button on the unit (or on the remote control).
Note: iPod touch version 1.1.4 or above can support REPEAT or RANDOM function.
During the unit in iPod MENU mode:
1. During the unit in iPod mode, press the iPod/MEM/CLOCK-ADJ. button once, the unit will enter to
the iPod MENU mode. The iPod MENU indicator will appear on the unit display. (F23)
2. Touch the STOP/MENU (only in iPod) touch plate return to the iPod menu.
a. To select the current menu as belows :
Music > Extras > Photo Import (without this function display on the iPod Mini) > Settings >
Shuffle Songs > Backlight > Now Playing will shows on the iPod Player display.
b. Touch the SKIP/TUNE SEARCH (UP or DOWN) touch plate on the unit (or remote control) to
search the current menu.
3. Touch the PLAY/PAUSE/ENTER (only in iPod) touch plate enter to the desired menu folder.
a. Touch the SKIP/TUNE SEARCH (UP or DOWN) touch plate on the unit (or remote control) to
search the current content in the each desired menu folder.
b. If you want return to the iPod menu, touch the STOP/MENU (only in iPod) touch plate again.
4. To resume playback, press the iPod/MEM/CLOCK-ADJ. button once again, the unit will return to
iPod mode.

ENGLISH
ENG 14
Charging the iPod Player battery through the main unit:
1. iPod Player has a internal no removable battery, the battery may need to be charged that is
not used for a while.
2. You can charge the iPod Player through the main unit automatically under the STANDBY or
POWER ON mode.
Note: 1. It is not better to charge under the TUNER mode. It may interfere the reception.
Note:
1. In any time, you can control the iPod player on the main unit, remote control or iPod player itself
while the unit in the "iPod" or "iPod MENU" mode.
2. In any time, the iPod player must be fixed well under in the STANDBY mode to avoid the unit and
iPod player were damaged.
3. During the unit in iPod mode. The video function of the iPod with abnormal working normally.
Update the latest version of the iPod video function from the apple web-site.
VIDEO OUT SETTING (for i-Pod Video only)
1. During the unit in the STANDBY mode : Connect the TV set with a videos cable (RCA-type cables) to
the VIDEO out jack on the rear of the unit.
2. During the unit in the iPod mode : Press the "MENU" button on the iPod Click Wheel to set the video
function.
3. To set iPod to display videos on a TV :
(a) Choose Videos > Video Settings, and then set TV Out toAsk or On.
(b) If you set TV Out to Ask, iPod gives you the option of showing videos on TV or on iPod while every
time you play a video.
Note: 1. The Video mode only support that the iPod players have a video function.
2. iPod classic 80/160GB, iPod nano 3rd generation(Video) 4/8GB and iPod touch 8/16GB
should be fixed well under in the STANDBY mode before operation of the Video function.
3. Video cable (RCA-type cable) not included.
AUX PLAY
1. Touch the FUNCTION touch plate on the unit or press the FUNCTION button on the remote control,
until the "AUX” indicator light on the display. This unit can input analog audio through the
AUX (LINE) IN jack on the right of the unit.
2. Use a cable with RCAjack to connect external audio source.
Note: Aux in cable not included.
SLEEP FUNCTION
1. If you want to fall asleep to music, press the SLEEP button on the unit or on the remote control.
2. You may select the TUNER, CD/MP3, USB, SD/MMC, iPod or AUX mode in sleep function to
play from 90, 80, 70 up to10 minutes of music before shutting itself off automatically.

ENGLISH
ENG 15
EQ CONTROL
EQ shows the present sound tone.
When you touch the EQ touch plate or press the EQ button on the remote control, the sound tone
changes as below:
MUTE SETTING(on the remote)
1. When you press the MUTE button on the unit or on the remote control once, the volume level will
flash and the audio output will be temporarily terminated.(F24)
2. Press the MUTE button on the unit or on the remote control again, the volume level and the audio
output will return to normal.
HEADPHONE
To listen to the unit with headphones (not included) insert the 3.5mm mini-stereo plug from the
headphones into the PHONES jack on the front panel. The external speakers are automatically
disconnected when headphones are using.
MEMORY BACK-UP
To insert 1.5V x 3, UM-4,AAA or equivalent batteries in the battery compartment of the unit. It is
used to back-up the memory of the main CPU.

ENGLISH
ENG 16
LCD DISPLAY WINDOW
A. TIMER INDICATOR
B. ALBUM NUMBER INDICATOR
C. REPEAT 1 &ALL INDICATORS
D. STEREO INDICATOR
E. VOLUME HIGH/LOW INDICATOR
F. SLEEP INDICATOR
G. TRACK/NUMBER/TIME INDICATO
SPECIFICATION
POWER SUPPLY: 230V~50Hz
OUTPUT POWER: 10 Watts x 2
POWER CONSUMPTION: MAX 76 Watt
UNIT DIMENSION: 400 (W) x 154 (D) x 211 (H) mm
SPEAKER BOX DIMENSION: 160 (W) x 154 (D) x 211 (H) mm
RADIO SECTION
FREQUENCY RANGE: FM 87.5 - 108 MHz
BATTERIES
MEMORY BACK UP: 4.5V 3x UM-4/AAA 1.5V
REMOTE CONTROL: 3V 2x UM-4/AAA1.5V
CAUTION: TO REDUCE THE RISK OF ELECTRIC SHOCK DO NOT REMOVE COVER (OR BACK),
NO USER SERVICEABLE PARTS INSIDE, REFER SERVICING TO QUALIFIED
SERVICE
PERSONAL.
DANGEROUS VOLTAGE
Conductor dangerous voltage that may be of sufficient magnitude to constitute a risk of
electric shock to persons is present within this product's enclosure.
ATTENTION
The owner's manual contains important operating and maintenance instructions, for
your safety, it is necessary to refer to the manual.
WARNING: TO PREVENT FIRE OR SHOCK HAZARD, DO NOT EXPOSE THIS APPLIANCE TO
DRIPPING OR SPLASHING.
SPECIFICATION SUBJECT TO CHANGE WITHOUT FURTHER NOTICE.
Copyright by Woerlein GmbH, 90556 Cadolzburg, www.woerlein.com
Table of contents