Woodland Power Stove User manual

1
The Woodland
POWER STOVE
OWNER’S MANUAL
Made in the U.S.A.
TM
Woodland Group Inc.
544 7th Ave
Kirkland, WA 98033
Phone: (425) 481-8187
Fax: (425) 488-3619
www.powerstove.net

2
Warning
READ AND UNDERSTAND ALL SAFETY WARNINGS.
FOLLOW INSTRUCTIONS BEFORE USE TO PREVENT
FIRES, INJURY, OR DEATH.
PAY CLOSE ATTENTION TO WARNINGS OR INSTRUCTIONS
WHICH ARE ACCOMPANIED BY THIS WARNING SYMBOL
· This stove is for Outdoor Use Only! Do not use indoors or in a confined
space. Do not attach or remove propane tank indoors.
· Propane is heavier than air and will accumulate in low places. If you smell
gas, leave immediately and ventilate the area thoroughly.
· This stove is designed for propane gas only. Use only with propane tanks that
are US Department Of Transportation (DOT) approved.
· Store propane in accordance with local and state laws. Never store propane in
enclosed areas or near open flame.
· Stove is for adult use only. Keep children and pets away from stove while in
use. Do not leave stove unattended when in use.
· Keep propane tank at least 24" away from stove. Do not allow hose to
contact hot surfaces or flame.
· Never use this stove on or near combustible materials or surfaces.
· Use only flat bottom cookware approved for stove top use on this stove.
· Cookware handles can become extremely hot when used on this stove. Use
extreme caution when handling cookware.
· Never reach or lean over top of stove when lighting or while in use.
· This stove remains HOT for ½ hour or more after use. Use caution when
handling to avoid burns.
If Malfunction Occurs, Immediately Shut Off Gas At Tank.

3
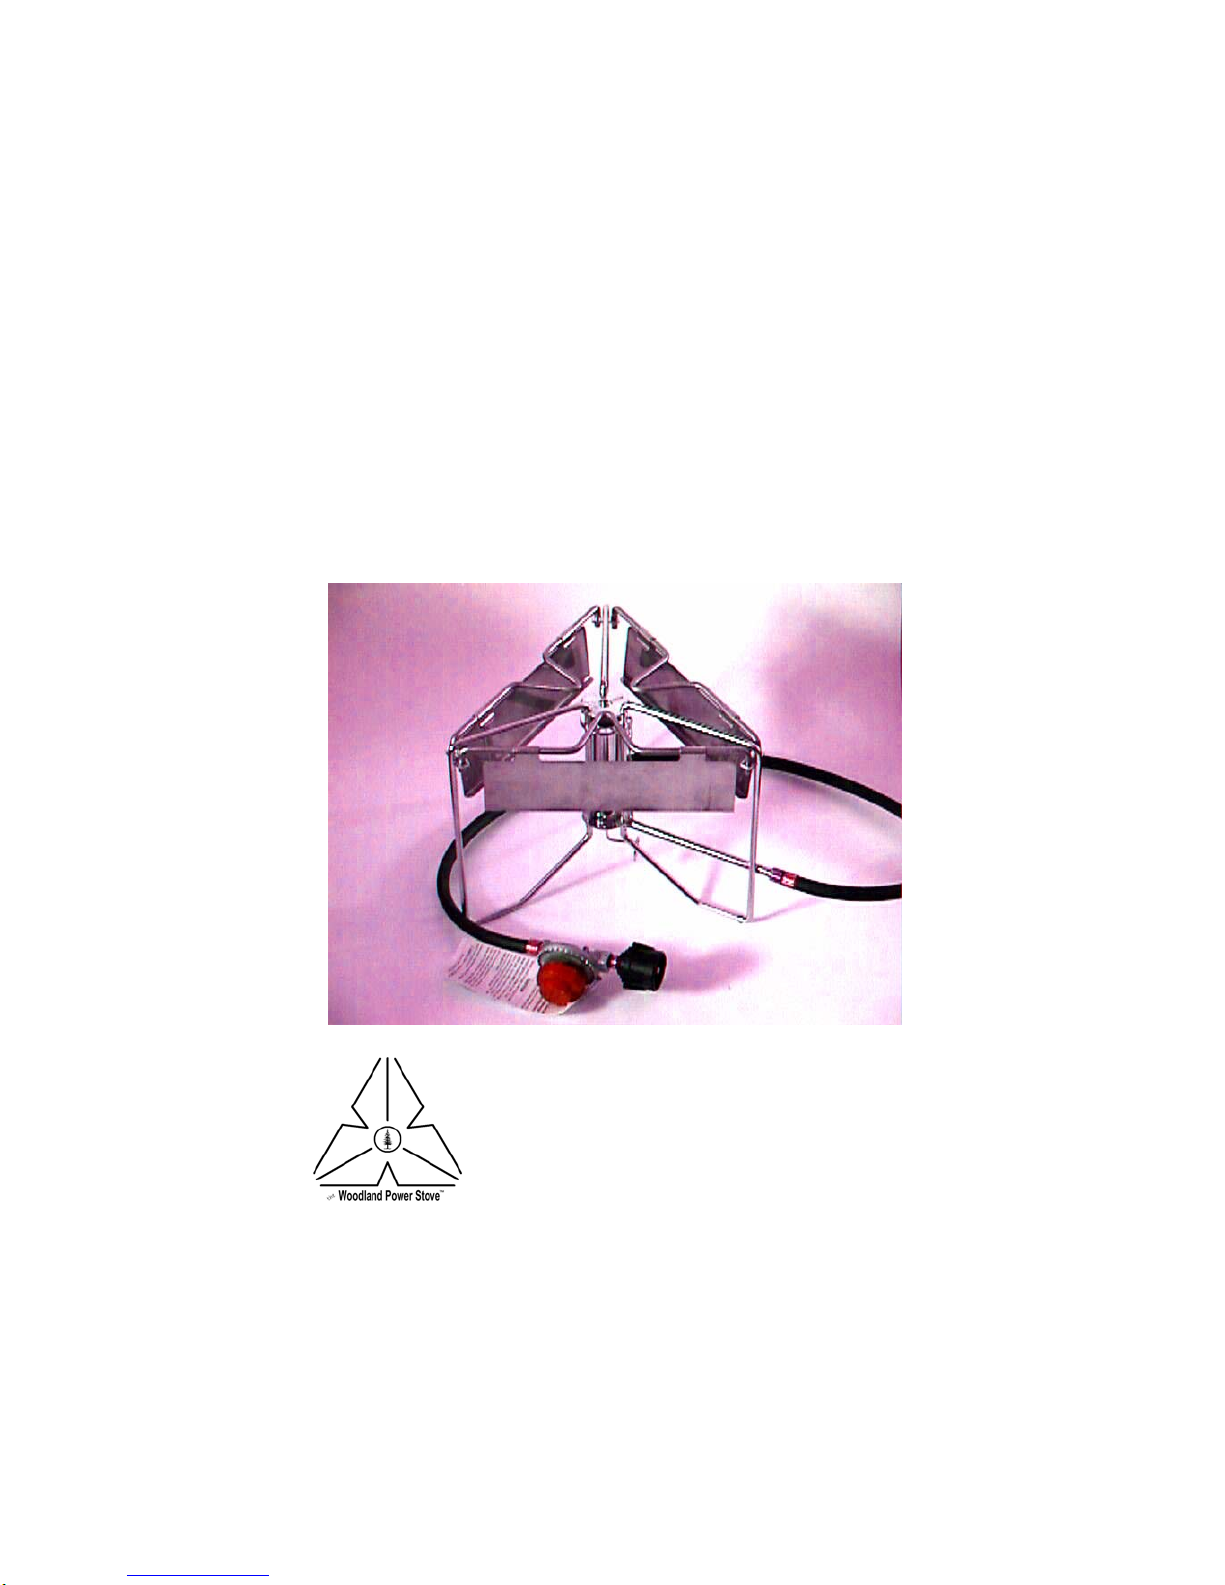
Congratulations on your purchase! The Power Stove is a
unique new concept in cook stoves. Your stove has many
features which set it apart from other high powered stoves.
· 100% stainless steel means you can leave the Power Stove out in
the weather or douse it with water for rapid cooling. You may
submerse the stove (not the regulator) to clean it and the Power
Stove is DISHWASHER SAFE!
· Ultra light weight, yet your Power Stove will safely hold more
weight than other high powered stoves on the market.
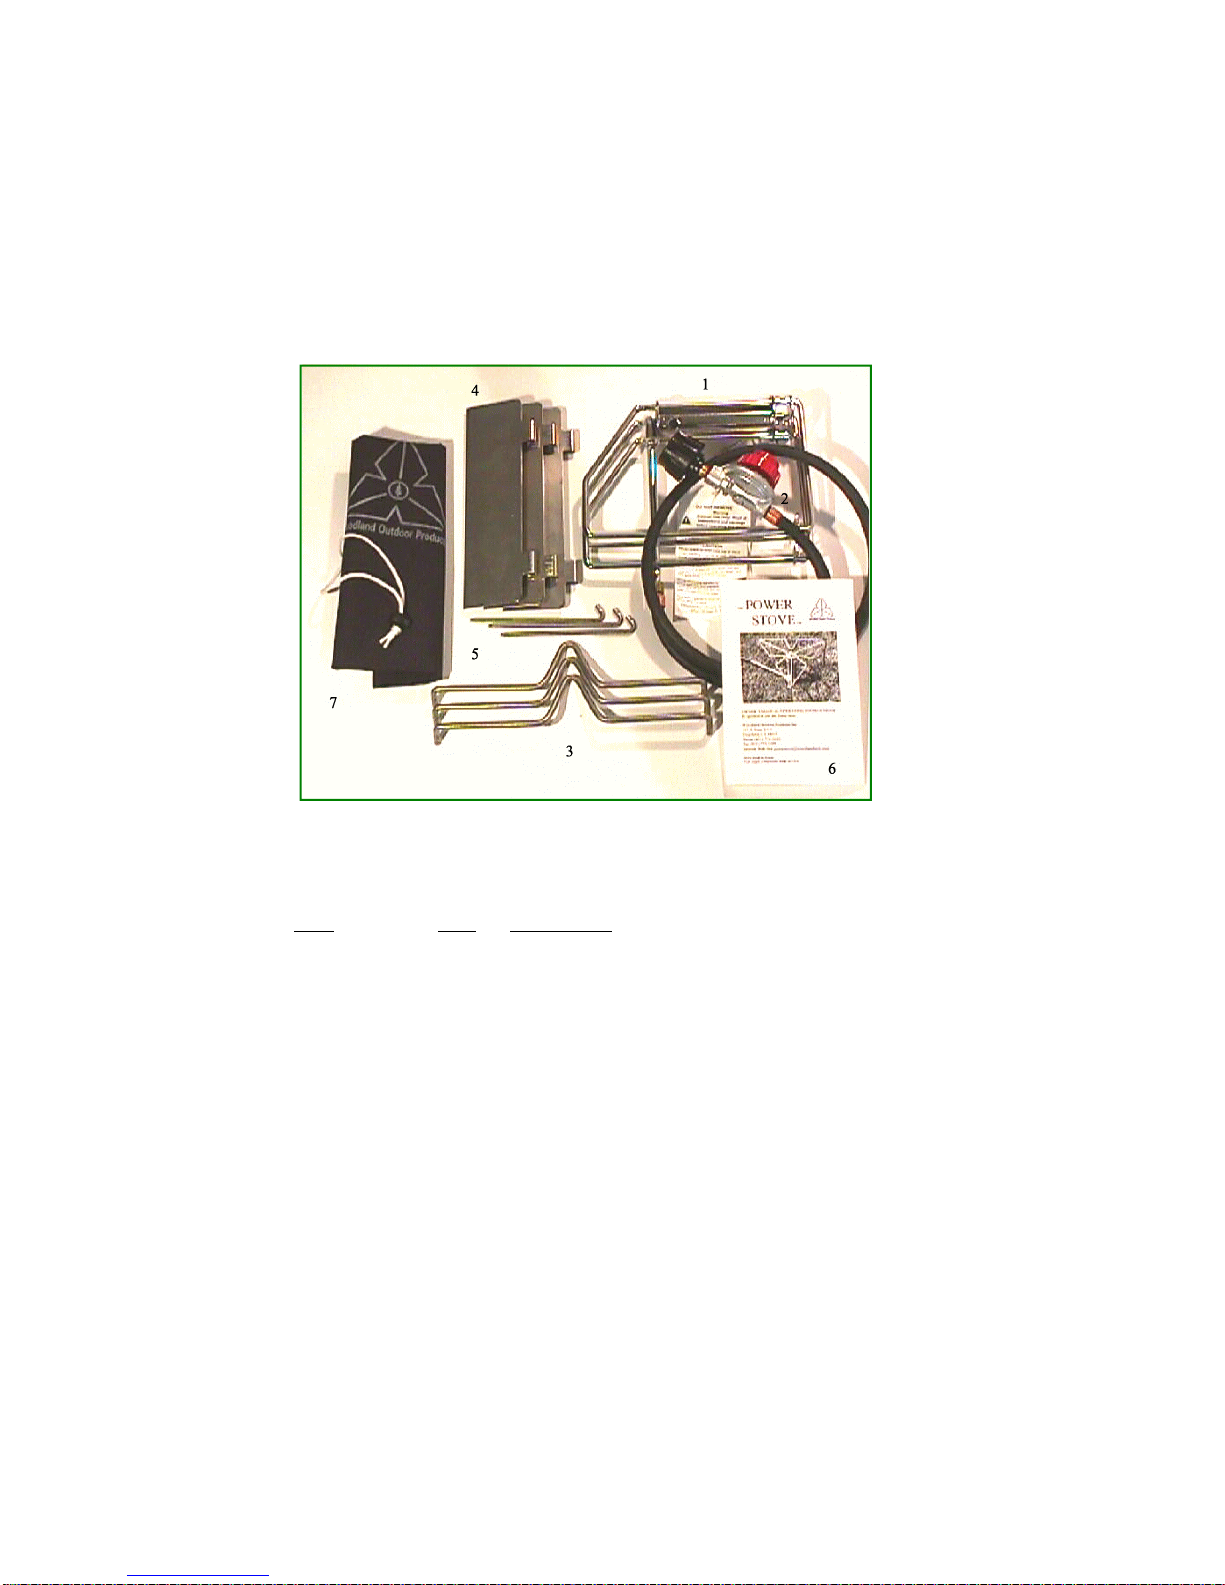
· Collapsible design means you can store your Power Stove in small
spaces (i.e. behind truck seats, in small RV storage cupboards,
under beds, on small shelves, ETC.).
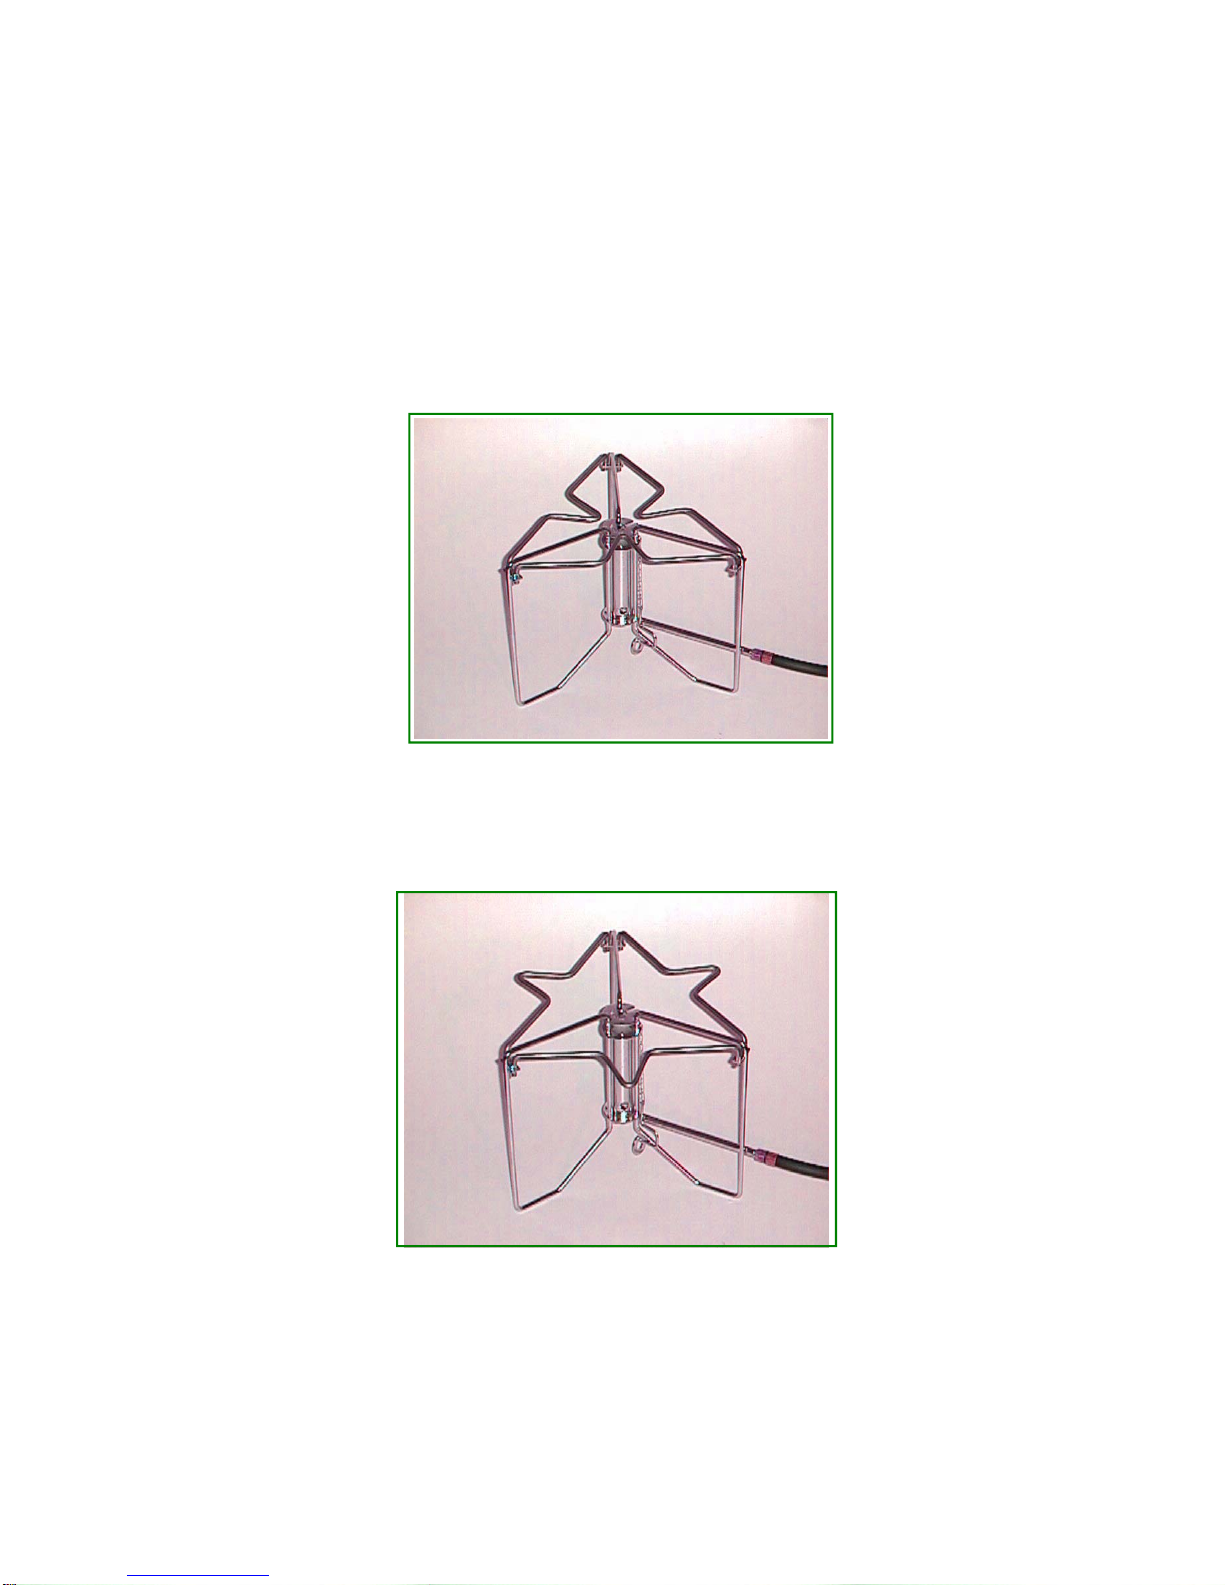
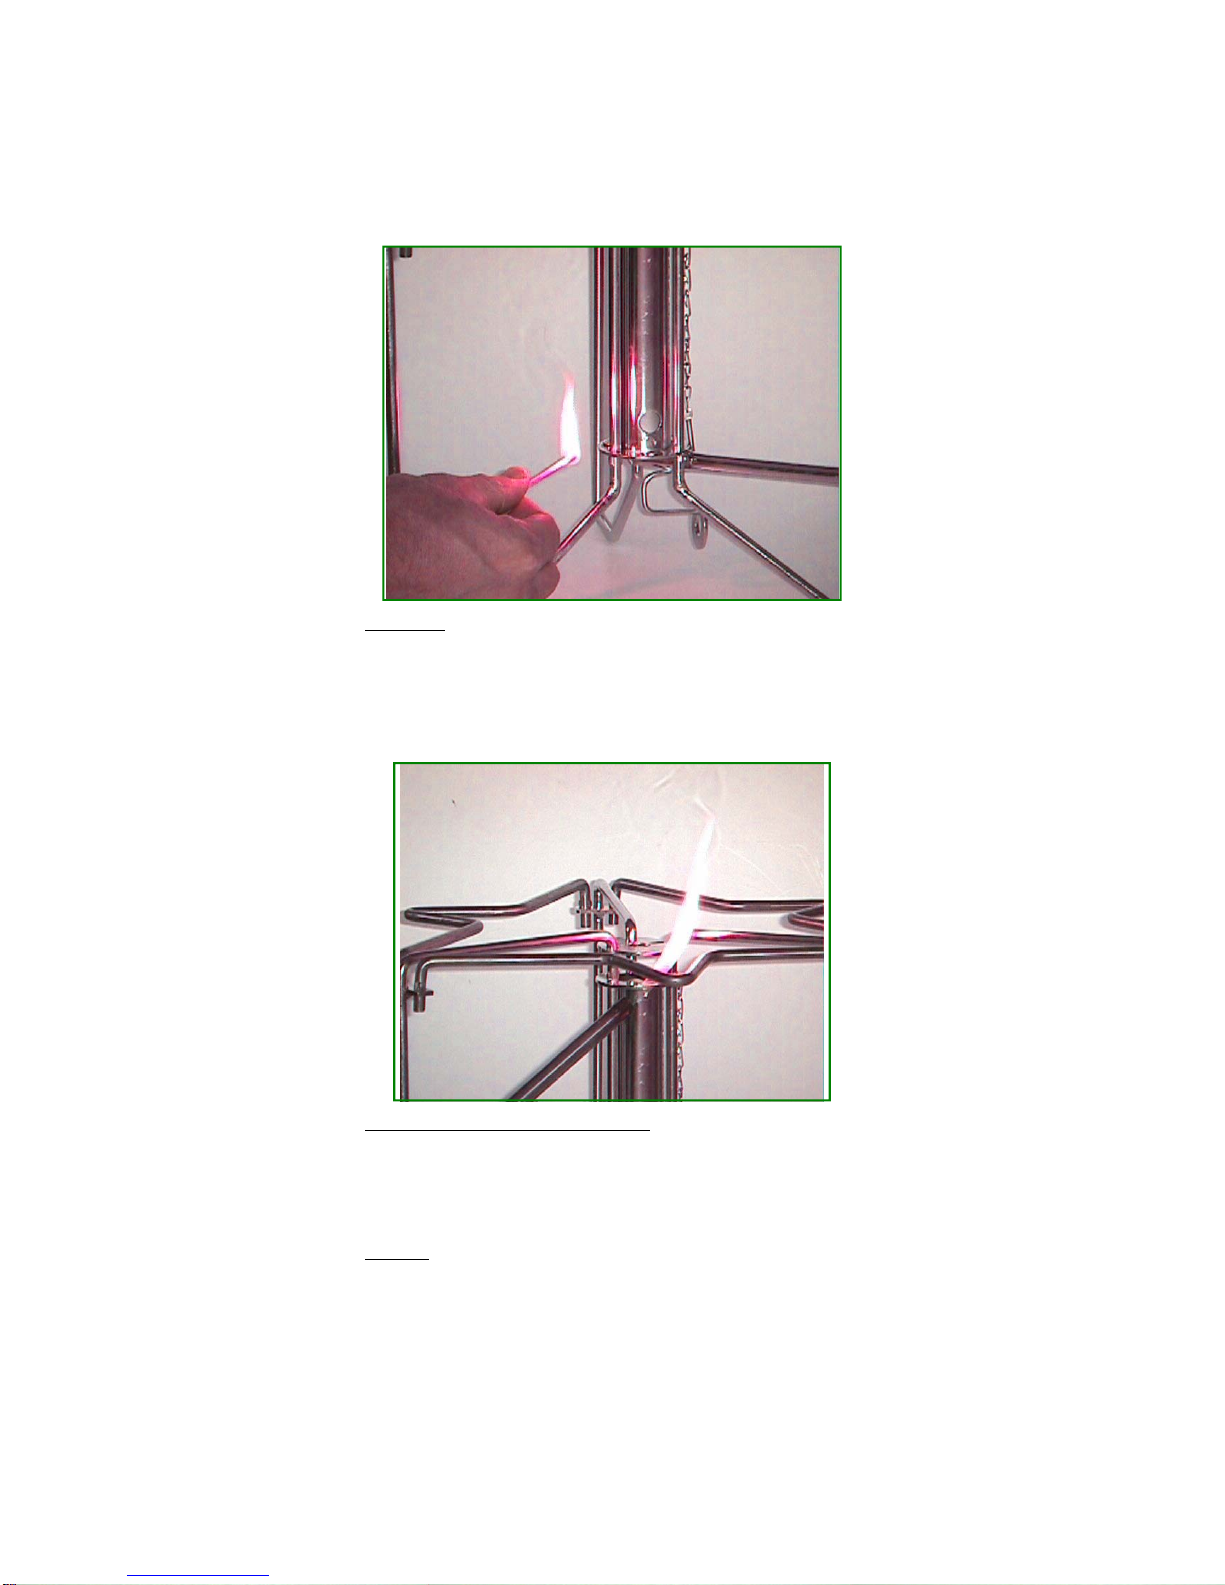
· Unique burner design allows the Power Stove to burn in any
position - even on its side! It’s great for starting camp fires, heating
barrels of water, and canning fruit & vegetables.
· The Power Stove’s burner won’t plug or cease to operate (like
conventional stoves) if food is spilled on it.
· The Power Stove distributes heat evenly over cookware by
spreading the flame rather than relying on the thickness of the pan.
The “Hot Spot” in the center (common with other stoves) is
minimized - even with thin cookware!
· With the unique flame modifier the stove will simulate a wood
camp fire without smoke or smell. You can use the optional
ceramic log set for a real camp fire atmosphere.
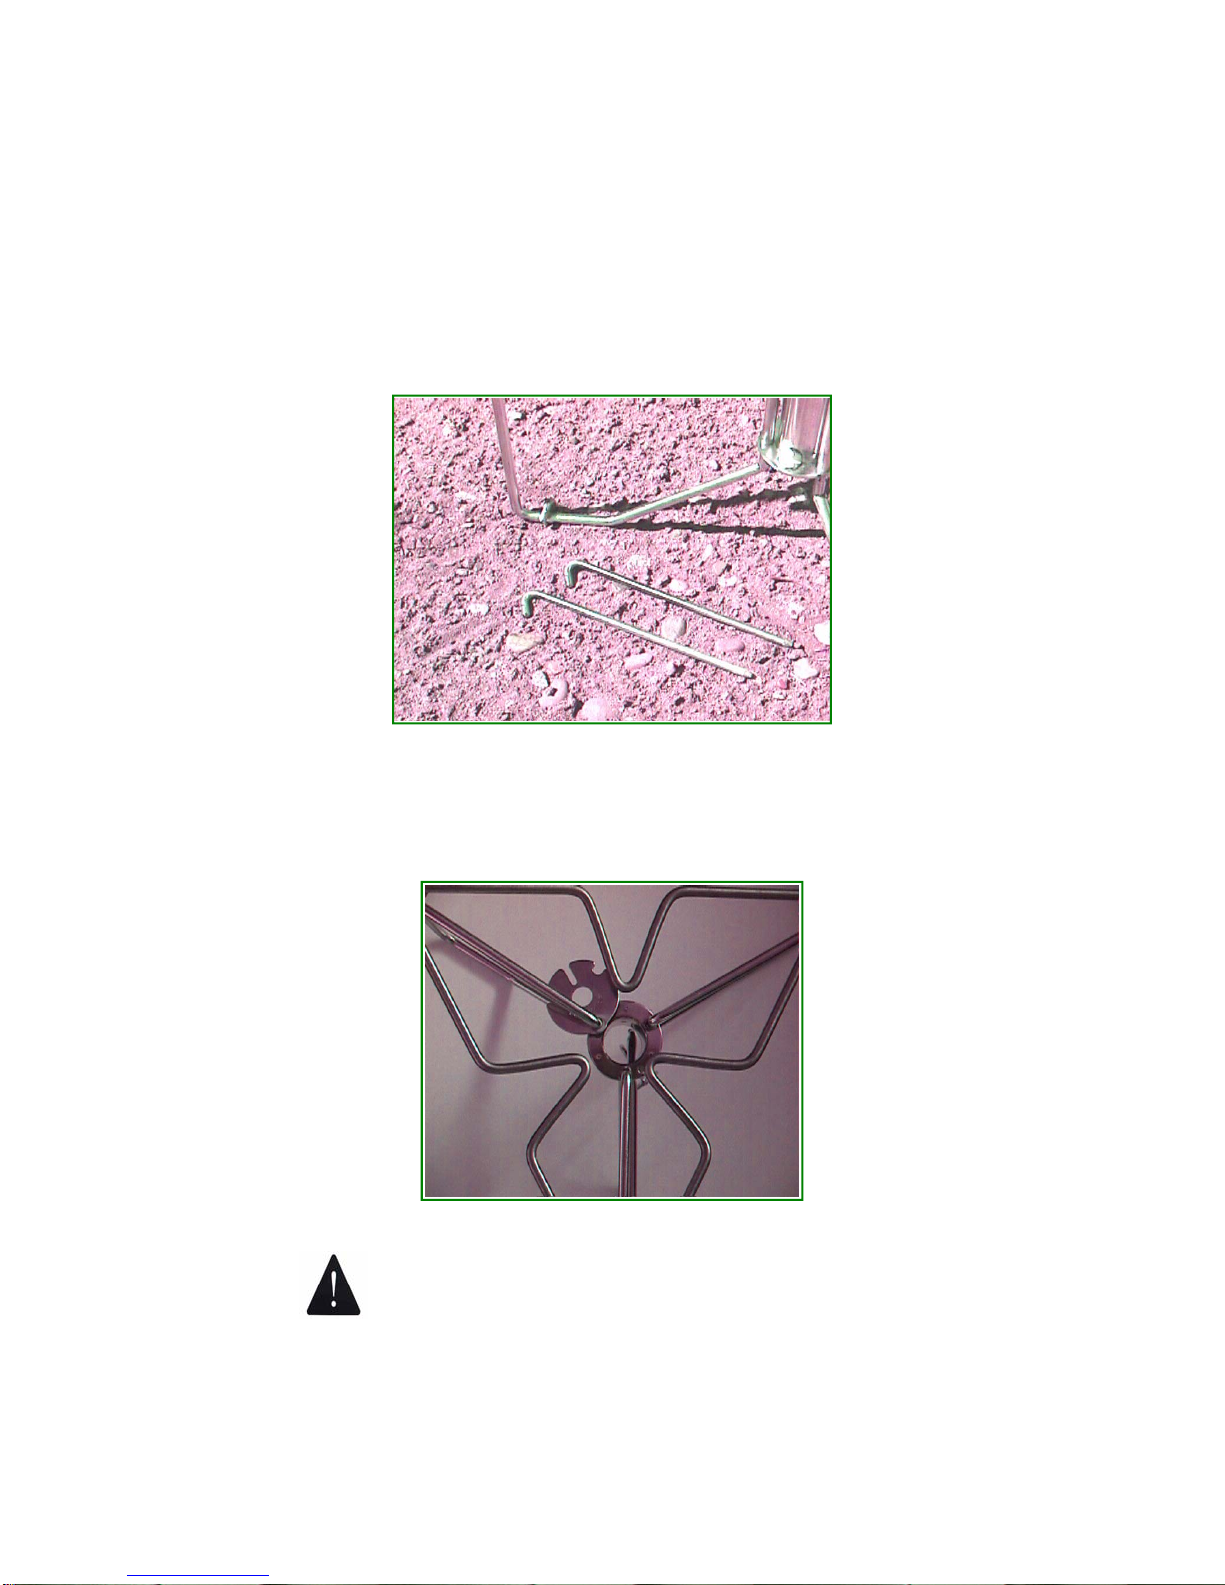
· Safety features
such as solid vertical support columns, depressed
center, permanently attached flame spreader, lower lighting hole,
three leg design, reversible leg braces, high temperature resistant
alloys, fuel dispersing burner, inlet safety fitting, and high strength
ground stakes make the Power Stove one of the safest high power
cook stoves available.

4
Assembly Instructions
Please familiarize yourself with each of the parts shown below in
Photograph 1 before assembling or operating your Power Stove.
Item Qty. Description
1 1 Stove burner assembly with legs
1 Flame spreader (attached to stove leg)
1 Flame modifier (attached by short chain)
2 1 Regulator, inlet fitting, hose & tags (attached).
3 3 Reversible leg braces
4 3 Wind screens
5 3 Safety ground stakes
6 1 Owners manual & product registration card
7 1 Storage bag

5
1. Select a level area (outdoors and on the ground) to place the
stove. Clear an area approximately 3 feet (1 meter) in diameter of
dry grass, sticks, leaves, or other flammable material.
2. Fold out the stove legs and insert the leg braces into the legs as
shown in Figure 2.
• For cookware smaller than 12" in diameter, insert the leg
braces with stabilizer points facing inward (Figure 2).
• For cookware 12" or larger in diameter, insert the leg braces
with stabilizer points facing outward as shown in Figure 3.

6
3. Place stove on the ground in the center of the cleared area. Drive
the safety stakes into the ground anchoring the stove to the ground
as shown in photograph 4.
4. Lift the flame spreader away from the top of the burner tube as
shown in Figure 5 and inspect burner tube for obstructions. Clear
any debris or obstructions from inside of burner tube before use.
Replace the flame spreader over the top of the
burner tube before continuing!

7
5. In windy conditions, move the stove to a protected area before use.
Wind screens may be used to reduce the effects of breeze. The wind
screens snap onto the back of the leg braces as shown in Figure 6.
6. Inspect the gas hose for damage. Inspect the propane tank fitting
and regulator fitting for cleanliness or damage. Clean fittings if
necessary. If hose, fittings, regulator, or stove is damaged, do not
use until repairs have been approved by Woodland.

8
7. The tank inlet fitting (Figure 7, item 1) which is attached to
the regulator has a safety feature called the EXCESS FLOW
VALVE which shuts off the gas supply if the hose is cut or
burned in two. To avoid false activation of this safety feature,
make sure that both the tank valve (Item 3) and the regulator
control knob (Item 2) are in the OFF position. Attach the
regulator control knob (item 2) to the tank. Hand tighten the
fitting (no tools required) to a positive stop. Turn on the tank
valve slowly to avoid activating the excess flow valve. Spray
soapy water on the fittings and watch for leaks which will
form bubbles in the soapy water. Repair any leaks before
lighting the stove.

9
Operating Instructions
To prevent fires or injury:
Never reach over the top of the stove while lighting or
in use!
Always turn the flame low when handling cookware on
the stove.
Keep the Power Stove flame level low enough that it
does not rise above the sides of the cookware.
For cookware smaller than 12" in diameter, use
removable handles.
If problems occur, immediately turn off the gas at the
tank valve (Figure 7, item 3).
1. LIGHTING: To light the stove open the tank valve first. Then turn
the regulator control knob ON (clockwise) one (1) turn. You will
hear a soft hissing sound in the stove.

10
Matches: Place a lighted match or lighter flame into the
lighting hole on the lower side of the burner as shown in
photograph 8. If the match is blown out as it approaches the
lighting hole, the fuel control may be turned on too high.
Reduce the regulator control knob setting and try again.
Long Match or Spark Lighter: Place a long match or spark
lighter near the top of the burner tube as shown in photograph
9. Be sure to keep your hand away from the flame path as the
stove ignites to avoid burns.
NOTE: If stove fails to light or lights with a small yellow
flame, the excess flow valve may have been activated. To reset,

11
turn the regulator control knob and the tank valve completely
off for a few seconds. The valve will reset itself and you may
proceed to light the stove.
2. After lighting, adjust the flame as desired. The best cooking setting
is usually when the flame just reaches the underside outer edges of
the cookware. This allows the cookware to absorb most of the
stove’s heat without wasting fuel. When lower cooking temperature
is desired, use the flame modifier to cool the flame instead of
turning the burner down to a low yellow flame (low yellow flames
cause heavy sooting of the cookware and stove and should be
avoided).
3. To shut off the stove, turn the regulator control knob fully OFF
(counter clockwise) and then shut off the propane tank valve. Do
not touch for ½ hour, allowing time for it to cool down. If rapid
cooling is desired, douse the stove with water.
Flame Modifier:
The Flame Modifier (disk attached to chain) can be placed in the top of
the burner tube to create a cooler flame for slow cooking of pancakes,
eggs, hash browns, Dutch ovens, etc., or for creating a camp fire style
burn. Do not handle the flame modifier when the stove is hot.
When the flame modifier is in place, light the stove at the top of the
burner tube, while keeping hands below the flame path to avoid burns.
If a gurgling sound is heard, fuel is burning below the flame modifier.
Turn the regulator ON fully for a moment until the gurgling sound stops
and then reduce flame to the desired level.

12
Operating Tips
Simulated Camp Fire
A quiet yellow flame, similar to that of a camp fire, is easily created by
inserting the Flame Modifier into the burner tube. The Power Stove will not
produce smoke, odor, ash, charcoal, or sparks common to wood camp fires.
The risk of causing a forest or grass fire is reduced because no hot coals
remain after the Power Stove is shut off.
Cooking Temperature
Most cooking is done at low to mid heat levels. High heat levels are
appropriate for lighting charcoal or wood camp fires and boiling large
amounts of water. When cooler cooking temperatures are needed, the flame
modifier may be used. Light sooting of the cookware may occur when using
the flame modifier. Apply a light coating of dish soap to the underside of
the cookware (prior to use) to ease soot removal.
Lighting Charcoal
The Power Stove will light charcoal fast! Place charcoal in a lighting
chimney, steel basket, or on a grate on the stove. Slide the flame spreader
disk away from the burner tube if using a lighting chimney. Light the stove,
turn it up high, and within minutes the charcoal will be ready for use. Turn
off the stove before removing the charcoal.
Dutch Oven Use
The Power Stove is excellent for Dutch oven cooking! The oven’s legs will
fit inside of or around the stove’s leg braces, preventing the oven from
sliding. The Power Stove provides a regulated heat source from below the
Dutch oven while charcoal on the lid heats from above. The flame modifier
may be used if low heat is desired.
Lighting Camp Fires
The Power Stove is perfect for lighting camp fires! Place fire wood in an
approved fire pit. With wind screens and leg braces removed, slide the flame
spreader disk away from the burner tube. Fold the legs together and place
stove on its side in the fire pit with the top of the burner pointing toward the
base of the wood. Route the fuel hose away from the fire to prevent damage.
Ignite stove and turn the flame level up high. The fire wood will ignite
within minutes. Turn off stove and remove it from the fire pit.

13
Cooling
The Power Stove may be cooled fast by dousing it with water or snow. It
can also be left out in the weather without being damaged! Be careful not
to get moisture in the regulator.
Cleaning
The Power Stove is easy to clean with common household cleaners. It can
be immersed in water and it is DISHWASHER SAFE! To keep the
inside of the regulator dry, remove it from the hose assembly. Use a 5/8"
and a 9/16" wrench to separate the regulator from the hose assembly.
Before re-attaching the regulator, drain water from the hose and be sure it
is free of debris. Tighten fitting and test for leaks with soapy water while
the hose is pressurized.
Side Use
The leg braces are designed to sit in their support brackets loosely. If the
Power Stove is turned on its side frequently, you may wish to stiffen the fit
to prevent the braces from falling out. You can shorten one brace by
pinching the stabilizer point slightly in a vise. This will make it more
difficult to insert but the braces will remain in place when the stove is
operated on it’s side.
Fuel Level Testing
To measure the fuel level in a tank, pour a cup of hot water slowly down
the side of the tank. Run your hand down the side of the tank and feel the
temperature of the tank. The temperature of the tank wall will be much
cooler when your hand reaches the liquid level.
Fuel Consumption
The Power Stove’s typical fuel consumption is between ½ pound to 3
pounds of fuel per hour depending on heat setting. Burn time with a 20lb
(5 gallon) tank is approximately 7.1 hours on high and 80 hours on low.
Propane inside a tank is liquid. It turns to vapor as the tank absorbs heat
from the surrounding air. Large tanks absorb more heat and produce more
fuel vapor for longer periods of time. Small tanks are light and convenient
but only deliver a low volume of vapor. When a tank is nearly empty (or
too small for the need) water droplets or ice will form on the tank and
stove performance will degrade. Cold temperatures also limit a tank’s
performance. In cold operating conditions, a tank should be larger than
normal in order to absorb more heat from the cold surrounding air. We

14
Tank Selection
The Power Stove can operate from any size of refillable propane tank. It is
only limited by the length of the fuel supply hose on the stove. Typical
usable tank sizes are 5, 11, 20, 30, and 40 pounds. Following is a size &
use chart:
5 Pound: One stove, medium size cookware, Dutch oven, occasional
charcoal or fire starting, 2-8 hours burn time.
11 Pound: Multiple stoves, large size cookware, Dutch oven, charcoal or
fire starting, limited camp fire use, 4-20 hour burn time.
20 Pound: Multiple stoves, large size cookware, Dutch oven, charcoal or
fire starting, camp fire use, 8-40 hours burn time.
30 Pound: Multiple stoves, multiple large size cookware, extended use, 12-
60 hours burn time.
40 Pound: Multiple stoves, large size or multiple cookware, extended use,
16-80 hours burn time.
Accessories
Visit us at www.powerstove.net for updates on optional acces-
sories to improve the versatility of your new Power Stove.
Parts or Service
To keep your Power Stove in perfect operating condition, replace-
ment parts and/or service are available regardless of warranty status.
Replacement parts which involve the fuel system must be installed
by Woodland authorized personnel. Please call for the latest pricing
and availability.
If your Power Stove needs service, please call Woodland’s Cus-
tomer Service to receive a RMA number and further instructions.
Write the RMA number clearly on the package label and send it
postage prepaid to Woodland Outdoor Products. Your stove will be
repaired or replaced and returned to you. Woodland Group will not
be responsible for products returned for service without an RMA
number.

15
Troubleshooting
Problem Causes Solution
Flame burns too hot for
cooking.
Regulator control knob is
turned up too high.
Flame modifier is not in use.
Turn regulator knob down until
desire flame level is reached.
Place flame modifier in the
burner tube to cool flame.
Stove fails to light or
lights with a small yellow
flame.
Type 1 regulator inlet fitting’s
excess flow valve device has
activated.
Fuel tank is near empty.
Shut off the tank valve and the
regulator control knob for a
few seconds. Remove the
flame modifier from the burner
tube. Turn the tank valve on
slowly. Turn the regulator
control knob on one turn and
light stove.
Refill the tank.
Match is blown out as it
approaches lighting hole.
Regulator control knob is
turned up too high.
Turn the regulator control knob
down and try again.
Flame fades slowly and
turns yellow.
Tank is either low on fuel or
too small for the desired appli-
cation (tank chilling indicates
tank is too small).
Fill the tank or replace it with a
larger one. The smallest rec-
ommended tank size is 4 lbs.
The standard Power
Stove fitting does not
work with my tank.
Propane tank manufacturers are
now required to use Type 1
tank valves. The Power Stove
comes standard with a Type 1
regulator inlet fitting to match.
Older propane tanks may not
feature the industry standard
TYPE 1 fitting. Because of the
inherent safety features, Wood-
land recommends you only use
tanks with TYPE 1 fittings.
Heavy black soot forms
on stove and cookware.
Stove is turned too low to burn
efficiently.
Flame modifier is not in use
during low level cooking.
Flame is burning below the
flame modifier while in use.
Use the flame modifier to cool
the stove flame (instead of
turning the stove down to a
yellow flame). When using the
flame modifier, light the stove
at the top of the burner for a
cleaner burn.

16
Warranty
Woodland Group, Inc. warrants the stainless steel Power Stove and all of its
stainless steel components against defects due to materials or workmanship for
as long as the original purchaser owns the stove. We further warrant all non-
stainless steel components of the Power Stove against defects due to materials
or workmanship for a period of one (1) year from the date of original purchase.
This warranty does not cover stoves which have been damaged from
improper use, improper maintenance, accidents, alterations, disassem-
bly, or repairs by anyone other than authorized personnel of Wood-
land Group, Inc.
This warranty does not cover the loss of any component of the Power
Stove, whether attached or separate.
This warranty does not cover finish scratching or discoloration which
is considered normal when Stainless Steel is exposed to heat.
Woodland Group, Inc. may choose to repair or replace defective prod-
ucts covered under this warranty.
In order to receive warranty service you must provide proof of purchase. War-
ranty service may be received by calling Customer Service at (425) 481-8187
for an RMA number and further instructions.
The above obligation is Woodland Group, Inc.’s sole liability under this or any
implied warranty. Woodland Group, Inc. shall not be held liable under any
circumstances for any incidental or consequential damages.
Table of contents
Popular Stove manuals by other brands

Defro Home
Defro Home QUADROOM operating manual

GE
GE JGBS14PCD Training bulletin

WANDERS
WANDERS SQUARE 68 - SCHEMATICS manual

Ferlux
Ferlux FORNO VISTO User and installation manual

Regency
Regency F39-NG Owners & installation manual

Vermont Castings
Vermont Castings Radiance RUVSOD 3358 Installation and operating manual