Workzone GT-UDM-02 User manual

ULTRASONIC
DISTANCE MEASURER
Instruction Manual
AFTER SALES SUPPORT:
Telephone: 1800 269 981
E-mail: [email protected]

AFTER SALES SUPPORT:
Telephone: 1800 269 981
E-mail: [email protected]
AFTER SALES SUPPORT:
Telephone: 1800 269 981
E-mail: [email protected]
02 03
Contents
03 Warranty details
04 Introduction
05 Proper use
06 Safety advice
09 Additional safety advice for lasers
10 Disposal of device
10 Battery instructions
11 List of contens
12 Description of parts / scope of delivery
14 Operation
14 Insert battery
14 Displays
15 Avoiding measurement errors
17 Distance measurement
18 Addition (without M+storage)
19 Addition (with M+storage)
20 Area
22 Area addition in area mode
23 Volume
25 Volume addition in volume mode
26 Temperature display
27 Battery display
27 Switching off the device
28 Cleaning
28 Storage
28 Disposal of device
29 Technical data
Ultrasonic Distance Measurer
Warranty Details
The product is guaranteed to be free from defects in workmanship and
parts for a period of 12 months (dependant on product) from the date
of purchase. Defects that occur within this warranty period, under nor-
mal use and care, will be repaired, replaced or refunded at our discre-
tion. The benefits conferred by this warranty are in addition to all rights
and remedies in respect of the product that the consumer has under the
Competition and Consumer Act 2010 and similar state and territory laws.
Our goods come with guarantees that cannot be excluded under the
Australian Consumer Law. You are entitled to a replacement or refund
for a major failure and for compensation for any other reasonably
foreseeable loss or damage. You are also entitled to have the goods
repaired or replaced if the goods fail to be of acceptable quality and the
failure does not amount to a major failure.

AFTER SALES SUPPORT:
Telephone: 1800 269 981
E-mail: [email protected]
AFTER SALES SUPPORT:
Telephone: 1800 269 981
E-mail: [email protected]
04 05
Introduction
We congratulate you on your new ultrasound distance measurer
and are convinced that you will be satisfied with this state-of-the-art
device. The device conforms to the relevant safety regulations.
In order to guarantee that this device will always function and
perform and in order to ensure your personal safety, please read
through these instructions before using the device and, above all,
follow the safety advice! All activities carried out on and with this
device are only permitted to be carried out to the extent that they
have been described in these operating instructions.
If you should pass this ultrasound distance measurer on, please
include these instructions.
Packaging
Packaging is for protection from transport damage. Packaging
consists of raw materials that can be reused or returned to the raw
materials circuit.
Remove all parts from the packaging before operating the device.
Proper use
The electronic multi-measurement device GT-UDM-02 deter-
mines the distance of an object through electronically generated
high-speed signals. The measurement result can be read off of the
display. The device has a computer chip and a key indicator and
memory function, can be used for automatic area calculation and
volume counting and is an ideal device for the construction and fur-
nishing industry (e.g. property brokers, furniture designers and crafts-
men, etc.).
The device has a laser orientation function, i.e. it emits a red laser
beam with which it can easily aim at an object during use. The
automatic temperature comparison of the device provides a more
precise measurement result and indicates the exact environmental
temperature at the same time.

AFTER SALES SUPPORT:
Telephone: 1800 269 981
E-mail: [email protected]
AFTER SALES SUPPORT:
Telephone: 1800 269 981
E-mail: [email protected]
06 07
The electronic multi-measurement device GT-UDM-02 is a class II laser
device and conforms with international safety guidelines 21CFR
1040.10, 1040.11 and EN 60825-1:2007
Do not remove the labels from the device.
Warning!
• When using battery-operated devices, basic safety measures must
be followed, including the following guidelines, for protection from
risk of fire and damage to persons or property.
• Read these instructions thoroughly before using the device.
• Keep these instructions.
Keep your work area in order!
Disorder in work areas leads to risk of accident.
CAUTION
Laser radiation
Do not stare
into the beam
EN 60825-1:2007
Max. power
1 mW at 650 nm
Class 2 laser product
Safety advice Safety advice
Take environmental influences into consideration!
Do not expose the device to rain. Do not use the device in a damp
or wet environment. Ensure that your work area is well lit. Do not
use the device in locations where there is a risk of fire or explosion,
e.g. near flammable liquids or gases.
Keep children away!
This device is not intended for use by persons (including children)
with impaired physical, sensory or mental capabilities or lack of
experienced and/or lack of knowledge, unless they are supervised by
a person responsible for their safety or have received instructions
from this person on how to use the device.
Children must be supervised in order to ensure that they do not
play with the device.
Keep the packaging material out of the reach of children. Suffocation
hazard if swallowed.
Ensure that you are standing securely!
Ensure that you are standing securely, in order to maintain balance
in every working position.
Always pay attention!
Concentrate on your work. Proceed sensibly. Do not use the device
if you are tired.
Do not look into the laser beam.
Do not shine the laser beam directly into the eyes of other people.
Do not set up the device at eye level and do not use on or near reflective
surfaces, as the laser beam could be projected into your eyes or the

AFTER SALES SUPPORT:
Telephone: 1800 269 981
E-mail: [email protected]
AFTER SALES SUPPORT:
Telephone: 1800 269 981
E-mail: [email protected]
08 09
eyes of another person. Do not look at the laser beam with binocu-
lars or a magnifying glass.
Use the correct device!
The proper use is described in these operating instructions.
Warning! The use of attachment devices or accessories other than
those recommended in these instructions or carrying out work with
this device that is not in accordance with proper use can lead to risk
of accidents.
Check your device for damage!
Do not drop the device. Check the device for damage before
starting work.
Ensure that the device functions properly. Do not use the device if a
part is defective.
Keep your devices in a safe place!
Unused devices and batteries are to be stored in a dry place that is
not accessible for children.
Repairs:
This device complies with the respective safety guidelines. Repairs
are only to be carried out by authorised specialists and with original
replacement parts.
Please also note the following:
Not using the device according to these operating
instructions, could void your warranty.
Safety advice Safety advice
Additional safety advice for lasers
Caution! Laser beams!
Do not look into the laser beam.
Do not look at the laser beam with optical instruments
• This laser complies with class 2 according to EN 60825-1:2007.
• Do not exchange the laser diode for another type. Have a defective
laser repaired by a customer service workshop.
• Only use the laser for aiming.
• Never look directly/intentionally into the laser beam.
• Do not use any optical devices to look at the laser beam.
• Do not set up the tool in such a position that the laser beam could
cross people at head level.
• Do not allow children near the laser.

AFTER SALES SUPPORT:
Telephone: 1800 269 981
E-mail: [email protected]
AFTER SALES SUPPORT:
Telephone: 1800 269 981
E-mail: [email protected]
10 11
• Avoid contact with skin, eyes and mucous membranes. Upon
contact with battery acid, rinse the affected areas with plenty of
clear water and immediately call on a doctor.
• Remove dead batteries from the device and dispose of them
responsibly. Replace with a suitable new 9V battery.
List of contens
– 1 x Ultrasonic distance measurer
– 1 x 9V Battery
– 1 x Instruction Manual
– 1 x Warranty Certificate and Warranty Detail
– 1 x Warranty Sticker
– 1 x Quick Start Guide
Disposal of device
Please dispose of this product and battery responsibly at
end of life. Do not throw away with household waste. Please
contact your retailer or local authority for details of recycling
schemes operating in your area.
Before starting ...
Battery instructions
• Batteries are not permitted to be disposed of with household waste.
Every consumer is legally obligated to dispose of the batteries
properly at the specified collection sites.
• Never recharge batteries! Risk of explosion!
• Keep batteries away from children, do not throw into fire or short
circuit or dismantle.
• Immediately call on a doctor if a battery has been swallowed.
• Pay attention to correct polarity when inserting batteries.
• Clean battery and device contacts prior to insertion, if required.
• Immediately remove depleted batteries from the device! Increased risk
of leakage!
• Do not expose batteries to any extreme conditions, e.g. on radiators!
Increased risk of leakage!
• Non-compliance could result in batteries being discharged beyond
their end voltage and leaking! Immediately remove batteries in
order to avoid damage.
Safety advice Safety advice

AFTER SALES SUPPORT:
Telephone: 1800 269 981
E-mail: [email protected]
AFTER SALES SUPPORT:
Telephone: 1800 269 981
E-mail: [email protected]
12 13
Description of parts / scope of delivery
1. Ultrasound transmitter/receiver
2. Direction-finding laser
3. Double row LCD display
The data in the top row show the current measurement result
and the data in the bottom row show the memory/calculation
result
4.
BASE
– The distance measurement can be calculated from two
points. Pressing the
BASE
key can set the distance measurement
between the baseline and top of the device.
5. FT/M – Push this button lightly in order to switch between
metres and feet. Keep the button pressed down for approx. 2
seconds in order to display the environmental temperature.
6. MODE – Push this button briefly in order to delete the measure-
ment or return to the menu, in order to change over to the
length, area or volume mode. Keep the button pressed down
for approx. 2 seconds, in order to save the length, area or volu-
me measurement.
7. +/= - Press this button lightly in order to add the measured
length, area or volume. Keep the button pressed down for
approx. 2 seconds, in order to read and display the last saved
length, area or volume value.
8. READ – Press this button in order to start the measurement.
Keep the button pressed down and move the device during the
measurement process so that dynamic values can be read off.
9. Spirit level
Description of parts / scope of delivery
10. Measurement reference --- The distance can be calculated from
the baseline or the top of the device. By pressing the
BASE
key the measurement reference can be switched.
–Battery compartment on reverse (not shown)
–9 V block battery, size 6F22 (not shown)
12
3
4
57
9
10
6 8
10

AFTER SALES SUPPORT:
Telephone: 1800 269 981
E-mail: [email protected]
AFTER SALES SUPPORT:
Telephone: 1800 269 981
E-mail: [email protected]
14 15
Operation
Avoiding measurement errors
Note the following points in order to avoid measurement errors:
1. Measurements through glass are not possible
2. Distance measurement of sound-absorbent items (e.g. curtains) is not
possible.
3. Measurement errors can occur depending on the surface quality of
the object opposite.
4. The device must be aligned at 90° to the surface opposite (use spirit
level).
5. Strong wind can lead to measurement errors.
6. Objects between the measurement object and the device can affect the
precision of measurement.
7. With distance measurement in the maximum distance range, mea-
surement errors can occur (measurement range 0.6 – 16 m / 2 – 53 ft.).
• If the measured distance is outside of the indicated area:
• If the measured result is outside of the indicated area: The error
message“Err”is shown in the bottom row of the display.
8. With the addition of various parameters (e.g. length plus area), the
“+”is ignored and the display shows the same result as the previous
measurement.
Insert battery
Open the battery compartment cover on the
reverse of the device, pull the connector forward
slightly and press the battery (9 V block battery,
size 6F22) onto the connector. Insert the battery
into the compartment and close the compart-
ment cover.
Displays
A) Plus
B) Length/area/volume L=length W=width H=height
C) Measurement display from where the device measures.
D) Memory
E) Memory, calculation result
F) Current measurement result
G) Displayed with insufficient power supply
H) square foot
I) Cubic foot
J) Metre / square metre / cubic metre
Operation

AFTER SALES SUPPORT:
Telephone: 1800 269 981
E-mail: [email protected]
AFTER SALES SUPPORT:
Telephone: 1800 269 981
E-mail: [email protected]
16 17
Operation
Distance measurement
• Keep the device loop in the direction of the measured object (e.g. the
wall) and the device vertical to the measured object: by repositioning
the device, ensure that the gauge of the spirit level is between both lines.
• Press the
BASE
button in order to start the device, the device is
ready for operation.
If the last measured value was deleted, the display shows:
• Press the READ button in order to measure the distance between
the measurement reference and the object aimed at. If you intend to
change the measurement reference, briefly press the key
BASE
.
• Continue to press the READ button and move the device, in order
to obtain the dynamic values; the measured distance will be shown
in the upper section of the display;
• Press the FT/M button at the same time in order to display the
imperial or metric units of measurement (default unit of measure-
ment: metric system). Press and hold the key for three seconds to
switch off the device. The device switches off automatically within
60 seconds if no action is performed.
9. Nearby additional ultrasound devices or high frequency sounds:
switch off the source(s) of noise during measurement.
10. With unfavourable measurement conditions:Temperature and humidity
influence the precision of measurement – the temperature of the
device should agree with the environmental temperature,
particularly when measuring larger distances (between 12 m to 16
m/ 40 ft. and 53 ft.), relative humidity should be above 48 % and the
measured area should be at least 3 m x 3 m.
11. With distance measurements in corridors or hallways, measurement
errors can occur.
The further the distance, the wider the area to be kept clear must be
in the direction of measurement.
Only during the actual measurements, as long as the READ button
is pressed down, the laser pointer is activated, in order to mark the
measurment point opposite.
Note the following
diagram:
Operation

AFTER SALES SUPPORT:
Telephone: 1800 269 981
E-mail: [email protected]
AFTER SALES SUPPORT:
Telephone: 1800 269 981
E-mail: [email protected]
18 19
Operation
• Press the READ button again in order to carry out a second mea-
surement – the measurement value appears in the upper section of
the display;
• Press the +/= button again in order to display the sum in the bottom
section of the display;
• By repeating the above steps, the addition is continued.
Addition (with M+storage)
• Carry out the measurement. Save the final result by keeping the
MODE button pressed for at least 2 sec., until a double beeping
tone sounds.“M+“ will appear in the display.
• Start new measurement as described - press the READ button;
• Press the +/= button in order to switch into the addition mode –“+”
will appear in the display;
Tips:
A. The measured object should have a hard surface and not be blocked by
obstacles;
B. In order to obtain precise results, select a large, smooth, hard surface;
C. If the measured surface is too small, irregular or too soft, chipboard
can be used on the surface of the measured object;
D. This device can not be used to measure through glass;
E. The device should be further than 60 cm away from the measured
object during measurement;
F. In order to achieve a more precise measurement result, the temperature
of the device should correspond to the environmental temperature.
Addition (without M+storage)
• Press the READ button – the measurement value appears in the
upper section of the display;
• Press the +/= button in order to enter the addition mode – the“+”
symbol appears in the display and the result will be shown in the
bottom section of the display at the same time (press the +/= button
again in order to stop the addition);
Operation

AFTER SALES SUPPORT:
Telephone: 1800 269 981
E-mail: [email protected]
AFTER SALES SUPPORT:
Telephone: 1800 269 981
E-mail: [email protected]
20 21
• The width symbol“W“ in the display flashes and shows the next
measurement to be carried out. Press the READ button in order to
obtain the width measurement, which is shown in the upper section
of the display (Step 2);
The area is automatically shown in the lower section of the display;
• Pressing the READ button again switches back and forth between
length and width in the upper section of the display;
− Press the MODE button in order to delete the data from the
display – now a new area calculation can be carried out.
− In order to switch the measurement mode, press the MODE button
again;
Tips:
With single pressing of the MODE button, you can switch back and
forth between the length, area and volume. If there is data available
in the display, pressing the MODE button will delete the current
data – the mode remains unchanged.
• Adding memory to last measurement result: Press +/= for at least
2 sec. until a double beeping tone sounds.“M”will disappear from the
display. Only the saved value will be shown in the bottom of the display.
• Press the +/= button briefly – the result of the last measurement +
saved measurement will appear in the display.
Area
• Press the MODE button in order to switch into the area mode and
appears to calculate the area of a space;
• The length symbol“L“ in the display flashes and show the first mea-
surement that you have carried out. Press the READ button in order
to obtain the length measurement, which is shown in the upper section
of the display (Step 1);
OperationOperation

AFTER SALES SUPPORT:
Telephone: 1800 269 981
E-mail: [email protected]
AFTER SALES SUPPORT:
Telephone: 1800 269 981
E-mail: [email protected]
22 23
• Press the +/= button – the sum of both areas appears in the bottom
section of the display;
• Repeat the above mentioned steps, in order to further add up the
measured area.
Volume
• Press the MODE button in order to switch to the volume mode and
appears in the display in order to calculate the space volume;
• The length symbol“L“ in the display flashes to indicate that the
length measurement is taking place. Press the READ button in order
to measure the length, the result appears in the upper section of the
display. (Step 1)
Area addition in the area mode:
• Keep the MODE button pressed down in order to save the calcu-
lated area from the first measurement; at the same time, the“M+”
symbol appears on the display. A double beeping tone will sound;
• Press the MODE button in order to delete the currently displayed
data – now the second measurement and calculation can be carried
out (Follows steps 1 and 2 under the“Area”section);
• After obtaining the desired area from the second calculation, press
+/= in order to switch into the addition mode. The“+“ symbol
appears in the display.
• Adding the memory content to the last measurement result: Keep
+/= button pressed down for a minimum of 2 seconds until a dou-
ble beeping tone sounds.“M”disappears from the display, in the
lower row of the display, the value from the memory now appears.
OperationOperation

AFTER SALES SUPPORT:
Telephone: 1800 269 981
E-mail: [email protected]
AFTER SALES SUPPORT:
Telephone: 1800 269 981
E-mail: [email protected]
24 25
Volume addition in the volume mode:
• Press the MODE button in order to store the calculated volume
from the first measurement – the“M+“ symbol appears in the display;
• Press the MODE button in order to delete the currently displayed
data – now the second measurement and calculation can be carried
out (follow steps 1 and 3 under the“Volume”section).
• After obtaining the calculated second volume, press the +/=
button, in order to switch into the addition mode. The “+“ symbol
will appear in the display. A double beeping tone will sound;
• Add the content of the memory to the last measurement result:
Keep +/= button pressed down until a double beeping tone
sounds. “M+”will disappear from the display, only the value from the
memory will now appear in the lower row of the display.
• The width symbol“W“ in the display flashes to indicate the next
measurement to be carried out. Press the READ button in order to
measure the width, the result appears in the upper section of the
display. (Step 2);
• The height symbol“H“ in the display flashes and indicates the next
measurement to be carried out. Press the READ button in order to
measure the height, the result appears in the upper section of the
display. (Step 3);
• The repeated pressing of the READ button switches back and forth
in the upper section of the display between the length, width and
height;
• Press the MODE button in order to delete the data from the display
− now, a new volume calculation can be carried out;
− in order to switch into the measurement mode, press the MODE
button again.
Tips:
With the individual pressing of the MODE button, you can switch back
and forth between the length, area and volume. If data is available on
the display, the pressing of the MODE button will delete the current
data – the mode remains unchanged.
Operation Operation
AFTER SALES SUPPORT:
Telephone: 1800 269 981
E-mail: [email protected]
AFTER SALES SUPPORT:
Telephone: 1800 269 981
E-mail: [email protected]
26 27
• Press the +/= button – the sum of both volumes will appear in the
lower section of the display;
• Repeat the above mentioned steps, in order to continue adding the
measured volumes.
Temperature display
Keep the FT/M button pressed for approx. 2 seconds – the tem-
perature appears in the lower section of the display. If the Anglo-
Saxon system is set (ft./in), the temperature will be displayed in °F
(Fahrenheit), if the metric system is set (m), the temperature will be
displayed in °C
Press the READ button again in order to switch to return to the
measurement mode.
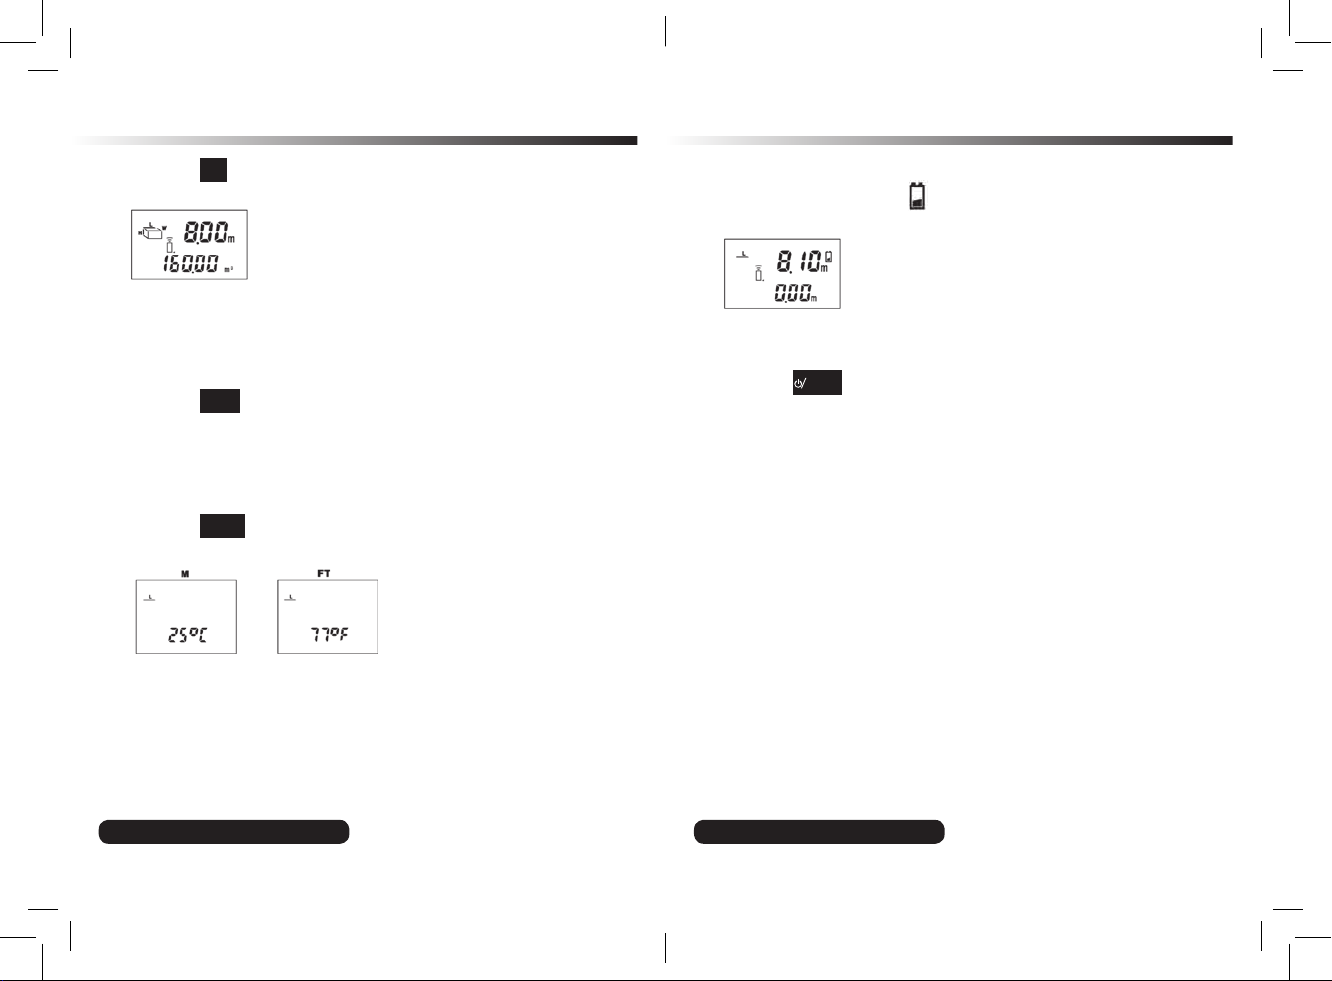
Battery display
Empty battery: Here, the symbol constantly appears in the display
in order to remind you to change the battery.
Switching off the device
Keep the
BASE
button pressed down until the device switches off.
After approx. 60 without entry, the device will switch off automatically.
OperationOperation

AFTER SALES SUPPORT:
Telephone: 1800 269 981
E-mail: [email protected]
AFTER SALES SUPPORT:
Telephone: 1800 269 981
E-mail: [email protected]
28 29
The ultrasound distance measurement device is maintenance-free.
Clean the device with a dry or slightly damp cloth.
Storage
Keep the device in a dry and frost-free location. The device must be
kept out of reach for children.
Disposal of device
Please dispose of this product and battery responsibly at end of
life. Do not throw away with household waste. Please contact your
retailer or local authority for details of recycling schemes operating
in your area.
Cleaning Technical data
Name Ultrasonic distance measurer
Type GT-UDM-02
Recommended use In enclosed spaces
Measurement range 0.6 to 16 m (2’to 53’)
Calculation range: Length 9999,99 m (9999’11’)
Area 99999,9 m² (99999,9 sq.ft)
Volume 999999 m³ (999999 cubic ft.)
Resolution 0.01 m
Wavelength of the laser 630~660nm
Temperature range 0° C to +40° C
Laser class 2
Power supply 9V block battery, size 6F22/6LR61
Power consumption < 50 mA
Automatic switch-off The device automatically switches itself
off after 60 seconds of
non-use.
Operating temperature 0° C to 40° C (32° F to 104° F)
Size (length x width x height) 155 mm x 72 mm x 41 mm

AFTER SALES SUPPORT:
Telephone: 1800 269 981
E-mail: [email protected]
AFTER SALES SUPPORT:
Telephone: 1800 269 981
E-mail: [email protected]
30 31

Table of contents
Other Workzone Measuring Instrument manuals


