Wosports G500 User manual

G500 GAME CAMERA
USER’S MANUAL
Thanks for purchasing this trail camera
Please read before using this equipment


CONTENTS
PART LIST
Front View
Operation Interface
Bottom View
Back View
Operating Buttons
Settings Menu
Quick Setting
How to use?
PRODUCT STRCTURE
CAMERA OPERATIONS
LOADING BATTERIES
INSERTING SD CARD
ITEM SETTINGS
MOUNTING
TECHNICALSPECIFICATION
FAQ
USING THE CAMERA
4
5
6
7
7
8
9
10
11
12
12-16
17
18-19
20-25

PARTS LIST
1.Trail Camerax1
2.User’s Manualx1
3.USB Cablex1
4.Nylon Strap with Bucklex1
5.Wall Mountx1
6.Screwsx3
G500 GAME CAMERA
USER’S MANUAL
Thanks for purchasing this trail camera
Please read before using this equipment
④
① ② ③
⑤ ⑥
4

PRODUCT STRCTURE
Infrared LED Array
PIR Sensor
Camera Lens
Indication LED
Latch
FRONT VIEW
5

LCD Screen
MENU
UP/Video
Left
OK
Down/Photo
Right/Shot
Battery ReleasePower/Mode Switch
PRODUCT STRCTURE
OPERATION INTERFACE
6

PRODUCT STRCTURE
BOTTOM VIEW BACK VIEW
Microphone
External Power Cover
(open to use DC power port)
Battery Compartment
Mounting-Bracket Screw Receptacle
(Standard 1/4’’-20-Tripod Mount)
SD Card slot
USB Port
Belt Hole
Sawtooth Brackets
Cable-Lock Hole
7

CAMERA OPERATIONS
HOW TO USE?
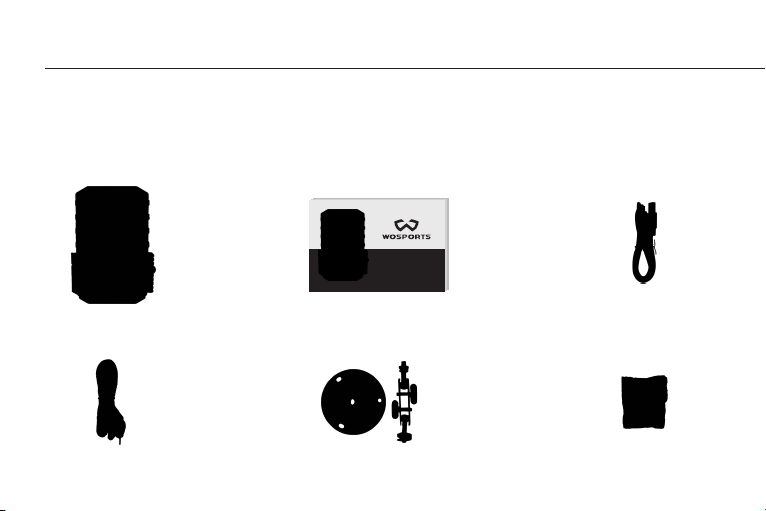
1. Install 8pcs AA batteries (NOT INCLUDED).
2. Install SD card (CLASS 6 or higher class Up to 32GB max, NOT INCLUDED).
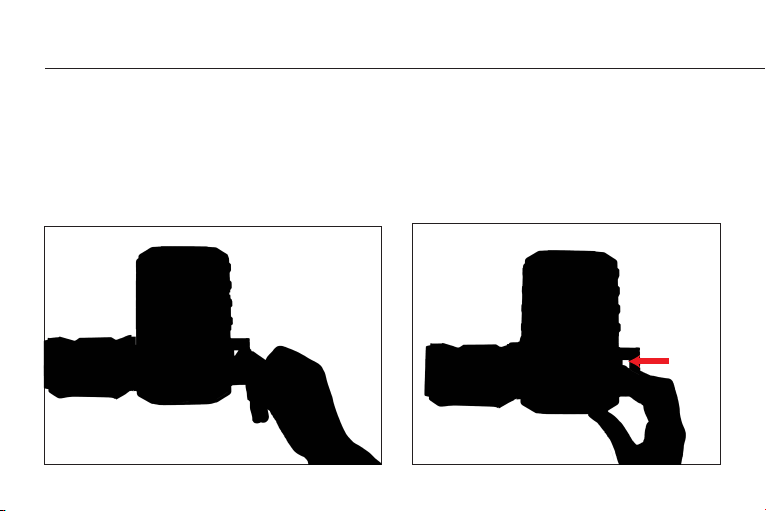
3. Put the switch to "AIM", then you can setting (Date/Time, Image resolution, video
resolution, and the Interval time etc)
4. Put the switch to the “ON” position, it will enter the PIR detection state. Then the trail
camera starts working.
Note:
1.Be sure to switch the camera’s power OFF before inserting /exiting the SD card and loading/unloading
the batteries.
2.Formatting the SD card before using it for the first time is recommended. (Put the switch to "AIM "
.Press “Menu “‒“Settings”-“Format” - Press OK to format the SD card . )
3.A full set of 8AA Alkaline or Lithium batteries is recommended
8

LOADING BATTERIES
1.Press the Battery Tray EJECT button to release the battery tray and pull it out for loading.
Switch the camera’s power OFF when loading/unloading batteries.
2.Be sure to inset each battery so its polarity(+/- direction) matches the polarity indications
at the bottom of the battery tray. A full set of 8AA Alkaline or Lithium batteries should be
used .
3.Pull the battery tray into the host, you will hear a slight “click” sound, which means the
battery compartment is locked.
9

Make sure that the SD card is insert correctly .If you hear“click” sounds that means it has
be inserted correctly .The camera uses a standard SD memory card to save your photos or
videos.SD and SDHC (high capacity)class 4 or higher seed cards up to a maximum 32GB are
supported. A class 10 memory card is recommended when the camera works at burst
mode.
INSERTING SD CARD
10

1. :Page up.
2. :Page down.
3. :Page left.
4. :Page right/ Shot key
5. : Save settings.
: Review photos and videos in the AIM mode.
Press OK again to exit the preview interface.
6. :Enter the setup menu in preview mode.
:Exchange between main screen and setup.
7.AIM mode: To program camera.
8.OFF mode: To turn off the camera.
9.ON mode: When movement occurs in the monitoring region, the camera will take pictures or videos
automatically according to the previous programmed setting. After switching the camera to ON
position, the motion-indication LED (red) will blink for about 10 seconds. This interval allows time for
you to close the Cam’s front cover, lock it, and leave the monitored area.
USING THE CAMERA
Operating Buttons
OK
M
EJECT
ON AIM OFF
OK
OK
M
M
11

To view the camera settings menu, press(M) in the AIM mode.
Use or to select the sub-menu, use or to select the different options, then
press (OK) to save the setting and the option. Press(M)to return.
ITEM SETTINGS
Settings Menu
Quick Setting
Setting Items Sub menu Description
Settings
Set Clock/Date
Photo/Video
Interval
Sensor Level
Flash Modes
Settings
Set Active Time
Set Timelapse
Format
Default
Language
Settings
Camera Name
Software Update
Version
Set Clock/ Date 00:00 -Hour: Minute
00-00-0000 -Month-Date-Year
12

Setting Items Sub menu Description
Photo/Video
Image Size
Capture Number
Video Size
Video Length
Image Size
Capture Number
Video Size
Video Length
-5MP, 16MP , 30MP Image size can be selected.
-Number of photos per PIR capture. Can select 1-6 images.
-Quality: HD:1280 x720P video ,FHD:1920x1080P,QHD:
2560x1440P,and VGA :640x480P video
-If you choose this mode, the camera will take a photo
first ,then start to record video.
-Video Length: Select between 5,10,20, or 30 seconds.
We recommends setting the video length for more
shorter tomaximize battery life.
There are 3 modes to choose from Photo
Video, Photo& video
Photo
Video
Photo &Video
13

Setting Items Sub menu Description
Interval 2second -60second
5minute-60minute
LOW
Middle
High
Power Save
Long Range
Fast Motion
Sensor Level
Flash Modes
This interval means how long the PIR will be disabled
after each triggering in the ON mode. During this time,
the PIR will not react motion. The minimum interval is
2 seconds and the maximum is 60 minutes.
- Power Save- Medium LED output Medium Shutter Speed.
- Long Rang-High LED output Low Shutter Speed.
- Fast Motion- High LED output Fast Shutter Speed.
-Set the distance of infrared induction. There are three
options can be selected.
-Low sensitivity, Middle sensitivity, High sensitivity can
be set .The higher degree indicates that the camera is
more easily triggered by motion.It is recommended to
use lower sensitivity for environments with lots of
interference like wind, tall grass, or intense shadows.
-Set the sensitivity of the sensor.
14

Format Yes/No
- If you choose format SD card, the system will delete all
images and video stored on the SD card. Make sure that
you have a backup of important data.
(Highly recommended to format with new SD cards.)
Setting Items Sub menu Description
Set Active Time Off
ON Start 00:00
Stop 00:00
Off
ON TL Freq
TL period
Set Time lapse
- Off means you shut down the function.
- ON The camera would always worked within the
active time you set up.
-Time lapse delay: Can select 5, 10 ,15, 30, 60 minutes.
For example, set the interval to 5 minutes, the camera will
take a photo each 5 minutes.
- Off Close the time lapse function
The camera will take photos automatically during the 2
blocks of time you set up at “A” and “B”.
Note: If the time of period A and period B you set are not
within “Active Time” you set, the time lapse function
will not react during this time quantum.
15

Setting Items Sub menu Description
Yes/No
English
日本语
Deutsche
Default
Language
Camera Name
-Set this serial number to identify different shooting
locations by numbering when multiple machines are in
use at the same time. After setting, the serial number
you set for the camera will stamp on the photos or videos.
-English , Japanese, Deutsche can be selected as camera
language.
UpdateSoftware Update
-Press OK when Update is shown and the camera will read
the software update files placed on the SD card if the
Firmware version number needs to be updated to a more
current version.
REV1.0Version Camera Version
-Returns to default settings. Default settings are as
follows:English, Photo,5MP,1Pict, Serial number and so on.
C A M 0 0 1
16

MOUNTING
After the setting the camera’s time/date and other options to your preference , you’re
ready to take it outside and begin capturing images of animals in the area you want to
monitor.
When mounting the camera to a tree, use the adjustable web belt provided. Please be sure
to mount it in place correctly and securely. To get the optimal picture quality, the tree
should be about 10-30ft. away from the place to be monitored, with the camera placed at a
height of 3.6-4.5ft..
Tips: Try not to mount the camera facing the rising or setting sun. If mounting to a feeder
or in a dusty environment , be sure to clean the camera lens and the PIR sensor regularly.
Periodically check the mounting of the camera to make sure it hasn’t come loose. Check
the batteries frequently to ensure they are still providing power to the camera.
17

TECHNICAL SPECIFICATION
Resolution
Trigger Speed
Camera Lens(FOV)
IR Illumination
IR Flash Distance
Detection Distance
Recovery Rate
Time Lapse Mode
Multi Shot Mode
5MP Native Sensor/Up to 30MP Interpolated
0.3s
120 degree
40pcs 850 LEDs
90' Flash
2560x1440P
1920x1080P
1280 x720P
640x480P
Up To 80 ft
1s
Yes
Up to 6 Per Trigger
Video Resolution
18

Battery Life
LCD Screen
Button Interface
Attachment Interface
Case Color
Power Source
DC IN
Cable Lock Compatible
Accessories
Weight (Product without packaging)
Dimensions (Product without packaging)
Up to 18 mouth
2.0" LCD Screen
Backlit 6 Button
1/4"-20 Brass Insert Bottom w/Dead Stop
Camo Dipped Front Case
8AA 12V
12V DC In
Yes, Closed Dual Slot Above Dual Strap Slot
Nylon Strap with Buckle
Less Than 270 Grams (Without Batteries)
147mm x90mm x55mm
19

FAQ
1.Make sure that you have installed all batteries in the battery compartment, filling all
battery spaces with no “gaps”.
2.We recommend using a full set of 8 Energizer® Lithium AA batteries.
3.Make sure that the batteries are installed correctly, observing proper polarity.
4.Please be sure to switch the power “OFF” and remove the batteries if necessary. Trying to
reopen the camera after 1 min.
CAMERA WON’T POWER UP
20
Table of contents