Wurtec 15-505 User manual

TimeouT Jumper
User Manual
6200 Brent Drive, Toledo, Ohio | Ph: 800.837.1066 | Buy Online! wurtec.com
Version 1.0 September 2009
Part No. 15-505

2Buy Online! Wurtec.com
Installation & Service Manual
Timeout Jumper Instructions
Ratings:
Voltage – 0 – 240vAC/DC
Current – 0 – 8Amps
Battery – 2 AAA
Programming
When the jumper is in sleep mode the display will be blank. At this point you
have the choice or programming the options in the menu system by pressing
the “Prog” button; or you can use timer mode by pressing the “Start” button.
When the “Start” button is pressed you will see either the default countdown
time or the user programmed countdown
time displayed and begin to count down.
If you wish to add more time press the
“Start” button again to add another incre-
ment of time.
To program the Wurtec Time out Jumper
begin by pressing the “Prog” button
scroll through the following menus
by pressing the “UP” or “DN” buttons: Time, Name, Number, Passcode, and
Status. Below is a description of what the menu is intended for and how to
program that particular option.
Additive Time – By default each press of the “Start” button will add one hour of
time on the timer. To change the default time per button press the “prog” button
once while in “Additive Time” menu.
Press and hold the “Prog” button again
for approximately two seconds then
release. The left set of digits is hours,
the middle set of digits is minutes and
the right set of digits is seconds. The
set of digits blinking is the current set
waiting to be changed. Press the “UP”
or “DN” buttons to change the value

Buy Online! Wurtec.com 3
Timeout Jumper Instructions
accordingly. To move to the next set of digits press and hold the “Prog” button
for approximately two seconds and then release. When nished press and hold
the “Start” button for approximately two seconds and then release. “Additive
Time” willscroll across the screen.
User Name – The “User Name” menu gives you the option of entering your
name to personalize your jumper. Programming your name is much like pro-
gramming the time. When “User Name”
has scrolled across the screen, press
and hold the “Prog” button for approxi-
mately two seconds and then release.
You will then see a blinking asterisk
(see picture C). At this point use the
“UP” or “DN” button to scroll through
the alphabet; when the desired letter is
displayed press and hold the “Prog” button for approximately two seconds and
then release. The letter you chose will be locked in, the cursor will blink waiting
for the next letter to be chosen. Follow these steps until your name is complete
(32 characters max). When nished press and hold the “Start” button for ap-
proximately two seconds and then release.
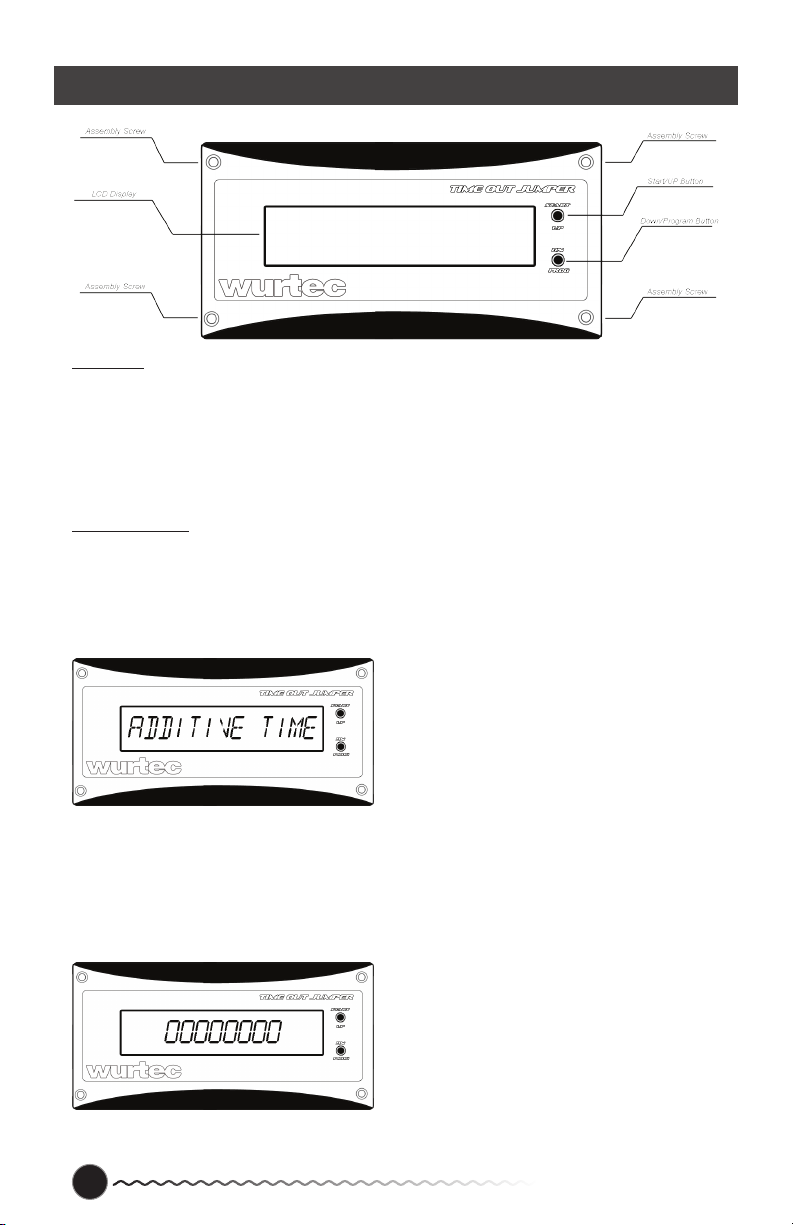
ID Number – The ID number menu is used to input a ID number for another
form of personalization. This number
can be up to eight characters. To
program a ID number scroll to the “
ID Number” menu; press and hold the
“Prog” button for approximately two
seconds and then release. At this
point you should see a string of eight
zeros being displayed with the rst
zero blinking. The number that is blinking is the number waiting to be changed.
To change the number use the “UP” or
“DN” button until you have come to the
desired number; press and hold the
“Prog” button for approximately two sec-
onds and release, you will see the next
digit begin to blink. Repeat as desired
for all numbers. When nished press
and hold the “Start” button for approxi-
mately two second and then release.
Access Code – The access code menu
is used to encrypt the user preferences
so it can’t be changed without entering
a user programmed access code. The
access code can be up to eight numbers.
To program the access code scroll to the
“Access Code” menu; press and hold the
“Prog” button for approximately two sec-

4Buy Online! Wurtec.com
Installation & Service Manual
Timeout Jumper Instructions
onds and then release. At this point you
will see a display of eight zeros with the
rst zero blinking. The number blinking
is the number waiting to be changed.
To change the number use the “UP” or
“DN” button until you have come to the
desired number, then press and hold
the “Prog” button for approximately two
seconds and then release; you will then see the next character blink; repeat as
desired fro all numbers. When nished press and hold the “Start” button for ap-
proximately two seconds and release.
Program Status – Program status is a non-programmable menu. This option
scrolls all the information that has been programmed into the Wurtec Time out
Jumper. To view scroll to the “Pro-
gram Status” menu, press and hold
the “Prog” button for approximately two
seconds and then release. To stop
the status scrolling, press and hold the
“Start” button for approximately two
seconds and then release. You will
then see “Program Status” scroll across
tje screen again. At this point you can
use the “UP” or “DN” button to scroll through the menus or press and hold the
“Start” button for approximately two seconds to put the Jumper into “sleep”
mode.
Changing Batteries - To change the batteries in the Timeout Jumper you
rst need to remove the four screws in the four corners of the enclosure. The
jumper will separate into three pieces.
The top of the enclosure, the bottom
of the enclosure and the guide plate
for the lead wires; the jumper board
is screwed internally to the top of the
enclosure. On the back side of the
jumper there will be two AAA batter-
ies in black plastic holder on the back
side of the board. Remove the dead
batteries from the holder and replace them with two fresh AAA batteries. To
reassemble the enclosure place the guide plate into the channel of the bottom
half of the enclosure, then place the top half over that. Replace the screws in
the four corners of the enclosure.

Buy Online! Wurtec.com 5
Timeout Jumper Instructions
Frequently Asked Questions
Q1. What happens if battery dies while it’s in use?
When a low battery threshold has been reached the Time Out Jumper will
display “Low Battery” and will then last approximately 8 hours before
shutting down if the Jumper is in use. If the Jumper is not in use and has
reached a low battery threshold, the Jumper will display “Low Battery” and
will not allow use until the batteries have been changed.
Q2. How long do the batteries last?
Approximately one month straight of constant use. Approximately one year
if not in use.
Q3. What type of batteries does it use?
Requires 2 “AAA” batteries. Rechargeable “AAA” batteries can be used
but please note that plugging the unit into the USB with not recharge the
batteries. The rechargeable batteries must be removed from the unit and
recharged in their own respective charger.
Q4. When does the time start ashing?
Time begins to ash when there is 5 minutes left on the timer.
Q5. How much time can I program into the jumper?
You can program up to 99 hours, 59minutes, and 59 seconds; which is equal
to about 4.2 days.
Q6. What happens if I connect my time out jumper to a circuit higher than 8
Amps?
The Time Out Jumper is equipped with a 250v, 8 Amp fast blow fuse. The
fuse will blow if connected to a circuit higher than 8 Amps and will save the
jumper from damage to itself and save injury to the operator. The fuse is
replaceable and should be replaced with a fuse of the exact same rating if
blown. Do NOT replace it with a fuse of a higher rating, this can damage the
unit and cause serious injury to the user.
This equipment has been tested and found to comply with the limits for a Class A digital
device, pursuant to part 15 of the FCC Rules. These limits are designed to provide reason-
able protection against harmful interference when the equipment is operated in a commercial
environment. This equipment generates, uses, and can radiate radio frequency energy and, if
not installed and used in accordance with the instruction manual, may cause harmful interfer-
ence to radio communications. Operation of this equipment in a residential area is likely to
cause harmful interference in which case the user will be required to correct the interference
at his own expense.

6Buy Online! Wurtec.com
Installation & Service Manual
Timeout Jumper Instructions
Notes...

Buy Online! Wurtec.com 7
Timeout Jumper Instructions
Notes...

8Buy Online! Wurtec.com
Installation & Service Manual
Timeout Jumper Instructions
Notes...
Table of contents
Popular Remote Starter manuals by other brands

CrimeStopper
CrimeStopper EZEE Start EZ-3 operating instructions

CrimeStopper
CrimeStopper Cool Start RS-3 operating instructions

Bulldog Security
Bulldog Security RS1100 Installation and owner's guide

ADS
ADS iDatastart HC1151A Product guide

Carbine
Carbine 55CSR owner's manual

Kia
Kia RED301-1WAY quick start guide