manuals.online logo
Brands
  1. Home
  2. •
  3. Brands
  4. •
  5. Xantech
  6. •
  7. Remote Control
  8. •
  9. Xantech SR21 User manual

Xantech SR21 User manual

1
Remote Control Switchers
INSTALLATION INSTRUCTIONS
SR21
SPEAKER RELAY MODULE
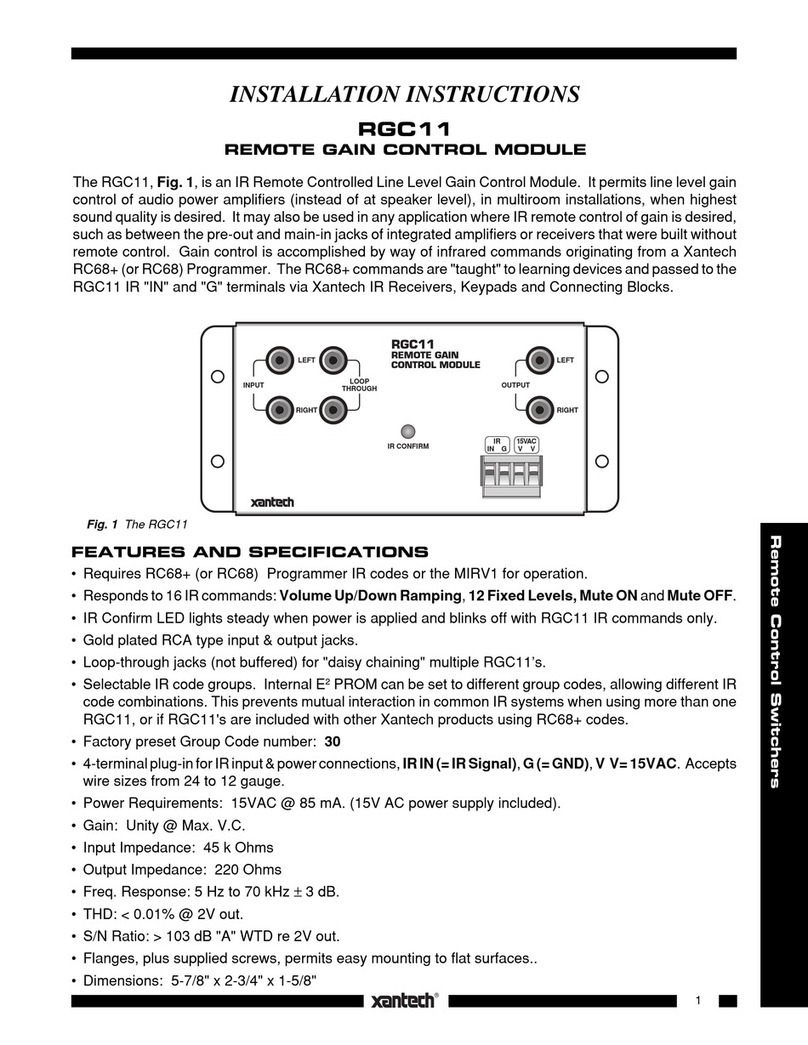
The SR21, Fig. 1, is an IR Remote Controlled A/B Speaker Relay Module. It allows the installer and user
to switch the output of one stereo amplifier between two speaker pairs, or, to switch one speaker pair
between the outputs of two stereo amplifiers. The switching is accomplished by way of infrared commands
originating from a Xantech RC68+ (or RC68) Programmer. It can also be switched by a DC voltage applied
between the CI (control input) and GND terminals. The RC68+ commands are "taught" to learning devices
and passed to the IR IN and GND input terminals of the SR21 via Xantech IR Receivers, Keypads and
Connecting Blocks.
Fig. 1 The SR21
NOTE: The SR21 can also be used as an IR router.
FEATURES AND SPECIFICATIONS
• 4-terminal IR input (IR IN = IR Signal, CI = Control Input, GND and +12VDC) for connection of Xantech
IR Receivers, Smart Pads, Connecting Blocks and other devices.
• Three 4-terminal plug-in connectors for stereo amplifier and speaker connections.
• Isolated Left and Right grounds. Allows use of bridging type power amplifiers.
• 5 Amp/30V DC relay contact rating; provides 200 watts per channel capability into 8 Ohms.
• All plug-in connectors accept wire sizes from 24 to 12 gauge.
•IR CONFIRM LED goes ON only when an RC68 IR command signal activates unit.
• LED indicates Aor Bswitching status.
• Four RC68+ IR commands permit OFF=A, ON=B, Pair, Toggle (A or B), and Momentary operation of
the switching relay.
• IR activated ON condition (ON=B) goes OFF (Off=A) if power is interrupted.
•+3V to +30V DC 1 mA applied to CI terminal will switch unit, instead of IR, if desired.
• Factory preset Group Code number: 50.
•CODE SUB-GROUP switch allows a choice of 8 different groups of the four RC68+ (or RC68) commands
that operate the SR21. This prevents mutual interaction in common IR systems when using more than
one SR21. Also, internal E2PROM can be set to different code groups, allowing up to 240 different IR code
combinations if the system uses more than eight SR21's or in combination with CC12's.
• Power: +12V DC @ 50 mA. Use the 781RG Power Supply for each SR21. If IR receivers or keypads are
used on the same 12V line, use the 782-00 Power Supply.
• Flanges, plus supplied screws, permits easy mounting to flat surfaces.
• Dimensions: 5-1/4" x 2-3/8" x 1-7/8" (133mm x 60mm x 46mm)
IR CONFIRM
L+ L– R– R+ L+
L–
R–
R+
CODE
SUB-
GROUP
SR21
SPEAKER RELAY
MODULE
OFF = A
ON = B
R+ R– L– L+
0
1
2
3
4
5
6
7
A
B
IR IN
CI
GND
+12VDC

2SR21
Fig. 2 The RC68 Programmer
RC68+ PROGRAMMER / REMOTE CONTROL
The RC68+ (and RC68) Programmer (available separately) contains
all the commands necessary to operate the SR21.
• You will need it to program universal learning devices such as the
Xantech URC series learning remote, the Xantech Smart Pads, the
590 Programmable Controller, the 710 Fone Link, etc., with com-
mands that operate the SR21.
•NOTE: The RC68+ codes operate several other Xantech models as
well, such as the RS41AV, RP41AV, ZPR68, etc. Therefore, only
the button descriptions that apply to the operation of the SR21
(Overlay "B") are listed below. All others should be ignored..
CAUTION: While the RC68+ will operate as a separate remote
control, it is highly recommended it not be given to the final user for the
following reasons:
• Since it includes setable code groups, the user may inadvertently
alter the installer configurations.
• Also, since the user will require IR commands from other brands of
equipment to control the total system, in addition to those of the
SR21, all commands should be consolidated into one learning
device, for ease of use.
APPLICABLE RC68 BUTTON DESCRIPTIONS
1. Pair OFF Command. This button activates the IR command that turns the internal relay of the SR21
to the OFF position (the Aselection).
2. Pair ON Command. This button activates the IR command that turns the internal relay of the SR21
to the ON position (the Bselection).
3. TGL (toggle) Command. The first press of this button turns the relay ON (the Bselection) -the second
press turns it OFF (the Aselection).
4. MMT (momentary) Command. Pressing this button causes the SR21 relay to go ON (the Bselection)
but stays ON only as long as the button is held down. When released, the relay returns to the OFF
position (the Aselection).
5. IR Emitter Lens.
CODE SUB-GROUP
The RC6+8 has 11 rows of 5 buttons each. Each row, identified by the numbers 0through 7(see Fig. 2),
will execute the same set of 4 commands listed above, when selected by the CODE SUB-GROUP switch
on the SR21. This is useful to prevent mutual interaction in common IR systems when using more than one
SR21, or if CC12's are used with SR21's.
To change the CODE SUB-GROUP, simply rotate the CODE SUB-GROUP switch on the SR21 to the
number that corresponds to the desired row on the RC68+. Remove and reapply power (after 20
seconds), then use the chosen row to execute the commands for that particular SR21.
NOTE: No changes are needed on the RC68+!
6. Code Group Numbers. The SR21 is also capable of being set to different basic code groups as well
as the sub-groups.
NOTE:
When shipped from the factory, the SR21 is set to code group number 50. Be sure to
set the RC68+ to the same number!
It may be necessary to change the SR21 to a different code group if it is used in a common IR bus controlled
system with many SR21's, CC12'S, etc., to avoid mutual interaction.
5
OFF ON TGL MMT
OFF ON TGL MMT
OFF ON TGL MMT
OFF ON TGL MMT
OFF ON TGL MMT
OFF ON TGL MMT
OFF ON TGL MMT
OFF ON TGL MMT
0
2
3
4
5
6
1
7
80 48 10 90 01
00 C0 50 D0 41
40 A0 30 B0 21
20 E0 70 F0 61
60 88 18 98 09
08 A8 38 B8 29
28 E8 78 F8 69
68 C8 58 D8 49
E1 89 C9 A9 E9
71 19 59 39 79
F1 99 D9 B9 F9
Place the
"B" Overlay
on the RC68+
0
1
2
3
4
5
6
7
CODE
SUB-
GROUP
6
2
4
3
1
RC68+
B
3
Remote Control Switchers
SR21
Refer to the RC68+ instruc-
tions for code group set-
ting procedures.
INSTALLATION
Fig. 3 is a simple installation
where the amplifier speaker
outputs of an AM/FM receiver
are switched, by IR control,
between the speakers in a
main room and those in a
remote room.
• This system allows speak-
ers to play in the main room
or
the remote room, de-
pending on the IR remote
commandsenttotheSR21.
They can not play simul-
taneously!
• A 780-80 provides IR control from the Remote Room. It includes a STATUS LED indicator that can be
driven by a +12V System Status (ON/OFF) source, such as an adapter plugged into the Switched AC
outlet on the AM/FM receiver.
• IR control in the Main Room is provided with a 490-30 Micro Link IR Receiver as shown (other Xantech
models could also be used).
• The 781C-00 powers the IR receivers as well as the SR21 through the 789-44 Connecting Block.
• In this type of system, you would "teach" either the Pair or the Toggle commands from the RC68 into a
learning remote to operate the SR21 (along with your other system commands).
Fig. 4 is a basic system where the speaker outputs of
two AM/FM receivers are made available, via A/B
switching, to a stereo pair of speakers in a remote
room.
• This system is a relatively
low cost means of provid-
ing two different sources to
a remote room.
• IR control in each room and
power supply consider-
ations are the same as de-
scribed for Fig. 3.
• To simplify the illustration,
otherpossiblesystemcom-
ponents are not shown in
Fig. 4.
• Again, you would "teach"
eitherthePairorthe Toggle
commands from the RC68+ into a learning remote to operate the SR21 (along with your other system
commands).
IR CONFIRM
L+ L– R– R+ L+
L–
R–
R+
CODE
SUB-
GROUP
SR21
SPEAKER RELAY
MODULE
OFF = A
ON = B
R+ R– L– L+
0
1
2
3
4
5
6
7
A
B
IR IN
CI
GND
+12VDC
789-44
Connecting Block
SR21
Speaker Relay Module
4-Conductor Inter-room
Cable (unshielded OK)
REMOTE ROOM
MAIN ROOM
283M Blink IR™
Mouse Emitter
Cassette DecK
283M Blink IR™
283M Blink IR™
R
L
+– +–
780-80
"J" Box
IR Receiver
+– +–
Left
Speaker
Right
Speaker
490-30
Micro Link™
IR Receiver
(For Main
Room
IR Control)
GND
IR OUT
+12V
STATUS
(To +12V System Status
Voltage, if desired).
To 120 V AC
(unswitched)
782-00
Power
Supply
PWR
+12VDC
GND
STATUS
SIGNAL
EMITTERS
IR
RCVR
789-44
CONNECTING BLOCK
®
AM/FM Receiver
CD Changer
Fig. 3 Main/Remote Speaker
Switching Using an SR21
IR CONFIRM
L+ L– R– R+ L+
L–
R–
R+
CODE
SUB-
GROUP
SR21
SPEAKER RELAY
MODULE
OFF = A
ON = B
R+ R– L– L+
0
1
2
3
4
5
6
7
A
B
IR IN
CI
GND
+12VDC
REMOTE ROOM
MAIN ROOM
789-44
Connecting Block
SR21
Speaker
Relay Module
4-Conductor Inter-room
Cable (Unshielded OK)
R
L
+– +–
780-80
"J" Box
IR Receiver
490-30
Micro Link™
IR Receiver
(For Main
Room
IR Control)
GND
IR OUT
+12V
STATUS
AM/FM Receiver #2
AM/FM Receiver #1
To Emitters on Other
Controlled Equipment
(To +12V System
Status Voltage, if desired).
To 120 V AC
(unswitched)
782-00
Power
Supply
PWR
+12VDC
GND
STATUS
SIGNAL
EMITTERS
IR
RCVR
789-44
CONNECTING BLOCK
®
Fig. 4 Amplifier A/B Switching Using an SR21

4
Additional Remote Rooms
You may add more remote rooms to the system shown in Fig. 4. Proceed as follows:
• Use one additional SR21 for each additional remote room.
• Connect the A and B terminals of each additional SR21 in parallel to the A and B terminals of the preceding
SR21 (daisy chain).
• Connect the center 4-terminal connector to the additional remote room speakers in the same manner as
shown in Fig. 4.
NOTE: Be careful not to overload the amplifiers as you add rooms. It is recommended that you use
Xantech Match Maker speaker volume controls whenever you have three or more rooms connected in
this way, to ensure correct impedance matching.
• Connect the IR IN, GNDn +12VDC terminals in parallel also and connect the IR receiver's to these same
terminals, one from each room.
• Be sure to use the higher current power supply, model 782-00 (one only).
• Finally, set the CODE SUB-GROUP (refer to page 2) on each SR21 to a different number, to avoid mutual
operation and "teach" the commands to dedicated learning remotes for each room.
NOTE: To avoid the use of dedicated remotes, you could connect each SR21 to it's own dedicated power
supply, connecting block and room IR receiver.
USING THE SR21 AS AN IR ROUTER
The SR21 can also be used as simple 2-way IR router - to switch between two satellite receivers, TV
monitors, etc. Fig. 5 is an example of how it can be used to improve the system shown in Fig. 4 so that the
IR control is automatically switched from one AM/FM receiver to the other when the speaker outputs of the
AM/FM receivers are switched.
• In this case, be sure that both SR21's are set to the same CODE SUB-GROUP! This ensures that they
switch together when the Pair or Toggle A/B commands are sent.
• Note that both operate from the same power supply.
IR CONFIRM
L+ L– R– R+ L+
L–
R–
R+
CODE
SUB-
GROUP
SR21
SPEAKER RELAY
MODULE
OFF = A
ON = B
R+ R– L– L+
0
1
2
3
4
5
6
7
A
B
IR IN
CI
GND
+12VDC
IR CONFIRM
L+ L– R– R+ L+
L–
R–
R+
CODE
SUB-
GROUP
SR21
SPEAKER RELAY
MODULE
OFF = A
ON = B
R+ R– L– L+
0
1
2
3
4
5
6
7
A
B
IR IN
CI
GND
+12VDC
REMOTE ROOM
MAIN ROOM
SR21
Speaker
Relay Module
4-Conductor Inter-room
Cable (Unshielded OK)
R
L
+– +–
780-80
"J" Box
IR Receiver
490-30
Micro Link™ IR Receiver
(For Main Room IR Control)
GND
IR OUT
+12V
STATUS
AM/FM Receiver #1
To Emitters
on Other
Controlled
Equipment
283M
Blink IR™
Mouse Emitter
AM/FM Receiver #2
283M
Blink IR™
White Striped
Side (+)
Second
SR21
(for IR Routing)
6015900
3.5mm-to-
stripped
ends cable
(To +12V System
Status Voltage, if desired).
To 120 VAC
(unswitched)
782-00
Power Supply
789-44
Connecting Block
PWR
+12VDC
GND
STATUS
SIGNAL
EMITTERS
IR
RCVR
789-44
CONNECTING BLOCK
®
Fig. 5 Using a 2nd SR21
For IR Routing
1-30-01
Rev.B
SR21

Other Xantech Remote Control manuals

Xantech XTRALINK IP User manual

Xantech

Xantech XTRALINK IP User manual

Xantech XTR39 User manual

Xantech

Xantech XTR39 User manual

Xantech RGC11 User manual

Xantech

Xantech RGC11 User manual

Xantech MRCREMRP User manual

Xantech

Xantech MRCREMRP User manual

Xantech MAC1 User manual

Xantech

Xantech MAC1 User manual

Xantech INJ94 User manual

Xantech

Xantech INJ94 User manual

Xantech URC-2 User manual

Xantech

Xantech URC-2 User manual

Xantech RC68 Plus User manual

Xantech

Xantech RC68 Plus User manual

Xantech XTR39 User manual

Xantech

Xantech XTR39 User manual

Xantech XVC100 User manual

Xantech

Xantech XVC100 User manual

Popular Remote Control manuals by other brands

THOMSON ROC 330 manual

THOMSON

THOMSON ROC 330 manual

DroidBOX VIP Remote user manual

DroidBOX

DroidBOX VIP Remote user manual

Boston Scientific Freelink SC-5552-1A Directions for use

Boston Scientific

Boston Scientific Freelink SC-5552-1A Directions for use

Monte Carlo Fan Company MCRC1R series Installation and operation instruction

Monte Carlo Fan Company

Monte Carlo Fan Company MCRC1R series Installation and operation instruction

Panasonic CZ-RTC6 operating instructions

Panasonic

Panasonic CZ-RTC6 operating instructions

Samsung MWR-WG00JN Service manual

Samsung

Samsung MWR-WG00JN Service manual

FUTABA GV T2PG instruction manual

FUTABA

FUTABA GV T2PG instruction manual

LEGRAND 0 676 95 quick start guide

LEGRAND

LEGRAND 0 676 95 quick start guide

Daikin BRC7C812 Operation manual

Daikin

Daikin BRC7C812 Operation manual

HygroMatik Spa Touch Control manual

HygroMatik

HygroMatik Spa Touch Control manual

Grundig Remote control handset manual

Grundig

Grundig Remote control handset manual

Sony RM-AX4000A - Universal Remote Control operating instructions

Sony

Sony RM-AX4000A - Universal Remote Control operating instructions

Universal Remote Control Easy Clicker UR3-SR2 operating manual

Universal Remote Control

Universal Remote Control Easy Clicker UR3-SR2 operating manual

Digitalis Digitarium user manual

Digitalis

Digitalis Digitarium user manual

Fujitsu UTY-RNNUM installation manual

Fujitsu

Fujitsu UTY-RNNUM installation manual

MOBILUS COSMO G3+ user manual

MOBILUS

MOBILUS COSMO G3+ user manual

Extron electronics IR 501 user guide

Extron electronics

Extron electronics IR 501 user guide

Protector AS-5030 operating instructions

Protector

Protector AS-5030 operating instructions

manuals.online logo
manuals.online logoBrands
  • About & Mission
  • Contact us
  • Privacy Policy
  • Terms and Conditions

Copyright 2025 Manuals.Online. All Rights Reserved.