Xenosys LooksCAM2 User manual

Doc. No.
F702M-LC2E
Optical Device Medical Device System Engineering
XENOSYS CO., LTD.
2, Venture-ro, 100 Beon-gil, Yeonsu-gu, Incheon 22013, Korea
TEL. 82-32-875-9811~2 FAX. 82-32-875-9813
LooksCAM2
CAMERA SYSTEM USER MANUAL

CAMERA SYSTEM (LooksCAM2) 2www.xenosys.co.kr
Table of Contents
INTRODUCTION ....................................................................................................... 4
SAFETY & PRECAUTIONS...................................................................................... 5
FEATURES................................................................................................................ 8
COMPONENTS.......................................................................................................... 9
EACH COMPONENT & FUCNTIONS .................................................................... 10
1. Main Body (Camera Control Unit, LC2-CU).................................................................. 10
2. Battery Pack (BTP-LC2) ................................................................................................ 11
3. Head Assembly Unit (LC2-HA)...................................................................................... 12
4. Remote Controller (LC2-RC).......................................................................................... 13
5. DC Power Supply (FW8000MUSB05) ............................................................................ 14
HOW TO USE.......................................................................................................... 14
INSTALLATION...................................................................................................... 16
1. Insert & Removal of Micro SD Card (FORMAT) ........................................................... 16
2. Assemble Main Body & Battery Pack ............................................................................ 17
3. Assemble Main Body & Head Assembly Unit................................................................ 18
4. Connect Video-Out Port .................................................................................................19
5. How to update the firmware ........................................................................................... 19
OPERATING INSTRUCTIONS................................................................................ 20
1. Power On/Off ................................................................................................................... 20
2. Video Recording .............................................................................................................. 21
3. Snapshot........................................................................................................................... 21
4. Turn on LED .................................................................................................................... 22
5. Insert the Highlight Tag.................................................................................................. 23

CAMERA SYSTEM (LooksCAM2) 3www.xenosys.co.kr
6. Auto Focus....................................................................................................................... 23
7. Zoom-in & Zoom-out...................................................................................................... 23
8. Check Video by Video-out port ..................................................................................... 23
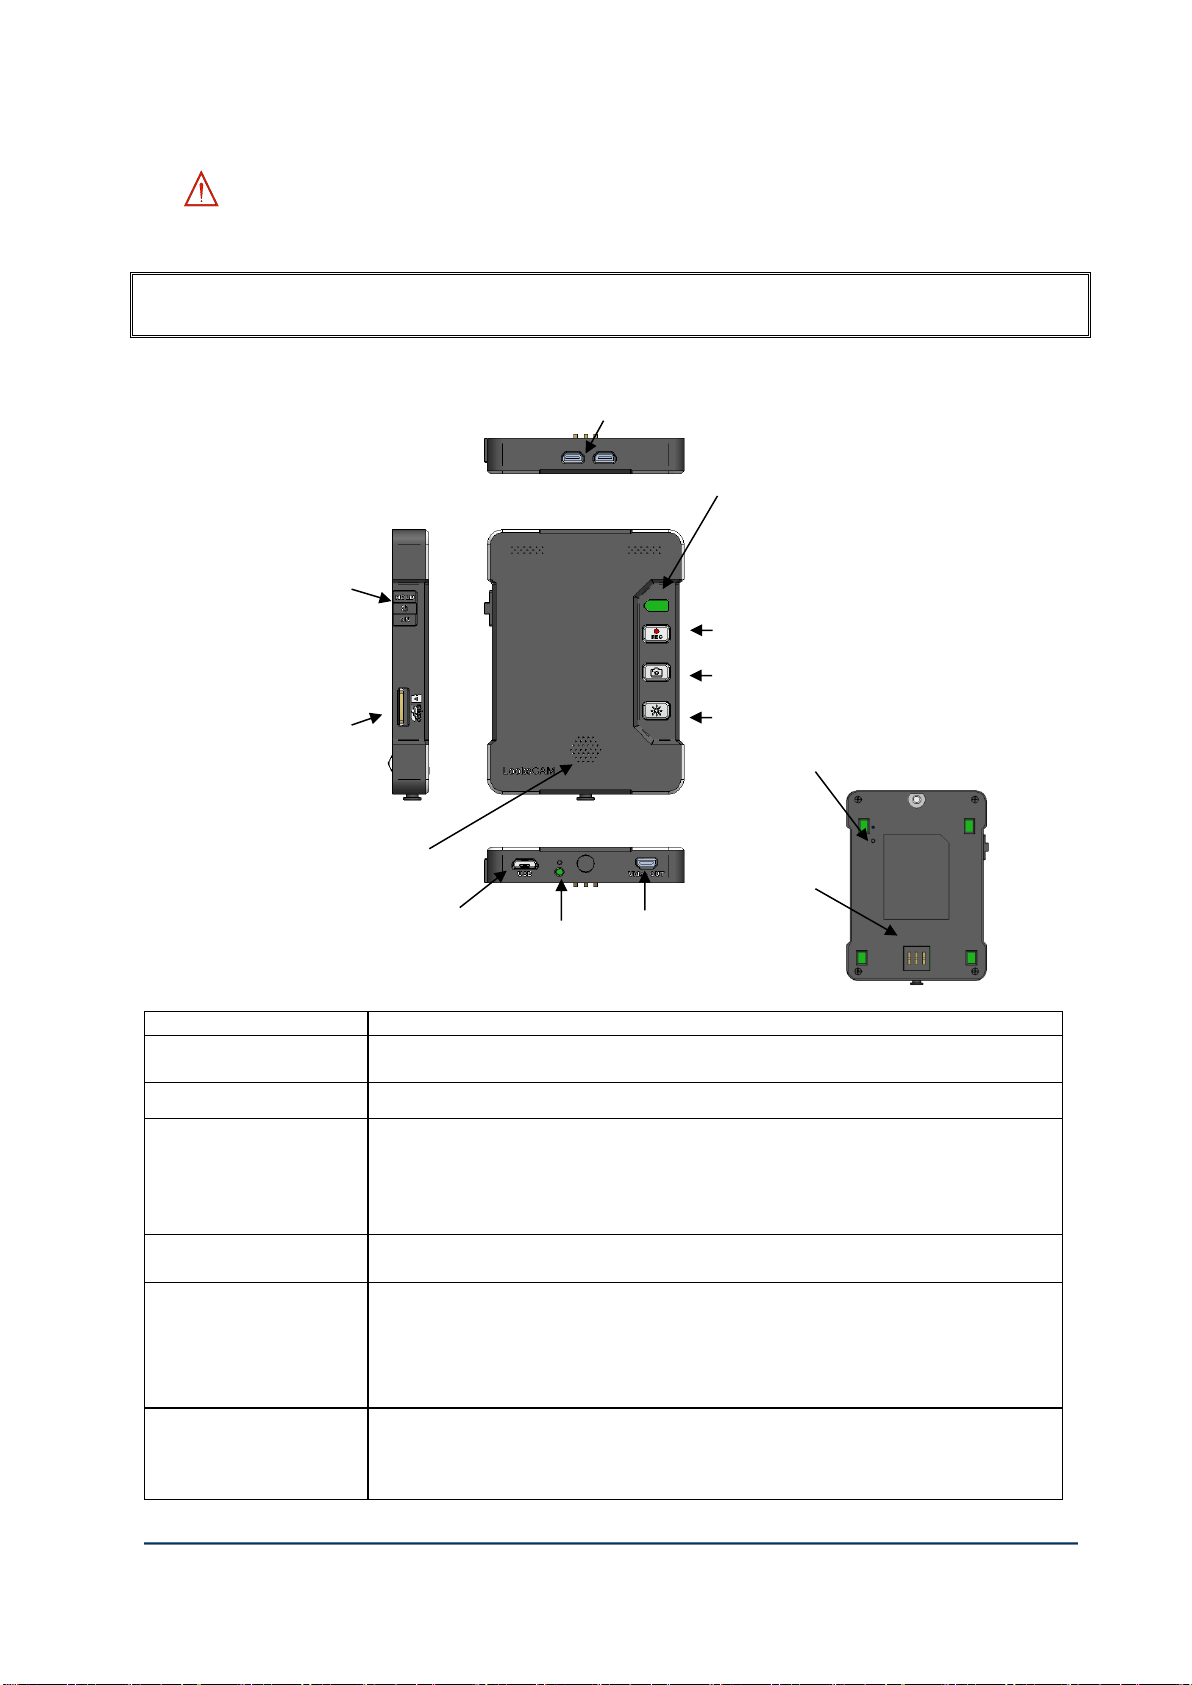
9. Battery Status LED.......................................................................................................... 24
THE VIEWER .......................................................................................................... 26
1. WiFi Connection .............................................................................................................. 26
2. How to install the Viewer ............................................................................................... 27
3. Features & Fuctions of Viewer ...................................................................................... 27
4. Detail Options / Configurations ...................................................................................... 29
(1) Language Setting: Choose which language will be used for control unit notices.. . 29
(2) WiFi : There are two modes Ap and Station. ............................................................................. 29
(3) Resolution: Set up for resolution 1080p or 720p..................................................................... 30
(4) Image Control: Set up for image color by manual or automatic (Recommend for
automatic) ................................................................................................................................................................. 30
(5) Lens ................................................................................................................................................................ 30
(6) AF Mode....................................................................................................................................................... 30
(7) LED LIGHT: Set up the brightness of LC2-CU during the booting process................. 30
(8) MIC, Speaker: Adjust main body microphone and speaker volume. .............................. 30
5. Button Details on Menu................................................................................................... 30
BASIC TROUBLESHOOTING ................................................................................. 31
SPECIFICATIONS ................................................................................................... 33
(1) Control Unit (LC2-CU)............................................................................................................................ 33
(2) Battery Pack (BTP-LC2).......................................................................................................................... 33
(3) Head Assembly Unit (LC2-HA)........................................................................................................... 33
(4) Remote Controller (LC2-RC) ............................................................................................................... 33
(5) DC POWER SUPPLY (DC Power Supply, FW8000MUSB05) ......................................... 34
(6) USB Power Cable (LC2-USBC)............................................................................................................ 34
(7) Video-Out Cable (LC2-VOC) ............................................................................................................... 34
2. Detailed Specifications.................................................................................................... 35
3. Label for packaging & components ...................................................................................... 36
ELECTROMAGNETIC COMPATABILITY.............................................................. 37

CAMERA SYSTEM (LooksCAM2) 4www.xenosys.co.kr
TRANSPORTATION ............................................................................................... 38
STORAGE................................................................................................................ 38
CLEANING INSTRUCTIONS .................................................................................. 39
SERVICES & WARRANTY...................................................................................... 39
INTRODUCTION
This product is the external medical camera to record
patient’s affected area or surgery during the medical
treatment by hospital. The basic components consist
of the camera optical module, camera head, camera
control unit (main body), and LED lens module.
There are two options to check the input video
through camera head spontaneously. One is to
connect VIDEO OUT port of the camera control unit
to HDMI port of the monitor. Another is to use wifi
setting by monitor or computer screen.
Recorded video file is stored in Micro SD card.
Here are summarized features of this product.
1. There is no limit in movement as it is wearable camera.
2. Possible to record shadow less video as the light & the line of sight from the operator is same.
3. Big depth of focus will provide the good focus while operation.
4. The advantage of the view point from the operator when trainees see recorded videos.
5. Use only light source if you do not use recording.
The description below is KFDA approval condition as the medical device.
Registration No.
1909
Certificate
No.
Gyeongin Jesin 07-117
Product Category
I
General Instruments
Class
Class 1
Product Category
II
A31000 Medical Mirror
Product
Category III
A31020.01 External Medical
Camera

CAMERA SYSTEM (LooksCAM2) 5www.xenosys.co.kr
Product Model
No.
LooksCAM2
Manufacturer
Xenosys Co., Ltd.
Country of Origin
Republic of Korea
SAFETY & PRECAUTIONS
Before the usage, you should read the manual & precautions carefully and use it properly. You
should follow next procedures and warnings about the battery & other components to prevent any
fire, injury, or damage to human body.
WARNING for Safety:
WARNING for Power Unit:
WARNING for Main Body:
Do not heat the product with microwave machine or oven.
Do not dispose the battery into a fire.
Do not make direct connection between ‘+’and ‘-‘of the battery terminal (both edge of
battery) simultaneously by the conductor (any metallic object, coin, or clip) which will cause
the short-circuit to occur fire or injury to human body. Thus the charged battery should be
handled with care.
The product is not waterproof (Ordinary equipment, IPX0), so avoid the humidity and water.
Do not use in the presence of a flammable anaesthetic mixture with air, oxygen, or nitrous
oxide.
Do not use any undesignated charger by Xenosys. If any damage or unexpected hazard
happens by the usage of undesignated charger, the manufacturer is free from the
responsibility.
In case of any oil spillage or liquid to inside of the product may cause fire or electric shock.
Then turn off the power immediately and disconnect the power cord.
Do not bend or twist the power cord excessively. It may cause fire or electric shock.
Do not touch the power cord with wet hand which may cause electric shock or equipment
damage.
Do not use LooksCAM2 with connecting directly to the battery pack during the operation or
medical practice.

CAMERA SYSTEM (LooksCAM2) 6www.xenosys.co.kr
Storage Environment (Operating)
Ambient Temperature
6℃- 40℃(43℉- 104℉)
Relative Humidity
30 - 85% at 6℃- 40℃(43℉- 104℉)
Pressure
860 hPa - 1060 hPa
Transportation & Storage Environment (Non-operating)
Ambient Temperature
10℃- 40℃
WARNING for LED Lens Module:
Never disassemble or undertake modification of the equipment.
Do not put any metal or flammable object into the main body. It may cause fire or electric
shock.
Any drop or hard shock may cause the potential damage to the equipment.
Do not use or store the equipment in the area where get the direct ray of light, humidity, dust
or soot. Clean up with a dry and soft cloth.
Do not use the detergent or chemical fluid to clean which may cause discoloration.
Avoid the reach of children or pets.
Maintain the following conditions for storing the product.
Do not drop, crush, or put a high pressure on LED lens module.
Clean LED lens surface with dipped alcohol or methanol in dry cloth softly.
Do not bend or twist the connection cable between the main body and LED lens module which
may cause the defective.
LED optic outside emits heat, so be careful on touching.
Do not look directly into LED lens module or some one’s eyes to avoid the risk of permanent
eye damage.
Refer to the below label for the caution.

CAMERA SYSTEM (LooksCAM2) 7www.xenosys.co.kr
WARNING for Battery:
Never disassemble the battery pack case in force which may cause the malfunction or explosion.
WARNING for DC Power Supply:
WARNING for Disposal
At the first installation, make sure to check the external figure of battery. If there is any spill,
swollen, stink, or unusual found, then do not use the product and contact the dealer. If it’s
normal, then charge the battery fully and use it.
The battery is lithium-polymer rechargeable one.
When transporting only battery, make sure to keep it in soft case. Do not make any conductor
to connect the battery charging point.
The battery operating time may shorten using in the cold place (below 0℃) even fully charged
one. In that case, warm up the battery within the pocket before using LooksCAM2. Do not heat
up the battery with microwave or any heater. Recommended ambient temperature to operate is
6℃- 40℃.
Use only the charger which is provided by Xenosys.
Charger battery in the range of +10℃- +35℃. It may take longer to charger the battery out of
this temperature range.
Provided battery can be charged and discharged about 300 times at room temperature.
Lithium-ion battery is expendables, thus if the operating time is shortened after full charge, we
recommend exchanging new battery.
Be careful on benzene, thinner, alcohol (volatile & flammable fluid) and water. If those
chemicals penetrate the battery, it may cause the trouble in circuit and any accident.
If there is any swollen battery, spill, emit, or fire, stop using immediately and contact the
distributor (dealer) or the manufacturer.
Never use any damaged battery and charger.
In case of the first installation or unused long time, then charge the battery fully before using.
Do not connect any metallic objects between the cradle connector and battery. This may
cause the defective on the charger and DC Power Supply.
Use only the charger which is provided by Xenosys on the phone jack. This may cause the
defective on the charger and DC Power Supply.
The desired lifespan of LooksCAM II is 1 year. In case of careless disposal, it may pollute the
environment, so make sure to separate collection.

CAMERA SYSTEM (LooksCAM2) 8www.xenosys.co.kr
FEATURES
1. Operating Principle
Enable to record Full HD video through high quality wide-angle lens with 4.0 Mega pixel CMOS
image sensor. Easy to install and operate by every people to share the recorded video through
wireless wifi to play and download via mobile phone.
2. Electrical Rating
1) Battery Pack: 3.6 V , 10050 mAh (Lithium ion, : This symbol means Direct Current)
2) DC Power Supply: Input 100-240 V~ (50-60 Hz, 0.3 A), Output 5 V , 2200 mA
3. Protection Classification & Type against Electric Short
1) Protection Classification:
①Battery Pack: Internal Power Device
②DC Power Supply: Class II Device
2) Protection Type: N/A
4. Safety Circuit: Contains protection circuit for over-current & over-voltage
5. Operation Block Diagram: Refer to below photo

CAMERA SYSTEM (LooksCAM2) 9www.xenosys.co.kr
COMPONENTS
1. Main body (Camera control unit)
2. Battery pack (2 pcs)
3. Head Assembly unit
4. Remote controller
5. RigidHeadband
6. DC Power supply
7. Micro SD card socket
8. USB power cable
9. Cable clamp
10. Video Out cable (3.6M)
11. AAA battery
12. Micro SD card (128GB)
13. Gown clip
14. RHB02-PADSET
15. Mini driver
16. Cleaning cloth
BTP-LC2
LC2-CU
LC2-HA
RHB02-LC
LC2-RC
FW8000MUSB05
LC2-USBC
LC2-SDCS
LC-AAABT
MLC type
UHS-I
LC2-VOC
LC2-SDC
GOC
RHB02-PADSET
DRV07
CC-01

CAMERA SYSTEM (LooksCAM2) 10 www.xenosys.co.kr
WARNING:
Components may change for safety and better performance without prior notice.
EACH COMPONENT & FUCNTIONS
1. Main Body (Camera Control Unit, LC2-CU)
Each Part
Function
①Initialization Key
If you press 1 second, the device will reboot. If you hold this key for 5 seconds, all settings
will be initialized for factory set up and SC card will be formatted.
②Camera Sensor Port
Connection port with head assembly unit cable
③Battery Status LED
LED status color and battery operating time (3 step will be used for recording & light)
1. Fully charged Green LED on (3 hours 30 minutes)
2. Orange LED on (2 hours 30 minutes)
3. Blinking Orange LED (1 hour)
4. When Orange LED blinking fast 2 minutes then turn off.
④Power Switch
Power ON/OFF: Hold the button to downward (1 second)
When you move the power switch to upward, all buttons of main body will not work.
⑤Record Button
Video Recording Start / Stop Button
REC LED ON: System initialization completed
REC LED Blinking: Video Recording is in process
REC LED OFF: Ongoing of system initialization or malfunction
⑥Snapshot Button
Quick press for one snapshot, Hold for continuous shots
Snapshot Button LED ON: WiFi On, Possible to connect viewer
Snapshot Button LED OFF: WiFi Off, Not possible to connect viewer
⑧Pairing Switch
⑪Micro SD Card Slot
⑩Speaker
⑨Video-Out
④Power Switch
⑤Record Button
⑥Snapshot Button
⑦LED Light Button
⑬Battery power
Input pin
③Battery Status LED
①Initialization Key
②Camera Sensor Port
⑫USB Slot

CAMERA SYSTEM (LooksCAM2) 11 www.xenosys.co.kr
⑦LED Light Button
LED Light ON/OFF Button
⑧Pairing Switch
Use for remote controller pairing set up (refer to Page 14)
⑨Video-Out
Output port for recoded video to external device.
⑩Speaker
Voice messages
⑪Micro SD Card Slot
Store recorded video files.
Possible recording time is less than 2 hours: 1 warning beep signal
Possible recording time is less than 30 minutes: 1 warning beep signal
Possible recording time is less than 10 minutes: Warning beep signal for every 2 minutes
⑫USB Slot
Connect DC Power Supply to charge the battery pack.
⑬Battery power input pin
Connect to battery pack charging points
⑭USB Slot LED
If it’s connected to DC power supply –Green light On.
If it’s battery charging status –Orange light On.
WARNING:
Battery input Pin on main body USB slot is quite vulnerable on external shock, so please be careful
on assembling or disassembling with battery pack. If this charging pin has been damaged, the
main body will NOT work properly and not possible to use.
2. Battery Pack (BTP-LC2)
Each Part
Function
①Battery Release Knob
Push to arrow pointed direction to assemble or disassemble the main body and battery
pack.
②Battery Hook
To connect main body (LC2-CU) and battery pack
③USB Slot
Connect DC Power Supply to charge the battery pack.
④Battery Status LED
Shows the charging status of battery pack
Fully Charged –Green, In process of Charging –Orange
⑤Battery power output pin
Connected to charging pin of main body.
⑤Battery Status LED
①Battery Release Knob
③USB Slot
②Battery Hook
④Battery power output pin

CAMERA SYSTEM (LooksCAM2) 12 www.xenosys.co.kr
④Clamp
⑤
Camera lens
(f14mm standard)
⑥LED Lens Module
②Adjustable link `
①
Microphone
③Recording status LED
WARNING:
1. ③USB slot of battery pack should be only used for charging usage, and it cannot be
used during the usage of camera.
2. There is protector PCB for this battery pack so when charging via USB slot after 7 hours
charging, it will stop charging.
3. Head Assembly Unit (LC2-HA)
Each Part
Function
①Microphone
Microphone Input
②Adjustable Link
To move up or down of camera head assembly unit
③Recording Status LED
LED ON: Stand By status
LED Blinking: Recording is in process
LED OFF: System initialization or Camera sensor connection error.
④Clamp
To fix at rigid headband (RHB02)
⑤Camera Lens
Choose your desired lens between f=14mm, f=20mm depending on FOV.
Field of View (Crosswise)
f=14mm : 137mm @ WD400mm (Basic set up)
f=20mm : 94mm @ WD 400mm
⑥LED Lens Module
. There are 3 kinds of LED lens and you may choose one.
Class
Model
Feature (Field of View Size)
Remark
Standard
LLM82
Ø 82mm@WD400mm
Standard
Option 1
LLM74
Ø 74mm@WD400mm
Option 2
LLM66
Ø 66mm@WD400mm
A180138
⑦Serial Number

CAMERA SYSTEM (LooksCAM2) 13 www.xenosys.co.kr
⑦Product ID Code
Will provide last 3 digit number from camera serial number
Configuration will be input viewer set up option “LENS”
Ex) A180138 -> input 138 to activate the viewer
4. Remote Controller (LC2-RC)
Each Part
Function
Record Button
Start or Stop video recording
Snapshot Button
Quick press for one snapshot, Hold for continuous shots
Continuous shots: 5 snapshots for 1 second and not feasible when video recording is on
Hightlight Tag Buggon
Press this button if you want to Tag specific moment or time lapse while recording or playing
the video.
Auto Focus Button
Focus on special subject automatically.
Zoon In Button
Digital zoom in and zoom out function
4 steps of magnifications: 1.0x, 1.5x, 2.0x, 3.0x
Zoom Out Button
LED Light Button
LED On/Off Button
LED brightness level can be controlled 4 steps 1, 2, 3, OFF in the "config.exe" file.
(See 21 page)
AAA Battery Slot
1.5V (2 EA), AAA size.
Reboot switch for control unit
Press this switch more than 5 seconds then LC-CU2 will reboot.
WARNING: The main body and remote controller are provided with pairing set up. The below table
is how to set up & release pairing. You should disconnect head assembly unit cable before setting up
the pairing.
Reboot switch for
CU
AAA
battery
slot

CAMERA SYSTEM (LooksCAM2) 14 www.xenosys.co.kr
Paring Set Up
1. Connect USB cable to main body (LC2-CU).
2. Main body (LC2-CU) power on
3. Press the paring switch quickly, then LED on the backside of
main body will blink “Blue”
4. Press any button on remote controller -> Blue LED will blink
repeatedly
5. Pairing completed
A. You can use one remote
controller for several units by
pairing.
B. If the main body is released in
paring, it can be controlled by
several remote controllers.
Pairing Release
1. Connect USB cable to main body (LC2-CU).
2. Main body (LC2-CU) power on
3. Press and hold the pairing switch for 5 seconds -> Blinking
LED (Blue) on the back side of main body
4. Press any button on remote controller -> Blue LED will blink
repeatedly
5. Pairing release completed
5. DC Power Supply (FW8000MUSB05)
A. Input Voltage
100/240 VAC, 50/60 Hz, 0.3A
B. Output Voltage
DC5V, 2.2A
C. Indicating LED
Green LED light means normal power supply
WARNING: Charging the battery should be used with Xenosys provided DC
power supply. If any other similar power supply used for charging to cause the
malfunction or faulty, it will be charged for additional cost.
HOW TO USE
1. Preparation before use
1) Unpack the box and check components quantity and external figures are good or not.
2) Read the manual to fully understand how to use.
3) Charge the battery pack before use and must use Xenosys provided DC Power Supply
(FW8000MUSB05).
2. How to use and control
1) Check Micro SD is imbedded & assembled.
2) Assemble the main body and fully charged battery pack.
3) Connect head assembly unit to main body and check the connection status.
①LED(Blue)
②Pairing Switch

CAMERA SYSTEM (LooksCAM2) 15 www.xenosys.co.kr
4) Fix the headband by using clamp.
5) Check the camera alignment or video,
connect video out cable to HMDI to
find or connect wifi via tablet.
6) Press and hold ON/OFF button for 1
second to boot, press and hold button to
downward for 3 seconds will make power
OFF. If you wish to NOT to make any
button to be operated, move the button to
upward to make HOLD mode, then only operated by remote controller. To move the button
downward make HOLF mode OFF.
7) After booting complete, REC button will turn on, then you can start recording by pressing REC
button.
8) LED button on main body/remote controller will do ON/OFF. You can change light intensity at
viewer configuration “LED LIGHT”.
9) If you wish to finish recording, press REC button will make LED button blinking then finish
recording.
10) You can turn off by pressing & holding the button to downward for 3 seconds.
11) Refer to main manual for detailed operating methods.
3. Storage and maintenance
1) Make clean the product after usage to be ready for next use.
* Clean with cleaning cloth included in the box for external cleaning. Use slightly dipped
neutral detergent if it’s dirtier. DO NOT make any humidity or water into the main body.
2) Store in a place where there is no possibility of affecting this product by containing air
pressure, temperature, humidity, ventilation, daylight, dust salt, and ion.
3) Store in safe place from slope, vibration, and impact.
4) Avoid storage area where chemicals or generating gas.
5) If any problem of faulty, stop using it and ask nearest distributor or agent for repairs.
6) DO NOT disassembly, repair, or remodel.

CAMERA SYSTEM (LooksCAM2) 16 www.xenosys.co.kr
INSTALLATION
1. Insert & Removal of Micro SD Card (FORMAT)
1) Prepare Micro SD card with formatted by FAT32 (File allocation size=32KB)
2) ①Insert Micro SD to main body.
WARNING: Make sure the direction of ①Micro SD card is correct when inserting to ②Card
Slot. If not, it may cause the breakage of ①Micro SD card.
WARNING: Warranty period of Micro SD card is 6 months from the date of purchase. Please
exchange Micro SD card immediately if you find problem in recorded video as it is expendables.
Periodical checkup for the recorded file is needed.
3) Press Micro SD card slightly to remove from the main body.
4) Format: When Micro SD card is inserted, then press this format key more than 5 seconds, all
files will be DELETED and formatted with FAT32.
WARNING: Check below contents before using Micro SD card.
Micro SD card is expendables with certain period of lifespan, so it needs periodical check up and
exchange.
Recommended using Xenosys provided Micro SD card. If there is any defective happen while
using non-Xenosys provided one, we don’t have the responsibility for that defective.
Make sure to remove Micro SD card after turn off the main body. The opposite way may cause
the defective and malfunction.
Prevent the loss of recorded files (i.e. important data) by downloading recorded files from Micro
SD card to move personal computer.
Normal recording process is possible after formatting with FAT32 (File Allocation Size=32KB).
If the file allocation size is NOT 32KB, SD card may not perform in best condition. You
may see “format warning message”in TV screen if you are connected to Video-Out cable.
Firstly, you should back up important files, and then you may format.
If OS is Window XP, the file allocation size may not fit to 32KB. You can format SD card at
different computer with OS –i.e. Window 7.
①Micro SD card
②Micro SD card slot
③FORMAT

CAMERA SYSTEM (LooksCAM2) 17 www.xenosys.co.kr
Other files like NTFS/EXT, etc. will not be supported to play. Voice message of ”Memory card is
not detected”will come out when there is defective in Micro SD card.
2. Assemble Main Body & Battery Pack
1) Match 4 holes of ③Main Body to same 4 hooks of ②Battery Pack and insert.
2) Push ③Main Body to the direction of red arrow and assemble ②Battery Pack.
3) Push ②Battery Release Knob to the direction of RED arrow and push the ①Main Body to
the direction of printed arrow on battery pack to disassemble.
4) ⑤The charging points of the main body is very weak at the external shock, so be careful
in handling.
5) To charge the battery, remove the battery from the main body ⑤Connect the USB slot and
DC power supply with USB power cable, an then connect wall AC power (100/240 VAC,
50/60 Hz, to plug the power supply.
WARNING:
- Battery power input pin is VERY weak at the external shock, so be careful in assembling the
battery pack. If the charging port is broken, the operation of LooksCAM II may NOT be
possible.
- Store the main body and battery pack with separated to prevent the battery discharging.
④Battery power input pin
①Battery Release Knob
⑤USB Slot
③Battery Hook
②Main Body

CAMERA SYSTEM (LooksCAM2) 18 www.xenosys.co.kr
3. Assemble Main Body & Head Assembly Unit
1)Connect the main body plug of head assembly unit cable to ②Camera sensor port of main body.
2)Fix ③Clamp of head assembly unit to the headband.
3)Verify if the product ID code is correct at Viewer set up option “Lens”.
WARNING:
- If the connection is bad on head assembly unit cable, the system booting process will continue.
- If the connection is bad on head assembly unit cable, UMS mode (connecting to USB) may not
work well.
- If the camera sensor plug of head assembly cable is twisted or damaged by hard pull off, video
out cable can be severely damaged which will cause loose contact to image transfer.
Recommended storage of LooksCAM2 will be stored with all head assembly unit cable connected.
MB
Head
Assembly Unit
Headband
③Clamp
⑤Camera lens (2 types)
Head Assembly Unit Cable
Main Body
①Main Body Plug
②Camera Sensor Port
A180138
⑤Product ID code

CAMERA SYSTEM (LooksCAM2) 19 www.xenosys.co.kr
4. Connect Video-Out Port
1)Prepare ①TV with HDMI port.
2)Connect ③Video-Out cable to ②Video-Out port of main body and ①TV HDMI port.
3)If necessary, use ④Cable clamp to prevent the cable pull off.
5. How to update the firmware
1)Copy firmware file(6.x.x.xx.bin) to IN folder of Micro SD card
2)Insert the SD card in LooksCAM2 Micro SD Card Slot and press power switch to downward (1
second)
3)LED on main body will blinking and firmware update will process. When the update is finished,
the power will turn off automatically.
4)If any error occurs, try the step from 1).
WARNING:
①TV or Monitor
②Main Body Video-Out Port
③Video-Out Cable
④Cable Clamp

CAMERA SYSTEM (LooksCAM2) 20 www.xenosys.co.kr
- Do NOT stop power or turn off while doing the firmware update which may cause fatal damage
to system.
- Make sure to move all recorded files & snapshots before firmware update.
OPERATING INSTRUCTIONS
1. Power On/Off
WARNING:
-Turn on power after connecting head assembly unit cable to main body and check Micro
SD card is inserted.
1)②Power ON: Press power switch to downward (1 second), then system initialization (booting)
will proceed.
Power on will start with the sound of “DingDongDeng”and the battery status LED will blink green
light while booting. When the system initialization will complete, LED sign on Record Button will
come with the sound of “DingDong”
2)②Power OFF: Press power switch to downward and hold 2 seconds to turn off.
3)①Hold ON/OFF: After booting, if you press Hold button to upward, all buttons will NOT work,
but all buttons from remote controller will work. This function is to prevent any unexpected
(unwanted) button press while doing on procedure.
4)If you press record button without Micro SD card, the error message "Memory card s empty" will
come out.
Power Switch
②Power ON/OFF
①Hold ON/OFF
Record Button
Snapshot Button
LED light Button
Head Assembly Unit Cable
Table of contents
Popular Digital Camera manuals by other brands

Panasonic
Panasonic LUMIX VQT1D44 operating instructions

Sony
Sony Cyber-shot DSCRX100M3G instruction manual

Canon
Canon Powershot SX520 HS user guide

Sony
Sony Cyber-shot DSC-S600 user guide

FujiFilm
FujiFilm FINEPIX JZ700 Series owner's manual

Omron
Omron FS-B4KU7DGES-F Product specifications and user's guide