Xiangde Electronic Technologies CD500DTGF User manual

Digital Camera User sManual
CD500DTGF
Pleasereadthismanual carefullybeforeusing
andkeep it forfuturereference

1
Tableofcontent
Introduction....................................................................................................................................................2
KeyFeatures..................................................................................................................................................2
What YourCameraIncludes..........................................................................................................................2
ComputerSystemRequirement forWindows2000/XP...............................................................................3
ComputerSystemRequirement forWindowsVista.....................................................................................3
ComputerSystemRequirementsforMacintosh...........................................................................................3
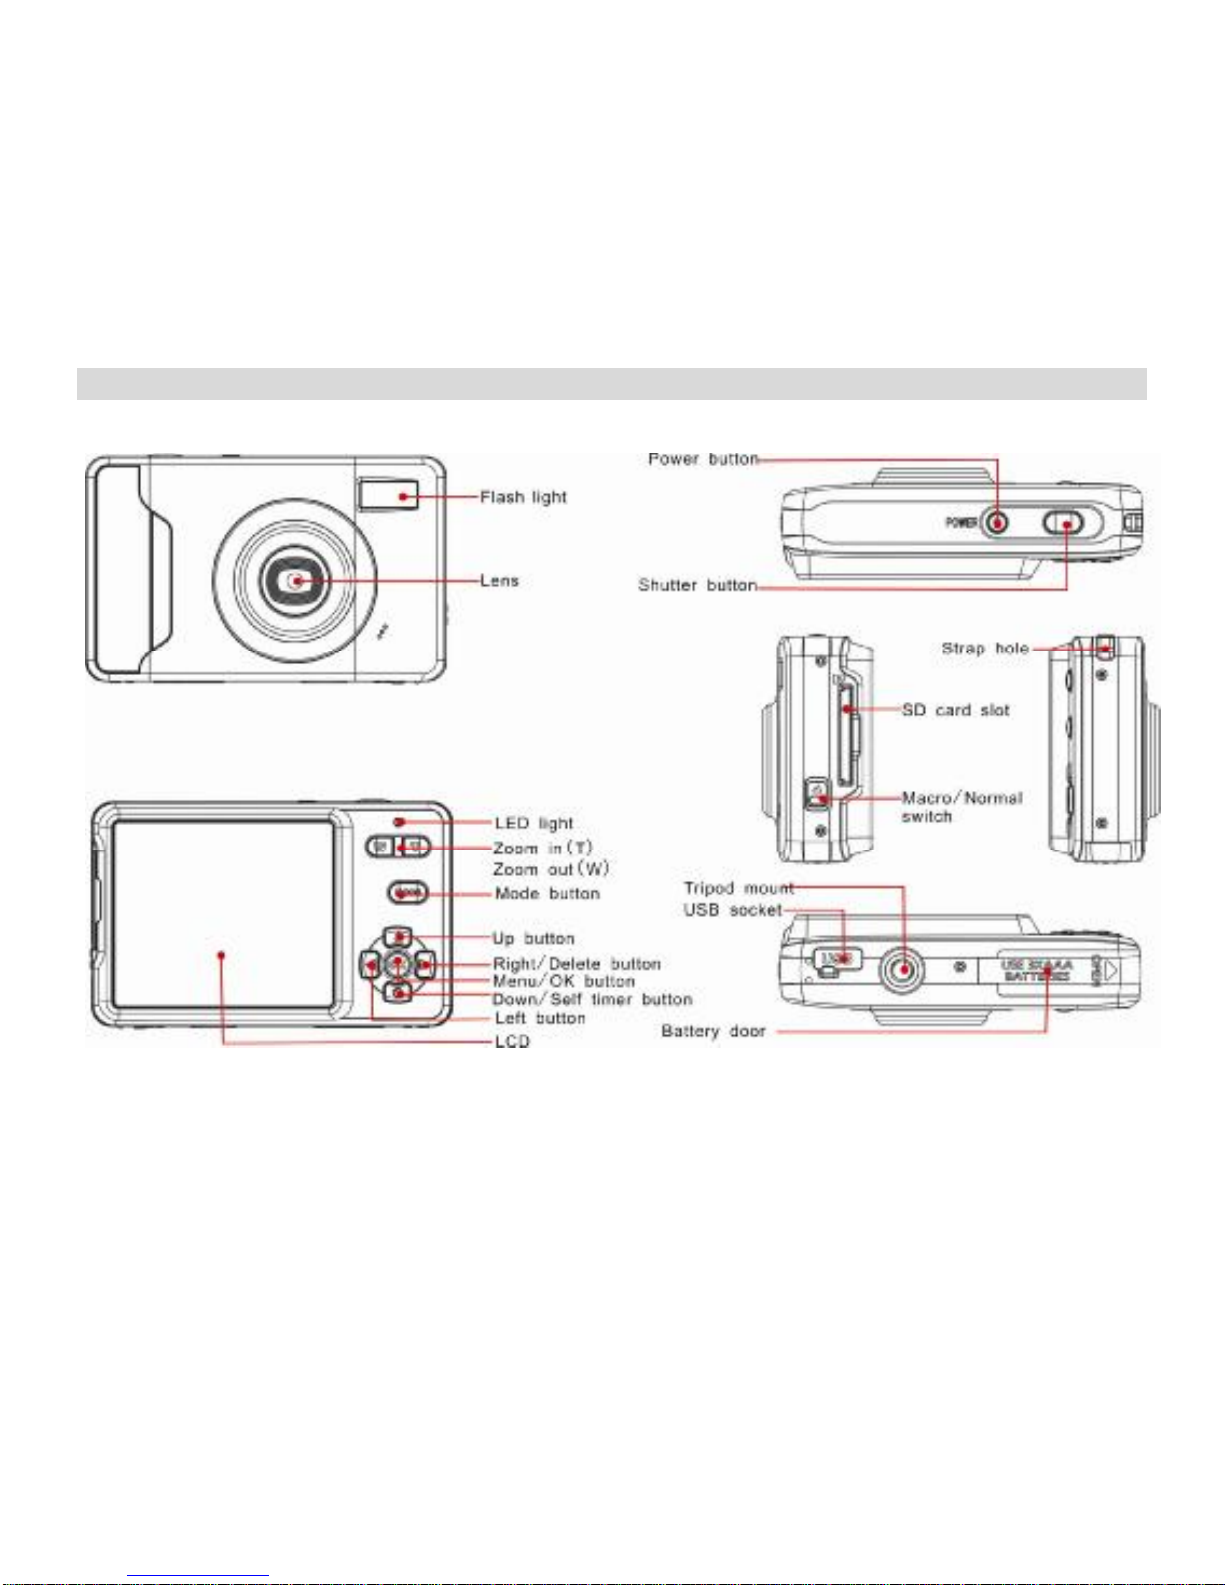
QuickLookat YourCamera..........................................................................................................................4
The ModeSwitch...........................................................................................................................................5
Main IconsontheLCD..................................................................................................................................6
PrepareYourCameraforuse........................................................................................................................8
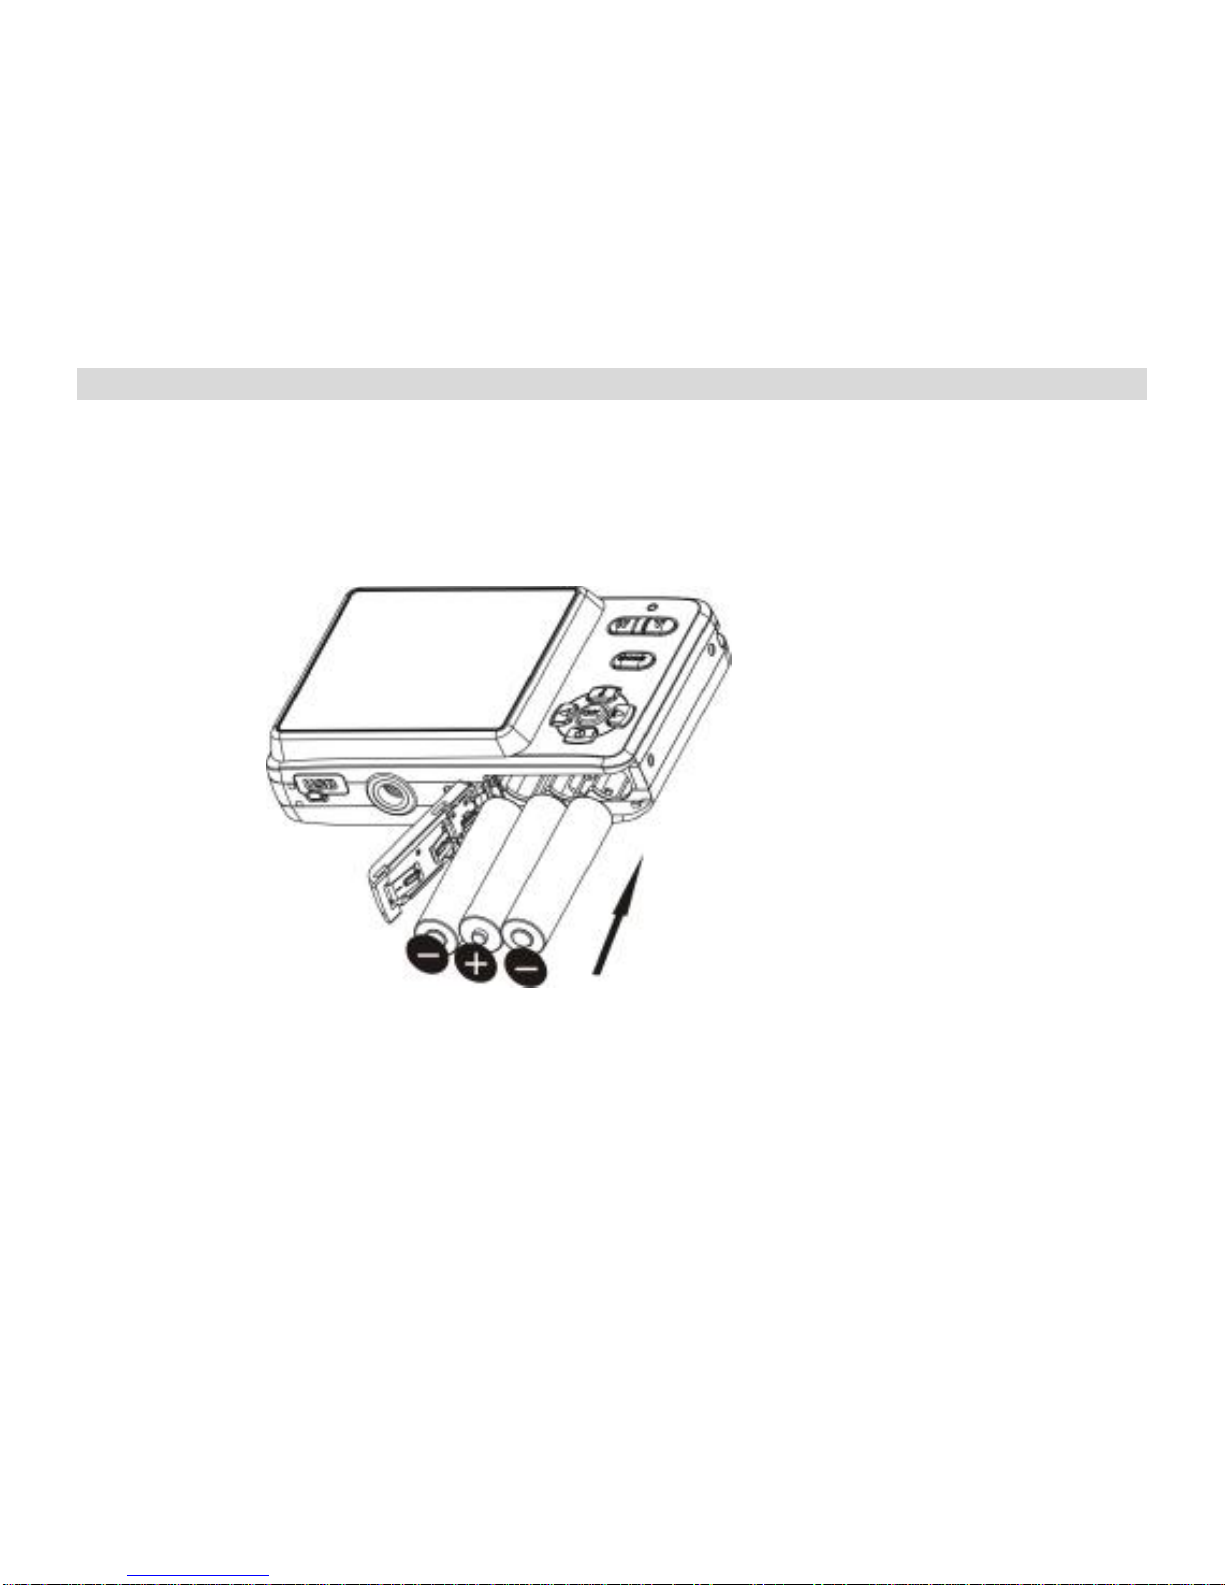
Installbattery..................................................................................................................................................8
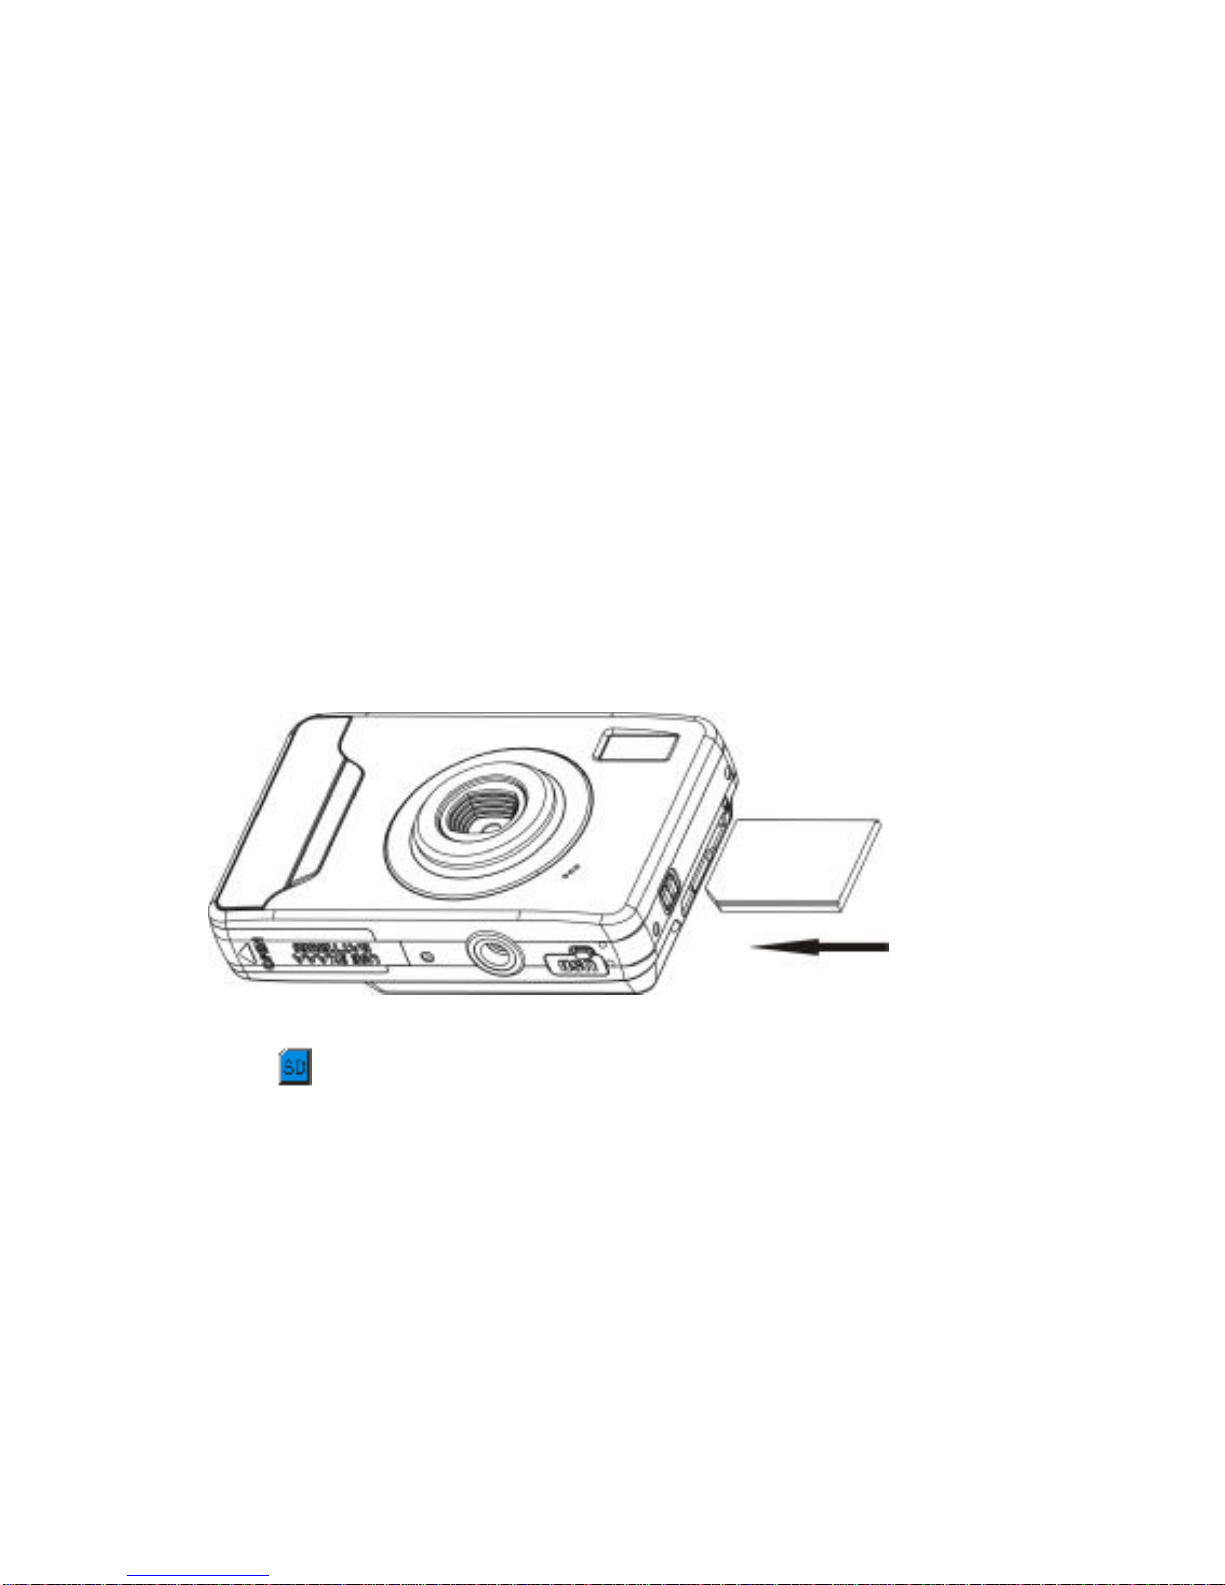
InstallSDmemorycard.................................................................................................................................9
StartingYourDigital Camera.......................................................................................................................10
TakingPhotos...............................................................................................................................................10
InstallPhoTagsExpress Software...............................................................................................................25
Everythingyouneedtoget themost fromyourphotos..............................................................................27
Download photostoyourPC.......................................................................................................................28
PhotagsExpress softwareownermanual...................................................................................................31
Viewing VideosonYourComputer..............................................................................................................32
MaintenanceofYourDigitalCamera...........................................................................................................32
AppendixA:TechnicalSpecifications..........................................................................................................32
AppendixB:Troubleshooting....................................................................................................................33

2
Introduction
Thankyou forpurchasingthiskind ofDigital Camera.Notonlycanyou takegood qualitydigital
photosandvideosbutyoucanalsouseyourcameraasaremovabledisk. Everything you needtotake
qualityphotosandvideosisincluded withyourcamera.Pleasereadthismanual carefullybeforeusing.
Key Features
ŸDigital Video resolutions-640x480Pixels(VGA),320x240Pixels(QVGA).
8.1megapixelscamerawithchoiceof 6digitalcameraresolutions-3264X2448Pixels(8M),
3648X2048Pixels(HD 7M), 2592X1944Pixels(5M), 2048X1536Pixels(3M),
1920X1080Pixels(HD 2M)640X480Pixels(VGA)
Ÿ2.4inchTFT LCD
Ÿ8xDigital Zoomfunction
ŸAnti-Shakefunction
ŸSDmemorycardslotacceptsSDcompatiblememorycardupto8GB.
ŸBuilt inFlash
ŸPhoTagsExpress softwareformanagingandenhancingyourphotos,printing, sending
photosbye-mailsand muchmore.
WhatYourCamera Includes
ŸDigital Camera
ŸPhoTagsExpress softwareinstallationCD
ŸUSB cable
ŸUser smanual
ŸStrap
ŸHoppocket

3
Computer System RequirementforWindows2000/XP
TobeabletodownloadphotosandvideostoyourPCyouwillneed thefollowingminimumconfiguration:
ŸPentiumprocessororabovewithWindows2000, XP
Ÿ128MBRAM,morethan 125MBfree diskspace.
ŸAvailableUSBInterface
ŸCD-ROMDrive
ŸRecommended screenresolution 1024X768pixelsorhigher.
Ÿ16-bitcolororhigherdisplayadaptor.
Computer System RequirementforWindowsVista
Tobeabletodownload photosorvideostoyourPCyouwillneedthefollowingminimumconfiguration:
ŸWindowsVista
Ÿ800MHzprocessorand512MBofsystemmemory
Ÿ20GBharddriverwithatleast15GBof availablespace
ŸSupport forSuperVGAgraphics
ŸAvailableUSBInterface
ŸCD-ROMDrive
Computer System RequirementsforMacintosh
ŸPowerMacintoshG3500 MHzorhigher
ŸMacOSXversion10.2.6orlater
Ÿ128MBormoreavailablesystemRAM(256MBrecommended),150 MBfree disk space
Ÿ800x600orhigher-resolution monitordisplayingmillionsofcolors
Note: Thishardwareisplugandplaycompatiblewhen usedon aMac, however, theincluded software
can beused on Windowsoperatingsystemsonly.

4
Quick LookatYourCamera

5
TheModes ofDigital Camera
Thereare3modeson yourcamera.
•CameraMode:
Takestillphotos
•Video Mode:
Capturevideofiles
•PlaybackMode:
View,print, editphotosandviewvideos

6
MainIconsontheLCD

7
Batterypowerlevel
Full batterypower
Mediumbatterypower
Low batterypower
Photoquality
Normalquality
Fine quality
Superquality
Flash
ForceFlash
Auto
Red eyereduction
NoFlash
Modes
CameraPlayback
Video
Scenes
AutoNightPortraitNightScenery
PortraitScenerySport
PartyBeachHigh Sensitivity
Self-timerOn(10s)
Self-timerOn(2s)
DigitalZoom
Protect
Protect On
WhiteBalance
AutoIncandescent
FluorescentCloudy
Daylight
Anti-Shake
Anti-Shakeon
Anti-Shakeoff
Macro/Farfunction
Macrocapture
Farcapture

8
Prepare YourCamera foruse
Installbattery
Yourdigital camerarequires3AAAbatteriesforpower, pleaserefertothefollowing illustration ascorrect
installation method:
1. Slideandopenthebatterydoor.
2. Insertthebatterycorrectlyasthecorrectpolarityfacingupwiththebatterycover.
3. Closethebatterydoor.
Note:
1. “Lowbattery”will showontheLCD when batteryisinsufficient andyourcamerawill beoff.
2. Pleaseuninstallyourbatterywhen youdon tintendtouseyourcameraforalongtimetoforbid
themleakageandcorrosion.

9
3. Yourdigital camerawill beoff when thebatteryisinsufficient.
4. The photoswillbelostwhen thecameraoff oropen thebatterydoor,transferthetest
photos/videostoPCasoften aspossible.
5. Donotmixoldand newbatteries.
6. Donotmixalkaline,standard(carbon-zinc),orrechargeable(nickel-cadmiummetal
hydride)batteries.
InstallSDmemorycard
ThiscamerasupportsanycompatibleSDmemorycardup to8GB.Limitedinternal memoryisonlyfor
youtotaketestphotos,thesephotoswillbelostwhen youturnoff yourcameraorremovethebatteries.
Fornormaluse,anSDmemorycardneedstobeinserted.Pleaserefertothebelowdiagramforcorrect
installation method:
LocatetheSDmemorycardslot,insertan SDmemorycardasabove,untilyou feel and heara “Click”
sound.When the icon appearson theLCD screen thisindicatesthatyourSDcardisinstalled
correctly.
Note:
1. AftertheSDmemoryisinsertedsuccessful, “Movetocard”willappearon thescreen,thephotos
youhavetakenwill bestoredon theSDmemorycard.

10
2. FormattingwilldeletealldataontheSDmemorycardincluding protected data.
3. Don t removetheSDcardduringformattingasthismaydamagethecardandrenderitunusable.
4. Downloadthephotos/videostoyourPCanddeletethephotosand videosfromyourSDCardin
ordertocontinueusing yourcamera.
Starting YourDigitalCamera
Yourdigital camerahas3modes-Cameramode,Video modeand Playbackmode.
Cameramodeisforyoutotakestillphotos.Youcan shootvideo fileswhileinVideo mode.InPlayback
modeyoucanpreviewphotos/videos, delete, rotate,protect, crop andprintyourphotos.
Poweron
Press thePowerbuttononcetoturnonyourcamera.TheLCDwilllightupand itwillsound a “beep”,this
indicatesyourcameraisturned onandreadyforuse.
Poweroff
Press thePowerbuttononcetoturnoffyourcamera.When thereisinsufficientbatterypower,your
camerawillbeoff automaticallyafteramoment.
CameraMode
Taking Photos
YoucancomposeyourshotusingtheLCD screen.Holdthecamerasteadyandpress theshutterbutton
totakethephoto.Therewillbeashortdelaywhilethecamerasavesthephototomemory.
Aftereachphotoisshot (when thecamerareturnstoiconmode)thenumbersofphotoslefttoshootat
thisresolution isdisplayedonthetoprightoftheLCD screen.
Whenthecamera'smemory(photocapacity)isfull,theLCD screenwill displayamessage “Memory
Full InsertaSDmemoryCard toTransferand TakeMorePhotos!”

11
Digital Zoomfunction
Youcan magnifyyoursubjectusingthedigital zoom.Usethe T and W buttonstoadjustthezoom.The
icon willshowonyourLCD screen.Press the T buttontozoomin onyoursubject.
Pushthe Wbutton tozoombackout.
Macro/Farshooting
The camerahasthefunctionthatcaptureobjectinveryneardistanceorveryfardistanceperyour
request.
Macroshooting:slidetheMacro/Farswitchto positionwhichisontheleftsideofthecamera,until
icon appearson theLCD screen,itindicatesthemacroshootingison.
Farshooting: slidetheMacro/Farswitchto position whichisontheleft sideofthecamera,untilicon
appearsontheLCD screen, itindicatesthatthefarshooting ison.
Flash
Inlowlightconditionsitisbesttousethebuilt-inflash.You can alsousetheflashtocompensatefor
backlight conditions.
Toset theflash:
Press theUpbutton repeatedlyuntilthe iconshowson theLCDscreen.Thiswillactivatethe
automaticflash.
Press theUpbutton repeatedlyuntil the iconappearson theLCD-++ screen.Thismeanstheflash
function hasbeen"forcedon"(manual flash).Iftheflashisnot ready, aLEDwill light upand the icon
willflashrepeatedly-waituntil theflashisreadybeforetakingaphoto.
Press theUpbuttonrepeatedlyuntilthe icon showson theLCD screen.Thered eyereduction is
open.
Press theUpbuttonrepeatedlyuntilthe iconappears.Thiswillturnofftheflashfunction.
Self-Timer
Youcanincludeyourselfinaphotobyusingthisfeaturetodelaythetimebetweenyourpressingthe

12
shutterand when thephotoisactuallytaken.Itisrecommended thatyou useatripod when youusethe
self-timer.
1. Press Downbutton repeatedlytoselect or secondsselftimer.
2. Press theshutterbutton tostarta10or2second countdown.After10 or2secondsthephotowill
automaticallybetaken.
Scene
Yourcamerasuppliesmanyscenesforyoutotakephotosinalmostanyenvironment.Sceneincluded
withyourcameraareAuto,NightPortrait,NightScenery,Portrait,Scenery,Sport, Party,BeachorHigh
Sensitivity. Youcan chooseyourbest sceneryaccordingtoyourlightandenvironmental conditions.
1. Press theMenu/OKbutton.
2. Press Up/Downbuttontoselect sceneperyourrequirement.
3. Press Menu/OKbutton toconfirmandexit tostandbymode.
ImageSize
The imagesizeandqualitysettingsdeterminethenumberof photosthatcanbesaved and theamount
ofmemoryrequired foreachphoto.Thehigherofthephotoqualitythemorememoryitwilltake.The
imagesizeand qualitywill alsoaffectthemaximumsizeyoucanprintyourphotoeffectively. Tosetthe
Imagesize:

13
1. Press theMenu/OKbutton.
2. Press Right/Left buttonuntil youselecttheImageSize.
3. Press theUp/Downbutton toselectthedesiredimagesize.
4. Press Menu/OKbutton toconfirmandexit tostandbymode.
Note: Theimagesizeicon willshowon theLCD screen.
Anti-Shake
YourDigitalCamerahasafunction thatpreventsphotoscoming outblurryasaresultoftremblingor
shakingwhen takingthephoto.Becauseof thisfunction,youarenotrequired touseatripodandtake
good qualityphotos.Tosetasbelow:
1. Press theMenu/OKbutton.
2. Press Right/Left buttontoselect theAnti-Shakemenu.
3. Press theUp/Downbutton toselectON.

14
4. Press theMenu/OKbutton toconfirm.The icon willappearon theLCD screen.
Setup Menu
Youcanset Exposure,WhiteBalance, Sharpness, Quality,ISO,Date,AutoPoweroff,Language,
Frequency,FormatandDefault Setting. OperatethisSetup asbelow:
1. Press theMenu/OKbutton.
2. Press theRight/Left button untilyouselect Setup menu.
Exposure
Thissettingallowsyoutocontrol thebrightness of yourimages.
1. Press theUp/Downbutton untilyouselect Exposure.
2. Press Menu/OKbutton.
3. Press theUp/Downbutton toselecttheexposurevalue(from+3to-3).
4. Press Menu/OKbutton toconfirmandexit tostandbymode.
ISO
Thisisaspecial function thatallowsyou tocompensatethelightconditionswhen thelightsourceisnot
goodandalsoyoudonotwishtouseaflashortripod. Asafirst choiceusing aflashlightoratripodis
bestinordertocompensateforthelightconditionsbut youcan alsousetheISOfeature.Whenyouwant
touseISOsensitization, pleasechoosethelowvalueISOtoprevent spotsorblotchesappearingon your

15
photo.
1. Press theUp/Downbutton untilyouselect ISO.
2. Press Menu/OKbutton.
3. Press theUp/Downbutton toselectAuto/100/200/400.
4. Press Menu/OKbutton toconfirmandexit tostandbymode.
WhiteBalance
Thissetting allowsthecameratoadjustthecolorofyourphotosaccordingtothecolorofyourlight
source.
1. Press theUp/Downbutton untilyouselectWhiteBalance.
2. Press Menu/OKbutton.
3. Press theUp/Downbutton toselectAuto/Daylight/Cloudy/Incandescent/Fluorescent.
4. Press Menu/OKbutton toconfirmandexit tostandbymode.
Sharpness
Thissettingallowsyoutoadjust thesharpness of yourimages,making edgesmoreorless distinct.
1. Press theUp/Downbutton untilyouselect Sharpness.
2. Press Menu/OKbutton.
3. Press theUp/Downbutton toselectNormal/Sharp/Soft.
4. Press Menu/OKbutton toconfirmandexit tostandbymode.
Quality
The qualityof yourphotosalsoaffectsthenumberofshotsyoucan take.AHIGHsettingmeansyoucan
takefewerphotos,buttheywillbeofbetterquality.ThedefaultvalueisSTANDARD.
1. Press theUp/Downbutton untilyouselect Quality.
2. Press Menu/OKbutton.
3. Press theUp/Downbutton toselectSuper/Fine/Normal.
4. Press Menu/OKbutton toconfirmandexit tostandbymode.
Note: Afteryouconfirm,thequalityicon willshowon theLCD. instead of normalquality,

16
instead offinequality, instead ofsuperquality.
Date
Thisallowsyoutoset thesystemtimewhichwill bedisplayedon thephotos.
1. Press theUp/Downbutton untilyouselect Date.
2. Press Menu/OKbutton.
3. Press theUp/Downbutton toselectOn/Off/Set Date.
4. Press Menu/OKbutton toconfirm.
Setdate:
1. Press theMenu/OKbutton toenterSetdateoption.
2. Press theRight/Left button toselect thedateand timeyouwanttoset.
4. UseUp/Downbutton tosetthedigit.
5. Press Menu/OKbutton toconfirmcurrent setting.
AutoPoweroff
Bydefault,ifyourcameraisidlefor60secondsitwill automaticallybepoweredoff.UsetheAutooff
option tochangethissetting
1. Press theUp/Downbutton untilyouselectAutoPowerOff.
2. Press Menu/OKbutton.
3. Press theUp/Downbutton toselect1Minute/2Minutes/3Minutes/Off.
4. Press Menu/OKbutton toconfirmandexit tostandbymode.
Language
Yourdigital camerasupportsonlyEnglishforthisversion,pleaserefertothelatestversion formore
languages.

17
Frequency
1. Press theUp/Downbutton untilyouselect Frequency.
2. Press Menu/OKbutton.
3. Press theUp/Downbutton toselect50Hz/60Hz.
4. Press Menu/OKbutton toconfirmandexit tostandbymode.
Format
Thisfunction willformatthememorycardandwilleraseall filesinmemoryincludingfilesthathavebeen
protected.
1. Press theUp/Downbutton untilyouselect Format.
2. Press Menu/OKbutton.
3. Press theUp/Downbutton toselectOK/Cancel.
4. Press Menu/OKbutton toconfirm.
5. Press Left/Right buttontoselectYes/No.
6. Press Menu/OKbutton toconfirmandexit tostandbymode.
Default Setting
Youcanrestoreyourcameratooriginalsettingsfromfactory.
1. Press theUp/Downbutton untilyouselect Default Setting.
2. Press Menu/OKbutton.
3. Press theUp/Downbutton toselectOK/Cancel.
4. Press Menu/OKbutton toconfirmandexit tostandbymode.
Video Mode
Press Modebutton repeatedlytoselectVideo mode.The iconwillappearon theLCD screen.
Press theShutterbutton toshootvideos,theelapsetimewillbeshownon theLCD screen andicon
will flashon theLCDscreen.

18
Note:
1.YoumustinsertaSDmemorycardtoexpandcapacityandshootvideos.
2.“Insert aSDmemoryCard”willbeshownonthescreenwhenyoupress theshutterbuttonifwithout
SDmemorycardinserted.
Press theShutterbuttonagain tostop andsavethisfileinAVI format.
YoucanplaythisAVIfileinplayback modeoron yourcomputerusingQuick TimeandWindowsMedia
Player.
Youcanselect differentWhiteBalanceforshooting.
1. Press theMenu/OKbutton.

19
2. Press theUp/Downbutton toselect an option fromthemenu.
3. Press theMenu/OKbutton toconfirm.Thecorresponding icon will appearon theLCDscreen.
ImageSize
Yourcamerasupports2video resolutions-640x480(VGA)pixels,320x240(QVGA)pixels.
1. Press theMenu/OKbutton.
2. Press Right/Left buttontoselect Imagesize.
3. Press theUp/Downbutton toselectImageSize.
4. Press Menu/OKbutton toconfirmandexit tostandbymode.
PlaybackMode
Press Modebutton toselectPlaybackmode.You canpreviewthephotosand videosyou haverecorded.
InPlaybackmodeyoucanrotate,protect,deleteand crop yourphotosandyoucan protectand delete
Table of contents