Xiaomi Mi phone User manual

Mi Desktop Monitor 27''
User Manual

1
Contents
Product Overview ................................................................................2
Monitor Overview ...........................................................................2
Package Contents...........................................................................2
Installation ........................................................................................... 3
Installing the Base.......................................................................... 3
Instructions.......................................................................................... 5
Connections.................................................................................... 5
Turning On/Off................................................................................ 6
Indicator Status.............................................................................. 6
5-way Navigation Button Instructions....................................... 6
Menu Description ...........................................................................7
Precautions.......................................................................................... 9
Troubleshooting.................................................................................10
Specifications..................................................................................... 11
Eye Health............................................................................................12
Low Blue Light Description.........................................................12
Regulatory Compliance Information .............................................13
2
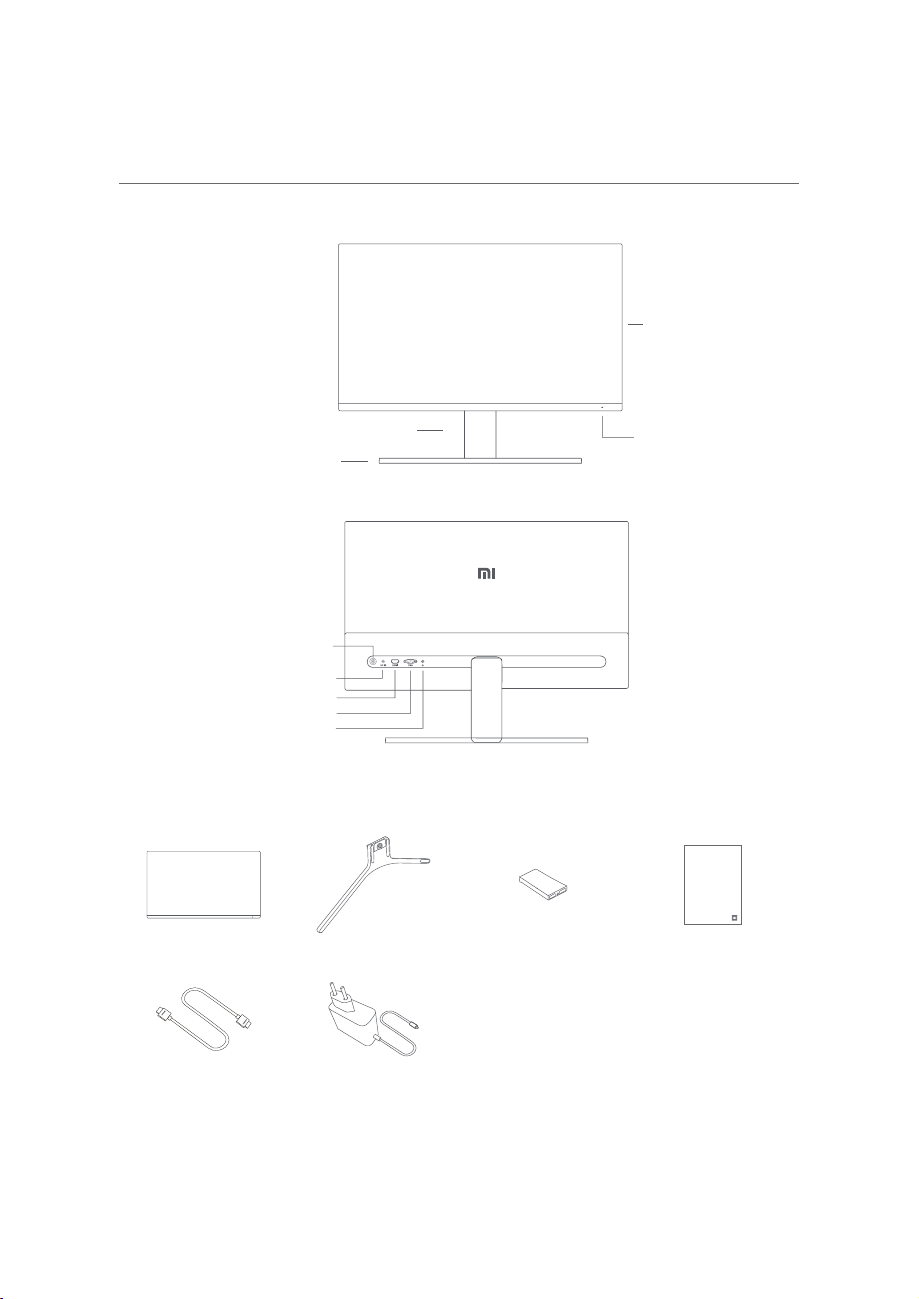
Product Overview
Monitor Overview
Monitor
Indicator
Stand
Base
5-way Navigation Button
Power Port
HDMI Port
VGA Port
Audio Port
Package Contents
MiDesktop Monitor 27'' User Manual 1
Benutzerhandbuchzum Mi Desktop-Monitor 27'' 14
Manualeutente Mi Desktop Monitor 27'' 27
Manueld’utilisation de Mi Desktop Monitor 27'' 40
Manualde usuario de Mi Desktop Monitor 27'' 53
Руководствопользователя Монитора Mi 27" 66
GebruikershandleidingMi 27 inch Desktopmonitor 79
Manualdo utilizador do Monitor PC Mi 27'' 91
Monitorkomputerowy Mi 27'' — instrukcjaobsługi 103
116 Miﻦﻣ ﺔﺻﻮﺑ 27 سﺎﻘﻣ ﺐﺘﻜﻣ ﺢﻄﺳ ﺔﺷﺎﺷ مﺪﺨﺘﺴﻣ ﻞﻴﻟد
Mi⾭㻡䲩䴎 㛥⼅䵭 27 䎵䪕 㳩䋦 㵡㛂㵙 129
Monitor Base Stand User Manual
HDMI Cable Power Adapter
Read this manual carefully before use,
and retain it for future reference.
3
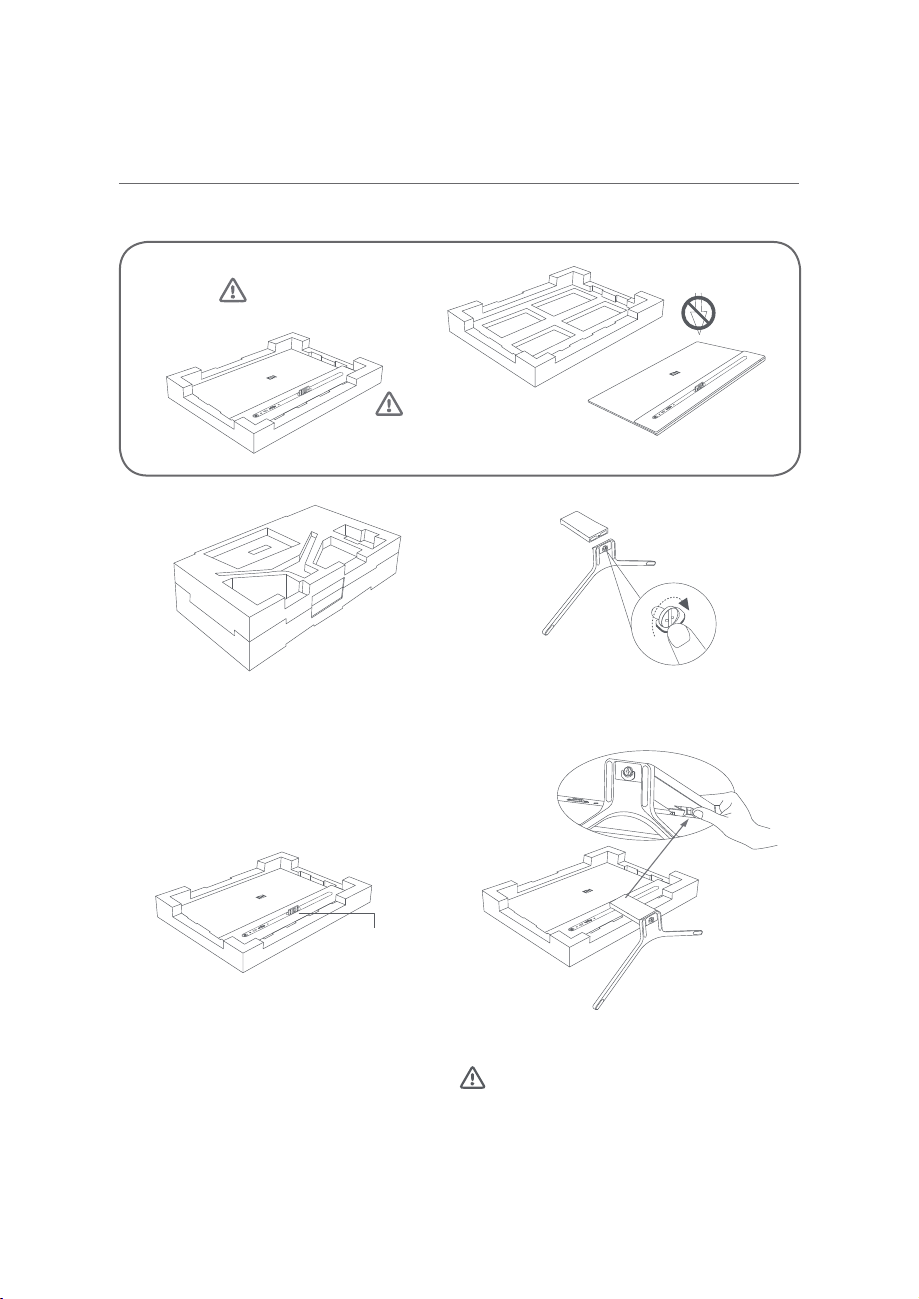
Installation
Installing the Base
Do not press.
It is recommended to
install the monitor on the
foam to avoid dropping or
scratching it.
1. Unpack the box, then remove the monitor with
its protective foam together from the box and
place them on a flat stable surface.
2. Install the stand onto the base and fasten it with
the thumb screw from the bottom of the base.
Mounting Point
Clip
3. Remove the top foam layer and the plastic bag
to expose the mounting point on the back of
the monitor.
4. Install the stand onto the mounting point until it
clicks into place. Try to shake the stand to make
sure it is securely installed.
Caution: To reduce the risk of the monitor from
accidentally falling down, please make sure the
stand is firmly installed in place.
Note: Press the clip to remove the stand.
4
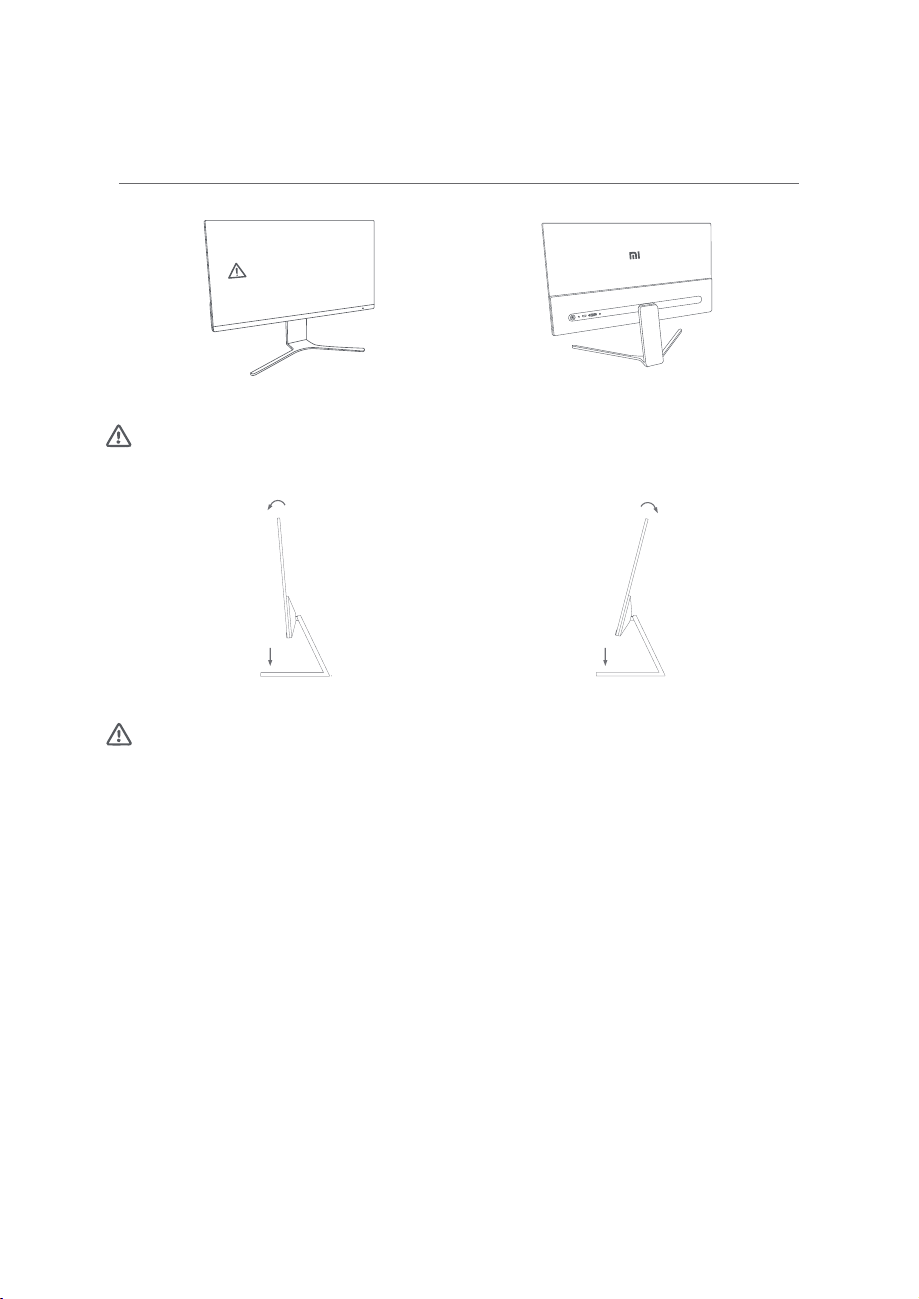
Do not press the screen.
5. Use both hands to carefully take out the fully assembled monitor and place it on a flat stable surface.
Note: To avoid damaging the screen, be careful not to press on the LCD screen when standing it up.
Forward 5° Backward 21°
6. Adjust the angles forward or backward based on your needs.
Note: When adjusting the angles, it is recommended to use one hand to hold down the base and use the
other hand to adjust the monitor. Otherwise, the monitor may fall down.
5
Instructions
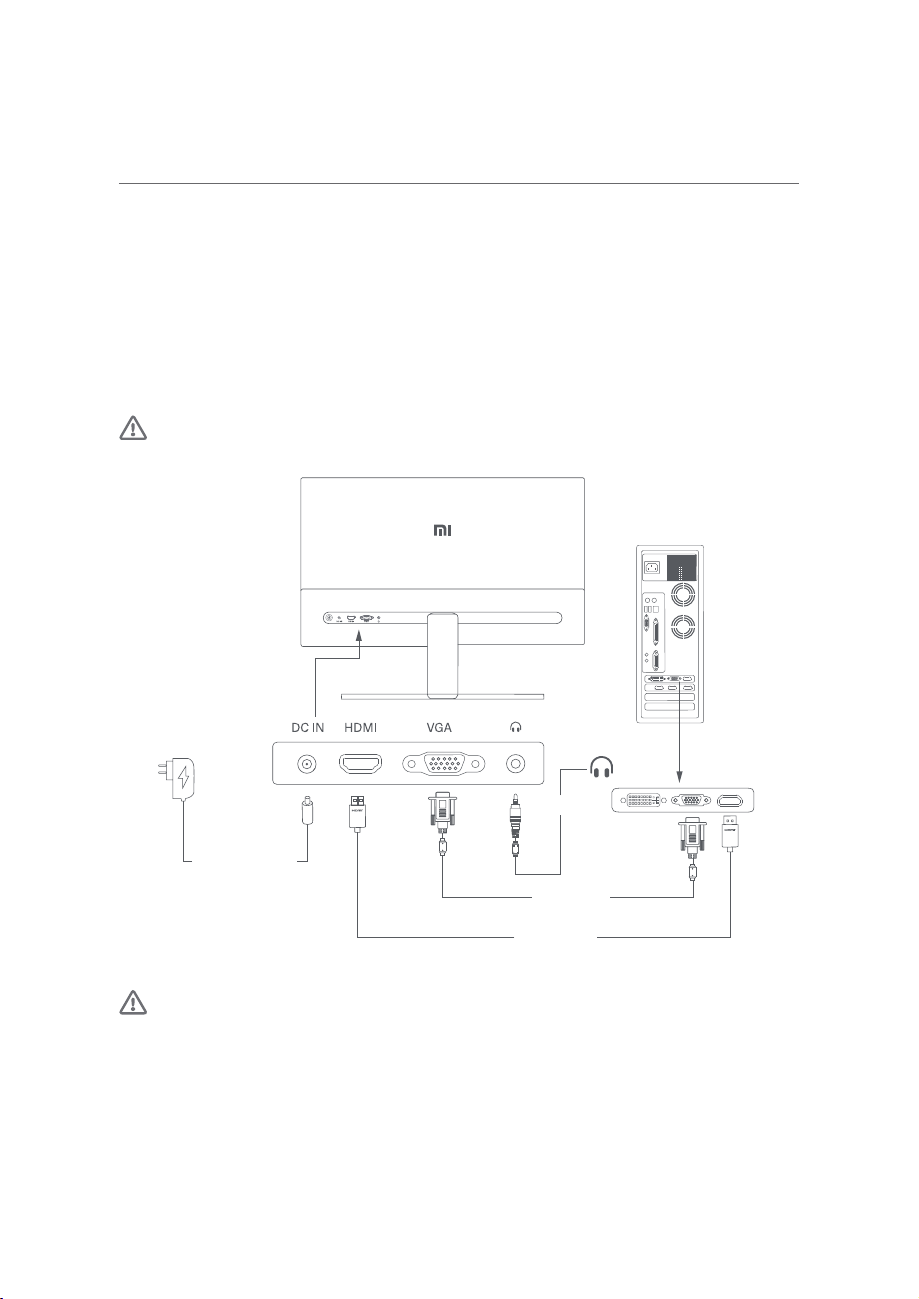
Connections
• Connect the VGA cable. VGA cable is only used for transferring data or signals via the VGA port. It is sold
separately.
a. Make sure the monitor and the computer are both turned off.
b. Connect one end of the VGA cable to the computer's VGA output port, and the other end to the
monitor's VGA port.
• Connect the HDMI cable. HDMI cable is only used for transferring data or signals via the HDMI port.
a. Make sure the monitor and the computer are both turned off.
b. Connect one end of the HDMI cable to the computer’s HDMI output port, and the other end to the
monitor's HDMI port.
• Connect a headset or any 3.5 mm compatible external audio device to the monitor’s audio port
Note: If the power cord or HDMI cable is damaged, it must be replaced with a genuine one purchased
from the manufacturer or after-sales service department.
DC Power Cord
HDMI Cable
VGA Cable
(sold separately)
Earphone
Note: The audio port is only used for the output of audio signals.
1. Power Port (DC IN): Power input.
2. HDMI(1.4) Port: Maximum resolution 1920 × 1080, maximum refresh rate 75 Hz.
3. VGA Port: Maximum resolution 1920 × 1080, maximum refresh rate 60 Hz.
4. Audio Port: Audio output.

6
DCIN
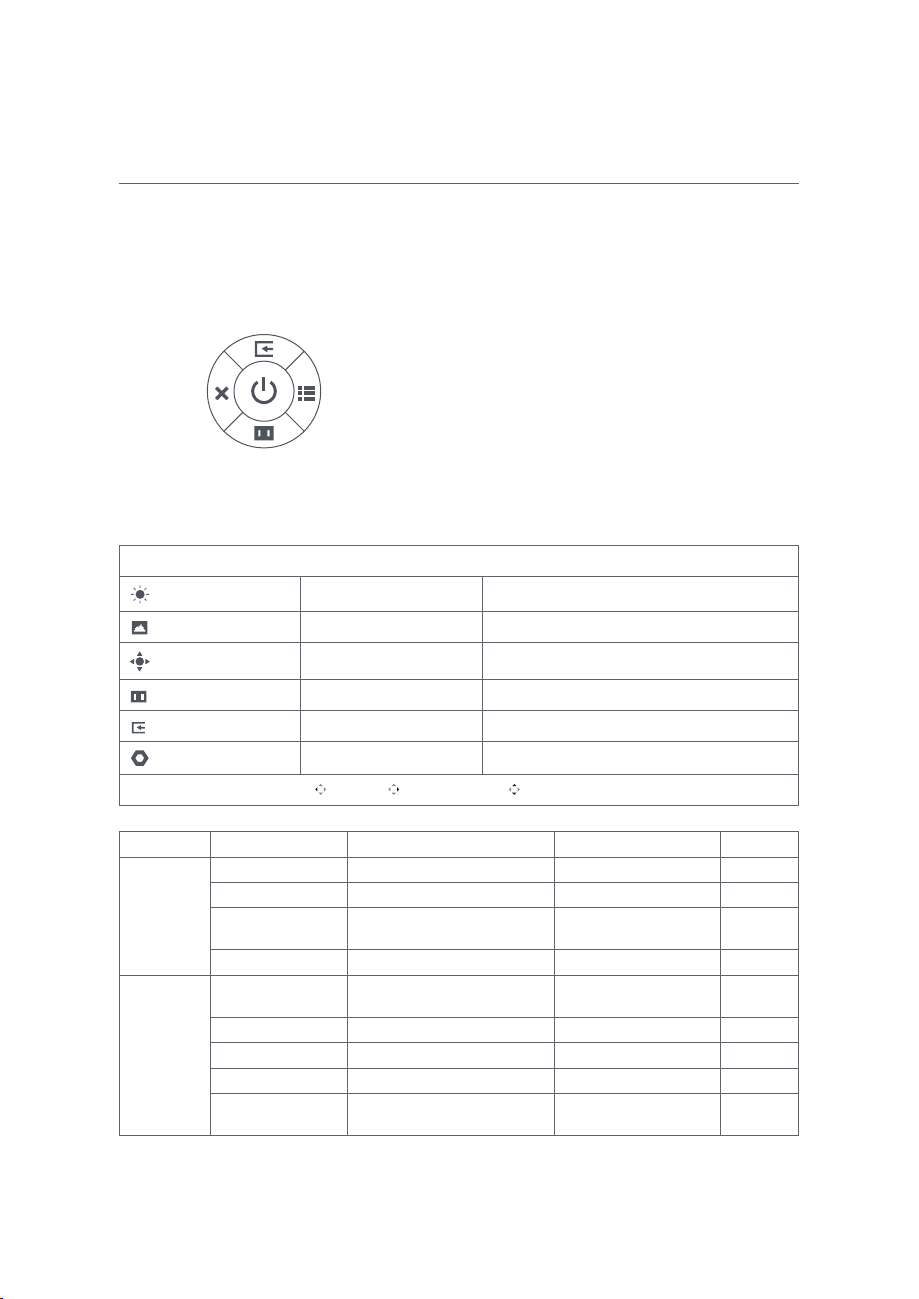
5-way Navigation Button
Turning On/Off
Press the middle of the
5-way navigation button Turn On
Press and hold the middle
of the 5-way navigation
button for 3 seconds
Turn Off
Indicator Status
Dimmed Off
Lit On
Blinking In sleep mode
5-way Navigation Button Instructions
Operation
Result
When menu is not
displayed on the
monitor
When shortcut menu
is displayed on the
monitor
When main menu
is displayed on the
monitor
Press right Open shortcut menu Open main menu Switch between menu
options/Select
Press up Open shortcut menu Shortcut Button 1 Move up/Increase the
value
Press up and hold for
5seconds Disable menu / /
Press down Open shortcut menu Shortcut Button 2 Move down/Decrease
the value
Press left Open shortcut menu Close shortcut menu Go Back
Note: Once the menu is disabled, doing any operation listed above is no longer able to open the menu.
A message will pop up to inform you that the on-screen display (OSD) has been locked up. Press and hold the
button for 5 seconds on any direction to enable the menu and unlock the OSD.
7
Menu Description
Shortcut Button Description
Shortcut Button 1
Main Menu
Shortcut Button 2
Exit
• When the menu is not displayed, you can open the
shortcut menu by pressing the 5-way navigation button
on any direction of up, down, left, or right.
• When the shortcut menu is displayed, press the 5-way
navigation button on the four directions up, down, left,
or right to select the corresponding options.
• You can set the shortcut button function via Main Menu
> Settings > Shortcut Key > Shortcut Key 1/Shortcut
Key 2. By default, the shortcut button 1 is input source
settings and the shortcut button 2 is smart mode
settings.
Main Menu Description
Mi Monitor Standard Mode
Bri/Con Brightness
Display Contrast
PQ DCR
Smart Modes Black Level
Input
Settings
Back Enter/Select Move/Adjust
Main Menu Submenu Description Option Default
Bri/Con
Brightness Adjust the monitor’s brightness 0-100 80
Contrast Adjust the monitor’s contrast 0-100 75
DCR Adjust the monitor’s dynamic
contrast On/Off Off
Black Level Adjust the monitor’s black level 0-100 50
Display
Color Temperature Adjust the monitor’s color
temperature
Standard/Warm/Cool/
Custom Standard
Hue Adjust the monitor’s hue 0-100 50
Saturation Adjust the monitor’s saturation 0-100 50
Gamma Adjust the monitor’s gamma 1.8/2.0/2.2/2.4/2.6 2.2
Aspect Ratio Adjust the monitor’s aspect
ratio Full/Auto Full

8
Main Menu Submenu Description Option Default
PQ
Response Time Adjust the monitor’s response
time
Ultrafast/Superfast/
Fast/Normal Normal
Sharpness Adjust the monitor’s sharpness 0-100 50
Auto-adjust Adjust the image automatically
when using the VGA signal
source
/ /
Smart
Modes
Standard Mode Set to standard mode
Only one mode can be
selected at a time
Standard
Mode
ECO Mode Set to eco mode
Game Mode Set to game mode
Movie Mode Set to movie mode
Low Blue Light
Mode Set to low blue light mode
Input HDMI Switch input source to HDMI / /
VGA Switch input source to VGA / /
Settings
Language Select the menu language
English/Español/
Русский/Français/
Italiano/Deutsch/Polski/
한국어/، يبرع
English
Shortcut
Key
Shortcut
Key 1
Set function for shortcut
button 1
Color Temperature/
Smart Modes/lnput
Source/Brightness/
Contrast
Input
Source
Shortcut
Key 2
Set function for shortcut
button 2
Color Temperature/
Smart Modes/lnput
Source/Brightness/
Contrast
Smart
Modes
OSD Settings Settings menu related
preferences Timer 10s
Volume Adjust the monitor’s volume 0-100 50
Information Model Number
Current Resolution
Input Source
HDMI logo
Low Blue Light Content
/ /
Reset / / /

9
Precautions
• Do not use this monitor in damp or humid environments such as bathrooms, kitchens, basements, or near
swimming pools.
• Make sure the monitor is placed on a stable surface. If the monitor falls down or is knocked over, it may
cause personal injury or damage to the monitor.
• Store and use the monitor in a cool, dry, ventilated place. Keep the monitor away from radiation and heat
sources.
• Do not cover or block the heat dissipation vents on the back of the monitor. Do not place the monitor on a
bed, sofa, blanket, etc.
• The monitor’s operating voltage range is indicated on a label on the back of the monitor. If you are unsure
what voltage your power supply is, please contact the monitor’s distributor or local power company.
• If you do not plan to use the monitor for a long period of time, unplug it from the electrical outlet so as to
prevent possible damage from power surges or lightning strikes.
• Do not overload electrical outlets, as this may cause a fire or an electric shock.
• Do not insert any foreign objects into the monitor, as this may cause a short circuit which can lead to a fire
or an electric shock.
• Do not attempt to disassemble or repair the monitor yourself. If the monitor is not functioning properly,
please contact our after-sales service department for assistance.
• Do not excessively pull, twist, or bend the power cord.
• There is a polarizing film attached to the screen (not the protective film), please do not tear it off. Any
damage caused by the user will void the warranty.
10
Troubleshooting
Issue Possible Cause Solutions
Unable to turn on No power
QMake sure the power cord is plugged in properly.
Image is dark
Brightness/
Contrast not
adjusted properly
QAdjust the brightness and contrast.
Image is jittery or has
ripples Interference
QKeep the monitor away from electronic devices that
may cause electrical Interference.
The indicator is blinking,
no image on the screen
No signal, entering
sleep mode
QTurn on the computer.
QMake sure the computer’s graphics card is working
properly.
QMake sure the VGA or HDMI cable is plugged in
properly.
The monitor displays that
the current resolution is
not supported
Resolution is
incorrect
QUse the specified recommended resolution settings.
Unable to open the menu,
and the monitor displays
the OSD is locked up
The menu is
disabled
QPress and hold the 5-way navigation button for
5 seconds on any direction to enable the menu and
unlock the OSD.
11
Specifications
Model RMMNT27NF
Power Input 12 V 2 A
Rated Power* 24 W Max.
Screen Size 27”
Viewable Image Size (Diagonal) 685.98 mm
Dot Pitch 0.3114 x 0.3114 mm
Brightness 300 cd/m2(TYP)
Contrast 1000:1 (TYP)
Dynamic Contrast 1000000:1
Color Gamut 16.7 M
Aspect Ratio 16:9
Response Time 6ms (GTG)
Maximum Resolution 1920 x 1080
Recommended Resolution 1920 x 1080
Maximum Refresh Rate 75 Hz
Recommended Refresh Rate 60 Hz
Item Dimensions 613.2 (L) x 205.3 (W) x 476.0 (H) mm
Net Weight 4.3 kg
Operating Temperature 0°C to 40°C
Operating Humidity 20% - 80% RH
* The power of the power adapter is not included.
The Adopted Trademarks HDMI, HDMI High-Definition Multimedia Interface,
and the HDMI Logo are trademarks or registered trademarks of HDMI Licensing
Administrator, Inc. in the United States and other countries

12
Eye Health
To avoid eyestrain, or neck, arm, elbow, and shoulder pain caused by using the computer for a long time,
please follow the suggestions listed below:
• Keep the monitor at a distance of 20-28 inches (approx. 50-70 cm) from your eyes.
• Blink more often to relieve eye fatigue when staring at the monitor.
• Give your eyes a 20-minute break after using the monitor for two hours.
• Take your eyes off the monitor and look at something a certain distance away for at least 20 seconds.
• Stretch your body to help relieve tension on the neck, arms, back, and shoulders.
Low Blue Light Description
In recent years, eye damage caused by blue light has attracted more and more attention. In general, the
wavelength of blue light is 400-480 nm, and the wavelength of harmful blue light is 415-455 nm. This monitor
has a function to help reduce your exposure to the blue light emission. You can enable the low blue light
mode via the settings menu.
13
Regulatory Compliance Information
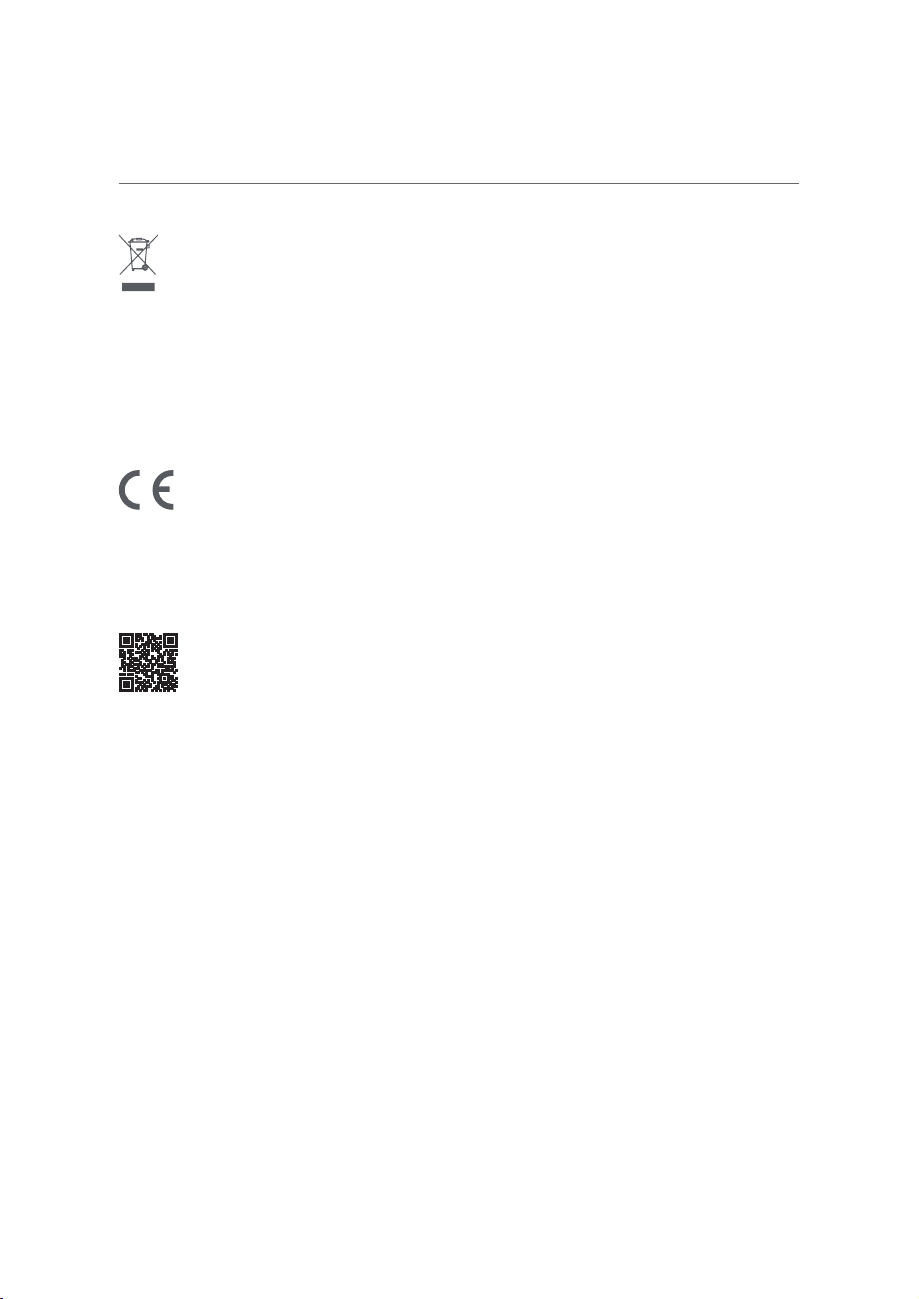
WEEE Disposal and Recycling Information
All products bearing this symbol are waste electrical and electronic equipment (WEEE as in directive
2012/19/EU) which should not be mixed with unsorted household waste. Instead, you should protect human
health and the environment by handing over your waste equipment to a designated collection point for the
recycling of waste electrical and electronic equipment, appointed by the government or local authorities.
Correct disposal and recycling will help prevent potential negative consequences to the environment and
human health. Please contact the installer or local authorities for more information about the location as
well as terms and conditions of such collection points.
EU Declaration of Conformity
We, Xiaomi Communications Co., Ltd., hereby, declare that this equipment is in compliance with the
applicable Directives and European Norms, and amendments. The full text of the EU declaration of
conformity is available at the following internet address:
http://www.mi.com/global/service/support/declaration.html
For Product Information Sheet, please scan the QR code below.

Xiaomi Communications Co., Ltd.
Address: #019, 9th Floor, Building 6, 33 Xi'erqi Middle Road, Haidian District, Beijing, China, 100085
For further information, please go to www.mi.com
Importer:
Beryko s.r.o.
Na Roudné 1162/76, 301 00 Plzeň
www.beryko.cz
Other manuals for Mi phone
13
This manual suits for next models
1
Table of contents
Other Xiaomi Monitor manuals


