XpertMatic F160 User manual

XpertMatic
Model: F160
WiFi/USB 2-in-1 Borescope
USER GUIDE
Made in China

Safety Notice
What’s in the Box
Product Description
Operation Steps
How to Use under WiFi Mode
How to Use under USB Mode
Q&A
Warranty
02
02
03
04
04
07
09
09
--------------------------------------------------
--------------------------------------------
------------------------------------------
----------------------------------------------
-----------------------------
-----------------------------
--------------------------------------------------------------
--------------------------------------------------------
01

Thank you for choosing XpertMatic WiFi/USB 2-in-1 Borescope.
Please read this user guide thoroughly before use.
Safety Notice
Do not attempt to disassemble, modify or fix this borescope
by yourself.
Keep the borescope away from fire or hot areas.
The lens gets warm after using for a while, which is normal
for borescope.
What’s in the Box
02
WiFi / USB
2-in-1 Borescope
1
23User Guide
XpertMatic
Model: F160
WiFi/USB 2-in-1 Borescope
USER GUIDE
Made in China
Accessories
Type-C

1
Product Description
1. Structure Introduction
4
3
5
6
USB WIFI
1
2
Waterproof Lens
2Semi-rigid Cable
3WiFi LED Indicator
4Brightness Control Button
5Shooting Button (Only for WiFi Mode)
6USB / WiFi Mode Switch Button
Specifications:
Camera Resolution
Camera Sensor
Focal Range
Camera Probe Diameter
Waterproof level
Support System
View Angle
Cable
LED Light QTY
1920*1080, 1600*1200, 1280*720
CMOS 2.0 Mega Pixel
4-500cm (0.1-16.4ft)
8.0mm (0.3in)
IP67
Android, iOS, Windows, Mac OS
70 Degree
5m (16.4 ft)
8
03

2. Accessories
Magnet
Mirror
Hook
Stainless steel
Telescopic Rod
3. How to Install Accessories:
Choose 1 accessory and attach it to the camera and lock it on
the indentation as shown below:
Operation Steps:
How to Use under WiFi Mode
1. For Android System
1) Please turn on your smartphone's OTG function before use.
(Most smartphones' OTG function can be activated
automatically)
04

For Samsung smartphone users, you can follow the below
video to enable the OTG function (USB Debugging), or connect
the borescope with your smartphone via the the Samsung
Type-C to USB-A adapter:
2) Download the free APP “WiFi Look” from “Google Play” or
download by scanning the QR code below and install it.
Tips: Don't run the APP before you finished all below
operation steps.
3) Connect and Use
a. Turn on WiFi mode as this picture shows. Connect the
borescope with your smartphone via Micro-B or Type-C
connector, then the LED will light up.
QR codeWiFi Look
USB WIFI
b. Click “Setting” on your smartphone, then search WiFi
“WiFiLook” and connect (No password needed).
c. Run the APP, then you can see the real-time video.
05

App Store QR codeWiFi Look
1Picture Capture
2Video Record
3File
4Image Rotate
5Resolution Setting
APP Functions Instruction
2. For iOS System
1) Download the free APP “WiFi Look” from “App Store” or
download by scanning the QR code below, and then install it.
Tips: Don' t run the APP before you finished all below
operation steps.
2) Connect and Use
a. Turn on the WiFi mode, then use connector to connect the
borescope with an external power supply, such as power
bank, adaptor or Android smartphone with OTG function
turns on. Then the LED will light up.
06

b. Click “Setting” on your iPhone/iPad, then search WiFi
“WiFiLook” and connect (No password needed).
c. Run the APP, then you can see the real-time video.
How to Use under USB Mode
1. For Windows System
1) Run a browser, then input below address to download the
file: http://www.51scope.cn/files/setup.rar
Unzip the file and then install the software “ViewPlayCap”
Tips: Don' t run the software before you finished all below
operation steps.
2) Turn on the USB mode, then use USB A connector to connect
the borescope with your PC / Laptop
3) Run the software “ViewPlayCap”, then click “Device” and
choose “USB.2.0 PC Camera”. You will see the real-time video.
07
USB WIFI
USB WIFI

“ViewPlayCap” Software Functions Instruction
1) Picture Capture: Click “Snapshot” to capture photos.
2) Video Record: Click “File” -> “Set Capture File” to create an
empty file, then click “Capture” to start shooting video.
Tips: If you use this borescope to record a video for a long time,
it is suggested to use no more than 1 hour, otherwise the file
will be occupied with too much memory.
3) Album: Click “View” -> “Open My Videos” or “Open My Pictures”
to find your videos or pictures.
4) Image Resolution Setting: Click “Options” -> ”Preview Format”
to choose the picture resolution you prefer.
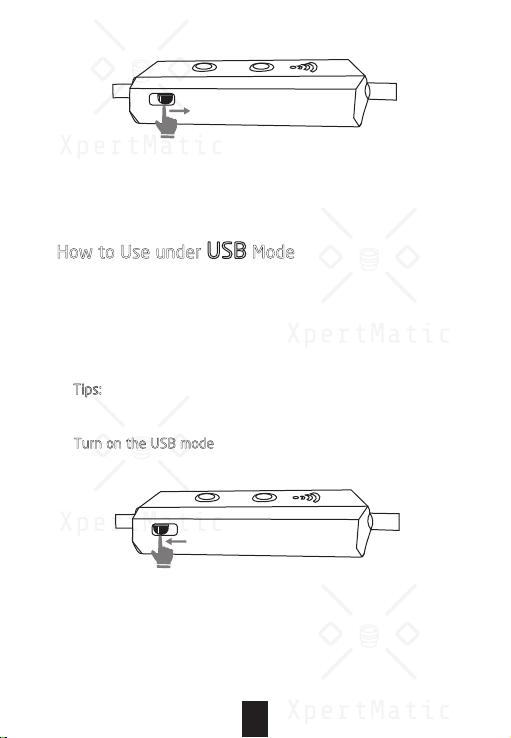
2. For Mac OS System
1) Turn on the USB mode, use USB-A or Type-C connector to
connect the borescope with your MacBook.
File DeviceOptionsCapture Snapshot ViewHelp
FileDevice Options Capture Snapshot View Help
Fi le Device Options Capture Snapshot View Help
SetCapture File
Exit
08

2) Click on the software “Photo Booth” to see the real-time video.
Q&A
1. Why the endoscope didn't work on my Samsung
smartphone?
There is a bug of Samsung smartphone that it
didn't activate the OTG function automatically.
Please follow the below video to enable the
OTG function (USB Debugging):
2. How to fix if the borescope didn't light up?
If you connect the borescope with your device
via type C connector, pls flip-down half of the
USB-A connector, and then plug the USB-C
part into it.
3. How to save the video in 1080P resolutions?
The video only can save in 640x480P resolution, otherwise,
it takes up too much memory of your device.
Warranty:
XpertMatic guarantees 60 days no reason replacement or
refunds from the day you purchase. We provide 2-year warranty
and support lifetime technical support. Please reach us via
09
USB WIFI

XpertMatic
Model: F160
WiFi/USB 2-in-1 Endoskop
BENUTZERHANDBUCH
Made in China

Sicherheitshinweise
Lieferumfang
Produktbeschreibung
Bedienung
Verwendung im WiFi-Modus
Verwendung im USB-Modus
Mögliche Probleme und deren Lösungen
Gewährleistung
12
12
13
14
14
17
19
19
-----------------------------------------
---------------------------------------------------
----------------------------------------
------------------------------------------------------
-------------------------------
-------------------------------
--------------
-----------------------------------------------
11

Vielen Dank, dass Sie sich für das XpertMatic WiFi / USB 2-in-1
Endoskop entschieden haben. Bitte lesen Sie sich das
Benutzerhandbuch gründlich durch, bevor Sie das Gerät in
Betrieb nehmen.
Sicherheitshinweise
Versuchen Sie nicht, dieses Endoskop auseinander zu bauen,
zu modifizieren oder zu reparieren.
Halten Sie das Endoskop von Feuer und heißen Bereichen fern.
Die Linse wird während der Benutzung warm. Dies ist normal
für ein Endoskop.
Lieferumfang
23Benutzerhandbuch
12
Zubehör
XpertMatic
Model: F160
WiFi/USB 2-in-1 Endoskop
BENUTZERHANDBUCH
Made in China
WiFi / USB
2-in-1 Endoskop
1
Type-C

1
Produktbeschreibung
1. Einführung in das Produkt
4
3
5
6
USB WIFI
1
2
Wasserdichte Sonde
2Halbstarres Kabel
3WiFi-Status-LED
4Taste für Helligkeitssteuerung
5Taste für Aufnahmefunktion
(Nur im WiFi-Modus)
6USB- / WiFi-Modus
Eigenschaften:
Kameraauflösung
Kamerasensor
Fokussierbereich
Durchmesser der Kamerasonde
Wasserdicht nach Schutzklasse
Unterstützte Systeme
Betrachtungbereich
Kabel
LED-Leuchten
1920*1080, 1600*1200, 1280*720
CMOS 2,0 Megapixel
4-500cm (0.1-16.4ft)
8.0mm (0.3in)
IP67
Android, iOS, Windows, Mac OS
70 Grad
5m (16.4 ft)
8
13

2. Zubehör
Magnet-Aufsatz
Spiegel-Aufsatz
Haken-Aufsatz
Teleskopstange
aus Edelstahl
3. Verwendung des Zubehörs
Wählen Sie einen Aufsatz aus, und schieben ihn über die
Kamerasonde bis er sich, wie unten abgebildet, in der Vertiefung
befindet.
14
Bedienung:
Verwendung im WiFi-Modus
1. Für Android Systeme
1) Bitte schalten Sie vor der Verwendung die OTG-Funktion Ihres
Smartphones ein. (Die OTG-Funktion der meisten Smartphones
ist automatisch aktiviert)

Für Benutzer von Samsung-Smartphones können Sie das
folgende Video verfolgen, um die OTG-Funktion (USB-
Debugging) zu aktivieren, oder verbinden Sie das Endoskop
mit Ihrem Smartphone über den Samsung-Adapter Type-C
auf USB-A Adapter:
2) Laden Sie die kostenlose App "WiFi Look" von "Google Play"
herunter oder laden Sie es herunter, indem Sie den QR-Code
unten scannen und installieren sie die App anschließend.
Führen Sie die APP nicht aus, bevor Sie alle unten aufgeführten
Schritte ausgeführt haben.
3) Verbinden und Benutzen
a. Schalten Sie den WiFi-Modus ein, wie in dieses Bild gezeigt,
und verwenden Sie dann den USB 2.0 / 3.0-Anschluss, um
das Endoskop mit einem externen Netzteil, wie z.B. einem
Netzteil, einem Adapterstecker oder einem Android-
Smartphone mit OTG-Funktion, zu verbinden. Dann leuchtet
die LED auf.
QR codeWiFi Look
b. Klicken Sie auf Ihrem Smartphone auf "Einstellungen",
suchen Sie dann im WiFi "WiFiLook" und verbinden Sie sich
(kein Passwort erforderlich).
15
USB WIFI

App Store QR codeWiFi Look
1Bild-Aufnahme
2Video-Aufnahme
3Dateispeicher
4Bild-Rotieren
5Auflösungseinstellungen
App-Funktions Anleitung
2. Für iOS Systeme
1) Laden Sie die kostenlose App "WiFi Look" aus dem "App Store"
herunter oder laden Sie es herunter, indem Sie den QR-Code
unten scannen und installieren Sie die App anschließend.
Führen Sie die APP nicht aus, bevor Sie alle unten aufgeführten
Schritte ausgeführt haben.
2) Verbinden und Benutzen
a. Schalten Sie den WiFi-Modus ein und verwenden Sie dann
den Anschluss, um das Endoskop mit einem externen
Netzteil, wie z.B. einem Netzteil, einem Adapterstecker oder
einem Android-Smartphone mit OTG-Funktion, zu verbinden.
Dann leuchtet die LED auf.
16
c. Starten Sie die App, dann können Sie das Echtzeit-Video
sehen.

b. Klicken Sie auf Ihrem iPhone/iPad auf "Einstellung", suchen
Sie dann im WiFi "WiFiLook" und verbinden Sie sich (kei
Passwort erforderlich).
c. Klicken Sie auf die App, dann können Sie das Echtzeit-Video
sehen.
Verwendung im USB-Modus
1. Für Windows System
1) Starten Sie ihren Browser und geben Sie dann die folgende
Adresse ein, um die Datei herunterzuladen:
http://www.51scope.cn/files/setup.rar
Entpacken Sie die Datei und installieren Sie dann die Software
"ViewPlayCap".
Führen Sie die Software nicht aus, bevor Sie alle unten
aufgeführten Schritte ausgeführt haben.
2) Schalten Sie den USB-Modus ein, wie in dieses Bild gezeigt und
verwenden Sie dann den USB A-Anschluss, um das Endoskop
mit Ihrem PC / Laptop zu verbinden.
17
3) Starten Sie die Software "ViewPlayCap", klicken Sie dann auf
"Gerät" und wählen Sie "USB.2.0 PC-Kamera". Sie werden jetzt
as Echtzeit-Video sehen.
USB WIFI
USB WIFI

“ViewPlayCap” Software-Funktions Anleitung
1) Bild-Aufnahme: Klicken sie auf „Snapshot“ um ein Bild
aufzunehmen.
2) Video-Aufnahme: Klicken Sie auf „File“ -> „Set Capture File“
um eine leere Datei zu erstellen, klicken sie dann auf „Capture“
um die Video-Aufnahme zu starten.
Hinweis: Wenn Sie dieses Endoskop verwenden, um ein Video
über einen längeren Zeitraum aufzunehmen, wird empfohlen,
nicht mehr als 1 Stunde zu aufzuzeichnen, da ansonsten Datei
sehr viel Speicherplatz belegt.
3) Album: Klicken Sie auf "View" -> "Open My Videos" oder "Open
My Pictures", um Ihre Videos oder Bilder zu finden.
4) Einstellung der Bild Auflösung: Klicken Sie auf "Options"->
"Preview Format", um die gewünschte bild Auflösung
auszuwählen.
File DeviceOptions CaptureSnapshotViewHelp
FileDevice Options Capture SnapshotView Help
File Device Options CaptureSnapshot ViewHelp
Set Capture File
Exit
18

2) Klicken Sie auf die Software "Photo Booth", um das Echtzeit-
Video zu sehen.
Mögliche Probleme und deren Lösungen
1. Wie soll man das beheben, wenn das Endoskop nicht
aufleuchtet?
Wenn Sie das Endoskop über den Typ C-Stecker mit
Ihrem Gerät verbinden, klappen Sie die Hälfte des
USB A-Steckers nach unten und stecken Sie dann
den USB-C-Teil ein.
2. Wie speichert man das Video in 1080P-Auflösungen?
Das Video wird nur in der Auflösung von 640 x 480P gespeichert.
Andernfalls nimmt es zu viel Speicherplatz auf Ihrem Gerät im
Anspruch.
Gewährleistung
XpertMatic garantiert 60 Tage lang eine Rückerstattung ohne
Angabe von Gründen ab dem Tag, an dem Sie das Produkt kaufen.
Wir bieten 2 Jahre Garantie und lebenslangen technischen
Support. Bei weiteren Fragen kontaktieren Sie uns bitte über
19
2. Für Mac OS System
1) Schalten Sie den USB-Modus ein, wie in dieses Bild gezeigt.
verwenden Sie den USB-A or Type-C um das Endoskop mit
Ihrem MacBook zu verbinden.
USB WIFI
Table of contents
Languages: