Xplore DT4000 User manual

DT4000
User Guide
Copyright2013 Group Sense Mobile-Tech Limited. All rights reserved.

2
Contents
Copyright .......................................................................................................................................3
Disclaimer......................................................................................................................................3
Regulatory Information..................................................................................................................4
Safety Information .........................................................................................................................5
Getting Started ...............................................................................................................................6
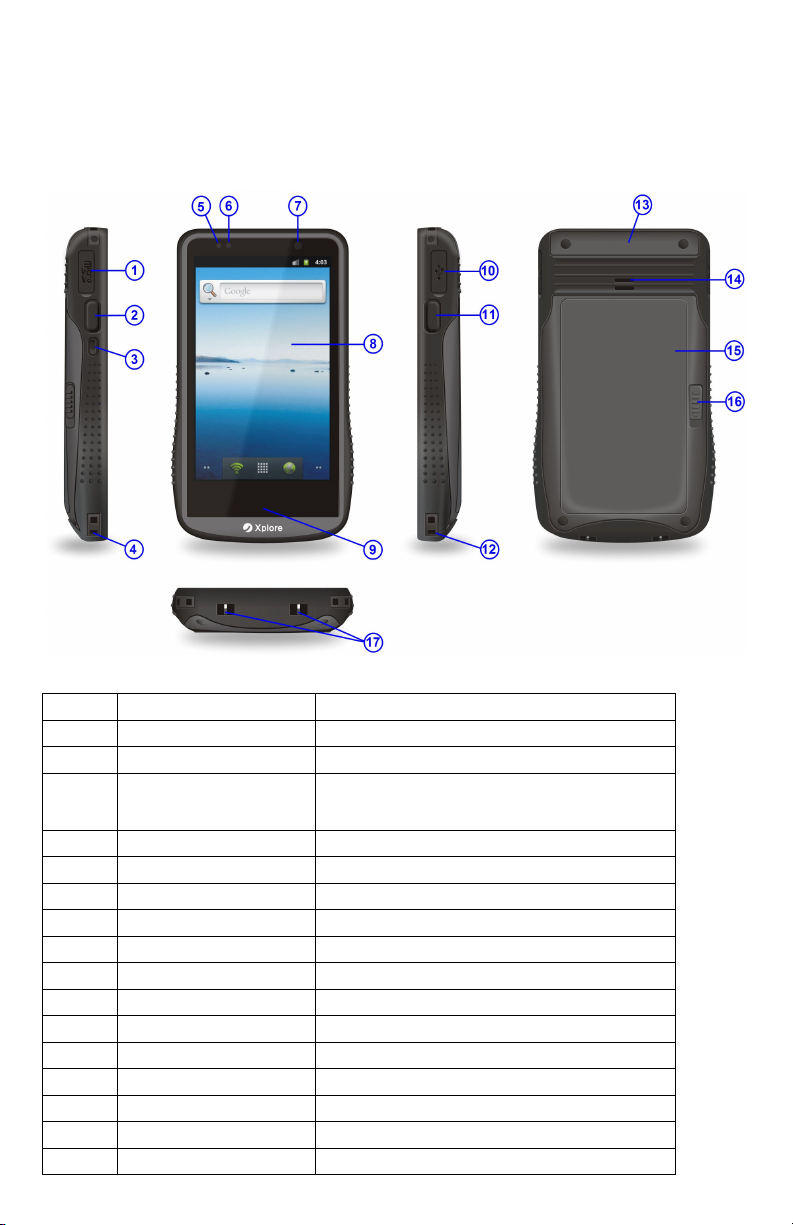
Device Overview......................................................................................................................6
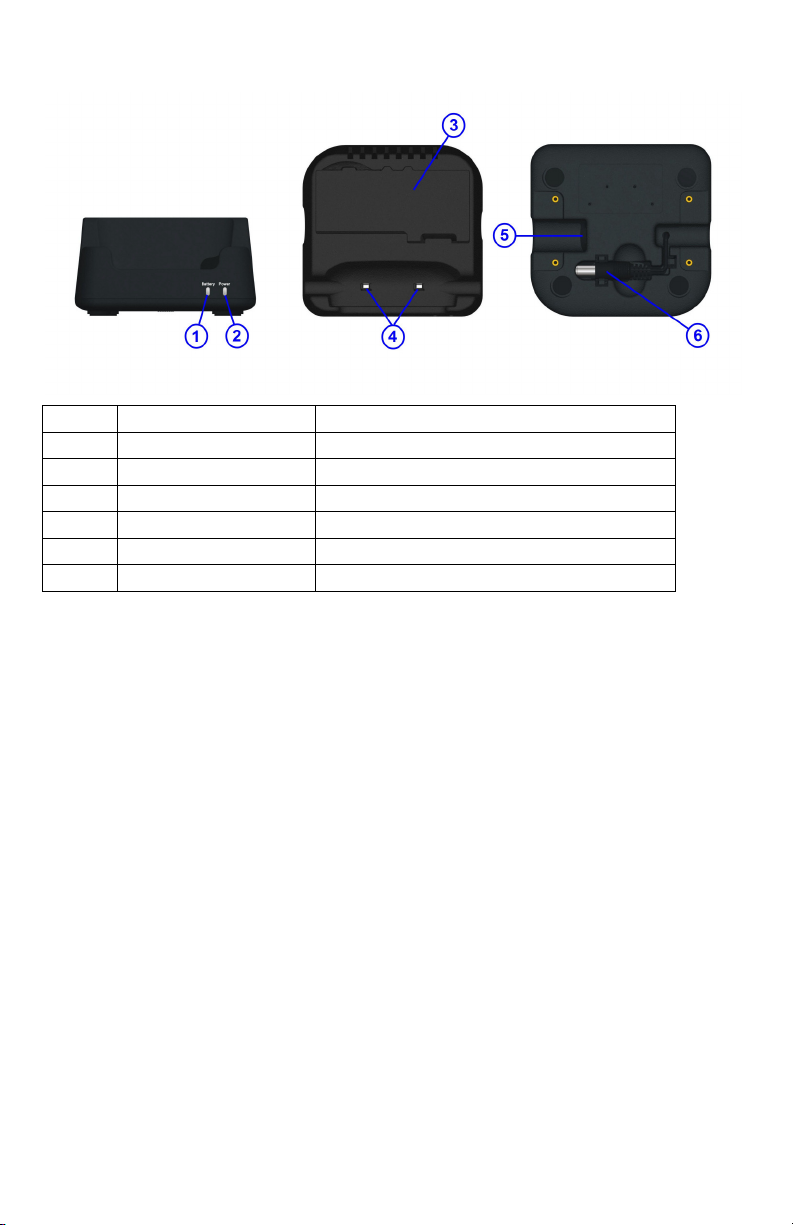
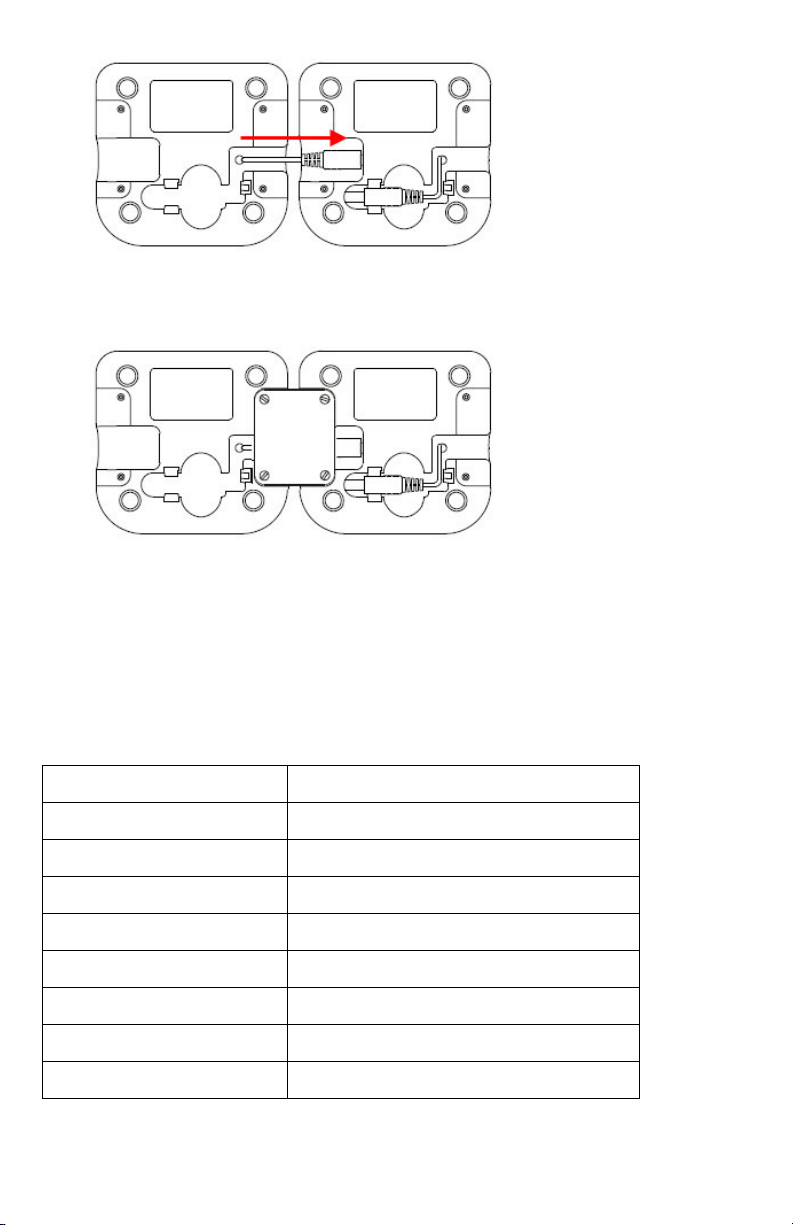
Installing and Removing the Battery ........................................................................................7
Battery Charging.......................................................................................................................8
LED Status Description ............................................................................................................9
Powering the Device On and Off............................................................................................10
Suspending the Device ...........................................................................................................10
Using the Device..........................................................................................................................11
Status Bar Icons......................................................................................................................11
Viewing System Information..................................................................................................12
Using Wi-Fi ............................................................................................................................12
Using Bluetooth......................................................................................................................14
Using NFC..............................................................................................................................16
Adjusting Volume ...................................................................................................................17
Adjusting Brightness ..............................................................................................................18
Enabling Auto-rotate screen ...................................................................................................19
Adjusting Screen timeout & Screen dim timeout ...................................................................19
Defining Keys.........................................................................................................................21
Changing Language................................................................................................................21
Adjusting Date & Time ..........................................................................................................22
Performing System Backup ....................................................................................................23
Performing System Restore ....................................................................................................24

3
Copyright
Copyright2013 Group Sense Mobile-Tech Limited. All rights reserved.
No part of this document may be reproduced, distributed, translated, or stored in any form
without the prior written permission of Group Sense Mobile-Tech Limited. All brands and
product names mentioned herein may be trademarks or registered trademarks of their respective
owners. Product specifications are subject to change without prior notice.
Disclaimer
The contents of this document are provided as is. Group Sense Mobile-Tech Limited makes no
representations or warranties with respect to the contents herein and specifically disclaims any
express or implied warranties of merchantability or fitness for any particular purpose. Group
Sense Mobile-Tech Limited reserves the right to revise this document at any time without prior
notice.

4
Regulatory Information
FCC Statement
This device complies with Part 15 of the FCC Rules. Operation is subject to the following two
conditions: (1) This device may not cause harmful interference, and (2) this device must accept
any interference received, including interference that may cause undesired operation. Changes or
modifications not expressly approved by the party responsible for compliance could void the
user’s authority to operate the equipment.
FCC Radiation Exposure Statement
This device should be installed and operated with a minimum separation distance of 5mm
between the radiator and all persons. This transmitter must not be co-located or operated in
conjunction with any other antenna or transmitter.
CE Statement
This device has been tested and found to comply with the following EU Directives:
R&TTE Directive (1999/5/EC)
EMC Directive (2004/108/EC)
Low Voltage Directive (2006/95/EC)
The assessment of compliance of the device was performed according to the following European
standards:
EMC: EN 301 489-1/-17
Health: EN 50371
Safety: EN60950-1
Radio: EN 300 328

5
Radiation Exposure Statement
This devise is designed, tested, and manufactured to comply with the limits for exposure to RF
energy set by international regulatory agencies. “Specific Absorption Rate,” or SAR, refers to
the rate at which the body absorbs RF energy. The SAR limits for Wi-Fi and Bluetooth are 1.6
watts per kilogram (W/kg) for the FCC, and 2.0 W/kg for the Council of the European Union.
This device has been tested, and meets the FCC and European Union RF exposure guidelines for
WiFi and Bluetooth operation.
Safety Information
Please read the following information carefully before using the device for the first time, and
keep this Quick Start Guide in a safe place for future reference.
Always treat the device with care and keep it in a clean and dust-free environment.
Do not expose the device to extremely hot, cold or humid environment. The operation
temperature is from –10
C to 50
C.
Do not use the device in wet or rainy conditions.
Do not charge the device in extremely hot (over 40
C) or cold conditions (below 0
C).
Do not attempt to disassemble or modify the device including the charger.
Do not operate the device when your hands are wet.
Do not insert foreign objects into the openings of the device.
Use only the charger and battery approved for the device.
Install the cradle on a flat and stable surface.
Do not cascade over 3 cradles in series.
Do not use the charger if the power cord or plug is damaged.
Do not disassemble, crush or puncture the battery.
Do not expose the battery to high temperatures.
Do not let battery terminals touch other metal objects that could lead to short-circuit of the
battery.
Do not dispose of the battery in fire or water.
Dispose of used battery properly according to local laws and regulations.

6
Getting Started
Device Overview
No. Item Description
1 MicroSD card cover Open the cover to access the MicroSD card slot
2 Left side key Configurable shortcut key. Default as Menu key
3 Power key Press and hold to turn the device on or off.
If the device is on, press to suspend.
4 /12 Strap eyelet Attach to anti-drop string
5 Configurable LED Software configurable LED
6 Device LED Power and WiFi connection status indicator
7 Ambient light sensor Auto screen brightness control
8 Touch screen LCD with capacitive touch screen
9 NFC reader Scanning area for NFC tag
10 USB cover Open the cover to access the USB connector
11 Right side key Configurable shortcut key. Default as Back key
13 Expansion slot cover Remove cover for Add-on module connection
14 Speaker Mono speaker
15 Battery cover Remove the battery cover to access the battery
16 Battery cover lock Slide down to release the battery cover
17 Charging plates Contact plates for charging in the cradle

7
No. Item Description
1 Spare battery LED Spare battery charging status indicator
2 Power LED Cradle power connection indicator
3 Battery slot To charge spare battery
4 Charging contact plates To charge the PDA
5 DC jack Connect AC/DC Adaptor or DC power cable
6 DC power cable Extension power cable for cascading cradles
Installing and Removing the Battery
Installing the Battery
1. Align the battery metal contacts with the contact pins inside the battery compartment.
2. Press the battery down until the battery lock clicks into place.
3. Align the battery cover with the battery compartment; and push the battery cover down until it
is locked.
Removing the Battery
Note: Always power off the device before removing the battery.
1. Slide the battery cover lock down until the battery cover ejects slightly.

8
2. Remove the battery cover.
3. Slide the battery lock to the right and hold it at the unlocked position.
4. Lift the the battery from the battery compartment.
Battery Charging
Charging the Device
1. Connect the AC/DC adaptor to the DC jack of the cradle.
2. Plug the AC/DC adaptor into a suitable power socket. The cradle power LED will turn
green when power is supplied to the cradle.
3. Insert the device to the cradle slot. The device LED will flash amber while charging, then it
will turn green when fully charged.
Charging the Spare Battery
1. Align the battery metal contacts with the contact plates of the battery slot.
2. Slide the battery to the battery slot. The cradle battery LED will turn red while charging,
then it will turn green when fully charged.
Cascading the DT4000 Cradles
DT4000 cradles can be cascaded in series to charge the DT4000 devices and batteries
simultaneously with one AC/DC adaptor. Each adaptor supports maximum 3 cascaded cradles.
Important: Do not cascade over 3 cradles in series.
1. Disconnect AC/DC adaptor, and turn over 2 cradles.
2. Connect the DC power cable of one cradle to the DC power connector of the other cradle.

9
3. Apply the metal plate accessory to the recess area between the cradles, and fasten the metal
plate screws with a coin or screwdriver.
4. Re-connect the AC/DC adaptor to the cradle.
LED Status Description
Device LED
LED colour Description
Red Battery low
Flashing Amber Charging
Green Fully Charged
Flashing Blue Quickly Wi-Fi Searching
Fashing Blue Slowly Wi-Fi Connected
Off Wi-Fi Disconnected
Aqua Blue Powering On
Flashing Green Battery door is open

10
Cradle Power LED
LED colour Description
Green Cradle is powered on
Off Cradle is powered off
Cradle Battery LED
LED colour Description
Red Spare battery is charging
Green Spare battery is fully charged
Off Battery slot is empty
Powering the Device On and Off
Powering on the Device
Press and hold the Power key for at least 2 seconds until the device LED turns aqua blue.
Note: The device can only power on when the battery cover is closed.
Powering off the Device
Press and hold the Power key for at least 2 seconds, and follow the screen instructions to power
off the device.
Suspending the Device
If the device is on, press the Power key once or close the flip cover to suspend the device (i.e.
entering sleep mode), saving battery power.
To resume operation from sleep mode, press the Power key once or open the flip cover.

11
Using the Device
Status Bar Icons
Icon
Description Icon
Description
Battery is full.
Uploading data.
Battery is partially drained.
Downloading data.
Battery is low.
Warning notification.
Battery is very low.
Preparing MicroSD card.
Battery is charging.
MicroSD card or internal memory is
full.
WLAN feature is on, but not
connected to a network.
Vibrate mode is on.
Connected to a WLAN.
Silent mode is on.
Bluetooth is on.
Alarm is set.
Connected to a Bluetooth device.
Connected to the add-on Barcode
scanner module.
USB connected.
Connected to the add-on MSR module.
USB debugging connected.
Ethernet over USB.

12
Viewing System Information
1. Select Application drawer > Settings > About device
2. Scroll to view model number, serial number, software version etc.
Using Wi-Fi
Connecting to WLAN
1. Select Application drawer > Settings > WLAN
2. Select the required AP under WLAN networks.
3. Input the network key when prompted. Select Lock Single Network checkbox, and select
Connect.

13
4. Once connected, the AP will indicate Connected & Locked, and the device LED will be
blinking blue slowly.
5. Select Advanced to perform advanced settings if required.

14
Using Bluetooth
Connecting to a Bluetooth Device
1. Select Application drawer > Settings > Bluetooth.
2. Select Bluetooth checkbox to turn on Bluetooth.
3. Select Scan for devices.
4. Select the required device under Bluetooth devices.
5. Input PIN when prompted to pair.

15
Unpairing a Bluetooth Device
1. In the Bluetooth devices list, touch and hold on a paired bluetooth device until a pop up
dialog box appears.
2. Select Unpair.

16
Making the Device Discoverable
1. Select Discoverable.
2. Select Discoverable timeout to adjust the timeout period if needed.
Using NFC
1. Select Application drawer > Settings > NFC
2. Select NFC checkbox to turn on NFC.

17
Note: Place tags within 2mm of the NFC scanning area to ensure successful scans.
Adjusting Volume
1. Select Application drawer > Settings > Sound > Volume.
2. Drag the slide bar to adjust the volume

18
Adjusting Brightness
1. Select Application drawer > Settings > Display > Brightness.
2. Drag the slide bar to adjust the backlight, or select Automatic brightness checkbox for
auto brightness adjustment.

19
Enabling Auto-rotate screen
1. Select Application drawer > Settings > Display > Auto-rotate screen.
2. Select the Enable checkbox.
3. Select the rotation angles, and select OK.
Adjusting Screen timeout & Screen dim timeout
1. Select Application drawer > Settings > Display > Screen timeout to adjust the idle
period elapsed before turning off screen.

20
2. Select Application drawer > Settings > Display > Screen dim timeout to adjust the
screen dim period before screen is turned off.
Table of contents