XPPen Deco Pro Series User manual

1
Deco Pro Series Drawing Tablet (Gen 2)
Contents
Introduction ........................................................................................................................................2
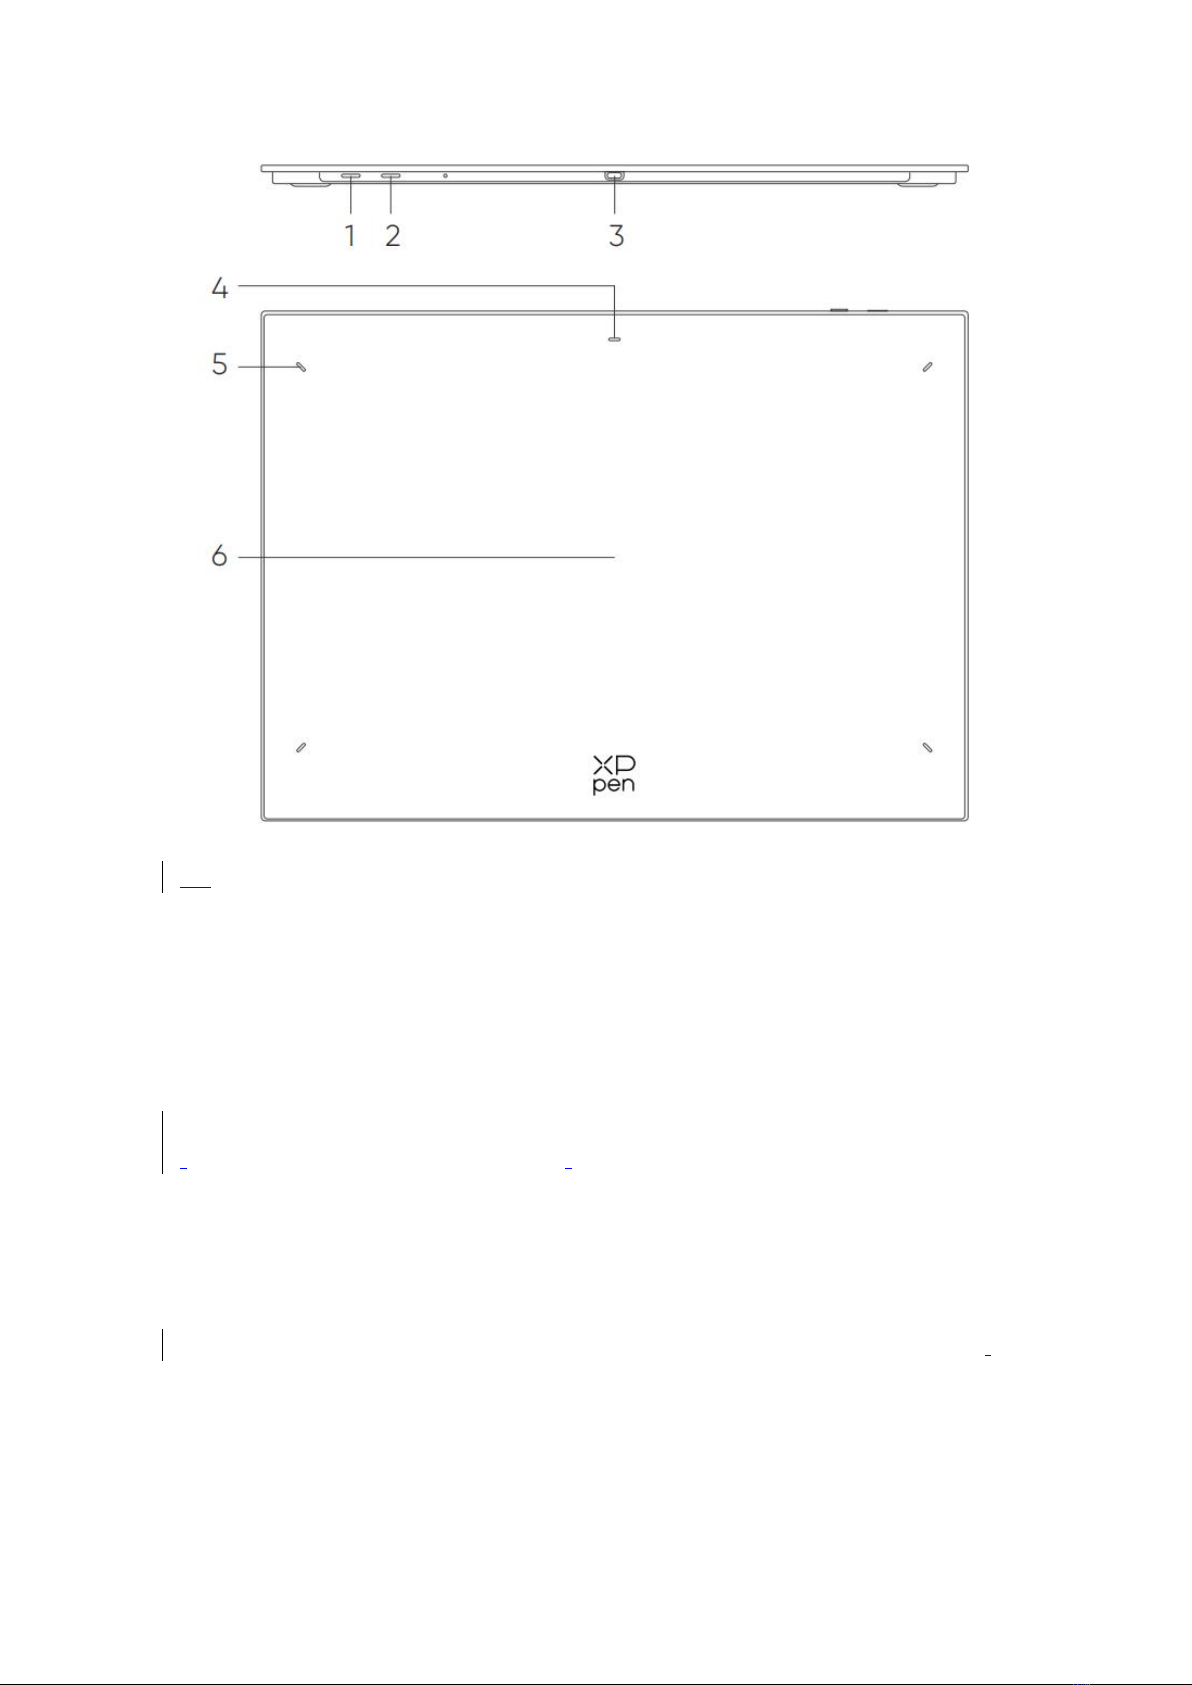
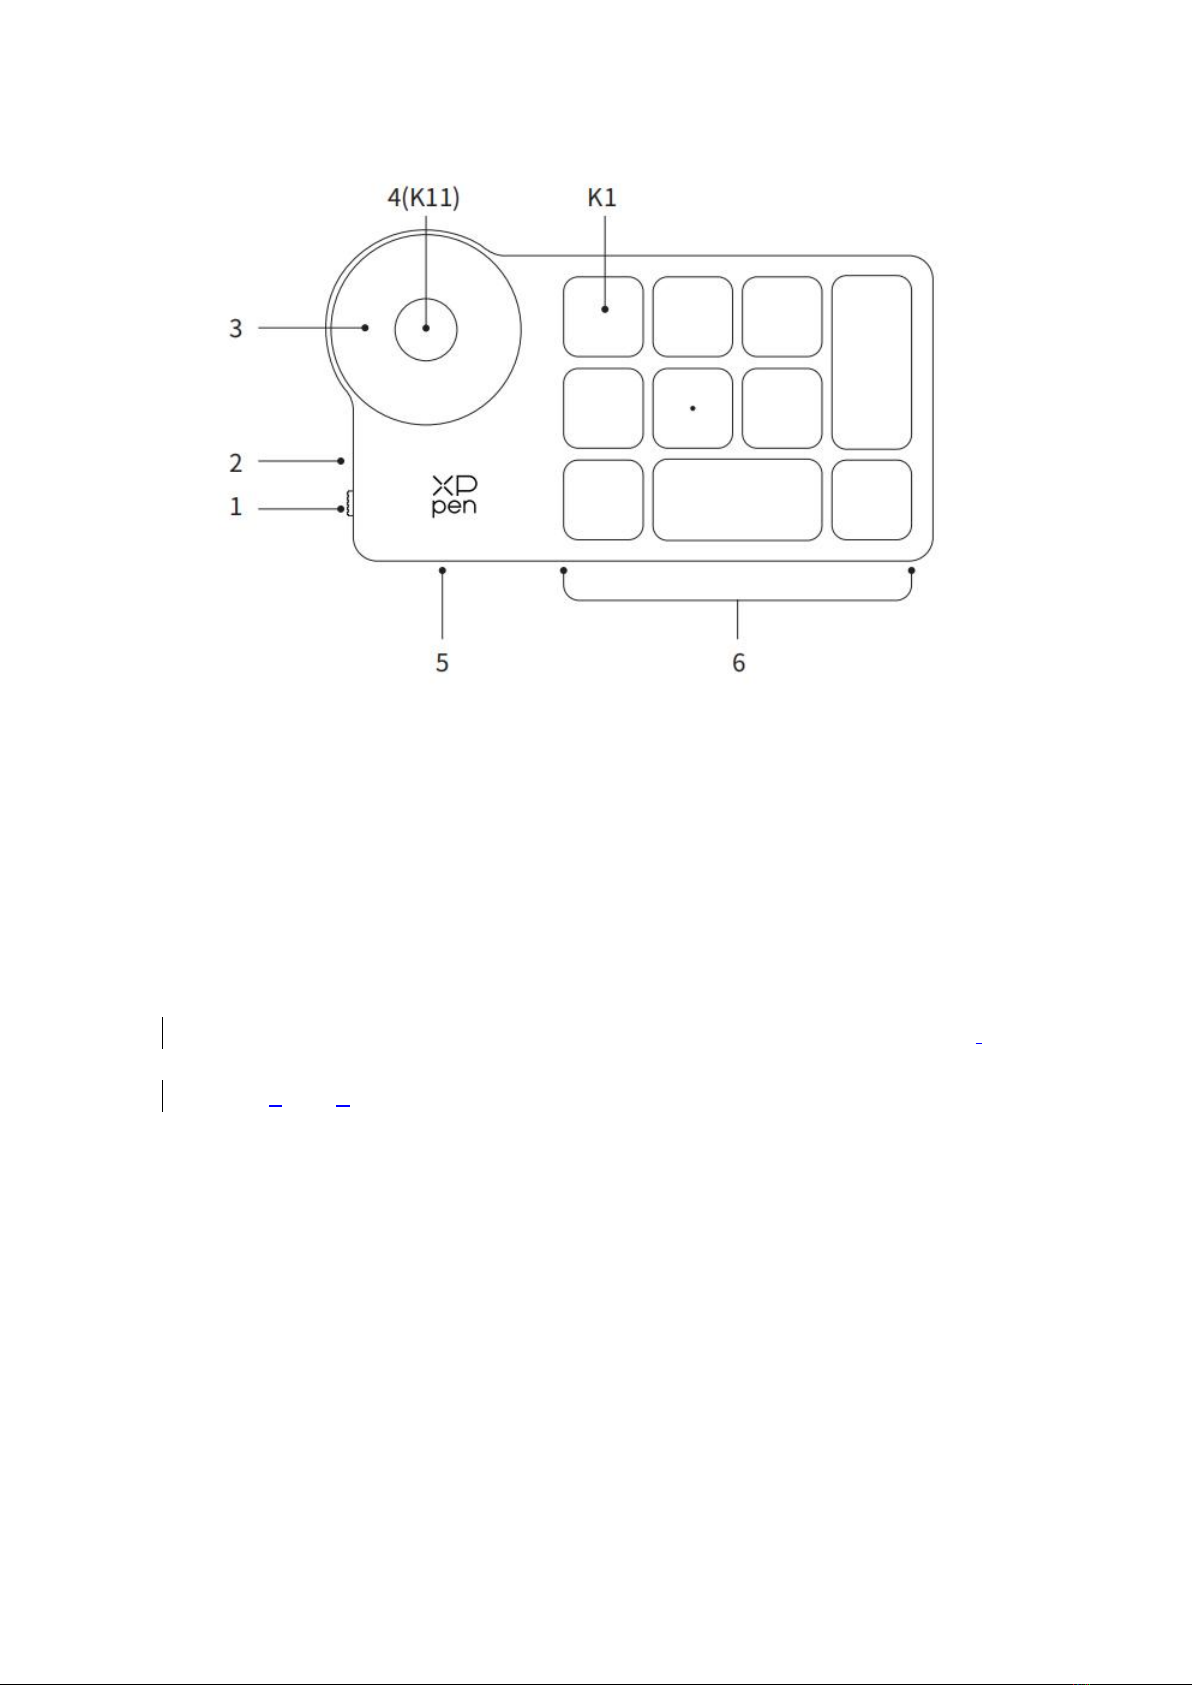
Product Overview .....................................................................................................................2
Included with your product ..................................................................................................... 4
Connection ........................................................................................................................................ 5
Wired Connection .....................................................................................................................5
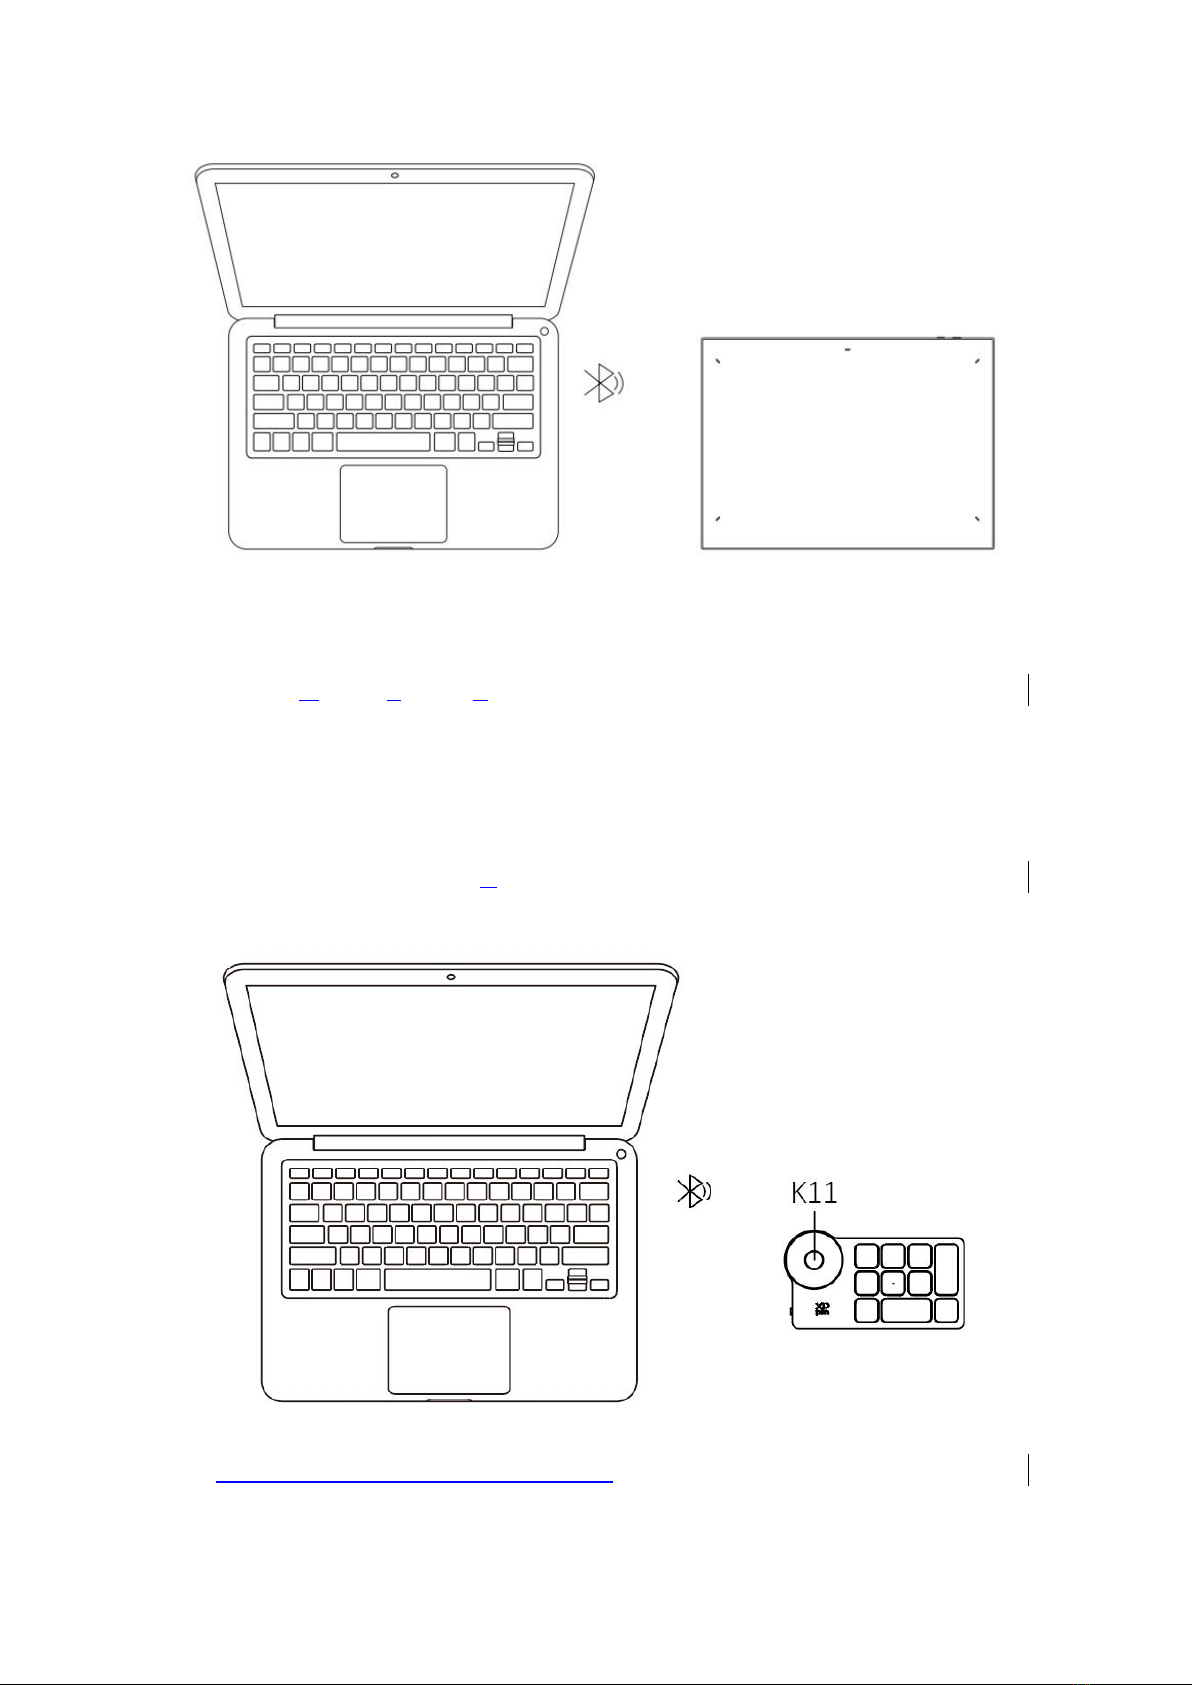
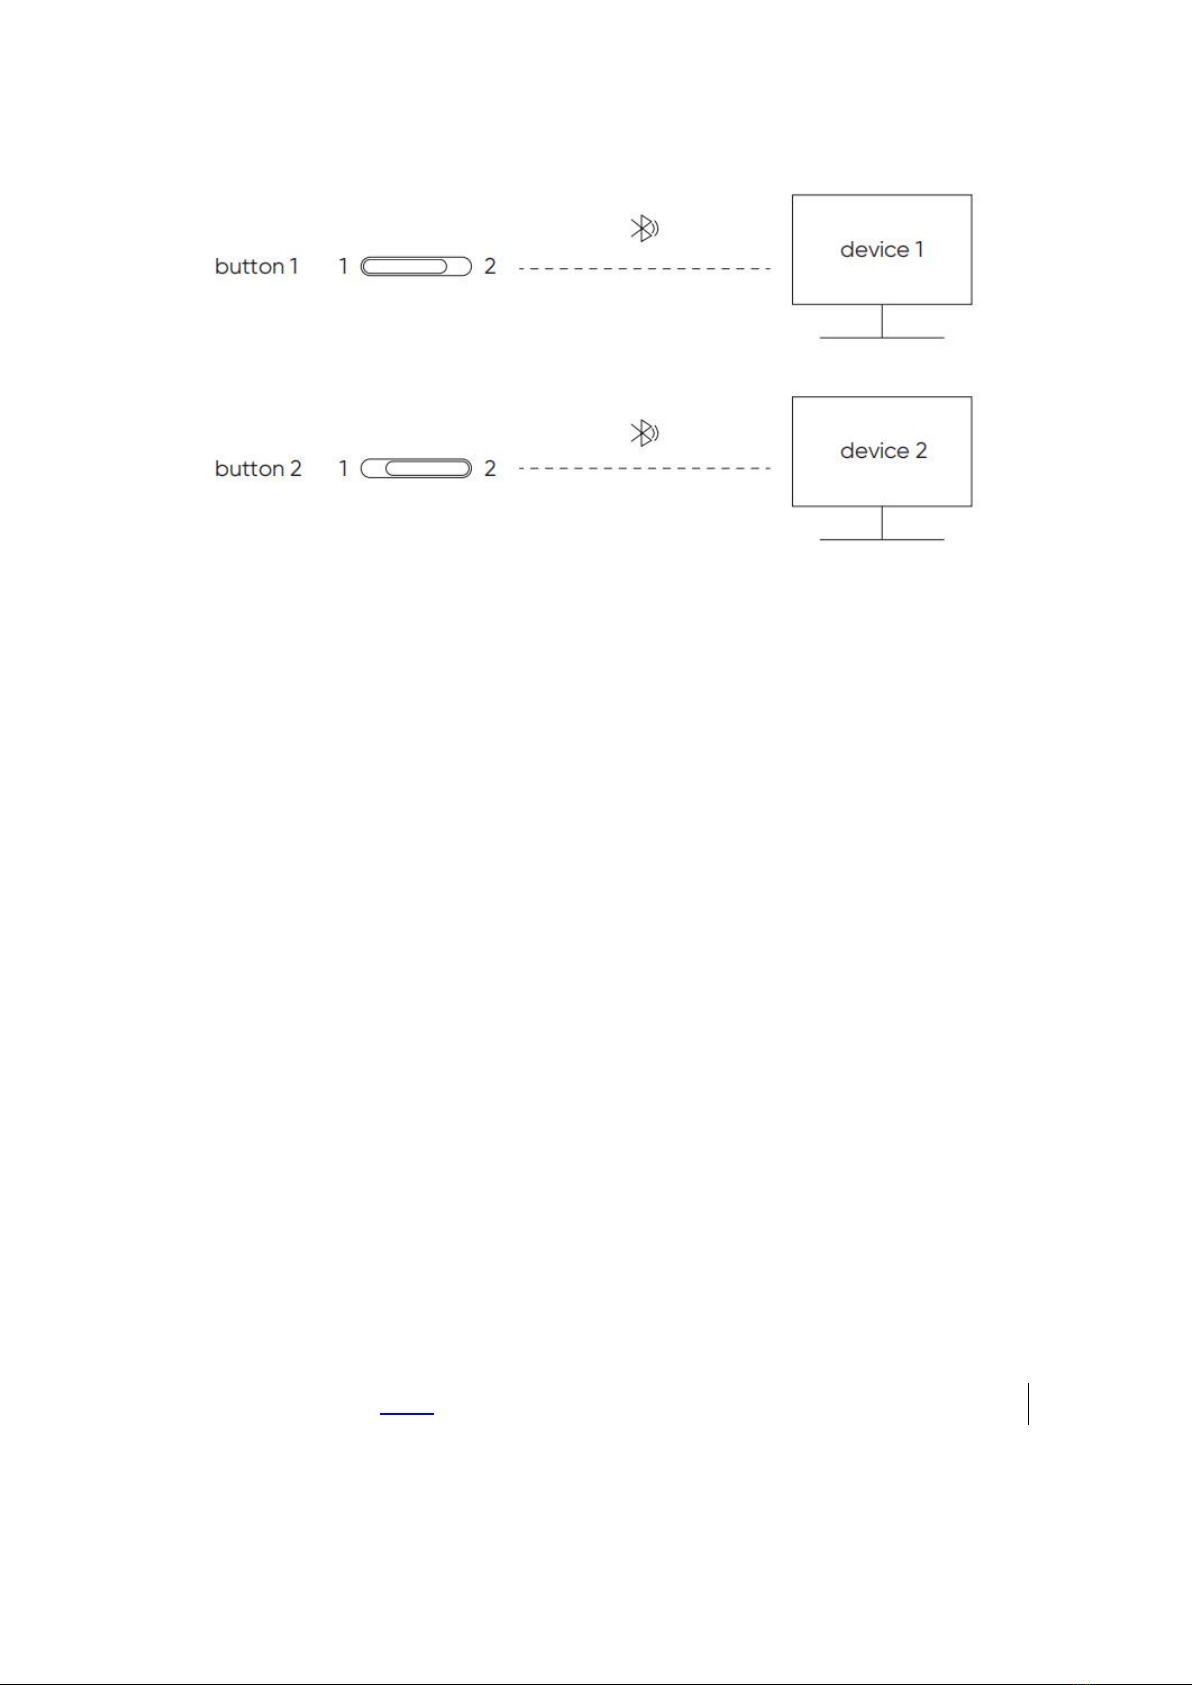
Wireless Connection ................................................................................................................7
Compatibility ....................................................................................................................................10
Product Settings ............................................................................................................................. 10
Driver Installation ................................................................................................................... 10
Introduction to Driver ............................................................................................................. 12
Device Settings .......................................................................................................................14
Drawing Tablet ............................................................................................................... 14
Work Area ................................................................................................................14
Pen Settings ............................................................................................................18
Wireless Shortcut Remote ............................................................................................21
Driver Settings ........................................................................................................................ 26
Driver Uninstallation .............................................................................................................. 27
FAQs .................................................................................................................................................27

2
Introduction
Thank you for choosing XPPen Deco Pro(Gen 2) Drawing Tablet. This user
manual is specially designed to detail the product’s functions and features.
Please read this manual before using the product to ensure safe and proper
use.
Due to the latest product improvements, content may differ from the final
product and is subject to change without prior notice.
Note: The pictures in the User Manual are for reference only. The User Manual
supplied with the device may vary depending on the model.
Product Overview
Drawing Tablet

3
1. Power Key
a. Long press for 3 seconds:Power on or off
b. Long press for 6 seconds:Bluetooth pairing mode
2. Bluetooth Switching Button
3. USB -C port
4. Indicator 1
In blue status:
a. Flashing slowly: Waiting for Bluetooth connection
b. Flashing quickly: Waiting for Bluetooth pairing
(Long press the Power Key for 6 seconds)
c. Always On: Successfully paired
In red status:
a. Flashing: Low battery (≤ 20%)
b. Always On: Charging
c. Off: Fully charged
The purple status indicates that the red and blue indicators are both On simultaneously.
5. Indicator 2
a. Off: The stylus is beyond the active area
b. Always On: The stylus enters into the active area
6. Active Area

4
Included with your product
Drawing Tablet x1
Stylus x1
Pen Nibs x4
Felt Nibs x4
Pen Case x1
USB-C to USB-C Cable x1
USB-C to USB-A Cable x1
Wireless Shortcut Remote x1**
Bluetooth Receiver x1 (use with Wireless Shortcut Remote)***
Glove x1
* The list is for illustrative purposes only. Please refer to the actual product.
** Due to different product specifications, the Wireless Shortcut Remote may not be
standard. Please refer to the actual product.
*** Due to different product specifications, the Bluetooth receiver may not be standard.
Please refer to the actual product.
Wireless Shortcut Remote

5
1. Power Slide Switch
2. Indicator light
In blue status:
a. Flashing slowly: Waiting for Bluetooth connection
b. Flashing quickly: Waiting for Bluetooth pairing
c. Always on: Successfully paired (Always on for 30 seconds and then off)
In red status:
a. Flashing: Low battery (≤20%)
b. Always on: Charging
C. Off: Fully charged
A purple color indicates that the red and the blue indicator are both On simultaneously.
3. Roller
4. Roller Switch Key (Long press for 6 seconds to enter Bluetooth pairing)
5. USB-C Port
6. Shortcut Key Group
4 customizable groups of 10 keys per application for a total of 40 shortcut keys. You can
disable sets if they are not needed.
Group One is enabled by default, and K1 is the toggle key. Click to switch between Group.
* The list is for illustrative purposes only. Please refer to the actual product.
Connection
Wired Connection

6
Drawing Tablet
Please connect the USB-C to USB-C cable or the USB-C to USB-A cable to the USB
port on the computer and the USB-C port on the tablet respectively.
Wireless Shortcut Remote
Please connect the USB-C to USB-C cable or the USB-C to USB-A cable to the USB
port on the computer and the USB-C port on the Wireless Shortcut Remote respectively.
Connect to Android Phone or Tablet
1. Please connect the USB-C to USB-C cable to the Android device and the drawing tablet
respectively.
2. Please place the XPPen drawing tablet and the Android device upright, and open an
Android App with support for pressure sensing.

7
3. Please disable the auto-rotate function in the Android device, and keep the screen in
portrait mode.
* Currently, the drawing tablet can only be used normally when the Android device is in
portrait mode. It will not be used normally when in landscape mode.
Wireless Connection
A. Direct Bluetooth Connection
Drawing Tablet
1. Press and hold the power switch for 3 seconds to turn on the drawing tablet, and the
indicator light 1 flashes in blue; then long press the power switch for 6 seconds to enter
Bluetooth pairing and the indicator light 1 flashes in blue quickly.
2. Turn on the Bluetooth on the computer, add Bluetooth device, search for the device
name "Deco Pro *** ", and click to complete the Bluetooth pairing, with the blue indicator
light 1 always on.
3. Press and hold the power switch for 3 seconds to shut down. Indicator 1 will be off.

8
Wireless Shortcut Remote
1. Slide the Wireless Shortcut Remote power switch and the blue indicator light flashes
slowly. Then long press the K11 shortcut key for 6 seconds to enter Bluetooth pairing and
the blue indicator light flashes quickly.
2. Turn on the Bluetooth on the computer, add Bluetooth device, search for device name
“Shortcut Remote” and complete Bluetooth pairing by clicking the device name “Shortcut
Remote”, with the blue indicator always on. The indicator will be off after 30 seconds.
3. Slide the power switch again to turn off the device.
B. Connection via Bluetooth Receiver

9
Only Wireless Shortcut Remote Supported
Plug the Bluetooth receiver into the computer and slide the power switch, with the
indicator light always on in blue. The blue indicator will be off after 30 seconds.
*If the Bluetooth receiver needs to re-pair with the device, please download the wireless
pairing tool from the official website of XPPen (https://www.xp-pen.com) according to the
product model, and refer to the operation guide for pairing connection.
Bluetooth Device Switching
The drawing tablet supports connection to two Bluetooth devices.
1. With the drawing tablet on, toggle the Bluetooth switching button to position 1, long
press the power button for 6 seconds, and the drawing tablet is paired with device 1.
2. With the drawing tablet on, toggle the Bluetooth switching button to position 2, press
and hold the power key for 6 seconds, and the drawing tablet is paired with device 2.
3. Toggle the Bluetooth switching button to switch the Bluetooth connection between the
two devices.

10
Compatibility
Drawing Tablet
Wired Connection
Windows 7 (or later), macOS 10.10 (or later), Android 10.0 (or later),
Chrome OS 88 (or later), Harmony OS, Linux.
Bluetooth Connection:
Windows 10 (or later), macOS 10.10 (or later).
Wireless Shortcut Remote
Wired or Dongle Connection
Windows 7 (or later), macOS 10.10 (or later), Linux.
Bluetooth Connection:
Windows 10 (or later), macOS X 10.10 (or later)
Product Settings
Driver Installation
To ensure the device works properly, please install the driver before using.
Please download the driver suitable for your product model from XPPen website
(https://www.xp-pen.com).

11
Notes:
1. Before installing the driver, please turn off all antivirus software and graphics software.
2. Uninstall drivers (if any) for other drawing displays/tablets before the installation.
3. Restart your computer after the installation is completed.
4. For the best performance for your device, we recommend you to install the latest driver.
Windows:
Unzip file. Run the "exe" file as administrator, and follow the prompts to complete the
installation.
Mac:
Unzip file. Run the "dmg" file and follow the prompts to complete the installation. Go to
System Preference -> Security & Privacy -> Accessibilities; Wireless: System Preference
-> Security & Privacy -> Accessibilities & Bluetooth, and click the lock icon in the lower left
corner to unlock the settings. Tick the checkbox on the left of the PenTablet_Driver
application to enable accessibility. Then click the lock icon to lock the settings.
If there is no PenTablet_Driver on the list, go to Resource Library -> Application Support ->
PenDriver to add the driver manually.

12
Linux:
Deb: Enter command “sudo dpkg -i”. Drag the installation file to the window and execute
the command;
Rpm: Enter command “sudo rpm -i”. Drag the installation file to the window and execute
the command;
Tag.gz: Unzip file. Enter command “sudo”. Drag “install.sh”to the window and execute
command.
Introduction to Driver
The driver will run automatically after being installed. If it does not run automatically, go to
the driver folder to run it manually.
Windows: Start -> Pentablet
Mac: Application -> XP-PenPenTabletPro -> PenTablet
If the device is not connected or the connection fails, you can see the following prompt. In
this case, try to restart your computer or the driver, or contact our service staff for support.

13
If the device is connected to your computer successfully, the device image and name will
be displayed in the upper left corner of the driver.
You can connect up to 3 devices via the driver at the same time. Customize a specific
device's settings after switching to that device, and all changes made will only apply to
that device.

14
Device Settings
Drawing Tablet
You can set the drawing tablet functions, including:
1. Work Area
2. Pen Settings
Work Area
Go to Work Area and define the mapping between the device's work area and the screen
display area.
Screen

15
You can set the mapping between the display area of the current monitor and the device.
If multiple monitors are used in duplicate mode, the work area of the device will be
mapped to all monitors. When the pen moves in the work area, the cursor on all monitors
will move at the same time.
If multiple monitors are used in extend mode, go to monitor tabs to select one of the
monitors that the work area of the device will be mapped to.
There are two available options to set the monitor mapping area:
1. Set full screen: The whole area of the selected monitor;
2. Customize screen area: There are three ways to customize the work area.

16
1) Drag to select an area: Drag the cursor from one point to another on the Screen.
2) Use the cursor to select an area: Select "Click to set screen area", then click the upper
left corner position and lower right corner position to select on the screen.
3) Coordinates: Manually enter coordinates in the corresponding input boxes for X, Y, W
and H.
Identify:
Identify all connected monitors. The numeric identifier will be displayed in the lower left
corner of each monitor.
Drawing Tablet
You can set the work area of current device here. The driver enables the following ways to
set the work area of the device:
1. Full area: The whole work area of the device is available.
2. Customize active area: There are three ways to customize the work area.

17
1)Drag to select an area: Drag the cursor from one point to another on the device.
2)Use the pen to select an area: Select "Click to set active area", then use stylus to click
the upper left corner position and lower right corner position on your device.
3)Coordinates: Manually enter coordinates in the corresponding input boxes for X, Y, W
and H.
Proportion:
Scale your device's work area and selected display area proportionately.
For example: After selecting proportion, if your draw a circle on the device, a circle will
appear on the screen, but some part of the work area may not be used. But if you
don’t choose the proportion and draw a circle, then the circle may change into an
ellipse on the screen.
Rotation:
You can set the device to 0°, 90°, 180° and 270° clockwise for use.
Left-handed mode: Rotate 180°.
Application
The driver allows you to set pen keys functions for a specified application.

18
Select an application from the list of applications at the top of the driver, tick the
application, and then customize its pen keys, shortcut keys and roller/touch functions.
For example, if you select an application and change its configuration in the driver, the
change is valid only when you use the application. When you switch to another application,
the driver will recognize it automatically. You can add up to 7 applications.
1. Click the + icon on the top right of the application bar to open the application list;
2. Select an application to be added from the running applications or click Browse to add
from the installed applications;
3. Click "OK" to add the selected application;
4. Select an added application, and click the - icon on the top right of the application bar to
delete the application.
If you select all other applications, it will apply to other uncustomized applications.
Pen Settings
When the stylus is within the work area, the device will recognize the stylus and add it to
the driver. The stylus used should be compatible with the device.

19
Click "Customize" in the drop-down menu to go to Shortcut key settings and customize
pen key functions.
Before setting shortcut key functions, tick to select any of the options under Keyboard,
Mouse Control, Others, and Run Application.
Keyboard:
You can set keyboard shortcut, for example, set it as “Alt+A” in 3D MAX, so the alignment
tool can be used.
Multiple groups of shortcut keys can be set. For example, type Ctrl+C, Ctrl+V, and when

20
you press the key, the shortcut key functions set will all run once.
Windows (Command): You can add a combination key containing system key, for example:
to enter Win(Cmd)+Shift+3, you can press Shift+3 and the driver will bring the system key
automatically.
Mouse Control:
Set the key combination of mouse and keyboard. With the "Shift" and "Left Click" selected,
the shortcut actions can be enabled in application that supports such key combinations.
Other:
Precision mode: Limit the device’s work area to a certain area. This function may allow
you to create more detailed drawings.
Run Application:
Run the selected application.
Customized name:
You can customize the name of the current key settings.
Pressure settings:
The sensitivity of pressure can be adjusted by adjusting the Output and Pen Pressure
curve or moving the slider on the progress bar.
Current pressure can test your current pen pressure.
Mouse mode:
When you move your pen out of the work area, the cursor will stay where you leave, which
is like operating a mouse. Select the mode and you can adjust the speed of the cursor on
your device. If you do not select the mode, the pen mode applies by default.
Windows Ink (for Windows only):
Windows supports handwriting function. If you need to use this function in Microsoft
Office/Whiteboard or other software, please do not turn it off.
Table of contents
Other XPPen Tablet manuals