XPPen Deco Pro Small User manual

User Manual
Deco Pro Small & Medium

1
℃
℃

2
Contents
I.Product Overview
Overview
II.
Driver Installation
Windows
Mac
III.
Driver Settings UI
Windows
Mac
IV.
Driver Uninstall
Windows
Mac
V.
FAQ

3
Thank you for purchasing the XP-Pen tablet. Our product user manual currently supports English,
Russian, Japanese, German, Korean, Chinese, Italian, Spanish, and French. We apologize if your
preferred language is not supported.
{ I. Product Overview}
Overview
Image 1-1. Overview
1.Working area
2.Express keys
3.Roller key
4.Touch pad
5.Type-C

4
{ II. Driver Installation }
Supported operating systems:
Windows 10, 8 or 7
Mac OS X 10.10 or above
NOTES:
(1)Uninstall any existing tablet software before attempting to install the Deco Pro Small & Medium’s driver.
Other tablet drivers may conflict with the Deco Pro Small & Medium’s driver or prevent installation
entirely.
(2)You can download the latest driver version from the XP-Pen website (www.xp-pen.com) and be sure to
extract the “.zip” file contents before running “.exe” or “.pkg.”
Windows
(1)Connect the Deco Pro Small & Medium to your computer using the included USB cable.
(2)Please download the Deco Pro Small & Medium latest driver from the support section of our website,
(www.xp-pen.com)
(3)Extract the “.zip” file contents before running the “.exe” file.
(4)After a successful installation, the driver’s icon ( ) will appear in your system tray and on your desktop.
If the icon is not present, uninstall the driver, reboot, and repeat step 2.
Mac
(1) Connect the Deco Pro Small & Medium to your computer using the included USB cable.
(2) Please download the Deco Pro Small & Medium latest driver from the support section of our website,
(www.xp-pen.com)
(3) Extract the “.zip” file contents before running “.pkg”.
Image 2-1: Mac driver

5
{ III. Driver Settings UI }
Windows
The Deco Pro Small & Medium’s driver settings can be opened in two ways:Double-click the driver’s icon
( ) in system tray or your desktop.
Driver UI
Image 3-1. UI
1.1.Pen Function Settings
You may customize the functions of your tablet pen’s barrel buttons here. Use the “Function Key”
option to program custom keystrokes.
Image 3-2. Pen Functions Setting
Note:
Pen/Eraser Toggle
With the stylus in range working area, press the assigned barrel button to toggle between pen and eraser
modes in compatible drawing software. The current mode will briefly be displayed on your monitor.

6
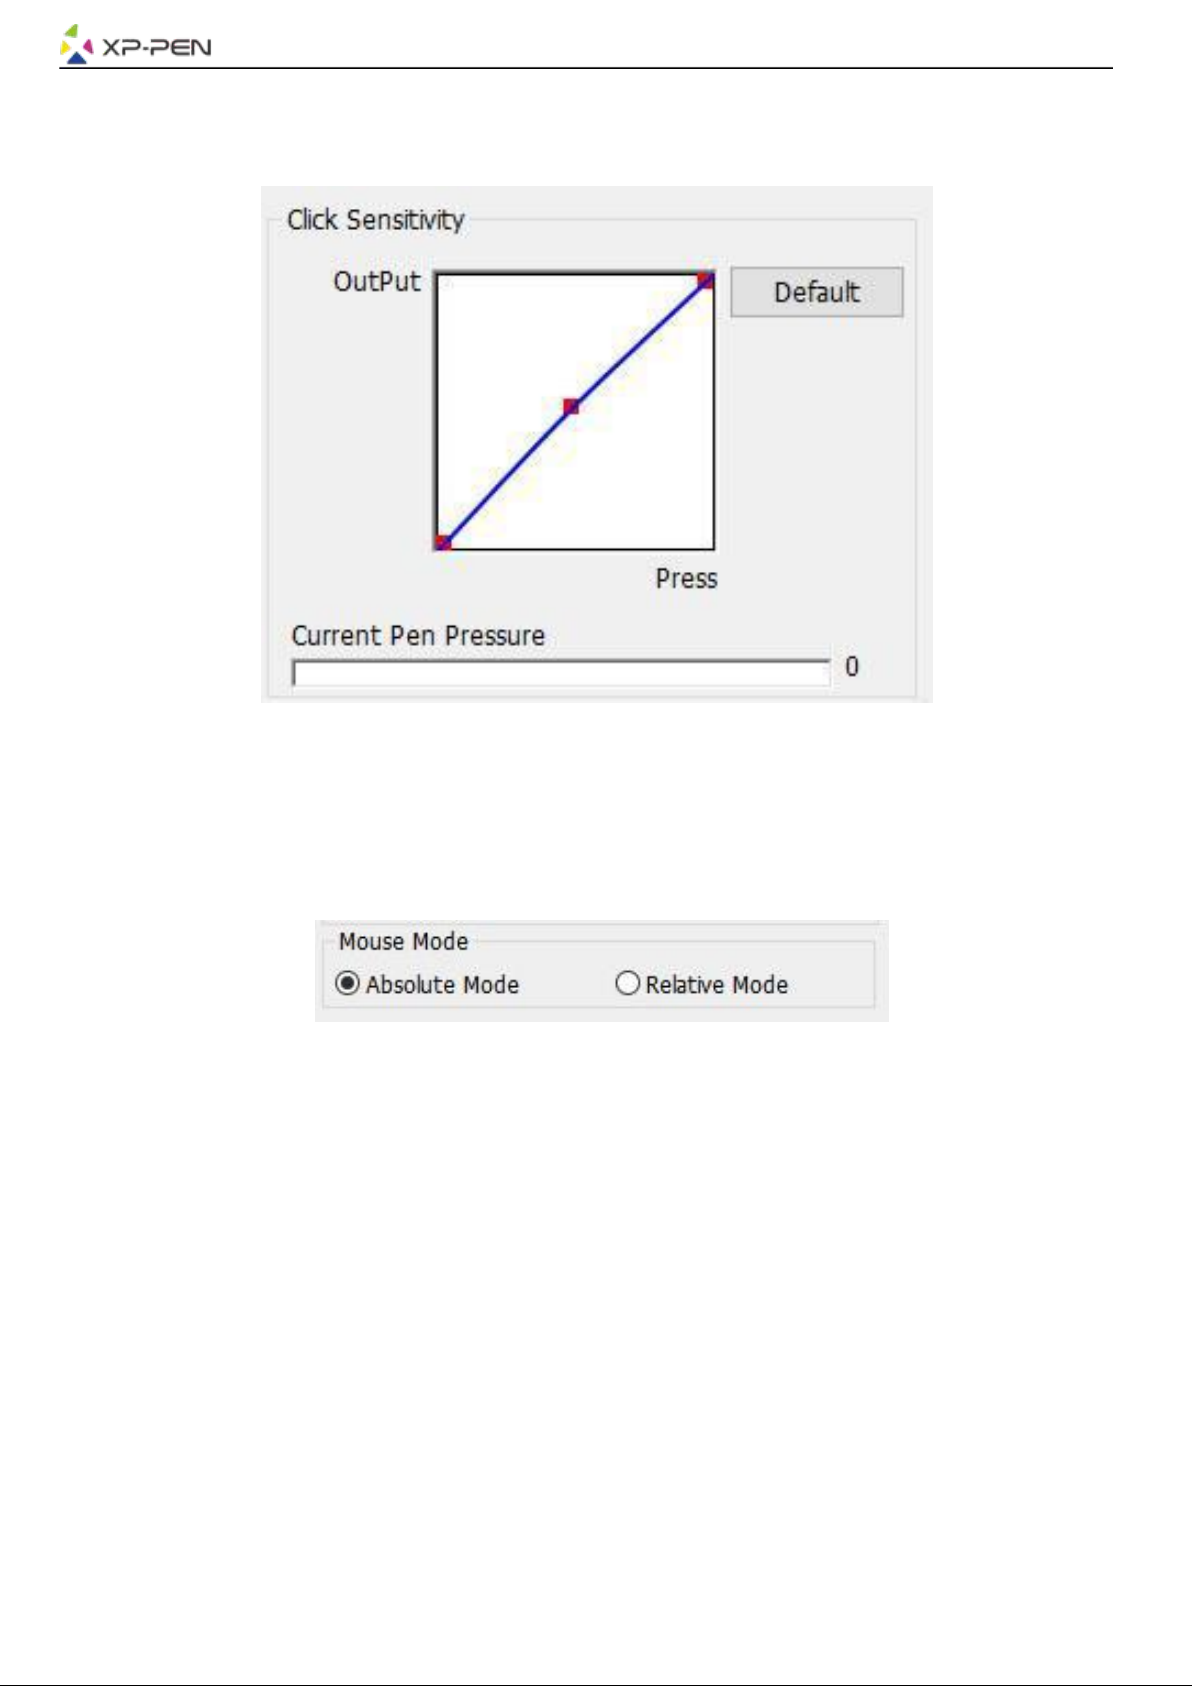
1.2. Click Sensitivity & Current Pen Pressure
You can adjust pen pressure to “Output” or “Press” sensitivity on here.
Current Pen Pressure shows the current pressure level being exerted on your tablet and can be used to
test pen pressure.
Image 3-3. Click Sensitivity & Current Pen Pressure
1.3. Mouse Mode
Absolute (Pen) Mode: Standard tablet mode; Each point of the tablet’s work area corresponds to an
absolute point on your computer display.
Relative (Mouse) Mode: Mouse mode; The tablet’s work area does not correspond to absolute points on
your computer display and your pen works as a standard mouse.
Image 3-4. Mouse Mode
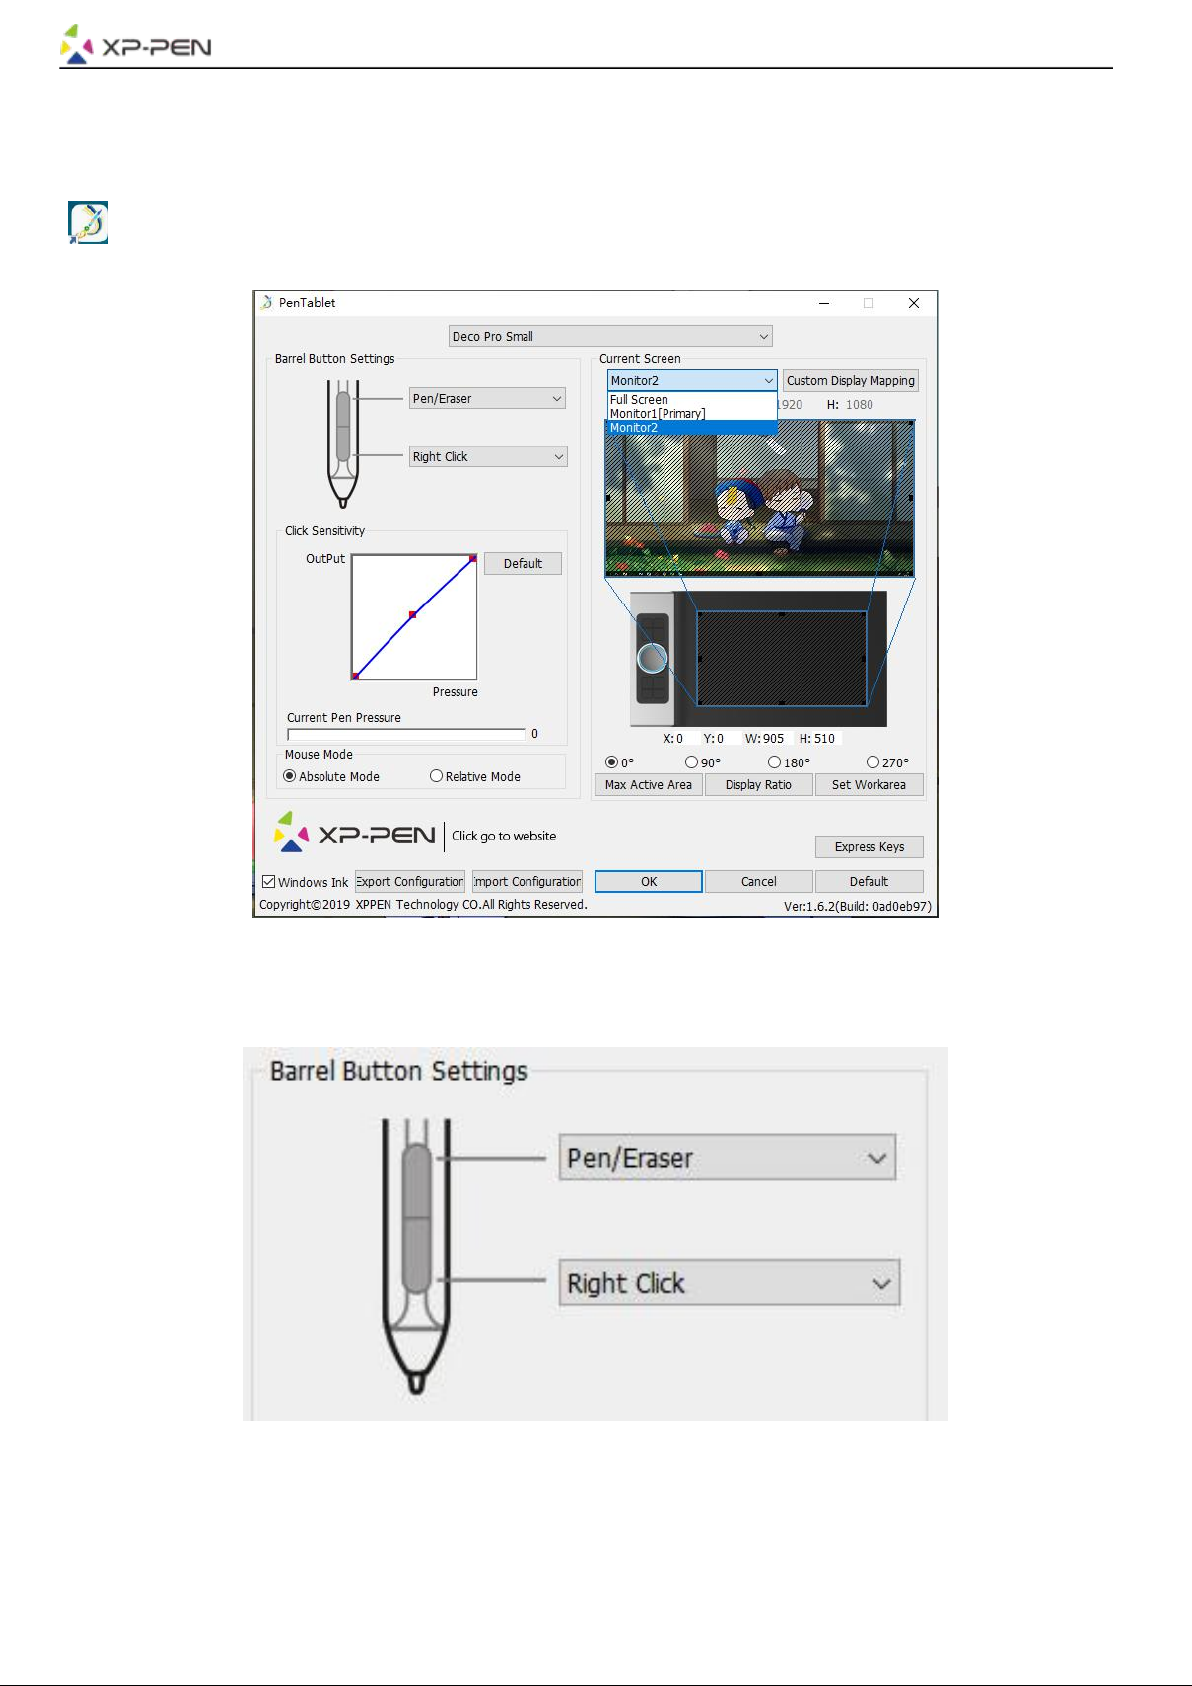
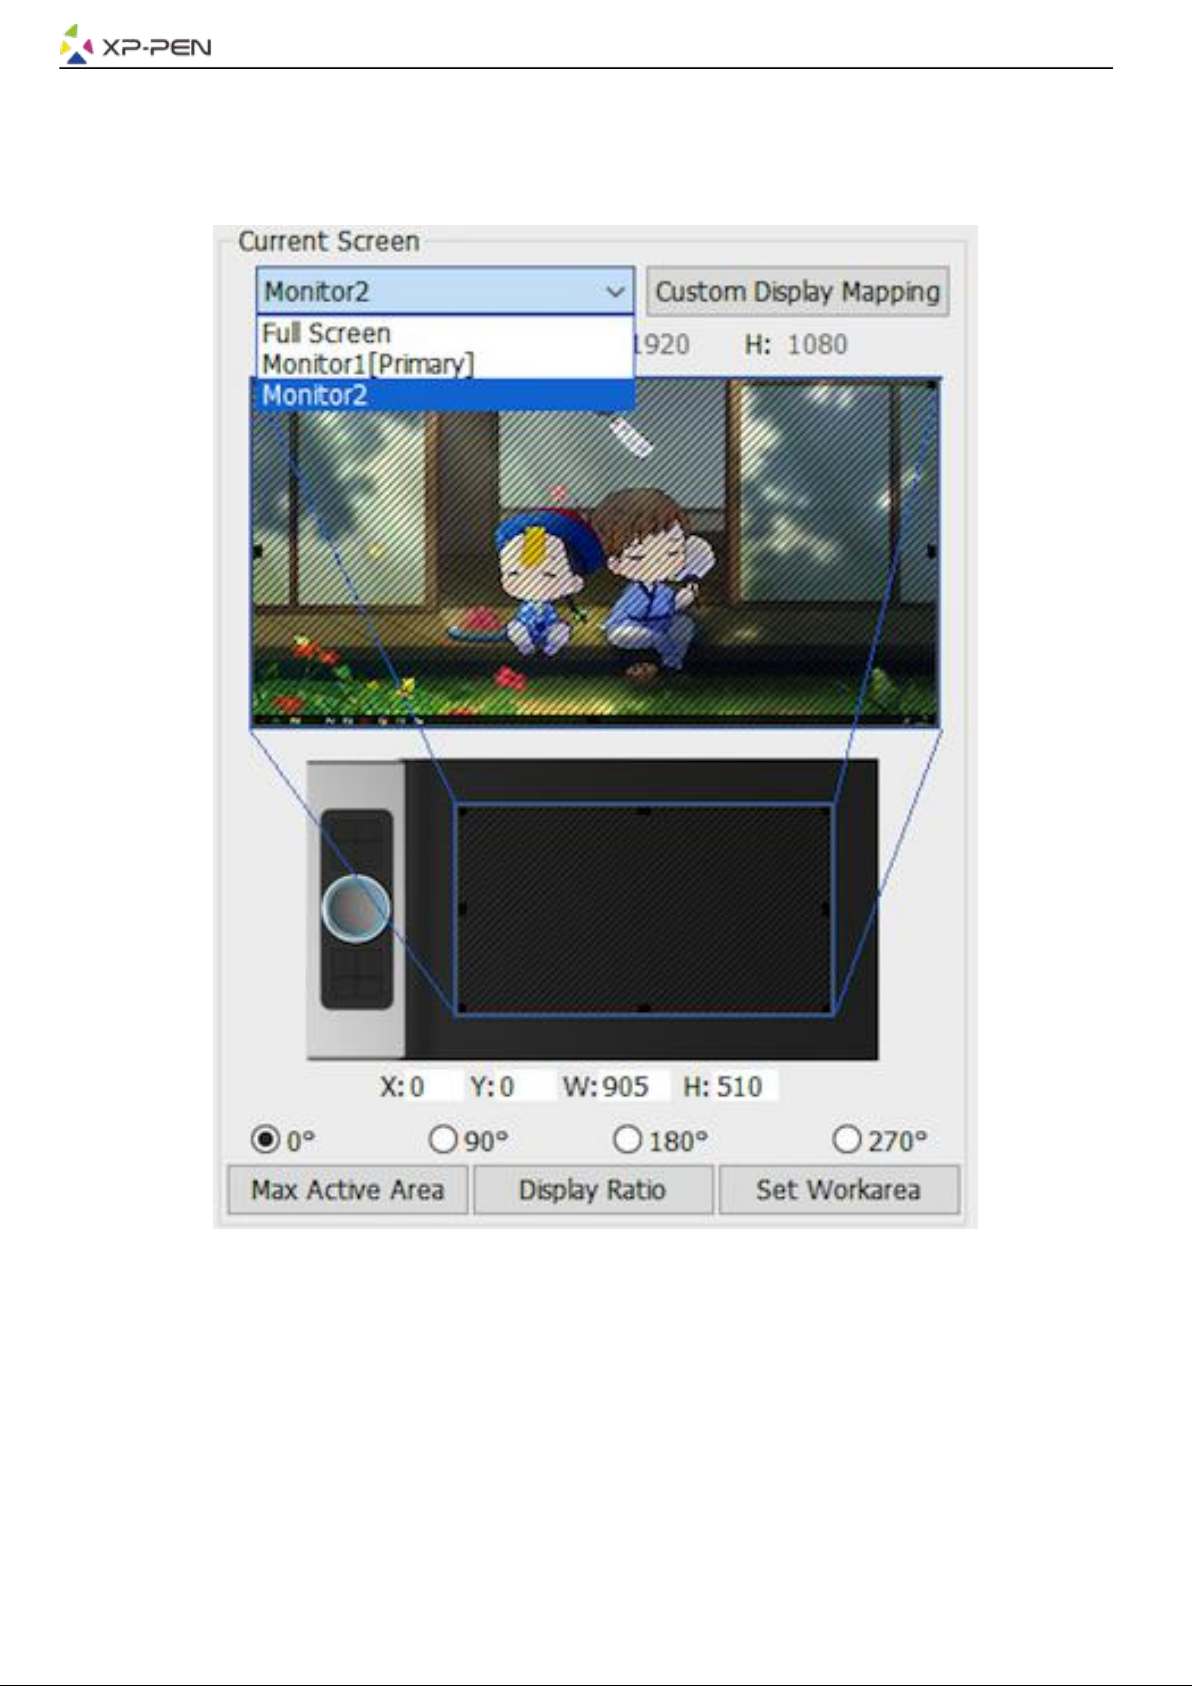
1.4. Current Screen
The Deco Pro Small & Medium may be configured for use with single or dual monitors.
If only one monitor is selected, your tablet input will be limited to that particular monitor.
Custom Display Mapping:
The dimensions of your tablet’s on-screen work area can be changed here. Please click the top-left and
bottom-right to customize.
0、90、180 & 270 angles:
The Deco Pro Small & Medium are set up for 0, 90, 180 and 270 angles and when you set it, you must
also rotate your Deco Pro Small & Medium.
Left hand is 180 angles.
You may adjust your tablet’s on-screen working area in this tab.
Set Work area:
When you click the “Set Work area” button, you can use the stylus pen to customize the Deco Pro Small
& Medium work area. Please click the top-left and bottom-right to customize.

7
Display Ratio:
You can set your Deco Pro Small & Medium work area adjusts the tablet’s on-screen working area to
match your monitor’s resolution.
Max Active Area:
You can set your Deco Pro Small & Medium work area to the max.
Image 3-5: Current Screen
1.5. Import & Export Profiles
You can use the Import & Export Profile function to save/load your barrel buttons and shortcut key
settings.
Note:
When you finish setting up your barrel buttons and shortcut keys, click the OK button to save and exit the
tablet settings menu.

8
Image 3-6. Export Profile
Image 3-7. Import Profile
1.6.Windows Ink
This capability can be toggled on and off here. Enabling this will allow support for Windows Ink and
applications that run using Windows Ink.
Image 3-8: Windows Ink

9
1.7. Express Keys Setting
Notes:
(a). The Deco Pro Small & Medium’s shortcut keys are designed to work with US English keyboards. Keys
may not function correctly with the other keyboard languages.
(b). By default, the Deco Pro Small & Medium express keys are mapped to standard Photoshop keyboard
shortcuts. Keys can be customized to function efficiently in other software.
Image 3-9. Keyboard
Disable express keys: When you enable it, all of the express keys function will be disabled.
Hide hints: When you enable it and press any express key, the message will not popup on the bottom of
your screen.
Image 3-10. Keys
In this tab, you may edit the functions of the Deco Pro Small & Medium’s shortcut keys. Use the “Definition”
option to program custom keystrokes.

10
Image 3-11: Function Key
Note:
You can set each shortcut key for different software.
a. Click the “+” button to go to Select Program ta
Image 3-12: Select Program

11
b. You can choose Default or use Browse to select your choice of software.
Image 3-13: Select Program
c. Return to the shortcut key settings tab, click the tablet icon, and then customize the shortcut keys. When
you are finished, click “OK” and exit the tablet settings menu.
You can set each dial for different software.
a. First, click software icon, then go to the Dial tab.
Image 3-14: Dial

12
b. Set each dial function to “Function key”.
c. On the setting tab, you can customize “KL” and “KR” to different shortcuts like Ctrl+ & Ctrl-.
Image 3-15: Setting
Dial 2: You can set the Dial2 function to Mouse, Roller or Customized.
Image 3-16: Dial2

13
Control: You can adjust “Wheel Light” & “Tablet Light” lights.
Image 3-17: Control
1.8.Default
You can click the Default button to restore default settings.
1.9. XP-Pen Logo
Click our logo to visit our website.
Mac
To open the Deco Pro Small & Medium’s driver settings, open Finder > Applications > PenTabletSetting.
Driver UI
Image 3-18. Tablet Setting

14
1.Pen
Image 3-19.Pen
In this tab, you may customize the functions of your stylus’s barrel buttons and click “Default Button
Setting” to revert to manufacturer settings.
Image 3-20. Pen
Note:
Pen/Eraser Toggle
With the stylus in range working area, press the assigned barrel button to toggle between pen and eraser
modes in compatible drawing software. The current mode will briefly be displayed on your monitor.
1.2. Configuration Setting:
Disable pen pressure: When the “Disable pen pressure” function is enabled, you can disable the pen
pressure function.
Disable Key Function: When you enable it, all of the express keys function will be disabled.
Disable Display Message: When you enable it and press any express key, the message will not popup
on the bottom of your screen.

15
Image3-21. Configuration Setting
1.3. Work Area Orientation:
Right Hand, Left Hand, 90 & 270:
The Deco Pro Small & Medium can also be configured for Right Hand, Left Hand, 90 & 270 angles. Be
sure to rotate the actual physical tablet as well.
Image 3-22: Work Area Orientation
1.4. Output:
You can adjust pen pressure to “Output” or “Press” sensitivity on here.
It shows the current pressure level being exerted on your tablet and can be used to test pen pressure.
Image 3-23. Output
1.5 Coordinate Mode:
Absolute (Pen) Mode: Standard tablet mode; Each point of the tablet’s work area corresponds to an
absolute point on your computer display.
Relative (Mouse) Mode: Mouse mode; The tablet’s work area does not correspond to absolute points on
your computer display and works as a standard mouse.
Image 3-24. Coordinate Mode

16
1.6. Import & Export Profiles
You can use the Import & Export Profile function to save/load your barrel buttons and shortcut keys
setting.
Image 3-25: Export configuration file
Image 3-26: Import configuration file
2. Monitor
The “Monitor” tab allows you to configure Deco Pro Small & Medium for use with single or dual monitors.
The tablet can also be configured to use only a portion of your display.

17
Image 3-27. Monitor
3.Tablet Area
You may adjust your tablet’s on-screen working area in this tab.
3.1. Full Area automatically selects the largest possible working area.
3.2. Screen Ratio adjusts the tablet’s on-screen working area to match your monitor’s resolution.
3.3. Wheel & Tablet LED can let you adjust Wheel & Tablet lights.
Image 3-28: Full Area

18
4. Express Keys
Notes:
(a). The Deco Pro Small & Medium’s shortcut keys are designed to work with US English keyboards. Keys
may not function correctly with the other keyboard languages.
(b). By default, the Deco Pro Small & Medium’s express keys are mapped to standard Photoshop keyboard
shortcuts. Keys can be customized to function efficiently in other software.
4.1. In the Express Keys tab, each express key has default.
Image 3-29. Express Keys
You may choose your preferred functions for the Deco Pro Small & Medium’s shortcut keys. Use the “Reset
Customer Defined” option to program custom keystrokes.
Image 3-30. Action Setting
You can set each shortcut key for different software.
a. Click the “+” button to go to Select Program tab.

19
Image 3-31. Select Program
b. Your choice of software.
Image 3-32. Select Program
c. Return to the shortcut key settings tab, click the tablet icon then customize the shortcut keys. When you
are finished, click the OK button and exit the tablet settings menu.
This manual suits for next models
1
Table of contents
Other XPPen Tablet manuals