XPRIT Shuttle User manual

1/16
Instructions to Set Up Your Delivery Shuttle E-bike
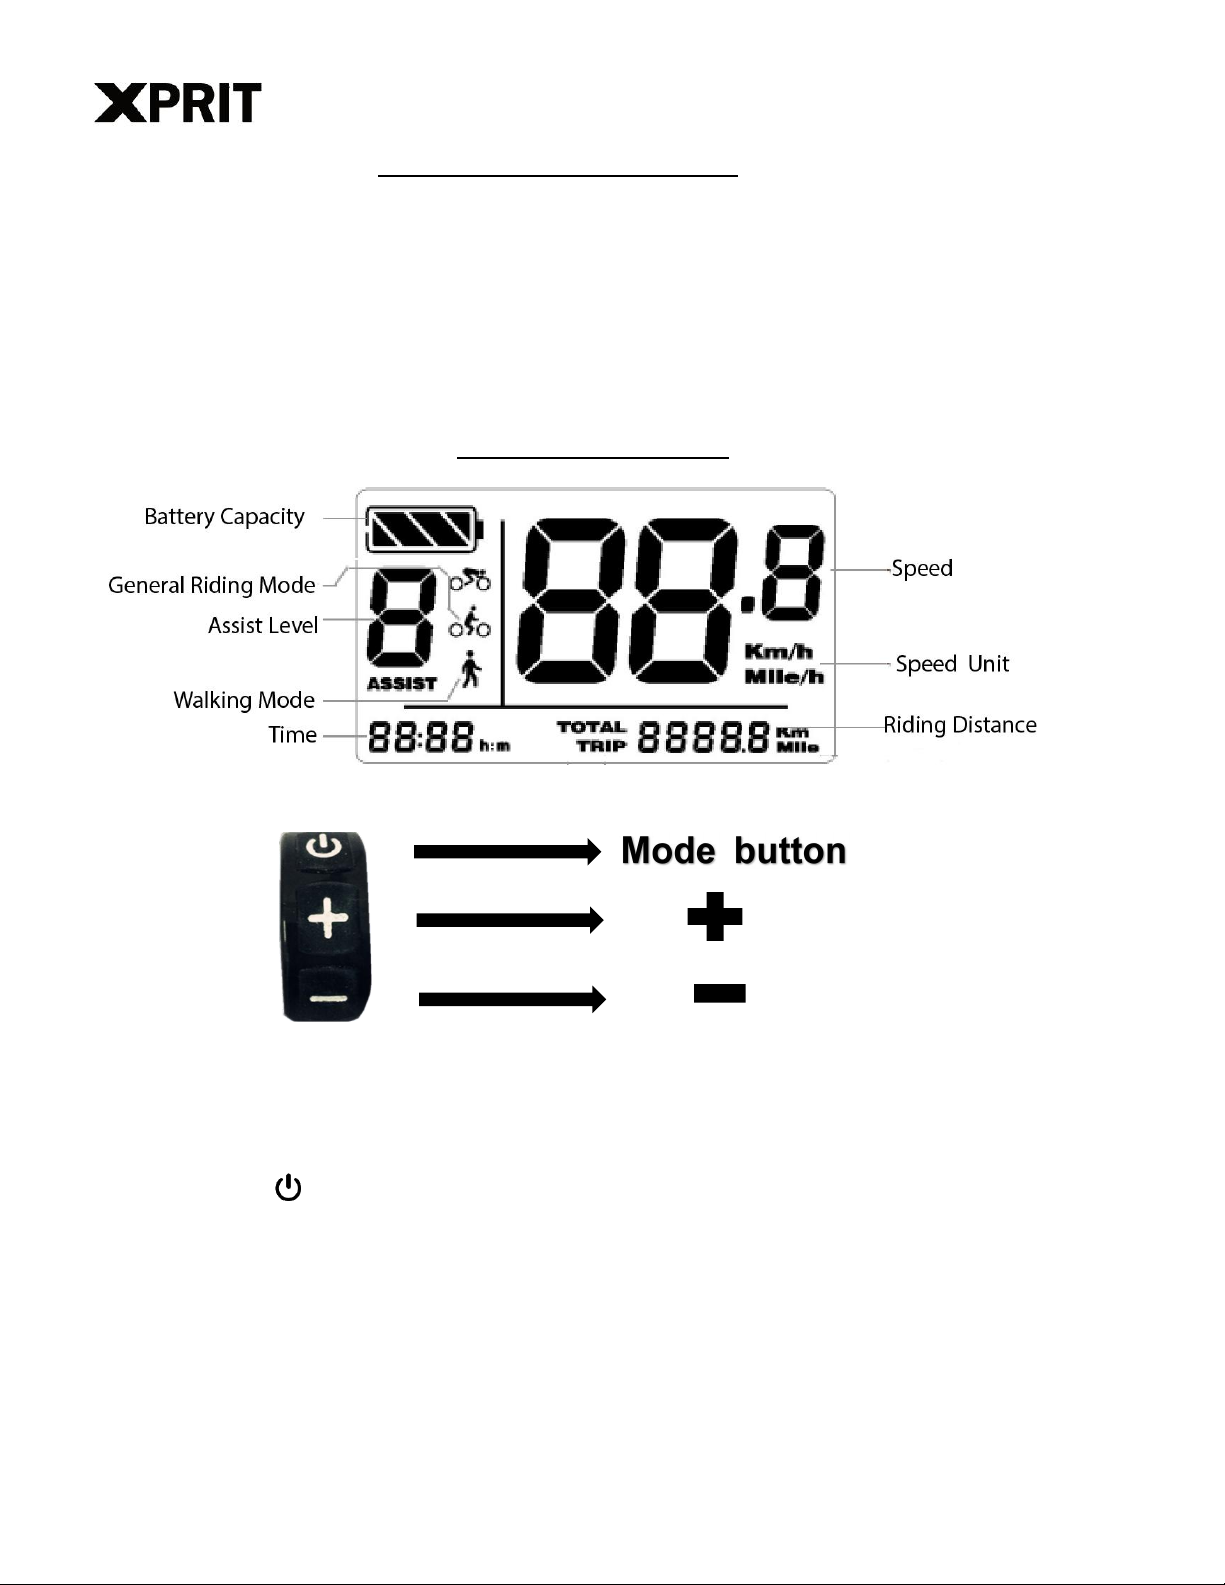
Diagram

2/16
We know you are excited about getting going but please:
✓Reseat and charge the battery before the first ride
✓Make sure the pedals are tight
✓Make sure the front wheel is installed properly and tight
✓Inflate the tires properly
✓Check that all screws are properly torqued
✓Carry out a fine adjustment of the gears and brakes
✓Learn how to use the LCD display
✓Wear a helmet before riding

3/16
Please Note: Your bike may need further adjustments after assembly.
________________________________________________________
If you have any trouble with setup, please contact us online or
through our email address: support@xprit.com
Assembling Your E-Bike
1) Read all of the instructions carefully. Be familiar with the proper operation of all items.
2) This quick guide is intended to list the steps needed to assemble your bike with some
mechanical skills. It is not a complete manual or training. If you do not feel comfortable or lack
some of the skills to assemble it yourself, reach out to a cyclist friend, a local bike mechanic or
one of our support technicians for guidance.
3) Our QA mechanics have assembled and tested your bike beforehand.
4) To assemble your bike, work on a clean area with enough space to maneuver.
5) If installed, remove the battery from the bike to start the assembly。
6) Inspect the bike completely to be sure no damage occurred during shipping.
7) The kickstand is designed to support the bicycle only. Not the rider mounted。
8) You can adjust your saddle position and the tilt on your handlebar items for comfort.
9) Check all screws and parts are tight and properly fixed. We recommend a pre-trip inspection
before your first rides.
10) Before riding, make sure battery is properly assembled and tightly locked on the bike in case
of any dropping down.

4/16
Installing Your Handlebars
1) Place the handlebar in the handlebar mount being careful with the wires.
2) Face the mounting brackets on the front end of the mount with the round edges facing outward.
Adjust the handlebar angle to your comfortable riding posture.
3) Secure the mounting brackets with four screws. (Screws shall be tightened with 6N.m torque)
4) Verify your front tire lines up with your headset.
5) Check whether all headset items are tight.

5/16
Installing Your Front Wheel - Through Axle Version
1) Insert the axle into the wheel hub as shown. Add the Slim Spacer on the LEFT side
(Brake Disk) and the Wide Spacer on the RIGHT side.
2) Insert the front wheel with the spacers in between the front fork on the bike. Be sure to
align the disk between the brake caliper as shown in Figure 2.
3) Now on the outside add the washer and nut on each side and hand turn until snug
4) Using your wrench, tighten each side alternatively until snug (you might need to secure
the opposite nut slightly so the whole axle doesn’t turn)
5) Now tighten each nut putting your weight into the wrench. Your front wheel is now
installed.
6) The Adjustment Nut needs to be very tight, be sure to retighten after your first couple
rides.
Figure 1
Figure 2

6/16
Installing Your Front Fender
1) Align the fender clamps on the left and right legs of the fork with the fender stay to enable
the fender in the line with the wheel. Fix the stay with the screws (M5 screw) provided on
the clamp.
2) Put the lifting lug of the fender behind fork gantry installing hole. Link and secure these two
pieces with the fixing screw (M6 screw) and end nut.

7/16
Installing Your Pedals
1) Warning: Incorrect installation will cause damage. Please read the instructions and watch our
videos if needed.
2) Identify the Left and Right markings on the pedals. They can only be installed in their
respective side.
a. L is for the Left Pedal and it goes on the Left Crank Arm.
b. R is for the Right pedal and it goes on the Right Crank Arm (Chain Side).
3) Sitting on your bike the pedals go on the Left and Right side respectively.
4) Keep the pedal Horizontal while hand screwing to get the thread started. Then Use your 15mm
wrench to tighten them.
5) Both pedals tighten towards the front of the bike. The left pedal is reverse threaded to allow
this.
6) The pedals need to be very tight (at least 25-35N.m torque), be sure to retighten after
your first couple rides.
Use your 15mm
wrench to properly
tighten the pedals
Right Pedal /
Chain Side
Left Pedal /
Key Side
Both pedals
tighten towards
the front
Rear
Front
8/16
Preparations Before Riding
1) Read all instructions carefully, be familiar with the proper operation of all items. Check for
detailed information and guidance on our product page.
2) Warning: Basic electric precautions should always be followed to avoid issues or malfunction.
How to Use the Bike
General settings
1) Power on/off
Long press the button on display switch to turn on display. Your bike will be ON. Long press
again to turn it off. Press the button on the top of battery to cut the power off if the bike not in
use. (Take out the battery if the bike will not be used for more than 4 hours)
2) Distance unit
After turning on display, long press “+” and “-” button at the same time for 3 seconds to enter
general setting mode, short press “+” or “-” button to change distance unit into “Km” or “Mile”.

9/16
3) Speed limit
After setting distance unit, short press the button to set speed limit.
Note: This bike speed is set by controller and cannot adjustable.
4) Display brightness
After setting speed limit, short press the button to set display brightness. Short press “+” to
increase brightness, short press “-” to decrease brightness.
5) Time
After setting display brightness, short press the button to set time. Short press “+” to
increase time showing, short press “-” to decrease time showing (After time setting, please
restart display to effect it)
Advanced settings
After restarting display, long press “+” and “-” button for 3 seconds to enter general setting
mode, then release all buttons, hold on “+” and “-” button without releasing and meanwhile
short press button for 8 times to enter advanced setting mode.
6) Wheel diameter
After enter advanced setting mode, short press the “+” button to increase wheel diameter, short
press “-” to decrease wheel diameter. Value:8-32inch. (Wheel Unit: Inch)
7) Automatic power off time
After setting wheel diameter, short press button to enter automatic power off time setting.
Short press the “+”button to increase automatic power off time, short press “-”to decrease
automatic power off time. Value: 0-60s. (When the power off time is set to “0”, bike cannot
power off automatically and need to be turned off manually)
Other Settings
8) Assist level
Turn on display, short press the “+” button to increase assist level, short press “-” to decrease
assist level.
9) Walking mode
Turn on display, hold on “-” button for 3 seconds to enter walking mode. Release “-” button
to exit walking mode.(Walking mode can not be used while riding)
10) Display brightness
Turn on display, press “+” button for 2 seconds to bright display. Again press “+” button to fade
the display.

10 /16
11) Distance clearance
Turn on display, press button and “-” button for 2 seconds, the distance record can be
cleared.
12) Single distance/Total distance
Turn on display, short press button to change single distance and total distance record.
Display Battery Capacity
Battery capacity shows in grid with corresponding percentage as below. It’s recommended to
charge the battery in time when there are two girds on the display.
USB port
There is USB charge port on the left side of handlebar which you can connect to charge your
cellphone.
Cruiser Control Function
The cruise control feature can be used to maintain a desired speed without using the Throttle
or Pedal Assist.
To activate the Cruise Control function:
80%-100%
60%-80%
40%-60%
20%-40%
<20%
Other Operations
Switch Set
There is a switch set on the right side of
handlebar.
1) Press headlight switches to turn on the
headlight.
2) Press turn signal switches to turn on the
turning light.
3) Press horn button to use the horn.
Table of contents
Other XPRIT Bicycle manuals


