Xtreme Power 75061 Original instruction manual

SAVE THIS MANUAL: KEEP THIS MANUAL FOR SAFETY WARNINGS, PRECAUTIONS, ASSEMBLY,
OPERATING, INSPECTION, MAINTENANCE AND CLEANING PROCEDURES. WRITE THE PRODUCT’S
SERIAL NUMBER ON THE BACK OF THE MANUAL NEAR THE ASSEMBLY DIAGRAM (OR MONTH
AND YEAR OF PURCHASE IF PRODUCT HAS NO NUMBER)
OWNER’S MANUAL AND SAFETY INSTRUCTIONS
FOR QUESTIONS PLEASE CALL OUR CUSTOMER SUPPORT: (909) 628 0880 MON-FRI 9AM TO 3PM PST
ROBOT POOL CLEANER
ITEM: 75061

GENERAL SAFETY WARNINGS
Read all safety warnings and instructions. Failure to follow the warnings and instructions may
result in electric shock, re and/or serious injury. Save all warnings and instructions for future
reference.
SAFETY
The warnings, precautions, and instructions discussed in this instruction manual cannot cover all possible
conditions and situations that may occur. It must be understood by the operator that common sense and
caution are factors which cannot be built into this product, but must be supplied by the operator.
Read and understand all instructions. Failure to follow all instructions may result in serious injury or
property damage.
DO NOT allow persons to operate or assemble the product until they have read this manual and have
developed a thorough understanding of how it works.
DO NOT modify this product in any way. Unauthorized modication may impair the function and/or
safety and could affect the life of the product. There are specic applications for which the product was
designed.
The cleaner’s lter bags should be thoroughly cleaned after each use or as often as needed to ensure
optimal performance. Clean bags more often if the pool is especially dirty.
Cleaner may stop in the middle of the pool and reverse during cleaning cycle. This is a normal part of
the programmed cycle.
1
IMPORTANT SAFETY INFORMATION
DO NOT start the cleaner out of water. Power button should only be switched to “I” position when the
unit is submerged. The unit will automatically shut off but it is best to turn the power off by switch off the
“O” position.
The electric supply connection should be made by a qualied electrician and comply with IEC 60364-1.
It is recommended that the electric supply to this machine should include either a residual current device
that will interrupt the supply if the leakage current to earth exceeds 30mA for 30ms or a device that will
prove the earth circuit.
The power supply box (including safety isolated transformer) of swimming pool cleaner must be located
at minimum 3.5 meters away from the pool edge and a minimum of 2.5 meters overtop of the top edge
of the pool.
This machine should not be used by anyone with reduced sensory, physical or mental capabilities.
If the supply cord is damaged, it must be replaced by the manufacturer or its service agent or a similarly
qualied person in order to avoid a hazard. The length of the supply cord of the power supply box is a
maximum 0.5meters.
DO NOT play with the cleaner or cable or apply it to your body. It can entrap or tear hair or body parts.
The control box of the cleaner must be xed securely on the ground wall. NEVER operate the unit
without afxing it to a wall.
NEVER operate the cleaner while people are in the pool.

The swimming pool cleaner independently scrubs, vacuums and lters your pool. No
installation, no attachments. Just drop it in your pool and turn it on. XtremepowerUS
features some of the best cleaning value on the market. Faster with more accurate
cleaning and top access to lter media. The sleek design allows for maximum
maneuvering through your pool and allows you to enjoy your pool more. Advances
in robotic technology have enabled us to offer many advantages to antiquated
cleaning traditions that can truly make a difference in the quality of your pool
experience.
FEATURES:
Top access to lter
2-Fixed Scrubbing Brushes for a
deeper clean
Power supply: 24v
Improved tread that allows better
traction
Easy to use
Higher suction power to pick up debris
2
FEATURES AND SPECIFICATIONS
Tangle free cord
Self contained ltration system
8X more energy efcient than other
suction cleaners

3
PARTS DIAGRAM / LIST

4
OPERATION
1. Select the nearest 115V AC outlet protected by RCD.
2. The control box must be xed at a minimum distance of 3.5m from the edge of the pool
and a minimum of 2.5 over the top edge of the pool. NEVER operate the unit without xing
the control box rst. The length of a standard cable is 42 feet.
3. Connect the oating cable to the power supply control box. Connect the oating cable
to the control box. Make sure there are connected correctly. The tting on the oating
cable should be connected with the control box by turning in a clockwise direction.
4. Place the cleaner in the pool. It will slowly sink to the bottom of the pool as the air inside
is released.
5. Connect the power supply to the GFCI protected outlet and switch it on. The cleaner will
run according to the procedures set to do the cleaning cycle.
CAUTION: DO NOT switch on the cleaner when the cleaner is out of water. This may result
in damage to the pump and drive motor seals, which will void the warranty.
6. Choose the program and start:
A. To turn the power supply on, press and release the power button once.
B. To turn the power supply off, press and release the power button. The light will turn off.
C. The power supply has 2 settings. Each setting is determined by the pool size and cleanliness
as well as for how long you plan to run the cleaning cycle.
D. You have an option for Cycle I and Cycle II. Cycle I is for a small pool, Cycle II is for larger
pools. Press the button to get your correct setting.
E. After setting, press the START button to start the engine.
F. To change the cycle mode during operation, press STOP rst, then select the desired
cycle mode, after 5 seconds, press START again.
Should a second cleaning cycle be required, switch OFF on the power supply for 5 seconds
and restart.

OPERATION
7. After the pool has been cleaned, switch OFF on the power supply before removing the
cleaner from the pool.
8. Remove the cleaner from the water at the shallow end of the pool by pulling the cable
until the cleaner reaches the surface. Then lift it out of the water using the handle, NOT the
cable.
9. The cleaner is only to be used with the power unit provided with the machine.
The operating water temperature range for the cleaner is 10 °C-35 °C
The operating depth of the cleaner is a minimum of 0.5m, max 3m
Remove the cleaner from the pool after every cleaning.
5
DIRECTIONS ANGLE ADJUSTMENT
The cleaner has two outlets and the direction angle of each outlet is adjustable during
operation. To change the angle, stop the cleaner and unscrew the screw as shown. Manually
adjust to a proper position (angle dimension: 0 < 1 < 2); after adjusting, tighten the screws.

MAINTENANCE
6
Clean the lter bags after each use:
Use a garden hose to clean the lter bag.
STORAGE
When out of the water, store the cleaner in a dry location at temperatures between 4 °C-
46 ° C
CABLE CARE
With continued use, the cable may become coiled. To correct this, periodically stretching
the cord out in the sun should remove any cord twists.
IMPORTANT: The cable should be checked periodically for an external damage.
IMPORTANT TIPS
Cleaning the lter bags after every use maximizes the machine’s performance.
Replace worn brushes
In a pool with high calcium content, more frequent cleaning is necessary.
The sealed motor unit and the power supply contain no user serviceable parts.
Remove all items from the pool before using the machine.

TROUBLESHOOTING
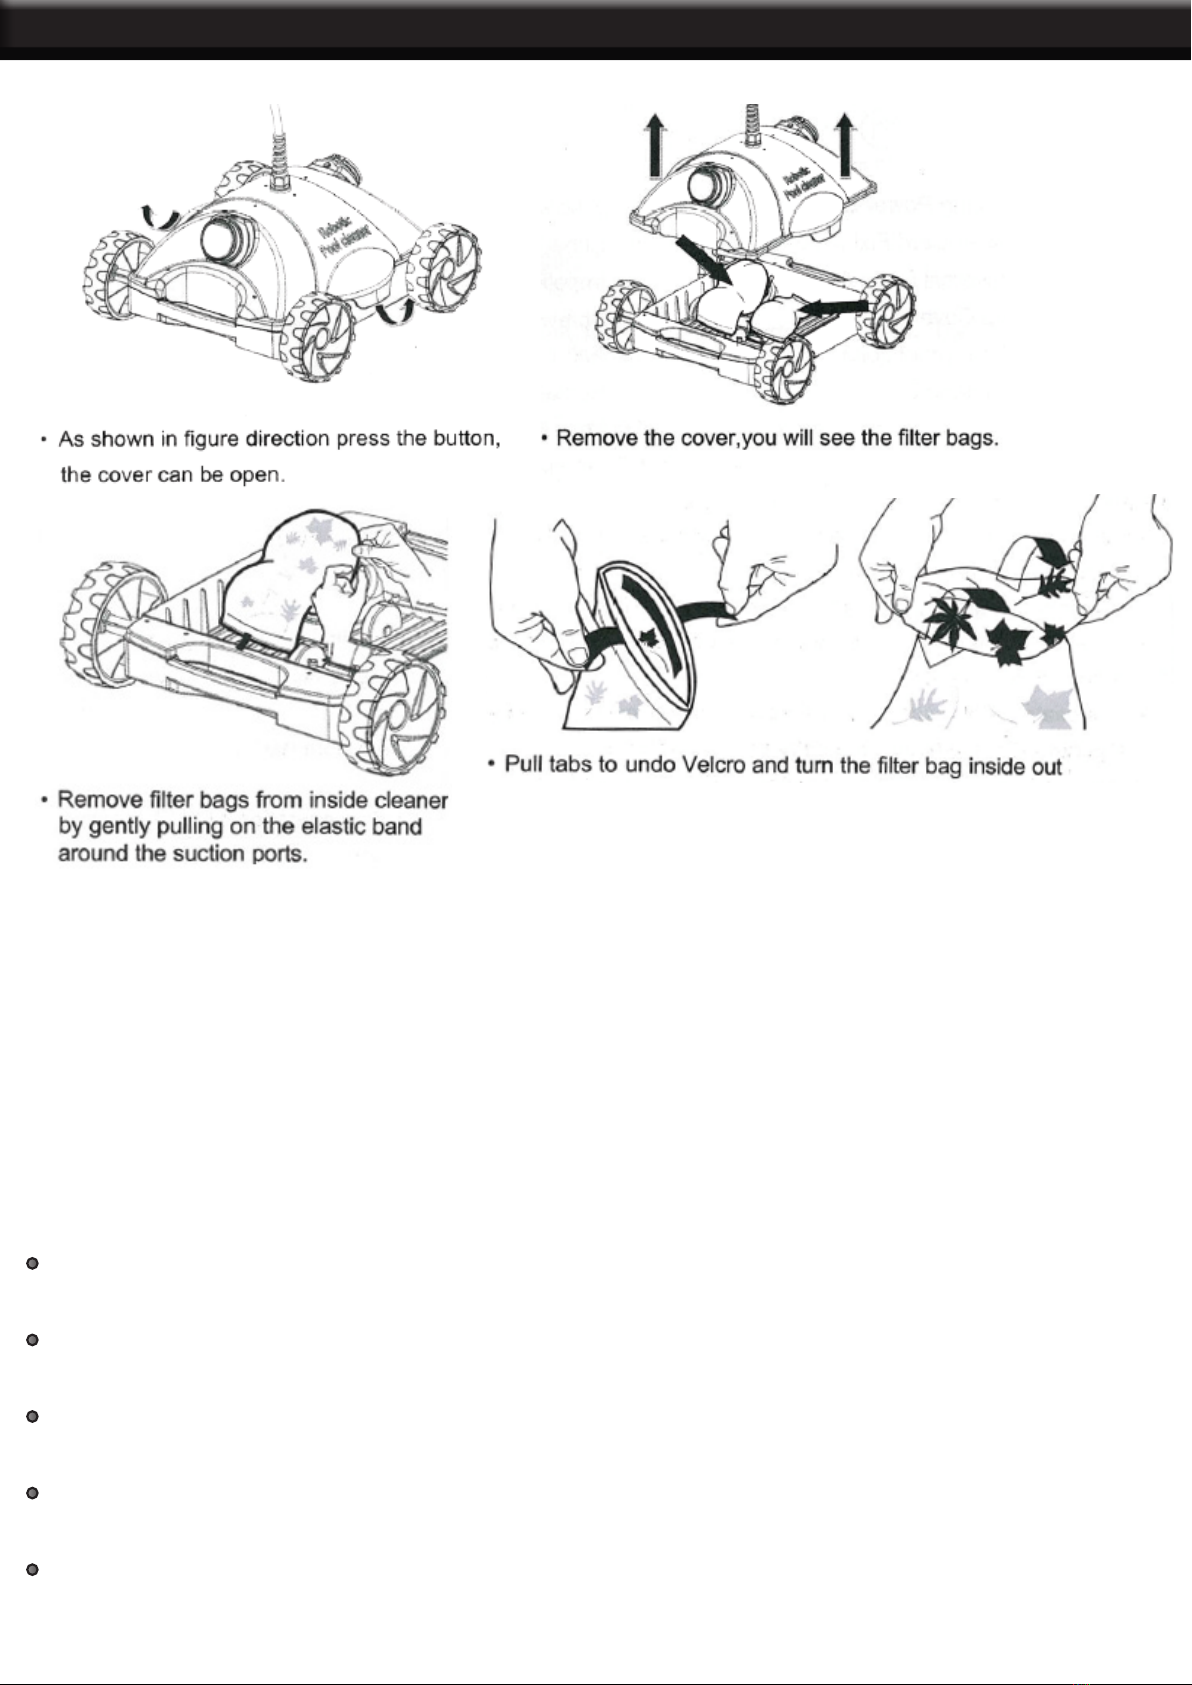
If the cleaner fails to pick up ne or heavy debris: Clean the lter bags. A lter cleaning
solution can be used to remove excessive dirt and/or sand.
If the cleaner starts working momentarily but then stops working: Impeller may be clogged
with debris. Check and clean if necessary.
There are two inlets located at the bottom of the cleaner and near the brushes. Inlets
located next to brushes help collect debris.
If the cleaner is being used in an area with a lot of sands, the cleaner may need to be
rinsed off on the main body and at the cover and outlet to allow free operation.
During normal operation, the cleaner will rise to allow the unit to clear any obstructions.
If the cleaner has poor coverage on one cycle, or only covers one area:
Check the lter and clean if necessary and make sure the unit is not getting caught in
drains. Try starting the cleaner in a different location.
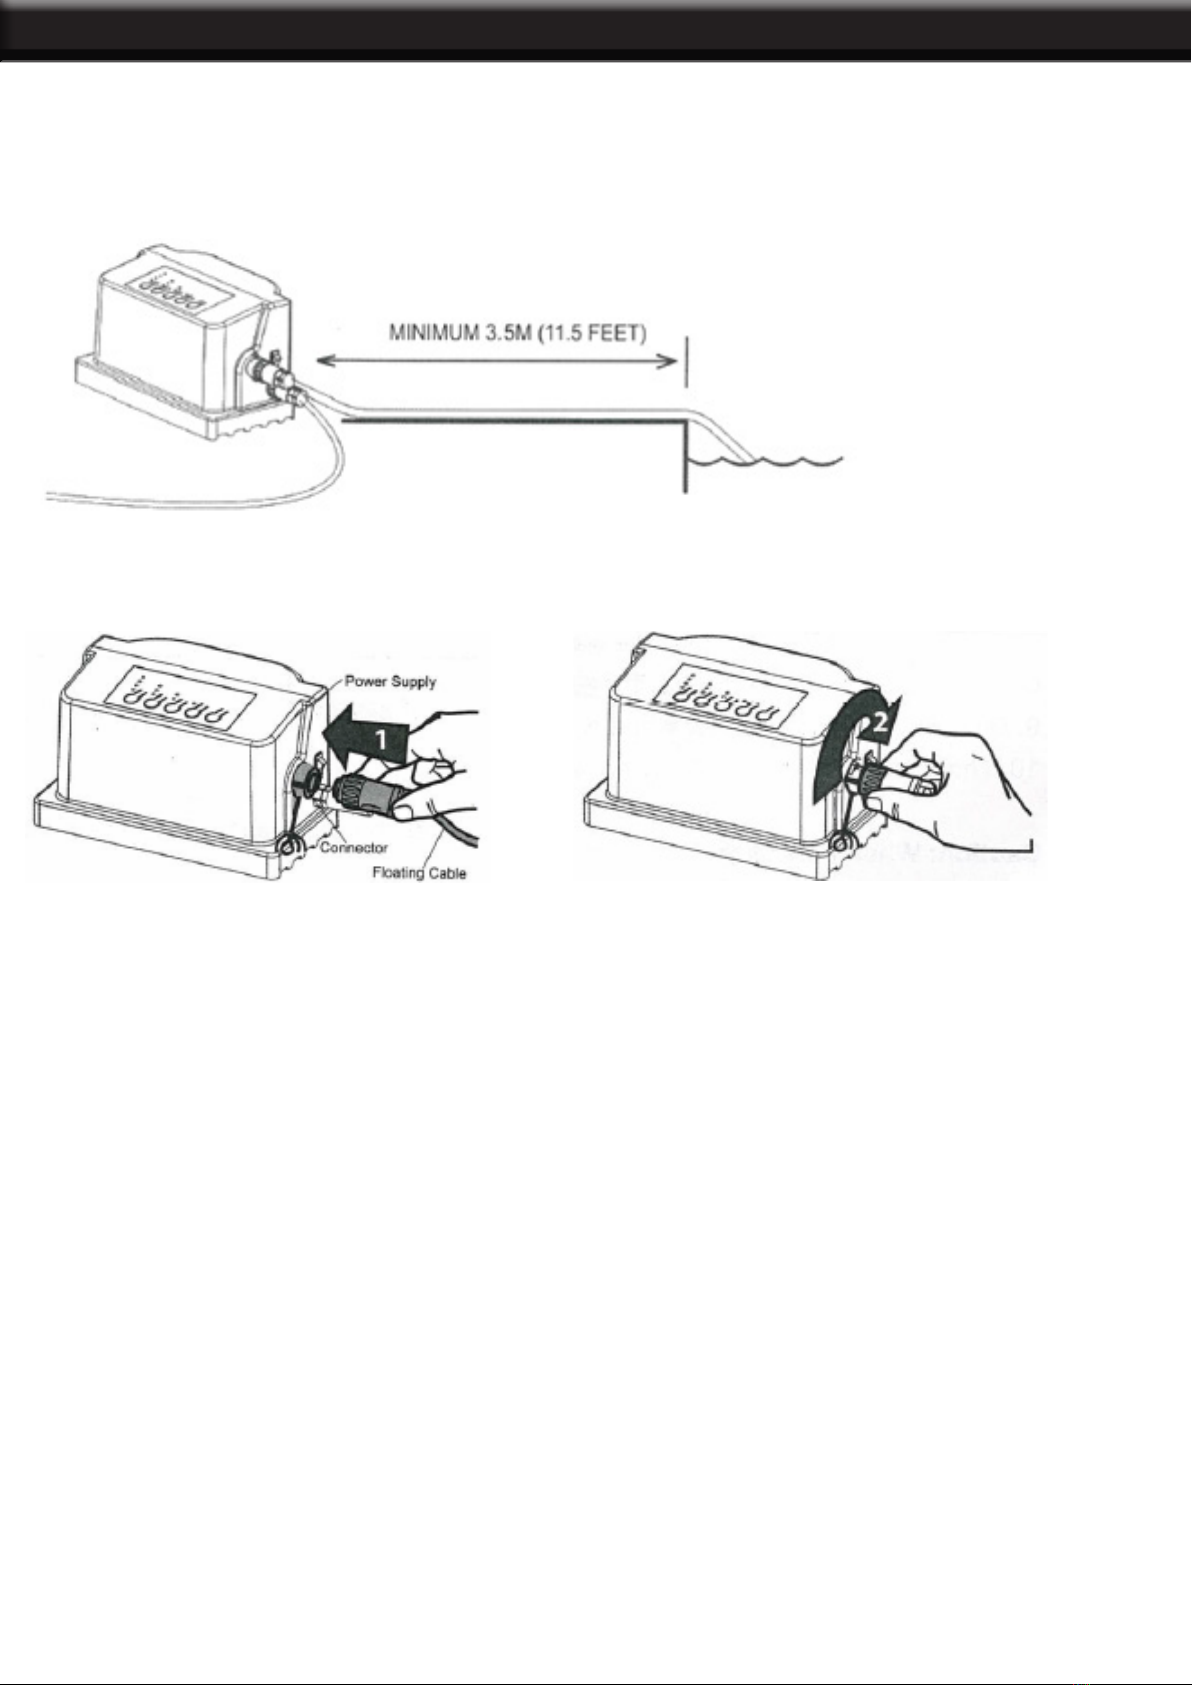
ALWAYS put the machine in the water before connecting it to the electrical outlet.
If debris falls from the cleaner while removing from the pool, it may be caused by lter
overload. Increase the frequency of lter cleaning. Assure that there is no large debris
blocking the two inlets.
If drain aps are out of place or stuck by sand/leaves in the open position, the aps can
be snapped back into place, after cleaning the area.
Avoid dropping or throwing the machine into the pool. Place the cleaner away from the
pool wall and set it into the pool carefully.
If the location cord gets twisted which can be caused by the cleaner working for too
long, it can be straightened by laying the location cord in the sun. Heat from the sun will
help reduce twisting.
If a lot of debris is visible though the outlet, remove cleaner quickly from the water to
reduce the chance of debris escaping the lter bag and re-entering the pool.
Thoroughly rinse the entire unit after each use.
Clean the lter bags thoroughly after each use. A clogged lter can decrease efciency
dramatically.
Avoid allowing the unit to “cool down” in the water.
NEVER use an extension cord with this machine. This can create a safety hazard and/or
damage the cleaner. Be sure the machine is plugged into a grounded outlet.
If the supply cord has been damaged, it must be repaired by a qualied technician
before operating the machine again.
Inspect the lter bags frequently, replace when necessary.
While the cleaner has been made to operate as safely as possible, we suggest you
exercise reasonable care in the handling of the vacuum and inspect the electrical cord
frequently for damage or wear. After use, remove the unit and rinse with fresh water and
remove any twists that may be present in the cord.
7

MAINTENANCE
8

THE MANUFACTURER AND/OR DISTRIBUTOR HAS PROVIDED THE PARTS LIST AND ASSEMBLY
DIAGRAM IN THIS MANUAL AS A REFERENCE TOOL ONLY. NEITHER THE MANUFACTURER OR
DISTRIBUTOR MAKES ANY REPRESENTATION OR WARRANTY OF ANY KIND TO THE BUYER THAT
HE OR SHE IS QUALIFIED TO MAKE ANY REPAIRS TO THE PRODUCT, OR THAT HE OR SHE IS
QUALIFIED TO REPLACE ANY PARTS OF THE PRODUCT. IN FACT, THE MANUFACTURER AND/OR
DISTRIBUTOR EXPRESSLY STATES THAT ALL REPAIRS AND PARTS REPLACEMENTS SHOULD BE
UNDERTAKEN BY CERTIFIED AND LICENSED TECHNICIANS, AND NOT BY THE BUYER. THE BUYER
ASSUMES ALL RISK AND LIABILITY ARISING OUT OF HIS OR HER REPAIRS TO THE ORIGINAL
PRODUCT OR REPLACEMENT PARTS THERETO, OR ARISING OUT OF HIS OR HER INSTALLATION
OF REPLACEMENT PARTS THERETO.
Record Product’s Serial Number Here:
Note: If product has no serial number, record month and year of purchase instead.
Note: Some parts are listed and shown for illustration purposes only and are not available individually
as replacement parts.
PLEASE READ THE FOLLOWING CAREFULLY
9
PRODUCT MADE IN CHINA
NOTE
Table of contents