Yamaha KCA-M538F User manual

Ver.1.09
UserʼsManual
FOR SUPPORT SOFTWARE
USB cable setup
Ver. 1.30
EUWV19C130
E136
Original instructions


CONTENTS USB cable setup
User’s Manual
T-1
1.
USB cable specications and part names
1.1
KBG-M538F USB Serial Port (Dsub connector) 1
1.2
KCA-M538F USB Serial Port (Round type connector) 3
2. Driver software setup
2.1 USB cable applicable support software 5
2.2 Windows 2000 6
2.3 Windows XP 13
2.4 Windows Vista 19
2.5 Windows 7 24
2.6 Windows 8/Windows 8.1 30
2.7 Windows 10 42
3. Uninstalling the driver software
3.1 Windows 2000/XP 53
3.2 Windows Vista 55
3.3 Windows 7 58
3.4 Windows 8/Windows 8.1 61
3.4 Windows 10 64


1. USB cable specifications and part names 1
1.1 KBG-M538F USB Serial Port (Dsub connector)
1.
USB cable specifications and part names
WARNING
· This USB cable is a dedicated cable solely for connecting the controller to the PC.
Do not connect this cable to other equipment since it may cause breakdowns in the
PC and other connected equipment.
· Make sure each connector is facing correctly and insert it straight inwards.
· Make sure the metal parts of the connector do not come in contact with the external
power supply terminals, etc.
· Make sure there are no metallic objects such as wire making connect between the
connector pins. These might cause heat, fire, or damage.
· Do not disassemble, modify or make a direct solder connection since this might
cause heat, fire, or damage.
· Do not let water or moisture get on the unit. Do not touch the connector with moist
hands since this might cause electrical shocks.
· Do not apply strong impacts to the unit since this might cause breakdowns.
· When inserting or removing the connector, grip the connector body. Do not pull on
the cable since this might cause wire breakage or connection defects.
· If the cable becomes worn or damaged then promptly stop using it and ask your
distributor for repair.
· Do not place heavy items on the cable, forcefully bend or pull on the cable since this
might cause fires or breakdowns.
· Never connect to any equipment other than the specified model since this might
damage the internal IC.
·
If you notice smoke or a strange odor then remove the cable, stop using the equipment,
and ask your distributor for repair.
1.1
KBG-M538F USB Serial Port (Dsub connector)
USB cable
Example: Controller is RCX340.
PC (personal computer)
V
W
Grasp the connector when inserting
Controller
USB connectorConverter
DSub connector
(9-pin male)
Communication connector (COM)

2 1. USB cable specifications and part names 1. USB cable specifications and part names 3
1.1 KBG-M538F USB Serial Port (Dsub connector)
■Specifications
Support OS *
Windows 2000 / XP / Vista (32bit/64bit) / 7 (32bit/64bit) /
Windows 8 (32bit/64bit) / Windows 8.1 (32bit/64bit) /
Windows 10 (32bit/64bit)
USB interface USB specification Rev 2.0, Full Speed compliant
Connector USB USB Type A
Serial Dsub connector (9-pin male)
Power
Bus power (supplied from USB host controller or hub)
Voltage 5V DC
Current consumption (Max.) 50mA
Ambient operating temperature 0 to 40°C
Ambient storage temperature -20 to 60°C
Ambient operating humidity 35 to 85% RH, no condensation
Ambient storage humidity 10 to 85% RH, no condensation
Cable length
Overall length 5m
Support controller SR1 / LCC140 / RCX221 / RCX222 / RCX240 / RCX240S /
RCX340 / RCX320
* These OSs (operating systems) are applicable to the USB cable driver software.
・
Download and install the latest driver software from our website;
https://global.yamaha-motor.com/business/robot/download/index.html#USBDriver
・
For details about OS applicable to each support software, refer to the support software manual.
To controllerConverter sectionTo PC
82250 4600 33.8
(Units: mm)
Dimensional outlines

2 1. USB cable specifications and part names 1. USB cable specifications and part names 3
1.2 KCA-M538F USB Serial Port (Round type connector)
1.2
KCA-M538F USB Serial Port (Round type connector)
USB cable
Example: Controller is TS-X.
N1
RGEN
LCOM1
I/O
ROB
CHARGE
200V
L1
MOTOR
I/O
N
PWR
ERR
Controller
Converter
Round connector
(8-pin male) USB connector
PC (Personal computer)
Grasp the connector when inserting
Communication connector 1 (COM1)
Press the cable's
connector straight into
the COM1 connector
after aligning its arrow
mark with the COM1
connector's triangular
mark (on left side, as
viewed when facing the
unit).

4 1. USB cable specifications and part names
1.2 KCA-M538F USB Serial Port (Round type connector)
■Specifications
Support OS *
Windows 2000 / Windows XP / Windows Vista (32bit/64bit)
/ Windows 7 (32bit/64bit) / Windows 8 (32bit/64bit) /
Windows 8.1 (32bit/64bit) / Windows 10 (32bit/64bit)
USB interface USB specification Rev 2.0, Full Speed compliant
Connector USB USB Type A
Serial Dedicated round connector (8-pin male)
Power
Bus power (supplied from USB host controller or hub)
Voltage 5V DC
Current consumption (Max.) 50mA
Ambient operating temperature 0 to 40°C
Ambient storage temperature -20 to 60°C
Ambient operating humidity 35 to 85% RH, no condensation
Ambient storage humidity 10 to 85% RH, no condensation
Cable length
Overall length 5m
Support controller TS-X / TS-P / TS-S / TS-S2 / TS-SD
* These OSs (operating systems) are applicable to the USB cable driver software.
・
Download and install the latest driver software from our website;
https://global.yamaha-motor.com/business/robot/download/index.html#USBDriver
・
For details about OS applicable to each support software, refer to the support software manual.
To PC Converter section
To controller
82250 4600
(Units: mm)
Dimensional outlines

2. Driver software setup 5
2.1 USB cable applicable support software
2. Driver software setup
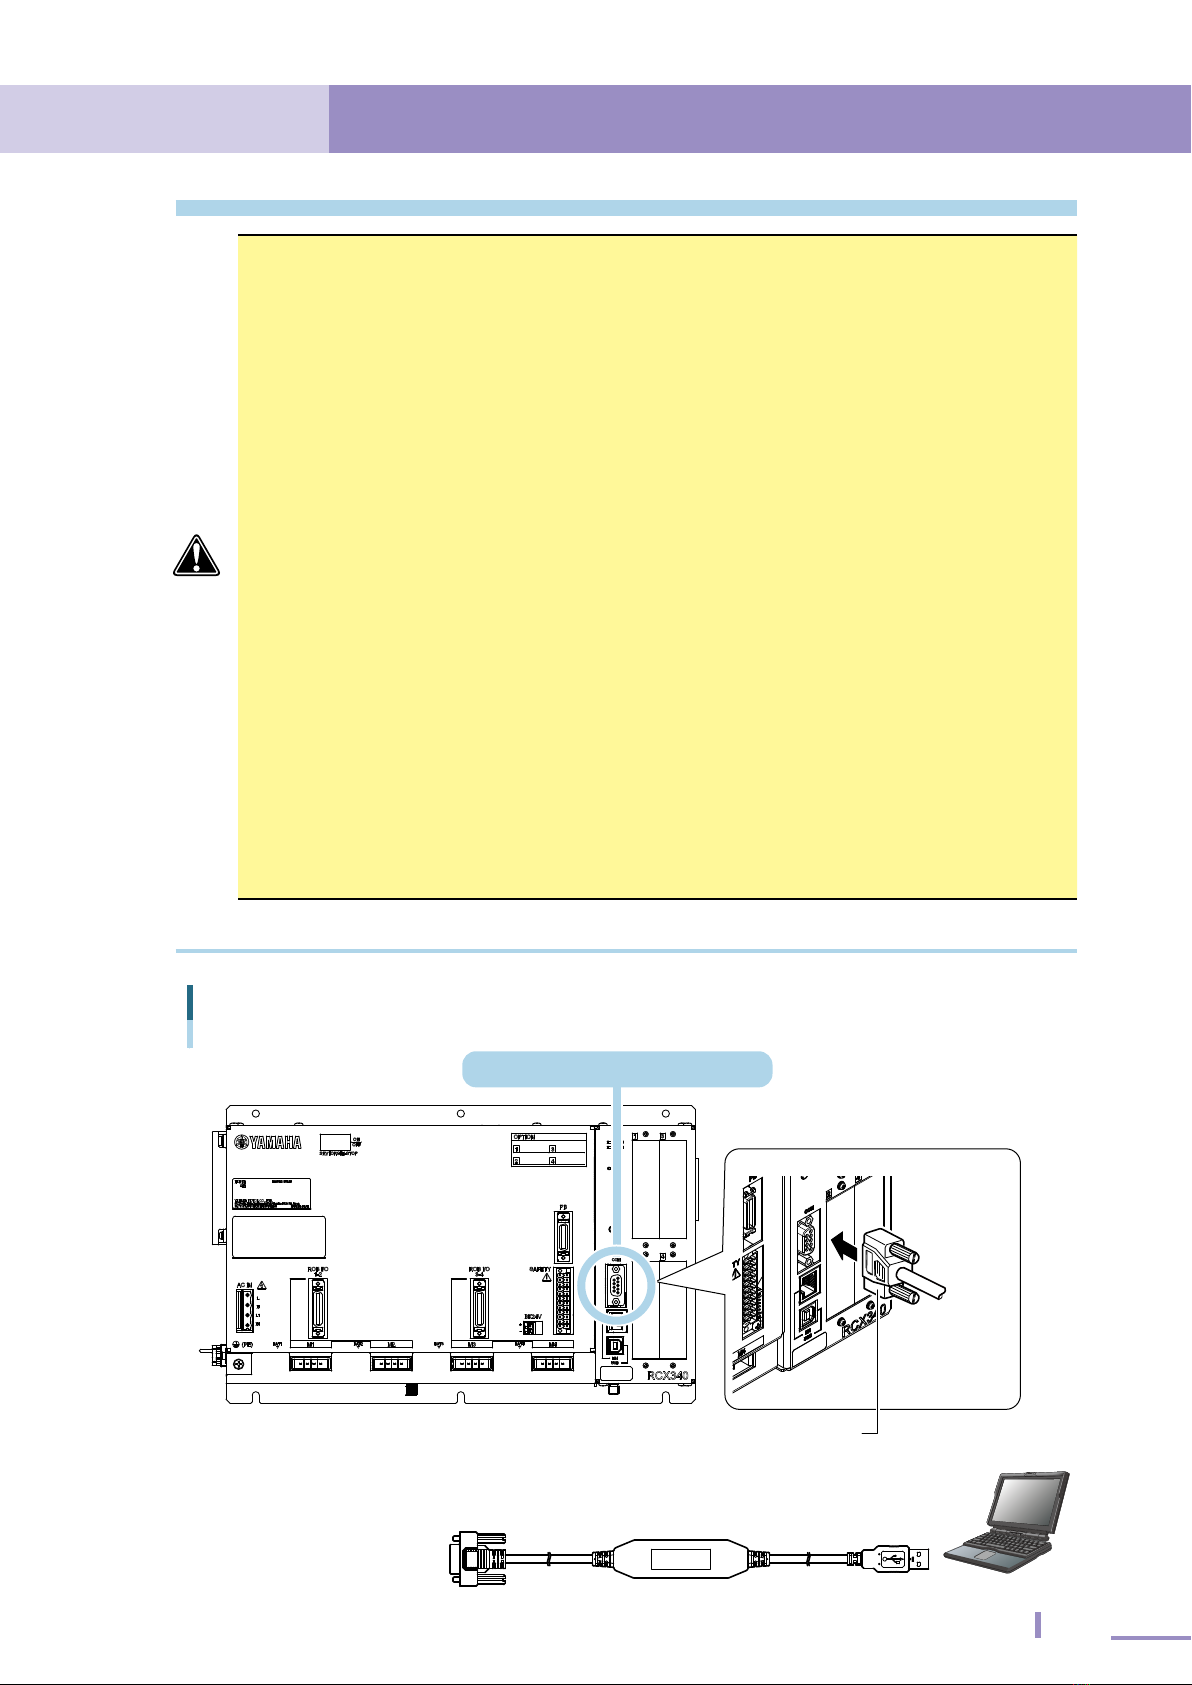
This section describes how to set up the USB cable for your PC.
CAUTION
To use the USB cable, always install the driver software that came with the USB cable.
The driver software is dedicated for *Windows 2000 / Windows XP / Windows Vista
/ Windows 7 / Windows 8 / Windows 8.1 / Windows 10. Installing the driver
software in a PC running on other OS might cause serious problems with the USB
driver or Windows OS.
See the relevant page in this manual according to Windows version you are using.
Windows 2000 (See 2.2, "Windows 2000")
Windows XP (See 2.3, "Windows XP")
Windows Vista (See 2.4, "Windows Vista")
Windows 7 (See 2.5, "Windows 7")
Windows 8 / Windows 8.1 (See 2.6, "Windows 8 / Windows 8.1")
Windows 10 (See 2.7, "Windows 10")
* Microsoft, Windows, Windows XP, Windows Vista, Windows 7, Windows 8, Windows
8.1, and Windows 10 are either registered trademarks or trademarks of Microsoft
Corporation in the United States and/or other countries.
2.1 USB cable applicable support software
The USB cable is applicable to the support software shown below.
・POPCOM+
・TS-Manager
・VIP+
・RCX-Studio
・RCX-Studio Pro
Download and install the latest driver software from our website;
https://global.yamaha-motor.com/business/robot/download/index.html#USBDriver
NOTE
The driver software for the USB cable is contained in the support software installation disc.
Additionally, you can also use the one that has been copied into the support software
installation folder to install the driver software. However, the ones are not always the latest
version.
The following shows the default support software installation folders.
[Windows 2000 / XP / Vista (32-bit version) / 7 (32-bit version) / 8 (32-bit version) /
8.1 (32-bit version) / 10 (32-bit version)]
C:¥Program Files¥Yamaha Motor¥<Support software name>
[Windows Vista (64-bit version) / 7 (64-bit version) / 8 (64-bit version) / 8.1 (64-bit version) /
10 (64-bit version)]
C:¥Program Files(x86)¥Yamaha Motor¥<Support software name>

6 2. Driver software setup 2. Driver software setup 7
2.2 Windows 2000
2.2 Windows 2000
■Installing the driver
First install the USB cable driver software.
NOTE
When installing the driver software for the USB cable from the support software installation
folder, start the work from Step 2 after Windows has started.
1Start Windows and insert the support software installation disc into the
CD-ROM drive of your PC.
If the setup program appears, click the [Exit] button to end the program.
2Plug the USB cable into the USB port of your PC.
The "Found New Hardware Wizard" dialog box appears. Click the [Next] button to
continue.
"Found New Hardware Wizard" start screen
Click

6 2. Driver software setup 2. Driver software setup 7
2.2 Windows 2000
3Select the method for installing the driver software.
When the "Install Hardware Device Drivers" dialog box appears, select "Search for
a suitable driver for my device (recommended)" and click [Next] to continue.
"Install Hardware Device Drivers" dialog box
Example: For KBG-M538F USB Serial Port
Click
Select
NOTE
When plugging the KCA-M538F USB Serial Port into the USB port of your PC, "KCA-
M538F-000" is shown.
4Specify the location of the driver file.
When the "Locate Driver Files" dialog box appears, select "CD-ROM drives" and
click [Next] to continue.
Search for driver file
Example: For KBG-M538F USB Serial Port
Select Click

8 2. Driver software setup 2. Driver software setup 9
2.2 Windows 2000
NOTE
・
・
When plugging the KCA-M538F USB Serial Port into the USB port of your PC, "KCA-
M538F-000" is shown.
When you use the driver software for the USB cable that has been copied into the support
software installation folder to install the driver software, select [Specify a location] and click
the [Next] button.
Click the [Browse…] button in the "Found New Hardware Wizard" window, specify [Driver]-
[WinXP-Vista-7-8.1] folder contained in the support software installation folder, and then
click [OK].
For details about support software installation folders, see "2.1 USB cable applicable
support software".
5Window searches for the driver file.
When the driver file is found, click [Next] to continue.
6Finish the driver installation.
When the dialog box appears indicating the driver software has been successfully
installed, click the [Finish] button.
Dialog box indicating the driver has been installed
Click
7Install the USB serial port.
The "Found New Hardware Wizard" dialog box appears again.
Click the [Next] button.

8 2. Driver software setup 2. Driver software setup 9
2.2 Windows 2000
8Select the method for installing the driver software.
The "Install Hardware Device Drivers" dialog box appears again. Select "Search for
a suitable driver for my device (recommended)" and click [Next] to continue.
"Install Hardware Device Drivers" dialog box
Click
Select
9Specify the location of the driver file.
The "Locate Driver Files" dialog box appears again. Select "CD-ROM drives" and
click [Next] to continue.
Search for driver file
Select
Click

10 2. Driver software setup 2. Driver software setup 11
2.2 Windows 2000
NOTE
When you use the driver software for the USB cable that has been copied into the support
software installation folder to install the driver software, select [Specify a location] and click
the [Next] button.
Click the [Browse…] button in the "Found New Hardware Wizard" window, specify [Driver]-
[WinXP-Vista-7-8.1] folder contained in the support software installation folder, and then click
[OK].
For details about support software installation folders, see "2.1 USB cable applicable support
software".
0Windows searches for the driver file.
When the driver file is found, click [Next] to continue.
qFinish the driver installation.
The "Completing the Found New Hardware Wizard" window appears. Remove the
support software installation disc from the CD-ROM drive and click the [Finish]
button.

10 2. Driver software setup 2. Driver software setup 11
2.2 Windows 2000
■Checking the COM port
After installing the driver software, check the COM port number assigned to the
USB serial port.
1Start "System Properties".
From the Start menu, select "Settings" and click "Control Panel".
Double-click the "Systems" icon to open the "System Properties" screen.
"Control Panel" and "System Properties"
Double-click

12 2. Driver software setup 2. Driver software setup 13
2.2 Windows 2000
2Check the COM port number for the USB serial port.
Select the [Hardware] tab and then click "Device Manager".
When the control side uses the Dsub connector, "KBG-M538F USB Serial Port (COM
□)" is displayed under "Ports (COM & LPT)". When the controller side uses the
round type dedicated connector, "KCA-M538F USB Serial Port (COM □)" is
displayed. Check the COM port number.
Example)
KBG-M538F USB Serial Port (COM3) →COM port number is 3.
KCA-M538F USB Serial Port (COM3) →COM port number is 3.
Checking the COM port number
Example: For KBG-M538F USB Serial Port
COM port number
3Close the Device Manager.
Click the button to close the Device Manager.

12 2. Driver software setup 2. Driver software setup 13
2.3 Windows XP
2.3 Windows XP
■Installing the driver
First install the USB cable driver software.
NOTE
When installing the driver software for the USB cable from the support software installation
folder, start the work from Step 2 after Windows has started.
1Start Windows and insert the support software installation disc into the
CD-ROM drive of your PC.
If the setup program appears, click the [Exit] button to end the program.
2Plug the USB cable into the USB port of your PC.
The "Found New Hardware Wizard" dialog box appears. Select "Install the software
automatically [Recommended]" and click the [Next] button.
TIP
When installing the driver, another screen might appear asking whether to access the
Window Update Web site. Select "No, not this time" when asked.
"Found New Hardware Wizard" dialog box
Example: For KBG-M538F USB Serial Port
Select Click

14 2. Driver software setup 2. Driver software setup 15
2.3 Windows XP
NOTE
・
・
When plugging the KCA-M538F USB Serial Port into the USB port of your PC, "KCA-
M538F-000" is shown.
When you use the driver software for the USB cable that has been copied into the support
software installation folder to install the driver software, select [Install from a list or specific
location (Advanced)] and click the [Next] button.
In the window for search and installation options, select
Search for the best driver in these
locations, specify [Driver] - [WinXP-Vista-7-8.1] folder in the support software installation
folder, and click [Next].
For details about support software installation folders, see "2.1 USB cable applicable
support software".
3Install the driver software.
When the "Hardware Installation" dialog box appears, click [Continue Anyway] to
continue the installation.
TIP
The message appears stating "The software you are installing for this hardware has not
passed Windows Logo testing to verify its compatibility with…. Continuing your installation of
this software may impair or destabilize the correct operation of your system….". But this will
not affect the PC, so click [Continue Anyway].
"Hardware Installation" dialog box
Click

14 2. Driver software setup 2. Driver software setup 15
2.3 Windows XP
4Finish the driver installation.
When the dialog box appears indicating the wizard has finished installing the
software, click the [Finish] button.
Dialog box indicating the driver software has been installed
Click
5Install the USB serial port.
The "Found New Hardware Wizard" dialog box appears. Select "Install the software
automatically [Recommended]" and click the [Next] button.
TIP
When installing the driver, another screen might appear asking whether to access the
Window Update Web site. Select "No, not this time" when asked.

16 2. Driver software setup 2. Driver software setup 17
2.3 Windows XP
"Found New Hardware Wizard" dialog box
Select
Click
NOTE
When you use the driver software for the USB cable that has been copied into the support
software installation folder to install the driver software, select [Install from a list or specific
location (Advanced)] and click the [Next] button.
In the window for search and installation options, select
Search for the best driver in these
locations, specify [Driver] - [WinXP-Vista-7-8.1] folder in the support software installation
folder, and click [Next].
For details about support software installation folders, see "2.1 USB cable applicable support
software".
6Select the method for installing the driver software.
When the "Hardware Installation" dialog box appears, click [Continue Anyway] to
continue the installation.
TIP
The message appears stating "The software you are installing for this hardware has not
passed Windows Logo testing to verify its compatibility with…. Continuing your installation of
this software may impair or destabilize the correct operation of your system….". But this will
not affect the PC, so click [Continue Anyway].
7Finish the driver installation.
The "Completing the Found New Hardware Wizard" window appears. Remove the
support software installation disc from the CD-ROM drive and click the [Finish]
button.
Table of contents