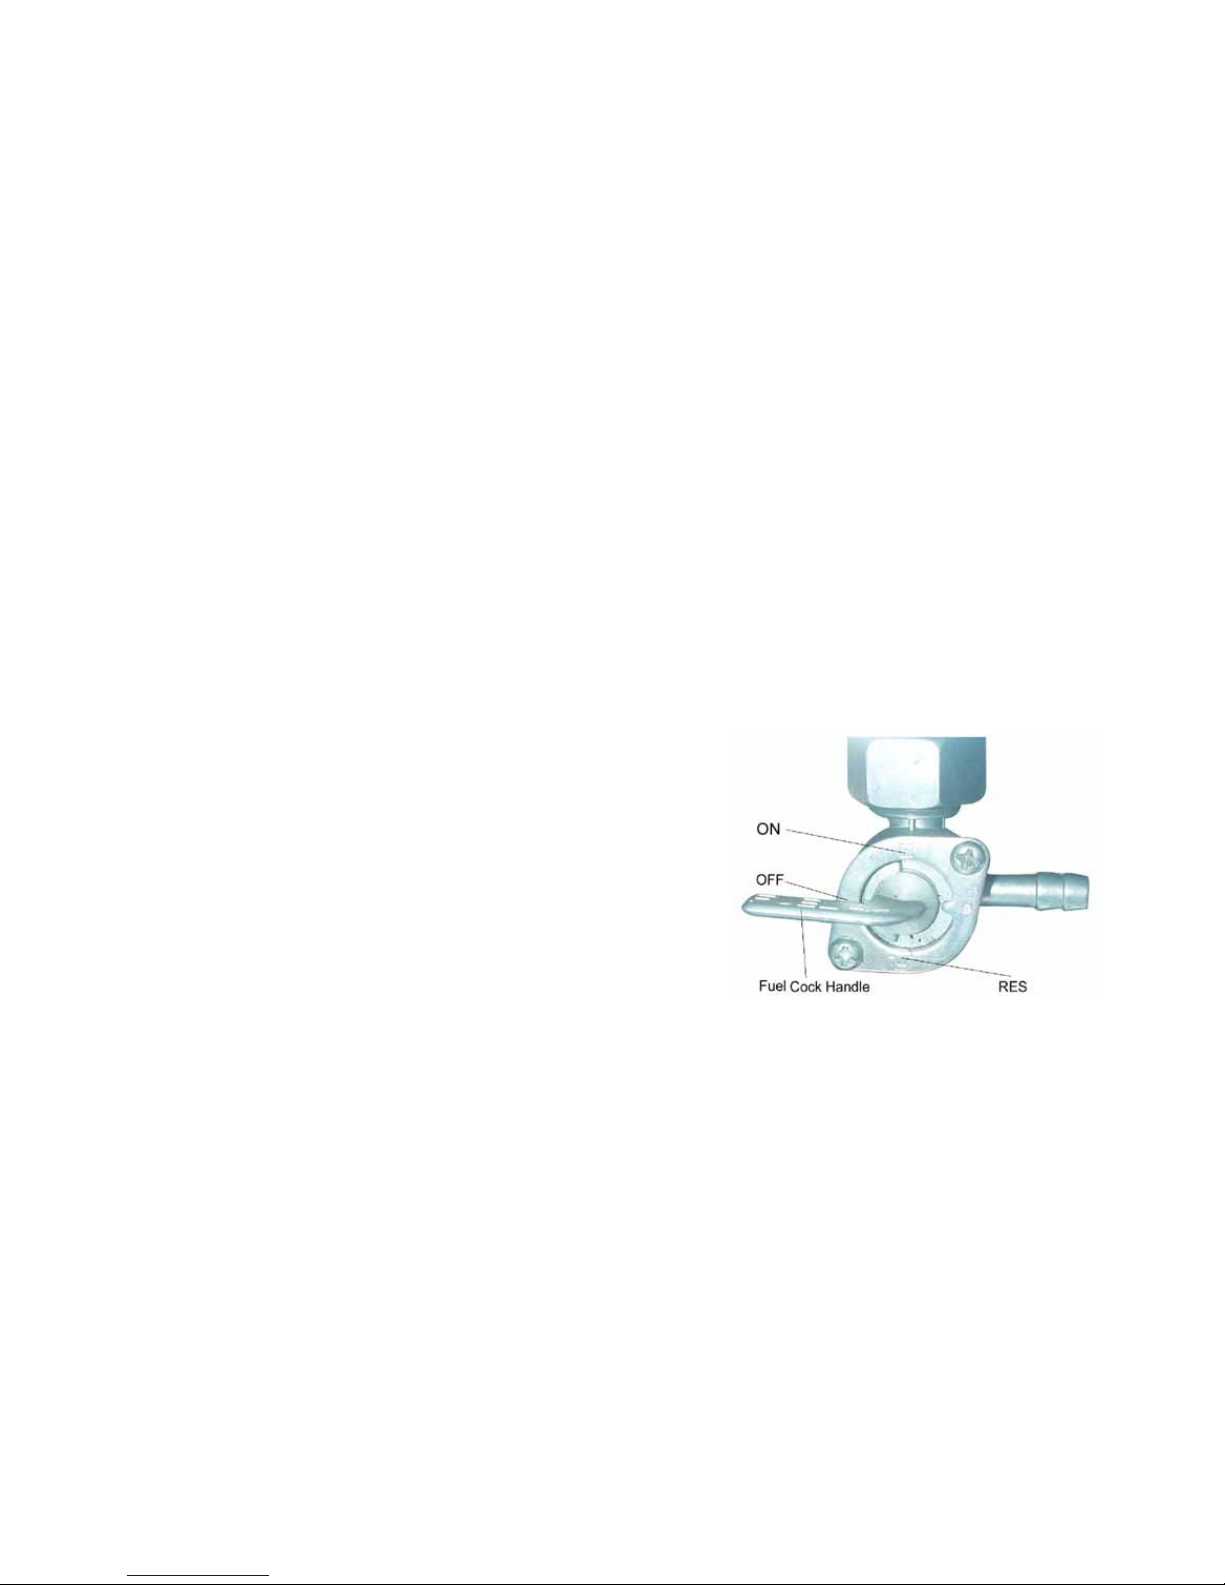
Yamasaki YM50-8B User manual

USER’ S MANUAL

FOREWORD
Thanks for your purchasing this motorcycle.
With the help of this manual, you will learn the correct procedures of operation and basic knowledge of
maintenance and trouble shooting of the motorcycle. It presents all the basic knowledge of maintenance and trouble
shooting of the motorcycle. It presents all the details of the performance of this motorcycle to you and the vehicle
will make your life more relaxed and happier.
In case any picture does not agree with the vehicle physically, the latter shall prevail.

CONTENTS
I .Safe Drive 1 Adjustment of Throttle Cable 15
II. Main Data 3 Adjustment of Carburetor 15
III. Parts and Subassemblies 4 Check-up& Adjustment of Air Valve Gap 16
IV. Operation 7 Brake Checking 16
Fuel Cock 7 Adjustment of Front Brake 17
Engine Starting 8 Adjustment of Rear Brake 18
Switches on Right Handlebar 9 VehicleWashing 20
Switches on Left Handlebar 10 Instructions for Storage 21
Gear Shifting 11 Resumption of Service after storage 22
V. Checking, Adjustment and Maintenance 12 Table of Torque for fasteners 22
Machine Oil Checking 12 Resumption of Service 23
Renewal of Machine Oil 12 Table of Maintenance 24
Cleaning of Machine Oil Tank 13 VI. Electrical Diagram 25
Check-up of spark plug 13
Check-up & Cleaning of Air Filter 14

1
SAFE DRIVE
Rules for Safe Drive
Check must be conducted,before starting the engine,to prevent mishaps and damage to components.
Only the qualified person who has passed the drive examination with a drive license is permitted to drive the
vehicle but not anybody else without a drive license.
Full preoccupation is required during drive, paying attention to the following points to avoid any possible
hurt to you by other motorized vehicles:
Do not drive too close to other vehicles;
Never contend for lane.
Strictly observe the local traffic rules.
As driving at overspeed is the cause of many accidents. Do not drive at a speed that the actual situation does
not permit.
Particular care should be exercised at the level crossing of roads, entrance and exit of parking lot or on the
autonobile lane.
During drive, grasp the left handlebar by the left hand and the throttle twist grip by the right hand,with feet
on the footrests.

2
Protective wear
1.Protective wear such as helmet with protective mask, dustproof glasses and gloves should be worn during
drive for the sake of personal safety.
2.Loose clothes are not suitable for motorcycle drive or ride as they may get caught on the operating
lever ,kick ,footrest or wheel, resulting in danger.
Modification of the vehicle
Caution:
Any unauthorized modification of the vehicle or replacement of the original parts can not ensure driving
safety and is illicit. The user must observe the regulations of the traffic conrtol authorities, We are not responsible
for any vehic le with unauthorized modification.

3
MAIN DATA
Item 50 type Item 50 type
200
39 41.4
8.8:1
2.8kw/8500r/min
2.2N.m/6250r/min
1500r/min±100r/min
Payload 150kg Displacement of cylinder 49 ml
A7TC
0.6~0.8mm
Speed,max 45km/h Inlake valve:0.05mm
Braking distance 7m(30km/h) Gap of air valve Exhaust valve:0.08mm
Climbability Ground clearance 190mm
Capacity of gasoline
k
15L Ignition means CDI
Transmission ratio
1 st gear 3.273 2nd gear 1.937 3rd gear 1.611
4th gear 1.350 5th gear
Final reduction 3.258
Overall length 2060mm Cylinder bore x stroke
Overall width 800mm Compression ratio
Overall height 1145mm Output,max
Dead weight 110kg Idling speed
Wheelbase 1300mm Torque,max
Front wheel 2.75-18 Spark plug
Rear wheel 3.5-16 Spark plug gap
x

4
III.PARTS & SUBASSEMBLIES

5

6

7
IV.OPERATION
Fuel Cock
1.Fuel filling
The capacity of the fuel tank is 4.5L.Leadless gasoline
of No.90or above or low-lead gasoline is required for the
motorcycle.To fuel the vehicle,support it by the main stand,
open the lock cover of the fuel tank and fill fuel through the
opening.
Operation of the fuel cock
ON:With the handle of the fuel cock to
“ON”position,the fuel circuit is through for fuel supply.
OFF:With the handle of the fuel cock fo “OFF”
position,the fuel circuit is cut off without supply.
RES: With the handle of the fuel cock to “RES” position, the
fuel is supplide from the reserve.(Note:The reserved fuel can
only be used when the normal supply is run
out,) In this case,refueling should be carried
out as soon as possible; for there is only
somel.0L of fuel reserve for use.

8
Engine Starting
Warning:Never start the engine in a closed
place or warehouse or warehouse as the
exhausted gas from the vehicle contains toxic
carbon monoxide.
1.Set the key of the ignition switch to
“ON”position.
2.Ascertain the neutral position,where it
should be displayed.
3.Ascertain the amount of fuel in the tank,
4.Set the fuel cock handle to “ON”position.
★To start a cold engine;
1.Pull up the choke bar of the carburetor(to
close the choke).
2.Rotate the throttle twist grip by 1/8to
1/4turn.
3.Start the engine by the electric or the kick
starting system.
4.Slightly turn the throttle twist grip to
increase the speed of the engine so as to
warm up the engine.
5.Turn the carburetor choke bar downward
to fully open the choke when the engine is
sufficiently warmed up.
★Caution:
The engine can only be started after the
neutral position is ascertained.Otherwise
accident will happen.
Unnecessary idle running(especially at a
high speed) is harmful to the engine.
★ Procedures for stopping the engine:
1.Release the throttle twist grip to
slow down the engine.
2.Turn to the neutral position.
3.Set the ignition switch key to
“OFF”position.
4.Set the fuel cockhandle to “OFF”
position.

9
Switches on Right Handle bar
Electric start button
The electric start button is located below the right handlebar.When the
ignition switch is set in “ON” position and the engine is in the neutral
position, push the button to start the engine
Light switch
The front light switch has three positions,
And “●”(a white point).
When the switch is in this position,the front head
light button ,tail and meter lights are all lit up.
When the switch is in this position,the tail, betraying and meter
Iights are lit up.
“●”When it is in this position. The front illuminator, tail, betraying and
meter lights are all off.

10
Switches on Left Handle bar
1. Headlights dimmer button
Position,Headligh is in high beam.
Position, Headligt is in low beam.
2. turning light switch
position,Left
position,Right
3.Horn button
press this button for horn

11
Gear Shifting
A non-cycling mode of gear shifting is employed of this motorcycle
● The throttle must be clossed befor the gear shifting every time,
Shifing the gear before closing the condition of backing it for four
times.
● The speed shifting pedal must be operated suitably.
● Stepping on the gear shifting pedal is forbided when driving to
prevent damaging the clutch when changing the gear abruptly.
NOTE (N) Neutral gear (1) 1th gear
(2) 2ndgear (3)3
rd gear
(4) 4th gear (5)5
th gear
Points forAttention during Drive1.Avoid unnecessary idling of the engine and it is not allowed. In
particular.to have it idling at a high speed. Other wise it will damage
components seriously.
2.Shift to the low speed gear when feeliing that the power is not strong
enoush on climbing.
3.It is forbidden to use the front brake only or to coast by the neutral gear
especially when descending or driving at high speed.
4.On braking. Narrow the throttle. and then apply the brake

12
V.Checking,Adjustm-
ent and Maintenance
Machine Oil Checking
★The vehicle should be checked
for machine oil before drive by
sup-porting it with the
Main stand on a flat ground.The oil
livel should be between the upper and
lower
Lines of the oil gauge. Which is not
screwed into the filling orifice.
★High quality 4-stroke machine
oil. Class SE or SD in API
classifi-cation.of SAE15W-40 in
viscosity will help maintain a long
service life or the engine.In case those
are not available,a substitute suitable for
the ambient temperature of application
should be selected according to the table
on the right side.
Renewal of Machine Oil
Machine oil plays a very important
role in the normal operation of the
engine and for this reason,it is necessary
to check the motorcycle for machine oil
periodically and renew the oil once
every800-1,000km of driving by the
following procedures.
Remove the screw plug from the
bottom of the hot engine to drain off all
old oil.
Wash the oil filter screen clean and
remount it really to position.Then fill in
0.8L fresh machine oil and start the
engine for idle running2-3 minutes.
Let the engine stop for 1-2 minutes
and check to see whether the oil level is
in between the upper and lower lines of
the oil gauge.
Do not use any machine oil of a
different grade than the specified one to
avoid machinery failure.

13
Cleaning of machine oil
tank
Check-up of Spark Plug.
1.Drain off all the run –in machine oil from
the oil tank.
2.Dismount the related parts.
3.Wash clean all the related parts.
4.Fill in the required oil.
*This job should not be done by untrained
persons but shall be done at an authorized service
center.
1.Remove the cap of spark plug and screw off
the spark plug by the plug wrench.
2.Clean the spark plug all aroud or replace it
if it is corroded or there is too much deposit on it.
3.Regulate the gap of the spark plug to
0.6-0.7mm.
4.The spark plug of the designated type should
be used. The applicable type of spark plug: NHSP
LD D8TC made in China.

14
Check-up & Cleaning of Air
Filter
Take out the air filter and check if it is
contaminated.
Dismounting:
Remove the right side cover,take out the screw
and disassemble the air filter.
Cleaning:
Wash the filter in clean washing oil and wipe it
dry with dry cloth.
Soak it in clean machine oil,squeeze it dry and
fit it back to position.
Recommended oil:15W/40QE
Caution:
The air filter element for use must be intact or
the enine will suck in dust and dirt, resulting in a
shorter service life of the engine.
Water should be prevented from entering into
the filter in washing the vehicle.
The filter shall never be cleaned with gasoline or any
other agent of a low ignition point.

15
Adjustment of Throttle Cable
Make sure that the adjusting nut of the throttle
cable and locking nut work normally.
Check to see if the throttle twist grip is with the
required free operating movement.
The required free operating movement:2-6mm.
If the grip can not be so moved freely.turn the
adjusting nut to ensure it.
After adjustment, start the engine and check for
the free operating movenent again,Repeat the
adjustment if necessary until it is as required.
Adjustment of Carburetor
Caution:
The adjusting procedures of idling speed:
1.Support the vehicle by a stand.
2.Adjust the idling speed by the throttle stop
screw(1) to 1500±150rpm.
Caution:
Do not try to cover up any trouble of other parts of
the carburetor by adjusting the idling speed. In case
of any abnormality with the carburetor,it has to
removed by your dealer.
Adjustment of idling speed shall be made only when
the cold engine is warmed up or 10 minutes after the
motorcycle is stopped from driving.

16
Check-up & Adjustment of Air Valve Gap
Noise will stem from too big gap of the air valve. However if there is too small gap or even no gap at all,
closing of the valve will be hindered, which will cause burn of the valve and output drop. Therefore, the air valve
gap must be checked periodically.
The gap of the air valve should be inspected and adjusted with a cold engine by the following procedures:
1.Remove the caps of the central hole and the top hole (the ignition timing observation hole)in the left
crankcase cover.
2.Remove the caps of the two air valves on the cylinder head.
3.Insert the “T” key into the central hole of the crankcase cover, jam it against the nut of the flying wheel and
then turm the flying wheel clockwise nutil the engraved “T” mark on the flying wheel alin\gns with the engraved
line on the top of the crankcase cover.Swing the rocking arm slightly.A loose rocking arm(which indicates the
existence of clearance) shows that the piston is in the upper stop position of the compressing t\stroke, where the
valve can be adjusted. A tight rocking arm means thar the piston is in the lower stop position of the compressing
stroke, In this case, continuously turn the “T” key clock wise for 360 degrees until the alignment of those engravd
marks, where the valve can be adjustd,Afterwards, check the valve gap by inserting a feeler in between the valve
adjusting screw and the end of the valve.
The specified air valve gap :0.05mm for the intake and exhaust valves respecively.
Brake Checking
(1) pull up the front and rear brakes respectively and check for wear of the brake shoes. If the mark “△” on
the brake drum cover aligns with that “△” on the brake cam, it means that the brake shoes are already worn to the
limit and have to be replaced.
(2) Replacement should be carried out at a designated service center and it is recommended that the parts made
by our company are used therein.

17
Adjustment of Front Brake
(1) The front brake has a free operating
movement of 10-20mm as shown in the figure on the
right side.
(2) inspect the reseivoir capacity and refill if
necessary in order to maintain proper level in the
reservior.This should be the major project of your
regular inspection
(3) check the front brake lining for its worm
depth.if its worn depth is up to the limited mark,
replace the brake lining.if the lining doesn’t have
limited mark but a concave slot as the figure,replace
the lining while its worn depth up to the bottom of
concave slot.replacement of a pair of linings shall be
conducted sumultaneously despite only one of them
is worn.
Table of contents