Yonac TROOPER User manual

First Edition, September 2022
1
Owner’s Manual

First Edition, September 2022
2
TABLE OF CONTENTS
Basics……….…..………………………………………………….
The Synthesizer…………..……………………………………...
Preferences….………………............................................
Audio Unit (AUv3)……………….……………………………...
Presets………….…….…………………………………………….
3
6
11
15
16

First Edition, September 2022
3
BASICS

First Edition, September 2022
4
1) Preset Access
Touch to reveal the preset browser
2) Virtual Keyboard Options
Touch to reveal control strip. Use buttons in the strip to hide or show the virtual keyboard; change its
height, or toggle scrolling/resizing to change the size and location of the keys.
3) Preferences
Touch to reveal synth & app preferences panel
4) FX (automatically appears according to window size)
If the device or AUv3 screen is too small to display all the synth controls at once, this button will
automatically appear. Touch it to display the FX panel, which also contains the Arp and the Modulation
Envelope.
5) Tapedeck (Standalone)
Displays the built-in recorder/playback/looper
6) Tap Tempo (Standalone)
Displays the tap tempo and scroll wheel interface for setting the app tempo
7) Master volume
Sets the output volume of the synth
8) Synth Controls

First Edition, September 2022
5
9) Virtual keyboard
Virtual Keyboard Management
Touch the KEYBOARD button on the taskbar to display keyboard options strip. From left to right, these buttons,
• Select the short height (“compact”) keyboard
• Select the full height (“performance”) keyboard
• Hide the keyboard altogether to make more of the synth controls visible, depending on the available
screen real estate.
• Toggle keyboard scrolling/resizing mode on and off. When turned on, scroll to change the keyboard
offset; pinch to change the key width to fit the desired number of keys on the screen.

First Edition, September 2022
6
THE SYNTHESIZER
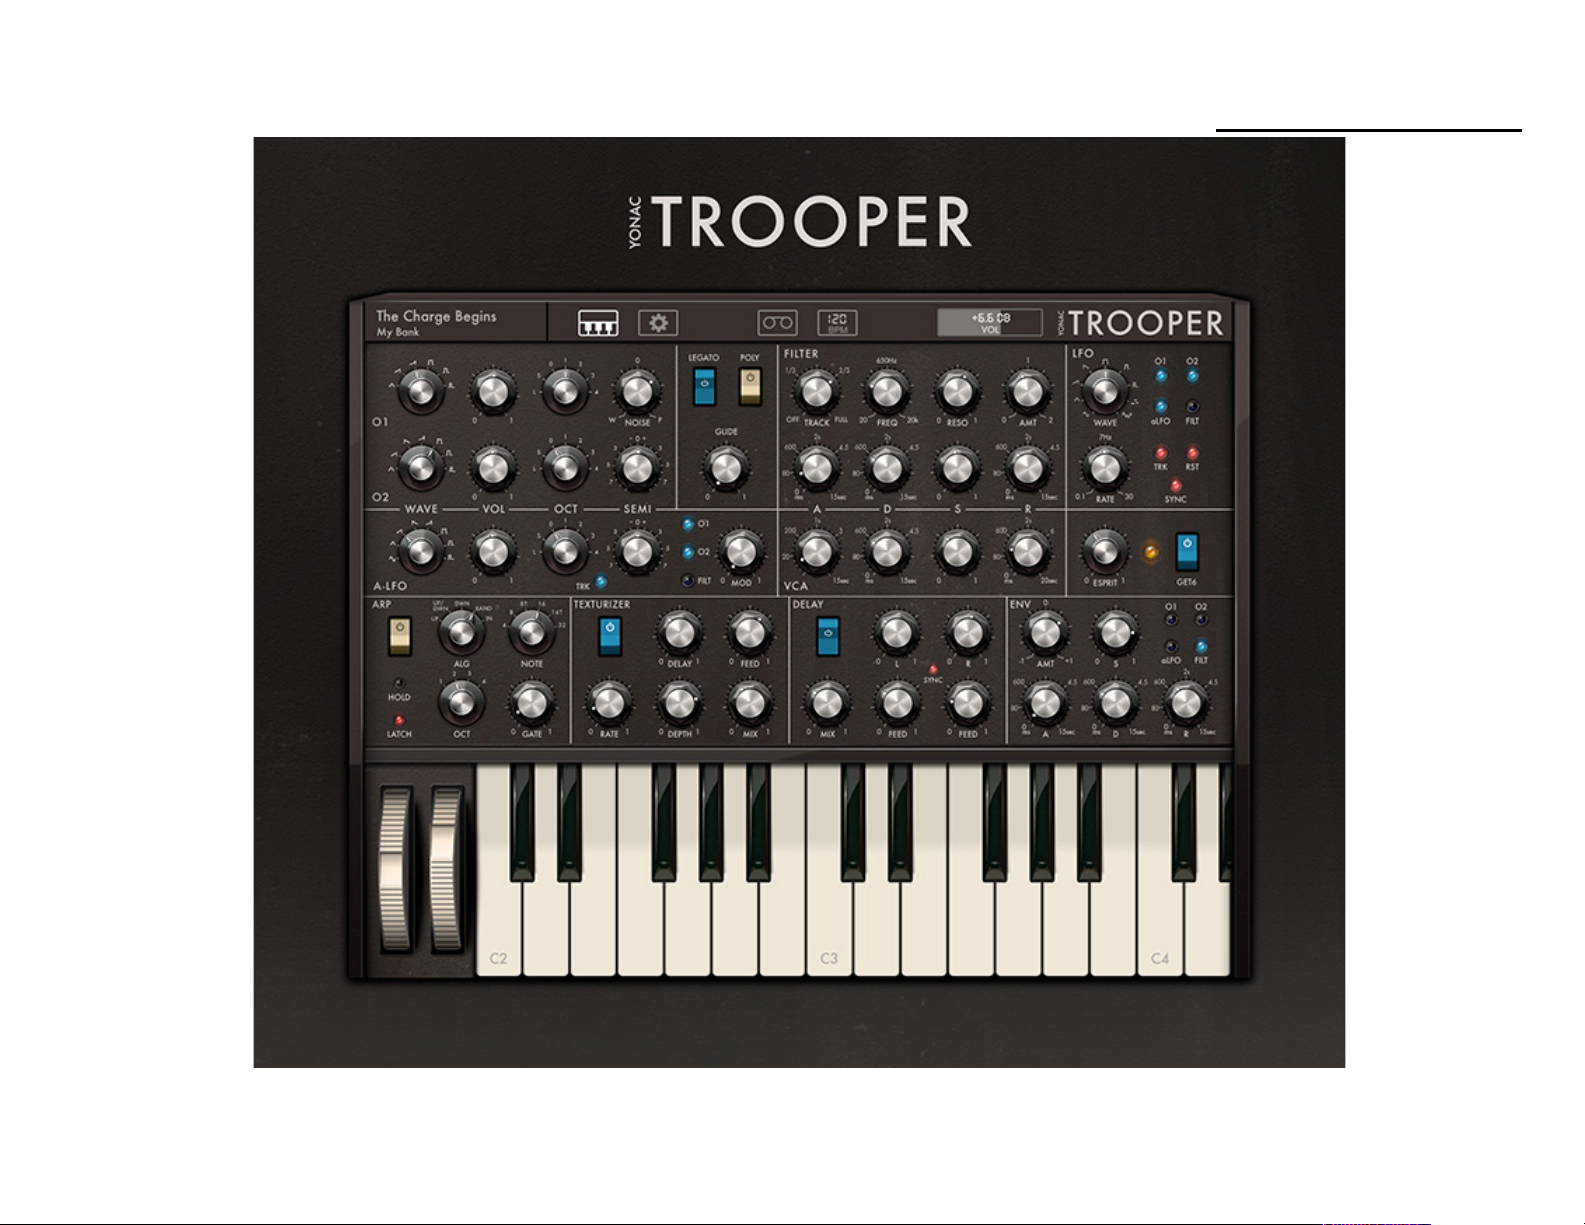
Oscillators & Audible LFO
Oscillators 1 and 2 are the principal signal generators, whereas the Audible LFO can simultaneously or
separately generate an audible signal or provide wide frequency modulation.
The waveform for an oscillator is selected using the WAVE knob. The base octave of the signal is set through the
OCT knob. Each oscillator and the aLFO provide six octaves in the audible range, including sub (S) and octaves
through 0 and 4. The additional low position (L) provides output below the audible range and can be used for
imparting interesting characteristics to the overall signal.
The VOL knobs specify the volume for each oscillator and react with other elements in the synth’s design. Up until
the mid position, the oscillator output will be relatively “pure,” which may be useful for cleaner synth sounds.
Above the mid point, the tonality of the signal will begin to change, resulting in a “rounder” sound. When
oscillators are combined, the volume controls can be used as an additional way obtain interesting new overtones
not usually available in the “clean” combination of signals.
The SEMI knobs in oscillator 2 and aLFO are used to vary the tuning of each relative to that of oscillator 1. In
small variations from the center, interesting “drifty” tones can be obtained.
The aLFO can be uncoupled from the keyboard by turning off the TRK button. In this case, it will emit a fixed
frequency that does not change no matter which key is held down. Modulation can be obtained by selecting a
target (O1, O2, or FILT) and then setting the desired amount of modulation via the MOD knob. Additional
modulation amount control can be obtained via the mod wheel, velocity, aftertouch, etc. These settings are found
in the PREFS -> MODULATION panel.

First Edition, September 2022
7
Filter
TRACK: amount of keyboard filter tracking.
FREQ: The corner frequency of the filter, as well as the initial value when the filter envelope is triggered
RESO: The amount of filter resonance. In higher settings, the filter will start to self-oscillate, which can be used as
a unique sound on its own and controlled via the keyboard by setting TRACK to desired amount.
AMT: The peak value of the filter envelope. Filter envelope will have a more traditional contour up to the middle
setting. Above the middle setting, the AMT knob will start to change the envelope contour
A: Filter envelope attack time
D: Filter envelope decay time
S: Filter envelope sustain level: will represent a value between FREQ and AMT
R: Filter envelope release time. When set to 0, the last envelope value is held
VCA
A: VCA envelope attack time: i.e., from silence to peak amplitude
D: VCA envelope decay time: i.e., from peak to amplitude specified by SUSTAIN (S)
S: VCA envelope sustain level
R: VCA envelope release time: i.e., from sustain level to silence
Legato, Poly, and Glide
LEGATO: Toggle legato mode.
POLY: Switch between monophonic and polyphonic synth operation
GLIDE: Specify the portamento time between two notes

First Edition, September 2022
8
LFO
The LFO applies a modulating signal to the selected targets. The amount of the signal is traditionally controlled
using the modulation wheel on the built in virtual keyboard or an external MIDI keyboard. Further control
options are provided in the Prefs -> MODULATION panel.
WAVE: Specify the waveform of the modulating signal
RATE: Specify the speed of the modulating signal
TARGET SELECTORS: Select which synth parameters to modulate
TRK: Turn on key tracking. The signal will speed up the higher one plays on the keyboard.
RST: Turn on first-key-in phase reset for the signal
SYNC: Enable BPM syncing. When BPM syncing is turned on, the RATE knob can be used to specify the note
value at which the LFO will operate
MOD WHEEL: Specify the amount of modulation supplied to the selected target(s). Further settings for the Mod
Wheel and other modulation related controls can be found in PREFS -> MODULATION
Modulation Envelope
Use the ENV as an additional modulation source to obtain interesting sounds. The ENV amount can optionally
also be controlled via MIDI velocity and Mod Wheel. Options are located in PREFS -> MODULATION.
AMT: Peak value of the envelope at the end of the attack stage
S: Sustain value of the envelope at the sustain stage
A: Attack time
D: Decay time
R: Release time
TARGET SELECTORS: Select the synth parameters to modulate

First Edition, September 2022
9
Esprit & Get6
Esprit is a special parameter designed to interact with other synth settings. Depending on the underlying patch, it
can be used to give tighter, deeper bass sounds; change the tonality of the signal; or make the overall sound
more full and aggressive.
Get6 turns on big, stereophonic synth sounds, supplying an extra tool with which to obtain ballsier tones.
Arpeggiator
POWER: Turn the arp on or off
ALG: Select the note order for the pattern
NOTE: Select the note value for each step
OCT: Select the octave range for the pattern
GATE: Specify the gate amount for each step. When legato is activated, the maximum gate amount will result
arpeggiation in legato.
Texturizer
Texturizer is a multi-use effect. By experimenting with its parameters, one can obtain various flavors of chorus,
flange, stereo expansion, short-time resonant delay, sweeping comb filter effects, and more.
DELAY: The initial delay for the wet signal
FEED: The feedback for the wet signal
RATE: Speed of modulation
DEPTH: Amount of modulation

First Edition, September 2022
10
MIX: Amount of wet signal applied to output.
Delay
Two-tap stereo delay.
L/R: Delay time for the left and right channels
FEED (L/R): Feedback amount for the left and right channels
MIX: Delayed signal mix
SYNC: Enable BPM syncing. Note values can be set via the L/R (delay time) knobs.

First Edition, September 2022
11
PREFERENCES
Control Surfaces
Here you can set general and MIDI elements relevant to performance components. All the preferences found
(except ROTARY KNOBS) on this panel are patch-bound. However, you can preserve the existing settings across
patch changes by activating the LOCK button on the lower right.
MPE: Enable synth to work with the MPE protocol. This will also automatically display TROOPER’s built in MPE
controller.
PITCH CTRL (MPE): Specifies the amount of note snapping when using TROOPER’s built in MPE controller. At 0,
the controller plays discrete notes; at 100, controller will be in full portamento.
MPE PITCH RADIUS: The range, in semitones, that the MPE voice-wise pitch shift messages map to. Default is 48.
PITCHWHEEL: The amount of pitch shift in semitones in either direction of the pitch wheel movement.
COARSE TUNE: Alter the master synth tuning in semitones
FINE TUNE: Alter the master synth tuning in cents
440: Specify the A4 reference pitch for the synth
MIDI NOTE MIN: The minimum MIDI note recognized by the synth. Default is 0
MIDI NOTE MAX: The maximum MIDI note recognized by the synth. Default is 127
MIDI NOTE SHIFT: The number of notes incoming MIDI data is shifted. Default is 0, i.e., no shift.
SCALE (MPE): Select one of the preset musical scales for the built-in MPE controller
EDIT SCALE: Edit the notes in the selected scale. You can add or drop notes by touching one of the buttons in the
array. To change the musical key, press and hold the button for the desired note.

First Edition, September 2022
12
ROTARY KNOBS: Specifies if the knobs found on the synth UI up/down fader like gestures, (default) or respond
to rotary touch gestures.
PANIC: Send global MIDI Panic.
Modulation Settings
You can access an array of modulation settings on the Prefs -> Modulation panel. Here you can specify the
amount of control certain MIDI elements have on synth parameters. For example, you can use MIDI velocity or
aftertouch to control voice amplitude or filter cutoff.
The amount of control that modulation wheel has on the LFO can also be set here. In addition, you can configure
the mod wheel to control the aLFO as well as the dedicated Modulation Envelope.
At 0%, the MIDI source has no effect on a given synth parameter.
MIDI Learn
MIDI CCs can be mapped onto the knobs and switches found on the synth and FX panels. The mapping can be
saved to file and recalled for later use. The files can be shared. In addition, the loaded map is linked to the
preset when the latter is saved, so that the map it contains it is automatically loaded when the preset itself is
loaded. Like some of the other settings panels, this one also contains a “lock.” If enabled, this preserves the
already loaded CC map across preset changes.

First Edition, September 2022
13
To enter MIDI Learn mode, press the LEARN button. Touch the overlay on the desired knob or switch on the synth
or FX panel so that it is highlighted. Manipulate the control on your MIDI device until the CC/Channel pair is
indicated on the overlay. Repeat with any number of synth elements. When finished, go back to Prefs -> MIDI
Learn and unselect the LEARN button. Save the changes to file using the SAVE or SAVE AS buttons.
To load a MIDI CC Map, touch the MIDI MAP display area and choose a file from the browser. Options for
sharing are also provided by touching the IMPORT or EXPORT buttons on the lower taskbar found on the file
browser.
App Audio / MIDI
These preferences are only available for the standalone deployment of the app. Use the HW or VIRTUAL MIDI In
buttons to toggle MIDI In from hardware or virtual sources altogether. Specify MIDI channel for notes received
by deploying the NOTE IN CH menu.
If you wish to send MIDI performance data from the app, select the MIDI out channel from the NOTE Out Ch
dropdown.
To specify the channel for MIDI program changes, use the PROG CH dropdown.
To access the dialog for connecting with Bluetooth MIDI inputs, touch the BTOOTH button.
You can manage connections to currently online MIDI I/O devices on the MIDI Inputs and MIDI Outputs lists. To
receive MIDI or MIDI clock data from a given source, make sure the associated button next to its listing is
highlighted in green. To disable receiving either data, touch the button to un-highlight it.

First Edition, September 2022
14
Similarly, the app will output MIDI performance data to all the recipients with the MIDI jack button highlighted in
green. To disable MIDI output to these recipients, touch the button to un-highlight it.
Enable Audio Backgrounding by touching the BG AUDIO button. Set the buffer size using the BUFFER dropdown.
Similarly, set the sampling rate using the SAMPLE RATE dropdown. Notice that access and ability to set buffer
size and sample rate works in a first-in-last-out manner, so that if an app is already open and using the audio
(including in the background), any app opened after it will not be able to change these settings to anything other
than specified by the first app.

First Edition, September 2022
15
AUv3
TROOPER comes packaged with its iOS Audio Units version 3 plugin binary. You can use multiple instances of
TROOPER in any iOS DAW or mixer capable of hosting AUv3 plugins.
Both the MIDI and MPE functionalities of TROOPER onscreen controllers are available in AUv3 format, provided
the hosting app is capable of receiving MIDI/MPE output from plugins.
The TROOPER AUv3 will be located among the MIDI Instrument plugins of your DAW. For more information
about how to use AUv3 MIDI instruments, please refer to your DAW’s user manual.

First Edition, September 2022
16
PRESETS
What’s saved in a preset?
All the parameters on synth and FX panels, except for keyboard latch and hold. In addition, settings in the Prefs -
> Control Surfaces and Prefs -> Modulation panels, as well as the offset and key width for the virtual keyboard
or MPE controller. Linkage to MIDI CC Map loaded at the time of the preset save. Note that there are locks
provided for each of the three preference panels. When turned on, these locks will preserve the settings across
preset changes.
Managing Presets
The app’s built-in preset management system is a powerful way to organize, access, and share banks and
presets. Here is the function of the buttons found in the preset manager’s taskbar, left to right:
Bank Taskbar
• PLUS: Create an empty bank.
• RENAME: Rename the selected bank.
• EDIT: Enable to reorder or delete banks. When finished, touch again to exit editing mode.
• SHARE: Display bank export/import options. See below for more information.
Presets Taskbar
• SAVE: Save as a new preset.
• OVERWRITE: Overwrites the currently selected preset.

First Edition, September 2022
17
• [INIT]: Loads a basic “initial” preset, useful when writing a new patch from scratch.
• RENAME: Rename the selected preset.
• MOVE: Move selected preset to a different bank.
• EDIT: Enable to reorder or delete presets. When finished, touch again to exit editing mode.
• SHARE: Display preset export/import options. See below for more information.
• JOKER: Randomly load a preset from the file system.
• SEARCH: Search for a preset.
• RESTORE FACTORY: Reinstall factory presets that came packaged with TROOPER.
Favorites Bank
• You can “favorite” up to 256 presets by touching the STAR button located next to it. These presets are
then displayed in the Favorites repository found at the very top of the banks list. To un-favorite a preset,
simply touch the star button again.
Importing/Exporting Banks & Presets
You can export banks and presets to iOS Files or via email. Simply touch the bank or preset share task button
and make a selection. The banks/presets exported to Files can be accessed through the iOS Files app (just
navigate to the TROOPER root directory) and can also be accessed on your desktop computer via iTunes
Filesharing.
You import banks and presets in many different ways: you can add them to the TROOPER root folder (either
within your iPhone or iPad, or using iTunes Filesharing), and then install them using YPAT3 > Sharing > Import
from Files. Or you can double tap any TROOPER bank/preset file, which will automatically launch the app, and
install that asset. Similarly, you can touch an email attachment to install an asset.
Table of contents