Zacuto Gratical HD User manual

The Gratical HD Micro-OLED Electronic Viewfinder
Full Digital Manual
Bright. Sharp. Brilliant.

2
Table of Contents
Gratical Features .........................................................................................................................3
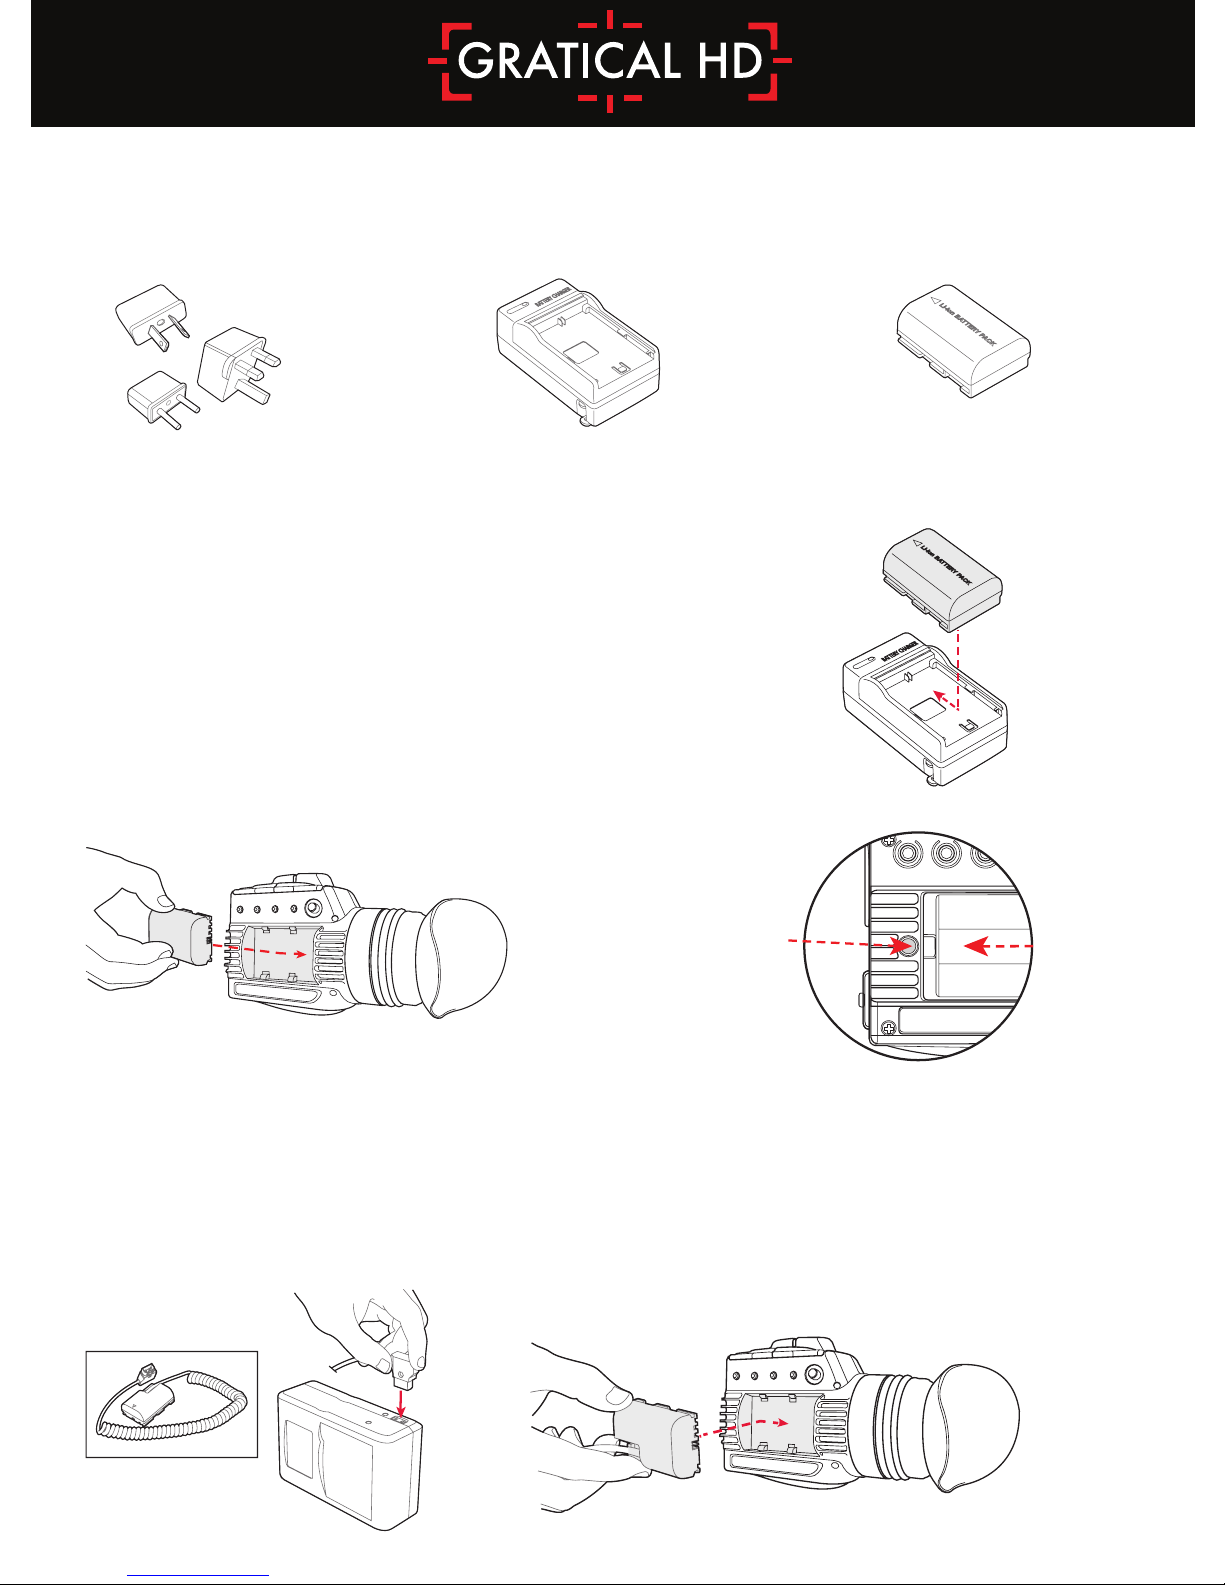
Included Components ................................................................................................................4
Battery Usage............................................................................................................................... 4
Power Sources..............................................................................................................................4
HDSDI & HDMI Connections......................................................................................................5
Operating Lens Door ..................................................................................................................5
Removing/ Installing Lens Protection ........................................................................................6
Operating Menus ........................................................................................................................7
Display Calibration ......................................................................................................................8
LUTs...............................................................................................................................................9
Color Bars...................................................................................................................................10
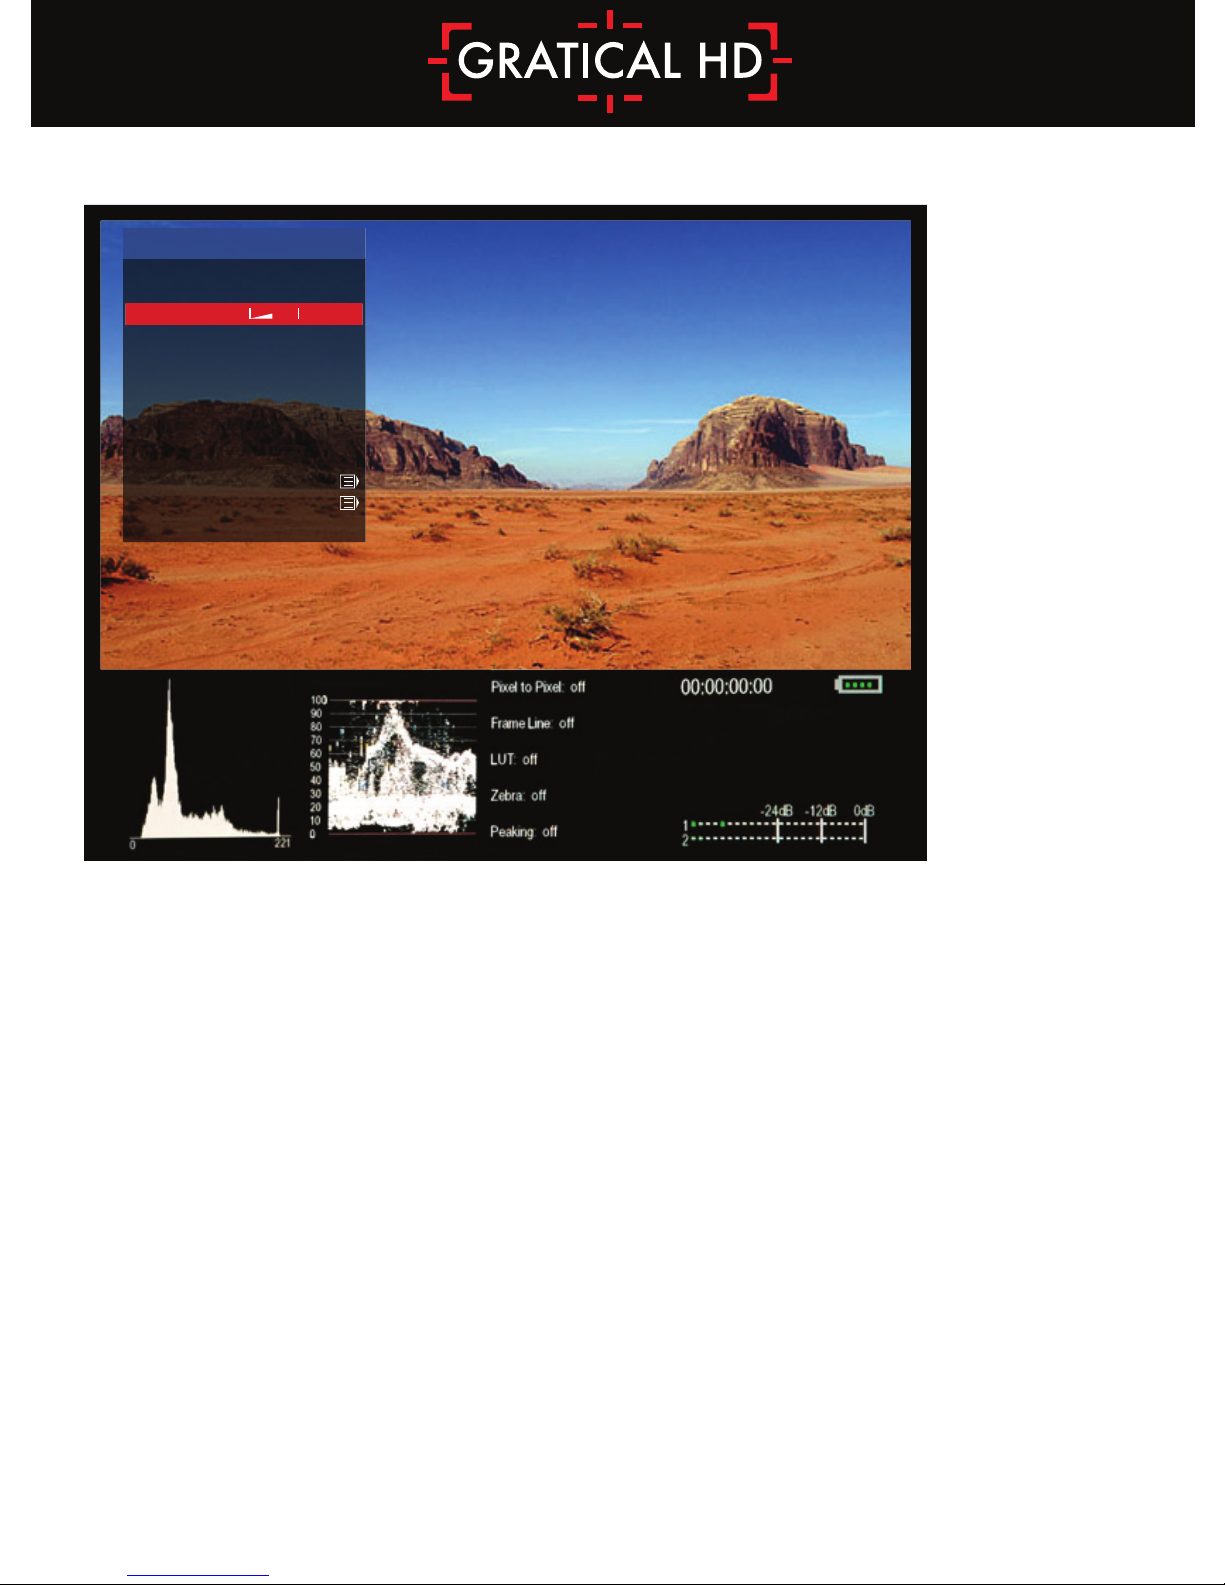
Scopes ........................................................................................................................................11
Scopes Settings .........................................................................................................................12
Overlays .....................................................................................................................................13
False Color .................................................................................................................................13
Focus Assist (Red Line)..............................................................................................................14
Peaking.......................................................................................................................................14
Exposure Assist (Zebras) ..........................................................................................................14
Frame Line..................................................................................................................................15
Time Code .................................................................................................................................15
Record Light...............................................................................................................................15
Meters.........................................................................................................................................15
Menu Settings............................................................................................................................16
Pixel to Pixel...............................................................................................................................16
DSLR Scaling ..............................................................................................................................16
Anamorphic ...............................................................................................................................18
Frame Store................................................................................................................................18
Function Buttons .......................................................................................................................19
Lock Buttons ..............................................................................................................................19
Update........................................................................................................................................20
About..........................................................................................................................................20
Precautions.................................................................................................................................21
Limited Warranty .......................................................................................................................21

3
Gratical Features
3
2
4
56
1
11 12
13
14
15 16
9
10
7
8
1. Power Button
2. USB Port
3. HDSDI Out
4. HDSDI In
5. HDMI Out
6. HDMI In
7. Focusing Ring
8. Arri 1/4”- 20 Rosette
9. Function Buttons
10. Joystick
11. Battery Release Button
12. LP-E6 Battery
13. HDMI Covers
14. HDSDI Covers
15. Lens Door
16. 1/4”-20 EVF Mount

4
Insert the battery into the left side compartment of the
Gratical. Slide to the right until locked in place. To remove the
battery press the release button and slide the battery to the left
of the case.
Connect male D-Tap
to power source.
PT-ZAC-E6
Slide Battery attachment
into the Gratical.
Battery Usage
To ensure full runtime charge your battery before first use.
Note: Only use LP-E6 type batteries with the
Gratical. Doing otherwise may damage the unit.
Using an External Power Source
Optional equipment includes an External Battery
Attachment with D-Tap and a compatible battery source.
Release Button
Included Components
3 AC Plug Adapters Li-ion Battery Charger Li-ion Battery LP-E6 Pack

5
Opening Eyecup Lens
Door Hands Free
Position your head next to the
lens door tab. Apply pressure
with your head to the lens door
tab, slide your head from left
to right opening the door.
See video at
www.zacuto.com/gratical-support
Opening Eyecup to
keep Lens Door open
The Eyecup can be folded over
on itself so that lens door
remains open. Reminder:
When the Lens Door does
not automatically close your
Gratical is exposed to the sun.
HDSDI and HDMI
Connections
The Gratical HD includes two
HDMI and two HDSDI ports with
cross conversion from HDMI
to HDSDI. Weather resistant
covers prevent moisture or debris
from getting in open ports.
In InOut Out

6
Removing & Installing Level 1 Fog Protection
Level 1 Fog Protection Anti-Fog Coated Diopter offers a mild fog
protection. Good for average conditions, comes pre-installed.
1. To replace the diopter, remove three Phillips screws and remove the diopter
2. Install new diopter and tighten 3 Phillips screws back into place.
Place the Eyecup on one side
of the Gratical Lens Lip, and then
push down around the rest.
Installing Level 2 Fog Protection
Level 2 Fog Protection Anti-Fog Shield offers extreme Fog protection.
Included with Gratical, but does not come pre-installed.
1. To install Level 2 Fog Protection, peel off protective layer from both sides of
the level 2 Fog protection. Lay on top of the lens lip and remount eyecup.
Level 1
Diopter
Concave
(Facing Display) Convex
Lens Lip Anti Fog Shield
Level 2

7
MAIN MENU
DISPLAY CALIBRATION
LUTS
COLOR BARS
SCOPES
OVERLAYS
METERS
PIXEL TO PIXEL (ZOOM)
DSLR SCALING [Auto/Playback]
ANAMORPHIC DE-SQUEEZE [NORMAL]
FRAME STORE
FUNCTION BUTTONS
USER FEATURES
LOCK BUTTONS
UPDATE
ABOUT
The menu screen reveals itself over the current video display to show real-time
updates of changes made. Menu will disappear after 30 seconds of inactivity.
1. To open menu press in joystick. Navigate
menu using up, down, left, right. Press in to
select. Left will return you to the previous
menu or make the menu disappear when
on main menu.
With the menu off, the Joystick can be pre-
programmed with functions. (Defaults
Listed Below) These Joystick functions
can be changed through the menu.
Up- Focus Assist
Down- Battery Meter
Left- None
Right- Toggle Waveform / Vector
2. The four function buttons on the side of the
Gratical can be programmed through your
menu to assign a video processing feature for
quick selection. These function buttons can
only be used while the menu is off.
F1- Toggle all Scopes ON/OFF
F2- False Color
F3- Exposure Assist (Zebras)
F4- Pixel to Pixel
2 1
Operating Menus
F1 F2 F3 F4
Current Selection
(In Red)
Current Setting
Sub-Menu
Indicator
Time-code
Battery Meter
Audio Meter
Waveform or
Vectorscope
Histogram
SET

8
Use these settings to adjust the calibration of the Micro OLED Display.
BRIGHTNESS: [-100 to 100]
CONTRAST: [-100 to 100]
RED: [-100 to 100]
GREEN: [-100 to 100]
BLUE: [-100 to 100]
RGB: [-100 to 100]
GAMMA: [0.2 to 2.6]
• Your settings may be saved and recalled with the SAVE PRESET
and RECALL PRESET functions.
• Select RESTORE DEFAULT to restore factory default settings.
Display Calibration
DISPLAY CALIBRATION
BRIGHTNESS
CONTRAST
SATURATION
RED
GREEN
BLUE
RGB
GAMMA
RESTORE DEFAULT
IMAGE FLIP
SELECT PRESET
STORE PRESET
9
0
12
0
0
0
5
1.00
OFF

9
Import Custom LUT
• To import a custom LUT, insert a USB stick into the Gratical and select import custom
LUT from the LUT menu. Select the LUT you wish to import from the list of available
LUTs. Currently compatible with 1D LUTs (.cube, .csm file types)
Select Preset EVF LUT
• To use a preset LUT for the Gratical, select a LUT from the list of available preset LUTs.
Select Custom EVF LUT
• To select a custom LUT, you must first create or import a LUT to the Gratical. Once you
have imported a custom LUT, select a LUT from the list available custom LUTs.
Select Preset SDI Out LUT
• To use a preset LUT for the SDI Out, select a LUT from the list available preset LUTs.
Select Custom SDI Out LUT
• To select a custom LUT, you must first import a LUT to the Gratical. Once you have
imported a custom LUT, select a LUT from the list available custom LUTs.
Create LUT
• You can create your own LUT from within the CREATE CUSTOM LUT menu. Saved cus-
tom LUTs can be found in the SELECT CUSTOM LUT menu. Note that when preset LUTs
have been selected, you will be able to see the values of those LUTs in the CREATE
CUSTOM LUT menu. This allows you to tweak and modify the preset values. Saving an
altered version of a preset LUT will not overwrite the original.
LUTs
LUTS
IMPORT CUSTOM LUT
CREATE CUSTOM LUT
EXPORT CUSTOM LUT
SELECT PRESET EVF LUT
SELECT CUSTOM EVF LUT
(off)
SELECT PRESET SDI OUT LUT
SELECT CUSTOM SDI OUT LUT
(off)
PREVIOUS MENU

10
Color Bars
• The SMPTE HD, MACBETH, and BLUE ONLY features can be used to calibrate
your Gratical.
COLOR BARS
SMPTE HD
MACBETH
BLUE ONLY
PREVIOUS MENU
OFF
ON
OFF
COLOR BARS
SMPTE HD
MACBETH
BLUE ONLY
MONOCHROME
PREVIOUS MENU
OFF
ON
OFF
OFF
COLOR BARS
SMPTE HD
MACBETH
BLUE ONLY
MONOCHROME
PREVIOUS MENU
ON
OFF
OFF
OFF

11
Scopes
The Gratical offers three different scopes: Histogram, Waveform, and Vectorscope.
Histogram
• (Luminance): The luma Histogram shows all luminance values in the image, from
black to white.
• (RGB):The RGB Histogram shows histogram analyses for each color, Red, Green,
Blue. This lets you compare the relative distribution of each color.
• (Scale): Select to show the histogram in a linear or logarithmic scale.
Waveform (Luminance):
• Shows exposure in IRE at a given location in the image, left to right.
Vectorscope (Saturation):
• Measures the chrominance in the image, including saturation and hue.
Histogram Waveform Vectorscope

12
Scope Settings
• TOGGLE SCOPES: Select to toggle scopes ON/OFF.
All scopes off defaults image to the center.
• WAVEFORM/VECTORSCOPE: Select to toggle waveform or Vectorscope.
Only one can be active at a time.
• SCOPES LOCATION: Select to change the location of the scopes. Scopes can be
positioned on either the bottom or top of the image.
• SCOPES SOURCE: The scopes can reflect data based on the raw input signal from the
camera, pre LUT, or from a LUT applied image, POST LUT.
• See Function Buttons Section p18 to assign to a function button.
SCOPES
TOGGLE SCOPES
HISTOGRAM TYPE
HISTOGRAM SCALE
WAVEFORM
VECTORSCOPE
SCOPES LOCATION
SCOPES SOURCE
PREVIOUS MENU
ON
LUMA
LINEAR
ON
OFF
BOTTOM
PRE LUT

13
0<0 IRE1 02 03 04 05 06 07 08 09 0 100 >101 IRE
PINK
GREEN
BLUE
FUCHSIA
YELLOW
RED
Overlays
Note that all overlay features can only see pre LUT applied image. When using a LUT,
these features will work off the original, non LUT image.
False Color
• Select FALSE COLOR to see feature ON/OFF.
• Use False Color to aid in obtaining the correct exposure of your scene.
• The chart below may be used as a key to determine which area of your frame are
overexposed, underexposed, or exposed properly.
• Overexposed: Objects will be displayed RED.
• Properly Exposed: Objects will display in Pinks and Greens.
• Underexposed: Objects will display Blue to Dark Blue.
• See Function Buttons Section p18 to assign to a function button.
OVERLAYS
FALSE COLOR
FOCUS ASSIST
FOCUS ASSIST (ZEBRA)
FRAME LINE
NONE
TIME CODE
RECORD LIGHT
RECORD LIGHT TYPE
MENU SETTINGS
PREVIOUS MENU
ON
ON
ON
RED

14
Exposure Assist
(Zebras)
• ENABLE Select to see
feature ON/OFF.
• Select the HIGH IRE LEVEL
to change the exposure
level at which the zebra
lines will appear. This
value must be higher than
the LOW IRE LEVEL value
or you will receive a Zebra
setting error.
• Select the HIGH COLOR
to change the color of the
HIGH IRE LEVEL zebra lines.
• Select the LOW IRE LEVEL
to change the exposure level
at which the zebra lines will appear.
• Select the LOW COLOR to change the color of the LOW IRE LEVEL zebra lines.
• LOW IRE +/-: Select to adjust the range of the LOW IRE zebra, 1-25.
• See Function Buttons Section p18 to assign to a function button.
Focus Assist
(Red-Line)
• Select RED-LINE ENABLE to
see feature ON/OFF.
• Select COLOR to change
the color of the focus
assist lines.
• Select LEVEL to change
the intensity of the focus
assist lines.
PEAKING
• PEAKING ENABLE: Select
to toggle ON/OFF.
FOCUS ASSIST
RED-LINE ENABLE
COLOR
LEVEL
PEAKING ENABLE
LEVEL
ON
RED
2
OFF
3
EXPOSURE ASSIST (ZEBRA)
ENABLE
HIGH IRE LEVEL
HIGH COLOR
LOW IRE LEVEL
LOW IRE +/-
LOW COLOR
STRIDE
WIDTH
ON
100
WHT
70
10
BLK
12
4

15
Frame Line
• Select to choose the frame
lines and/or action safe lines you
wish to overlay on the image.
Time Code
• TIME CODE: Select to Toggle
time code ON/OFF
(SDI only feature)
Record Light
• RECORD LIGHT: Select to toggle
record light ON/OFF. This is an
SDI only feature and your camera
must have a record light trigger
enabled in its menu for the Gratical
to detect it.
• RECORD LIGHT TYPE: Select the
appropriate camera manufacturer for the type of camera you are using: Canon, Sony,
RED. If your camera manufacturer is not listed you can attempt to use one of the three
previously mentioned, or you can use the TIMECODE option. Please note that using the
TIMECODE option while your camera is set to free run time code may cause the record
light to also activate.
FRAME LINE
1.33:1 (4x3) SDTV
1.66:1 (15x9) European Theatrical
1.78:1 (16x9) HDTV
1.85:1 American Theatrical
2.40:1 Anamorphic Theatrical
2.66:1 Cinemascope
CENTER CROSS
3x3 GRID
OFF
OFF
OVERLAYS
FALSE COLOR
FOCUS ASSIST
FOCUS ASSIST (ZEBRA)
FRAME LINE
NONE
TIME CODE
RECORD LIGHT
RECORD LIGHT TYPE
MENU SETTINGS
PREVIOUS MENU
OFF
ON
OFF
RED

16
Menu Settings
• MENU LOCATION:
Select to move the
menu to one of six
locations.
• MENU TRANSPARENCY:
Select to set the menu
transparency, 1-5
Meters
(Audio & Battery)
• AUDIO METERS: Select
to toggle the Audio
Meters ON/OFF.
• BATTERY LEVEL: Select
to toggle Battery Meter
ON/OFF
METERS
AUDIO METERS
BATTERY LEVEL
PREVIOUS MENU
ON
ON

17
DSLR Scaling
• AUTO/PLAYBACK allows
the EVF to scale and format
the image by automatically
detecting the camera’s
output (Default)
• Choose CAMERA PRESETS
to activate an included
camera preset.
• When creating a user preset,
the ACTIVE VIDEO (Red Line)
represents what will be
shown full frame on the
screen while the
FRAME LINE (Green Line)
tells the Gratical where the
picture area of the recorded
video image will be.
• Creating a user preset may be useful if you are trying to view camera data on the screen while it’s scaled.
Pixel to Pixel
• Select ENABLE to see feature
On/Off. While ON, use the
joystick to scroll around
the image.
• Select CENTER to
re-center the picture
while zoomed in.
• Select PAN to change the
number of pixels at which
you will scroll while
zoomed in.
• See Function Buttons
Section p18 to assign
to a function button.
DSLR SCALING
AUTO / PLAYBACK
CAMERA PRESETS
CREATE USER PRESET
RECALL USER PRESET
OVER/UNDERSCAN OVERSCAN
VIDEO FORMAT:
SHOW DSLR SCALING
ON
PIXEL TO PIXEL (ZOOM)
ENABLE
CENTER
PAN RATE
ON
5

18
Anamorphic
• Select the anamorphic
de-squeeze factor
corresponding to your lens.
Frame Store
• Toggle Show ON/OFF to
display the stored frame in
the selected memory bank.
If no frame has been stored
in the selected bank, a
warning message will
appear “Frame (X) has
not been stored!”
• Within SHOW STYLE you
may choose for the saved
frame to be overlaid as
OPAQUE or TRANSP
allowing you to match up
your live video with the
stored frame.
• Toggle the CAPTURE menu to ON and you will be promoted with a message “Press any Function
button to store frame...” Press a Function button on the side of the EVF and a frame from the
current video on screen will be stored to the next available memory bank.
• See Function Buttons Section p18 to assign to a function button.
ANAMORPHIC CORRECTION
NORMAL
1.33x
1.5x
2x **
2x(4:3)
FRAME STORE
STORE NUMBER
SHOW
SHOW STYLE
CAPTURE
1
ON
OPAQUE
OFF

19
Function Buttons
• The Gratical has eight function
buttons that can be assigned by
the user. These include the four
buttons (F1, F2, F3, F4) and the
four directions of the joystick
(UP, DOWN, LEFT RIGHT).
Function buttons come
preprogrammed but can be
changed at any time.
• To change the function
assigned to each button, select
the function button you wish
to change. From the
subsequent menu, choose
the desired function you
wish to be assigned to the
function button. It can now be activated by pressing the appropriate function button on the side of
the Gratical without the use of the menu system.
• Function buttons can only be used when the menu is not displayed.
Lock Buttons
• Select to lock the Gratical’s
buttons. While locked, the
buttons will not respond to
user input. To unlock, push
in the joystick and hold for
5 seconds.
MAIN MENU
DISPLAY CALIBRATION
LUTS
COLOR BARS
SCOPES
OVERLAYS
METERS
PIXEL TO PIXEL (ZOOM)
DSLR SCALING [Auto/Playback]
ANAMORPHIC DE-SQUEEZE [NORMAL]
FRAME STORE
FUNCTION BUTTONS
USER FEATURES
LOCK BUTTONS
UPDATE
ABOUT
FUNCTION BUTTONS
CURRENT SETTINGS
F1 TOGGLE EVF SCOPES
F2 FALSE COLOR
F3 EXPOSURE ASSIST
F4 PIXEL TO PIXEL
UP FOCUS ASSIST
DN BATTERY LEVEL
LF None
RT TOGGLE WAVEFORM/VECTOR

20
Update
• To update your Gratical with
the latest firmware, first
format your USB thumb drive
to FAT32 on a PC, MD-DOS
on a Mac.
• Download the firmware update
from www.zacuto.com.
• Insert your USB drive into the
Gratical’s USB port, select
UPDATE from the menu and
select USB DRIVE. Select
START UPDATE and follow
the on screen instructions.
The current firmware version
can be confirmed in the
ABOUT menu.
About
•Choose ABOUT to view
the EVF firmware version
on your device.
•SYSTEM INFO is used for
developer and debugging.
Table of contents
Popular Digital Camera manuals by other brands

360 Vision
360 Vision Centurion Hybrid Installation & configuration manual

Kodak
Kodak M763 - EASYSHARE Digital Camera Extended user guide

Viewpro
Viewpro Z-Fusion pro user manual

Kodak
Kodak C610 - EXTENDED GUIDE user manual

Concord Camera
Concord Camera 6340z quick start guide

Sony
Sony ILCE-5000L Service manual