EN
Parts descripon (g. A)
1. Handle
2. Upper housing
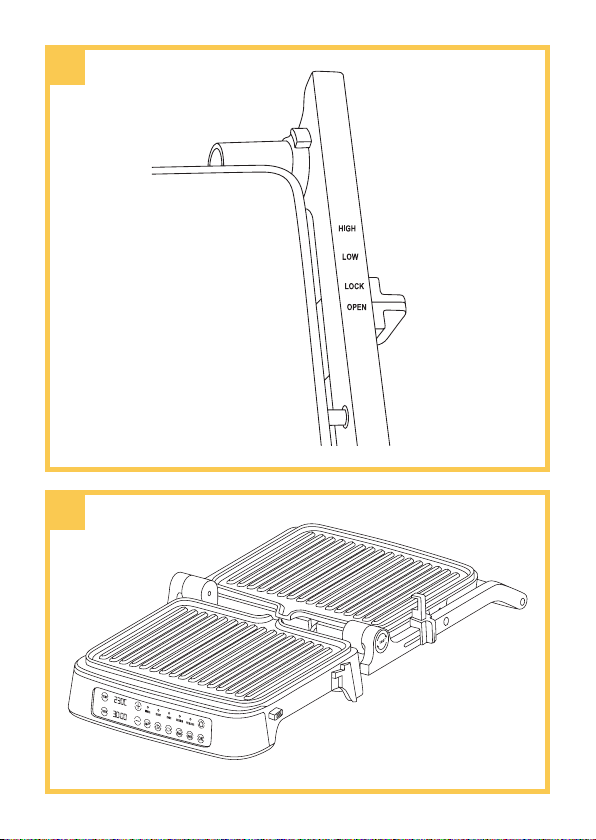
3. Height adjustment lever
4. Open grill funcon buon
5. Control panel
6. Non-sck grill plate
7. Grill plate release buons
8. Lower housing
9. Drip tray
Before rst use
1. Peel o and remove any packaging components.
2. Clean the grill plates with a damp cloth or sponge and warm
water.
3. Dry the device with a cloth or kitchen towel.
Note! Do not clean the device directly under a stream of running water.
Note! When using the device for the rst me, a slight smoke or
unpleasant smell is possible. This does not aect the safe use of the
device. Unpleasant smells will cease with the next use of the product.
Operang manual
1. Connect the device to a power source. The device will emit a
single sound and the switch (8, g. B) will light up.
2. Press the switch. The buons on the control panel ash.
3.
Press the buon of your choice, depending on the type of meal
you are preparing (9-13, g. B), then press the OK buon (14,
g. B) or wait for the programme to switch on by itself aer
about 5 seconds. The selected buon will light up white and
the POWER LED (3, Fig. B) will ash red.
4. The device will start pre-heang for approximately 4 minutes.
Aer this me, the device will beep three mes and the READY
LED (4, g. B) will light up green. The device is ready for use.
5.
You can set the me and temperature of your choice (see:
Time and temperature sengs) or use one of the 5 preloaded
automac programmes - steak, chicken, sh, toast, burger.
6. Open the upper housing of the device, place the meal on the
grill plate and close the upper housing.
7. By seng the height adjustment lever (3, g. A) to the desired
posion, you can select the degree of lt of the lid (HIGH - big,
or LOW - small), or close the device completely. When closed,