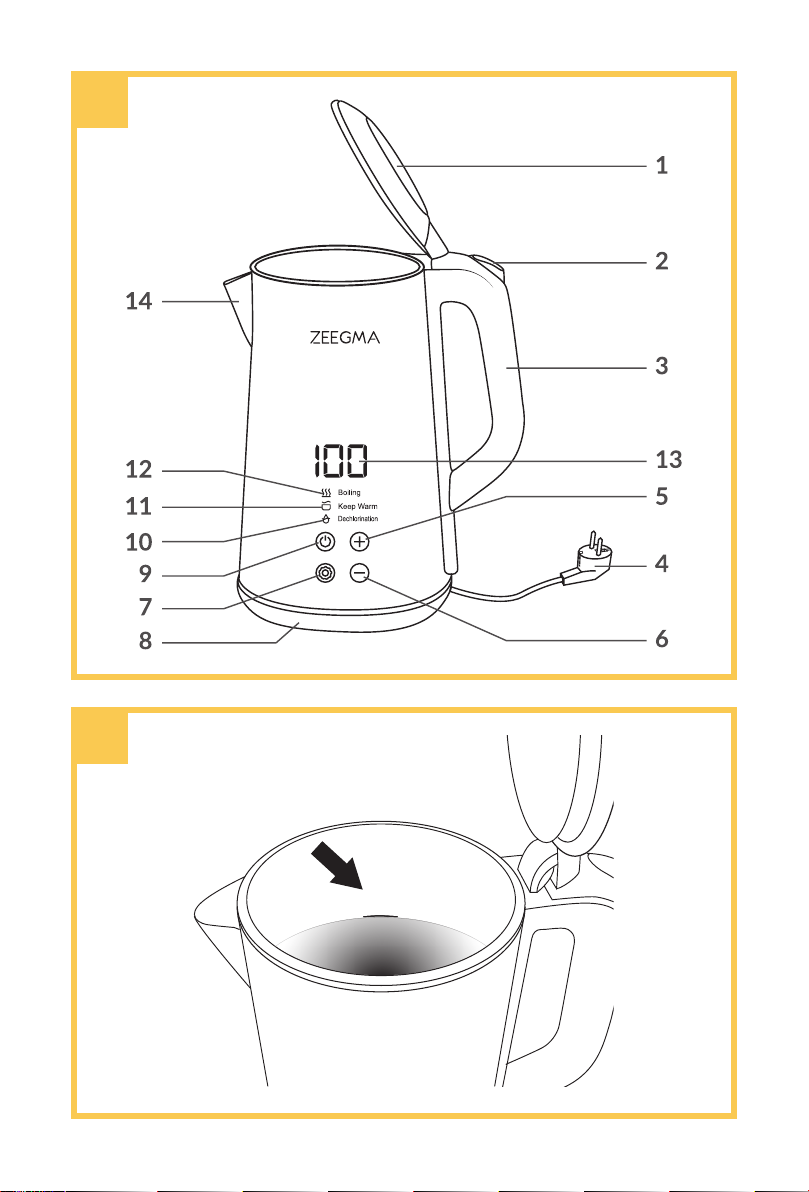
Zeegma Ketlee Control User manual

Ketlee
Control
EN | DE | PL | IT | FR | ES | NL | UA | LT | HR
User Manual | Bedienungsanleitung | Instrukcja obsługi | Manuale
d’uso | Manuel de l’Ulisateur | Manual de usuario | Handleiding |
Посібник користувача | Vartotojo vadovas | Korisnički priručnik

A
B
MAX

EN
3
Introducon
Dear customer!
Thank you for placing trust in us and choosing Zeegma.
We provide you with a product perfect for everyday use thanks to the use of high-
quality materials and modern soluons.
We are convinced that the product will sasfy your requirements as it has been
designed with utmost care.
Before you use the product, please read this manual carefully.
Should you have any remarks or quesons concerning the product, please do not
hesitate to contact us:
WARNINGS
Please read this instrucon manual before operang the device,
in order to familiarize yourself with its funcons and use it as
intended.
1.
This device can be used by children aged 8 years and
older, and persons with limited physical, sensory or mental
abilies or without experience and knowledge, if they are
supervised or instructed in the safe use of the device and
understand the risks involved.
2.
Cleaning and maintenance of the device must not be
undertaken by children unless they are at least 8 years old
and under the supervision of an adult. Keep the device and
its cord out of the reach of children under 8 years of age.
3. Children must not play with the device.
4.
The device is for domesc use only. Do not use it for other
purposes incompable with its intended use.
5. Do not operate the device when not lled with water.
6.
Do not pour water above the maximum level indicator.
This could damage the device, make it unstable, or cause
boiling water to escape.
7. Be careful and avoid spilling water on the power base.
8.
Only connect the device to a grounded outlet with the
characteriscs as indicated on the device label.
9. Do not open the lid when boiling water.
10.
Do not add water to the device while boiling water or
maintaining the temperature.

EN
4
11. NOTE: The lid must be closed so that steam can escape
through the spout, in the opposite direcon to the handle.
12. The kele may only be used on the supplied base.
13.
Risk of burns: the device generates high temperatures. Do
not touch hot parts of the device. The device may remain
hot aer use.
14. Do not immerse the device and its wires in water or any
other liquid.
15. Always disconnect the device from the power source and
allow it to cool down before cleaning and aer use.
16.
Do not use a damaged or malfunconing device or a device
with a damaged power cord or plug.
17. Do not repair or modify the device or the cable. This may
only be undertaken by an authorized service center.
18.
Use only original spare parts or those recommended by
the manufacturer.
19. Do not pull or carry the device by the cable. Do not place
any objects on it. Do not pull the cable over sharp edges
of walls and furniture and do not allow it to come into
contact with hot surfaces.
20. Store the device in a dry place, away from heat sources,
high temperatures, hot surfaces, direct sunlight, sources
of sparking, open ame.
21.
Use the product placed horizontally on a at and stable
surface.
22.
To ensure normal operaon, clean the kele regularly and
remove any scale or sediment from the boom.
NOTE! Hot surface - surfaces may become hot during use.
DESCRIPTION OF THE DEVICE (FIG. A)
1. Lid
2. Buon for opening the lid
3. Handle
4. Cable with plug
5. Buon to increase temperature
6. Buon to decrease temperature
7. Sengs
8. Power base
9. On/o switch
10. Water puricaon funcon
11.
Temperature maintenance funcon
12. Boiling water
13. Temperature
14. Spout

EN
5
FIRST USE
When using the device for the rst me or for the rst me aer a long break, it is
recommended to ll it with water up to the maximum allowed water level (g. B) and
to boil the water 1-2 mes. Water boiled the rst 1-2 mes should be discarded.
USE AND FUNCTIONS
• Place the device on a at and stable surface.
• Connect the device to a power source. The device will beep and the on/o
switch icon (6, g. A) will ash. The device is now in standby mode.
• Start the device by pressing the on/o switch icon (9, g. A). Then select one
of the available opons - boiling water, maintaining temperature or purifying
water.
•
Press the on/o switch icon (9, g. A) to switch the device o at any me
during operaon.
BOILING WATER
• Press the sengs icon (7, g. A) to select boiling water (12, g. A).
• Use the plus and minus icons (5, 6, g. A) to set the temperature you want
the water to reach. The temperature can be increased or decreased in 5°C
increments.
• Aer a few seconds the water will start to boil. The device will automacally
switch o when the water boils.
MAINTAINING THE TEMPERATURE
• Press the sengs icon twice (7, g. A), then select temperature maintenance
in the display (11, g. A). The device will automacally enter the current water
temperature maintenance mode.
•
If you wish to increase the maintained temperature, use the plus buon (5, g.
A). The water will then start to boil unl the selected temperature is reached.
• If you wish to reduce the temperature maintained, use the minus buon (6,
g. A).
WATER PURIFICATION - DECHLORINATION
• Fill the kele with water to a maximum of 3/4 volume.
•
Press the sengs icon (7, g. A) and then select water puricaon on the
display (10, g. A). The water will boil and then enter water puricaon mode
for approximately 5 minutes.
•
When the puricaon process is complete, the kele enters temperature
maintenance mode.
CLEANING AND MAINTENANCE
• To ensure normal operaon, clean the kele regularly and remove any scale
or sediment from the boom.
•
Before cleaning the device, make sure it is disconnected from the power
source. Allow the device to cool down.
•
Wipe the outside of the kele with a so, damp cloth and allow to dry
completely.

EN
6
•
To remove scale, use a commercially available descaling product following the
instrucons on the packaging, or use white vinegar.
• Clean the tank using a 1:1 soluon of vinegar and water. Fill the tank at least
halfway and sr the soluon to cover the enre inside. Leave the soluon in
the kele for about 8 hours.
• Pour out the soluon and ll the kele with fresh water. Boil and pour the
water 4-5 mes.
• Make sure all parts are completely dry.
• Never use abrasive cleaners or strong chemicals to clean the kele.
Photos are for illustrave purposes only, the actual appearance of the products may dier
from the photos.

DE
7
Einführung
Sehr geehrter Kunde!
Wir möchten uns bei Ihnen bedanken, dass Sie uns vertraut und die Zeegma-Marke
gewählt haben.
Wir übergeben Ihnen das Produkt, dass sich dank hochqualitaver Materialien und
moderner technologischer Lösungen in dem täglichen Bedarf perfekt bewährt.
Wir sind sicher, dass die sehr sorgfälge Ausführung Ihre Anforderungen erfüllt.
Vor der Verwendung des Produkts machen Sie sich mit der vorliegenden
Bedienungsanleitung vertraut.
Falls Sie Anmerkungen oder Fragen haben, setzen Sie sich mit uns in Verbindung:
WARNHINWEISE
Bie lesen Sie diese Bedienungsanleitung, bevor Sie das Gerät
in Betrieb nehmen, um sich mit seinen Funkonen vertraut zu
machen und es besmmungsgemäß zu verwenden.
1. Dieses Gerät kann von Kindern ab 8 Jahren und Personen
mit eingeschränkten körperlichen, sensorischen oder
geisgen Fähigkeiten oder ohne Erfahrung und Kenntnisse
benutzt werden, wenn sie beaufsichgt oder in die sichere
Benutzung des Geräts eingewiesen werden und die damit
verbundenen Risiken verstehen.
2.
Die Reinigung und Wartung des Geräts darf nicht von
Kindern durchgeführt werden, es sei denn, sie sind
mindestens 8 Jahre alt und werden von einem Erwachsenen
beaufsichgt. Bewahren Sie das Gerät und sein Kabel
außerhalb der Reichweite von Kindern unter 8 Jahren auf.
3. Kinder dürfen nicht mit dem Gerät spielen.
4.
Das Gerät ist nur für den Hausgebrauch bestimmt.
Verwenden Sie es nicht für andere Zwecke, die mit dem
vorgesehenen Verwendungszweck nicht kompabel sind.
5.
Starten Sie das Gerät nicht, wenn es nicht mit Wasser
gefüllt ist.
6.
Füllen Sie kein Wasser über die Höchststandanzeige hinaus
ein. Andernfalls kann das Gerät beschädigt werden, instabil
werden oder es kann kochendes Wasser austreten.
7. Seien Sie vorsichg und vermeiden Sie es, Wasser auf die
Basis mit der Stromversorgung zu schüen.

DE
8
8.
Das Gerät darf nur an eine geerdete Steckdose angeschlossen
werden, deren Eigenschaen den, auf dem Eke des
Geräts angegebenen Werten entsprechen.
9. Önen Sie den Deckel nicht, während das Wasser kocht.
10. Füllen Sie kein Wasser in das Gerät, während Sie Wasser
kochen oder die Temperatur halten.
11.
ACHTUNG! Der Deckel muss geschlossen sein, damit
der Dampf entgegengesetzt zum Gri durch die Tülle
entweichen kann.
12.
Der Wasserkocher darf nur auf der mitgelieferten Basis
verwendet werden.
13.
Verbrennungsgefahr: Das Gerät erzeugt hohe Temperaturen.
Berühren Sie keine heißen Teile des Geräts. Das Gerät kann
nach dem Gebrauch noch heiß sein.
14.
Tauchen Sie das Gerät und seine Kabel nicht in Wasser
oder eine andere Flüssigkeit.
15.
Trennen Sie das Gerät vor der Reinigung und nach dem
Gebrauch immer vom Stromnetz und lassen Sie es abkühlen.
16.
Verwenden Sie kein beschädigtes oder defektes Gerät oder
eines mit beschädigtem Netzkabel oder Stecker.
17.
Reparieren oder modizieren Sie das Gerät oder das
Kabel nicht. Dies darf nur von einer autorisierten
Kundendienststelle durchgeführt werden.
18.
Verwenden Sie nur originale oder vom Hersteller
empfohlene Ersatzteile.
19.
Ziehen oder tragen Sie das Gerät nicht an der Schnur. Legen
Sie keine Gegenstände auf das Gerät. Ziehen Sie das Kabel
nicht über scharfe Kanten von Wänden und Möbeln und
achten Sie darauf, dass es nicht mit heißen Oberächen
in Berührung kommt.
20.
Lagern Sie das Gerät an einem trockenen Ort, fern von
Wärmequellen, hohen Temperaturen, heißen Oberächen,
direkter Sonneneinstrahlung, Funkenquellen und oenen
Flammen.
21. Verwenden Sie das Produkt waagerecht auf einer achen
und stabilen Oberäche.

DE
9
22.
Um den normalen Betrieb des Geräts zu gewährleisten,
reinigen Sie den Wasserkocher regelmäßig und enernen
Sie Kalk und Ablagerungen vom Boden.
ACHTUNG! Heiße Oberächen - die Oberächen können während des
Gebrauchs heiß werden.
BESCHREIBUNG DES GERÄTS (ABB. A)
1. Deckel
2. Knopf zum Önen des Deckels
3. Gri
4. Kabel mit Stecker
5.
Taste zum Erhöhen der Temperatur
6. Taste zum Senken der Temperatur
7. Einstellungen
8. Stromanschluss
9. Ein/Aus-Schalter
10. Wasserreinigungsfunkon
11. Funkon Temperatur halten
12. Funkon Wasser kochen
13. Temperatur
14. Ausguss
ERSTE BENUTZUNG
Wenn Sie das Gerät zum ersten Mal oder zum ersten Mal nach einer längeren Pause
benutzen, wird empfohlen, es bis zum maximal zulässigen Wasserstand mit Wasser
zu füllen (Abb. B) und das Wasser 1-2 Mal zum Kochen zu bringen. Das Wasser,
das die ersten 1-2 Male abgekocht wurde, sollte verworfen werden.
ANWENDUNG UND FUNKTIONEN
• Stellen Sie das Gerät auf eine ache und stabile Oberäche.
•
Schließen Sie das Gerät an eine Stromquelle an. Das Gerät gibt einen Signalton
ab und das Ein/Aus-Symbol (6, Abb. A) blinkt. Das Gerät bendet sich nun
im Standby-Modus.
•
Starten Sie das Gerät, indem Sie auf das Symbol des Ein/Aus-Schalters (9,
Abb. A) drücken. Wählen Sie dann eine der verfügbaren Oponen - Wasser
kochen, Temperatur halten oder Wasser reinigen.
• Um das Gerät während des Betriebs jederzeit auszuschalten, drücken Sie auf
das Ein/Aus-Symbol (9, Abb. A).
WASSER KOCHEN
• Drücken Sie das Einstellungssymbol (7, Abb. A), um kochendes Wasser (12,
Abb. A) auszuwählen.
•
Verwenden Sie die Plus- und Minus-Symbole (5, 6, Abb. A), um die Temperatur
einzustellen, die das Wasser erreichen soll. Die Temperatur kann in 5°C-Schrien
erhöht oder gesenkt werden.
• Nach ein paar Sekunden beginnt das Wasser zu kochen. Das Gerät schaltet
sich automasch aus, sobald das Wasser kocht.
HALTEN DER TEMPERATUR
• Drücken Sie zweimal auf das Einstellungssymbol (7, Abb. A) und wählen Sie
dann auf dem Display (11, Abb. A) die Funkon Temperatur halten. Das Gerät
wechselt automasch in den Modus zur Aufrechterhaltung der aktuellen
Wassertemperatur.

DE
10
•
Wenn Sie die gehaltene Temperatur erhöhen möchten, verwenden Sie die
Plustaste (5, Abb. A). Das Wasser beginnt dann sich zu erhitzen, bis die gewählte
Temperatur erreicht ist.
•
Wenn Sie den Wert der gehaltenen Temperatur verringern möchten, verwenden
Sie die Minustaste (6, Abb. A).
WASSERREINIGUNG - ENTCHLORUNG
• Füllen Sie den Wasserkocher zu maximal 3/4 mit Wasser.
•
Drücken Sie das Einstellungssymbol (7, Abb. A) und wählen Sie dann
Wasserreinigung im Display (10, Abb. A). Das Wasser kocht und geht dann
für ca. 5 Minuten in den Wasserreinigungsmodus über.
• Sobald der Reinigungsvorgang abgeschlossen ist, geht der Wasserkocher in
den Temperaturerhaltungsmodus über.
REINIGUNG UND PFLEGE
•
Um den normalen Betrieb des Geräts zu gewährleisten, reinigen Sie den
Wasserkocher regelmäßig und enernen Sie Kalk und Ablagerungen vom
Boden.
•
Vergewissern Sie sich vor der Reinigung des Geräts, dass es von der Stromquelle
getrennt ist. Lassen Sie das Gerät abkühlen.
•
Wischen Sie die Außenseite des Wasserkochers mit einem weichen, feuchten
Tuch ab und lassen Sie ihn vollständig trocknen.
•
Um Kalkablagerungen zu entfernen, verwenden Sie handelsübliche
Kalkenerner gemäß der Bedienungsanleitung auf der Verpackung oder
verwenden Sie hellen Essig.
• Reinigen Sie den Behälter mit einer 1:1-Essig-Wasser-Lösung. Füllen Sie den
Behälter mindestens zur Häle und rühren Sie die Lösung um, damit das
gesamte Innere bedeckt ist. Lassen Sie die Lösung etwa 8 Stunden lang im
Wasserkocher stehen.
•
Gießen Sie die Lösung aus und füllen Sie den Wasserkocher mit frischem
Wasser. Kochen Sie das und gießen Sie das Wasser 4-5 Mal weg.
• Stellen Sie sicher, dass alle Teile vollständig trocken sind.
•
Verwenden Sie zum Reinigen des Wasserkochers niemals Scheuermiel oder
starke Chemikalien.
Die Fotos dienen nur zur Veranschaulichung. Das tatsächliche Aussehen der Produkte
kann von den Abbildungen abweichen.

PL
11
Wprowadzenie
Drogi Kliencie!
Dziękujemy za obdarzenie nas zaufaniem i wybranie marki Zeegma.
Oddajemy w Twoje ręce produkt idealny do codziennego użytkowania dzięki
wykorzystaniu wysokiej jakości materiałów i nowoczesnych rozwiązań technicznych.
Jesteśmy pewni, że ogromna staranność wykonania sprawi, że spełni on Twoje
wymagania.
Przed użyciem produktu zapoznaj się dokładnie z poniższą instrukcją obsługi.
Jeśli masz jakiekolwiek uwagi lub pytania do zakupionego produktu, skontaktuj
się z nami:
OSTRZEŻENIA
Prosimy o przeczytanie tej instrukcji przed przystąpieniem
do obsługi urządzenia, w celu zapoznania się z jego funkcjami
i wykorzystania go zgodnie z przeznaczeniem.
1.
To urządzenie może być używane przez dzieci w wieku
8 lat i starsze, oraz osoby o ograniczonych zdolnościach
fizycznych, sensorycznych lub umysłowych lub bez
doświadczenia i wiedzy, jeśli są nadzorowane lub
poinstruowane w zakresie bezpiecznego użytkowania
urządzenia i rozumieją związane z tym zagrożenia.
2.
Czyszczenie i konserwacja urządzenia nie mogą być
dokonywane przez dzieci, chyba że ukończyły one 8 lat
i są pod nadzorem osoby dorosłej. Przechowuj urządzenie
i jego przewód poza zasięgiem dzieci w wieku poniżej 8 lat.
3. Dzieci nie mogą bawić się urządzeniem.
4.
Urządzenie służy wyłącznie do użytku domowego. Nie
należy używać go do innych celów, niezgodnych z jego
przeznaczeniem.
5.
Nie należy uruchamiać urządzenia nienapełnionego wodą.
6.
Nie należy nalewać wody powyżej wskaźnika maksymalnego
poziomu. Może to spowodować uszkodzenie urządzenia,
jego niestabilne działanie, lub wydostanie się gotującej
wody na zewnątrz.
7.
Należy zachować ostrożność i unikać rozlania wody na
podstawę zasilającą.
8.
Urządzenie należy podłączać wyłącznie do gniazdka

PL
12
z uziemieniem o charakterystyce zgodnej z wartościami
podanymi na etykiecie urządzenia.
9. Nie otwieraj pokrywy podczas gotowania wody.
10.
Nie dodawaj wody do urządzenia w trakcie gotowania
wody lub utrzymywania temperatury.
11.
UWAGA: Pokrywa musi być zamknięta, aby para mogła
wydostać się przez dzióbek, w kierunku przeciwnym do
uchwytu.
12.
Czajnik może być używany wyłącznie na dołączonej podstawie.
13.
Ryzyko poparzenia: urządzenie generuje wysokie
temperatury. Nie należy dotykać gorących elementów
urządzenia. Urządzenie może pozostać gorące po użyciu.
14. Nie zanurzaj urządzenia i jego przewodów w wodzie lub
w żadnym innym płynie.
15.
Przed czyszczeniem oraz po zakończeniu korzystania
z urządzenia należy zawsze odłączyć urządzenie od źródła
zasilania i pozostawić do ostygnięcia.
16. Nie używaj urządzenia uszkodzonego lub nieprawidłowo
działającego ani urządzenia z uszkodzonym przewodem
zasilającym lub wtyczką.
17.
Nie należy naprawiać oraz dokonywać modyfikacji
urządzenia oraz przewodu. Czynności te może wykonywać
tylko autoryzowany serwis.
18.
Używaj wyłącznie oryginalnych lub rekomendowanych
przez producenta części zamiennych.
19.
Nie ciągnij i nie przenoś urządzenia trzymając za przewód.
Nie kładź na nim żadnych przedmiotów. Nie przeciągaj
przewodu przez ostre krawędzie ścian i mebli oraz nie
pozwalaj by stykał się z gorącymi powierzchniami.
20.
Przechowuj urządzenie w suchym miejscu, z dala od
źródeł ciepła, wysokich temperatur, gorących powierzchni,
bezpośredniego światła słonecznego, źródeł iskrzenia,
otwartego ognia.
21.
Należy korzystać z produktu ustawionego poziomo na
płaskiej i stabilnej powierzchni.
22.
Aby zapewnić normalne działanie urządzenia, należy
regularnie czyścić czajnik i usuwać kamień lub osad z dna.

PL
13
UWAGA! Gorąca powierzchnia - powierzchnie mogą się nagrzewać podczas
użytkowania.
OPIS URZĄDZENIA (RYS. A)
1. Pokrywa
2. Przycisk otwierania pokrywy
3. Uchwyt
4. Przewód z wtyczką
5.
Przycisk do zwiększania temperatury
6. Przycisk do zmniejszania
temperatury
7. Ustawienia
8. Podstawa zasilająca
9. Włącznik / wyłącznik
10. Funkcja oczyszczania wody
11.
Funkcja utrzymywania temperatury
12. Gotowanie wody
13. Temperatura
14. Dzióbek
PIERWSZE UŻYCIE
W przypadku użytkowania urządzenia po raz pierwszy lub po raz pierwszy po
dłuższej przerwie zalecane jest napełnienie go wodą do maksymalnego dozwolonego
poziomu wody (rys. B) oraz zagotowanie wody 1-2 razy. Wodę zagotowaną pierwsze
1-2 razy należy wylać.
UŻYTKOWANIE I FUNKCJE
• Umieść urządzenie na płaskiej i stabilnej powierzchni.
• Podłącz urządzenie do źródła zasilania. Urządzenie wyda sygnał dźwiękowy,
a ikona włącznika/wyłącznika (6, rys. A) będzie migać. Urządzenie jest teraz
w trybie czuwania.
•
Uruchom urządzenie wciskając ikonę włącznika/wyłącznika (9, rys. A).
Następnie wybierz jedną z dostępnych opcji – gotowanie wody, utrzymywanie
temperatury lub oczyszczanie wody.
•
Aby wyłączyć urządzenie w dowolnej chwili jego działania, należy wcisnąć
ikonę włącznika/wyłącznika (9, rys. A).
GOTOWANIE WODY
• Wciśnij ikonę ustawień (7, rys. A), aby wybrać gotowanie wody (12, rys. A).
• Za pomocą ikon plus i minus (5, 6, rys. A) ustaw temperaturę, jaką osiągnąć
ma woda. Temperaturę można zwiększyć lub zmniejszyć co 5°C.
•
Po paru sekundach woda zacznie się gotować. Urządzenie wyłączy się
automatycznie po zagotowaniu wody.
UTRZYMYWANIE TEMPERATURY
• Wciśnij ikonę ustawień dwukrotnie (7, rys. A), a następnie na wyświetlaczu
wybierz utrzymywanie temperatury (11, rys. A). Urządzenie automatycznie
przejdzie w tryb utrzymywania aktualnej temperatury wody.
•
Jeśli chcesz zwiększyć wartość utrzymywanej temperatury, użyj przycisku plus
(5, rys. A). Woda zacznie się wówczas gotować, aż do osiągnięcia wybranej
temperatury.
•
Jeśli chcesz zmniejszyć wartość utrzymywanej temperatury, użyj przycisku
minus (6, rys. A).

PL
14
OCZYSZCZANIE WODY – DECHLORYZACJA
• Napełnij czajnik wodą do maksymalnie 3/4 objętości.
•
Wciśnij ikonę ustawień (7, rys. A), a następnie na wyświetlaczu wybierz
oczyszczanie wody (10, rys. A). Woda zagotuje się, a następnie przejdzie
w tryb oczyszczania wody na ok. 5 minut.
•
Po zakończonym procesie oczyszczania czajnik przechodzi w tryb utrzymywania
temperatury.
CZYSZCZENIE I KONSERWACJA
•
Aby zapewnić normalne działanie urządzenia, należy regularnie czyścić czajnik
i usuwać kamień lub osad z dna.
•
Przed przystąpieniem do czyszczenia urządzenia, upewnij się, że jest ono
odłączone od źródła zasilania. Poczekaj, aż urządzenie ostygnie.
•
Zewnętrzną część czajnika należy przecierać miękką, wilgotną szmatką
i pozostawiać do całkowitego wyschnięcia.
•
Aby usunąć kamień, skorzystaj z dostępnych na rynku preparatów do usuwania
kamienia, postępując zgodnie z instrukcją na opakowaniu, lub użyj białego octu.
• Wyczyść zbiornik używając roztworu octu z wodą w stosunku 1:1. Napełnij
zbiornik co najmniej do połowy i mieszaj roztwór tak, aby pokryć całe jego
wnętrze. Pozostaw roztwór w czajniku na ok. 8 godzin.
• Wylej roztwór i napełnij czajnik świeżą wodą. Zagotuj i wylej wodę 4-5 razy.
• Upewnij się, że wszystkie części są całkowicie suche.
•
Nigdy nie używaj ściernych środków czyszczących ani silnych środków
chemicznych do czyszczenia czajnika.
Zdjęcia mają charakter poglądowy, rzeczywisty wygląd produktów może różnić się od
prezentowanego na zdjęciach.

IT
15
Introduzione
Genle Cliente!
Grazie per aver riposto in noi la Vostra ducia e aver scelto prodoo di un marchio
Zeegma.
Vi oriamo un prodoo ideale per l’uso quodiano grazie all’impiego di materiali
di alta qualità e soluzioni tecniche moderne.
Siamo sicuri che la grande cura della lavorazione lo renderà conforme alle vostre
esigenze.
Prima di ulizzare il prodoo, leggere aentamente il seguente manuale d’uso.
Se hai commen o domande su un prodoo acquistato, contaaci:
AVVERTENZE
Prima di ulizzare il disposivo, si prega di leggere questo
manuale di istruzioni per familiarizzare con le sue funzioni e
l’ulizzo per la desnazione d’uso prevista.
1.
Questo disposivo può essere ulizzato da bambini di
età pari o superiore a 8 anni e da persone con limitate
capacità siche, sensoriali o mentali o senza esperienza e
conoscenza, se supervisionate o addestrate in relazione
all’ulizzo del disposivo in modo sicuro e dopo aver
compreso i rischi connessi all’ulizzo del disposivo.
2. La pulizia e la manutenzione del disposivo non possono
essere eseguite da bambini, a meno che ques non abbiano
almeno 8 anni e siano soo la supervisione di un adulto.
Conservare il disposivo ed il suo cavo fuori dalla portata
di bambini di età inferiore a 8 anni.
3. Ai bambini non è consento giocare con il disposivo.
4.
Il dispositivo è destinato esclusivamente per l’uso
domesco. Non ulizzare il disposivo per altre applicazioni,
incompabili con la desnazione d’uso prevista.
5.
Non accendere il disposivo prima di aver versato dell’acqua
al suo interno.
6.
Nel versare l’acqua all’interno del disposivo, non superare
il livello massimo. Ciò potrebbe causare danni al disposivo,
funzionamento instabile o fuoriuscita di acqua bollente.
7.
Fare aenzione ed evitare di versare acqua sulla base di
alimentazione.

IT
16
8. Il disposivo deve essere collegato solo a una presa con
messa a terra, con parametri conformi con i valori indica
sull’echea del disposivo.
9. Non aprire il coperchio mentre viene riscaldata l’acqua.
10.
Non aggiungere acqua al disposivo durante il riscaldamento
dell’acqua o durante il mantenimento della temperatura.
11.
ATTENZIONE: Il coperchio deve essere chiuso in modo
che il vapore possa uscire araverso il beccuccio, nella
direzione opposta all’impugnatura.
12.
Il bollitore può essere ulizzato solo sulla base fornita
assieme al disposivo.
13.
Rischio di usoni: il disposivo raggiunge temperature
elevate. Non toccare le par calde del disposivo. Il
disposivo potrebbe rimanere caldo dopo l’uso.
14.
Non immergere il disposivo e i suoi cavi in acqua o in
qualsiasi altro liquido.
15.
Prima della pulizia e dopo aver terminato l’ulizzo, scollegare
sempre il disposivo dalla sorgente di alimentazione e
lasciarlo rareddare.
16.
Non ulizzare un disposivo danneggiato o malfunzionante
o un disposivo con un cavo di alimentazione o una spina
danneggiata.
17.
Non riparare o modicare il disposivo o il suo cavo.
Queste avità possono essere svolte solo da un centro
di assistenza autorizzato.
18.
Ulizzare esclusivamente ricambi originali o raccomanda
dal produore del disposivo.
19.
Non rare o trasportare il disposivo tendendolo per il
cavo. Non posizionare ogge sul disposivo. Non condurre
il cavo lungo spigoli vivi di pare e mobili e non lasciarlo
entrare in contao con superci calde.
20. Conservare il disposivo in un luogo asciuo, lontano da
sorgen di calore, temperature elevate, superci calde, luce
solare direa, sorgen di scinlle, amme libere.
21. Ulizzare il prodoo posizionato orizzontalmente su una
supercie piana e stabile.
22.
Per assicurare il normale funzionamento del disposivo

IT
17
è necessario pulire regolarmente il bollitore e rimuovere
incrostazioni o sedimen dal fondo.
ATTENZIONE! Supercie calda: le superci possono riscaldarsi durante l’uso.
DESCRIZIONE DEL DISPOSITIVO (FIG. A)
1. Coperchio
2. Pulsante di apertura del coperchio
3. Impugnatura
4. Cavo con spina
5.
Pulsante per l’aumento della
temperatura
6.
Pulsante per la diminuzione della
temperatura
7. Impostazioni
8. Base di alimentazione
9. Interruore ON/OFF
10.
Funzione di puricazione dell’acqua
11.
Funzione di mantenimento della
temperatura
12. Riscaldamento dell’acqua
13. Temperatura
14. Beccuccio
PRIMO UTILIZZO
Quando si ulizza il disposivo per la prima volta o per la prima volta dopo una pausa
prolungata, si consiglia di riempirlo con acqua al livello massimo consento (g. B)
e far bollire l’acqua 1-2 volte. L’acqua bollita le prime 1-2 volte deve essere versata.
UTILIZZO E FUNZIONALITÀ
• Posizionare il disposivo su una supercie piana e stabile.
•
Collegare il disposivo ad una sorgente di alimentazione. Il disposivo emee
un segnale acusco e l’icona di accensione/spegnimento (6, g. A) lampeggia.
Il disposivo è ora in modalità standby.
• Avviare il disposivo premendo l’icona ON/OFF (9, g. A). Quindi scegliere
una delle opzioni disponibili: acqua bollente, mantenimento della temperatura
o puricazione dell’acqua.
•
Per spegnere il disposivo in qualsiasi momento durante il suo funzionamento,
premere l’icona ON/OFF (9, g. A).
RISCALDAMENTO DELL’ACQUA
•
Premere l’icona delle impostazioni (7, g. A) per selezionare riscaldamento
dell’acqua (12, g. A).
•
Ulizzando le icone più e meno (5, 6, g. A), impostare la temperatura che
l’acqua deve raggiungere. La temperatura può essere aumentata o diminuita
ogni 5°C.
•
Dopo alcuni secondi, l’acqua inizierà a bollire. Il disposivo si spegnerà
automacamente quando l’acqua bolle.
MANTENIMENTO DELLA TEMPERATURA
•
Premere due volte l’icona delle impostazioni (7, g. A), quindi selezionare
Mantenimento della temperatura sul display (11, g. A). Il disposivo passerà
automacamente in modalità di mantenimento della temperatura corrente
dell’acqua.
• Se si desidera aumentare il valore della temperatura mantenuta, ulizzare il

IT
18
pulsante più (5, g. A). L’acqua inizierà quindi a bollire no al raggiungimento
della temperatura selezionata.
•
Se si desidera diminuire il valore della temperatura mantenuta, ulizzare il
pulsante meno (6, g. A).
DEPURAZIONE DELL’ACQUA – DECLORAZIONE
• Riempire il bollitore con acqua no ad un massimo di 3/4 della capacità.
• Premere l’icona delle impostazioni (7, g. A), quindi selezionare la funzione di
depurazione dell’acqua sul display (10, g. A). L’acqua bollirà, poi il bollitore
entrerà in modalità di modalità di depurazione dell’acqua per circa 5 minu.
•
Al termine del processo di depurazione, il bollitore entrerà in modalità di
mantenimento della temperatura.
PULIZIA E MANUTENZIONE
•
Per assicurare il normale funzionamento del disposivo è necessario pulire
regolarmente il bollitore e rimuovere incrostazioni o sedimen dal fondo.
•
Prima di pulire il disposivo, assicurarsi che sia scollegato dalla sorgente di
alimentazione. Aendere che il disposivo si rareddi.
•
La parte esterna del bollitore deve essere pulita con un panno morbido e
umido, e lasciata asciugare completamente.
•
Per rimuovere il calcare, ulizzare prepara disincrostan disponibili in
commercio, seguendo le istruzioni riportate sulla confezione o ulizzare
aceto bianco.
•
Pulire il serbatoio con una soluzione 1:1 di aceto e acqua. Riempire il serbatoio
almeno a metà e mescolare la soluzione in modo da coprire l’intero serbatoio.
Lasciare la soluzione nel bollitore per circa 8 ore.
•
Versare la soluzione e riempire il bollitore con acqua fresca. Far bollire e
versare acqua 4-5 volte.
• Assicurarsi che tue le par siano completamente asciue.
•
Per la pulizia del bollitore non ulizzare mai detergen abrasivi o sostanze
chimiche for.
Le immagini hanno caraere illustravo, l’aspeo reale dei prodo può dierire da quello
presentato nelle immagini.

FR
19
Introducon
Cher client!
Merci de nous faire conance et de choisir Zeegma.
Nous vous orons un produit idéalement adapté pour un usage quodien grâce à
l’ulisaon de matériaux de haute qualité et de soluons techniques modernes.
Nous sommes sûrs qu’il répondra à vos exigences grâce au grand soin apporté à
sa fabricaon.
Veuillez lire aenvement les instrucons suivantes avant d’uliser le produit.
Si vous avez des commentaires ou des quesons sur le produit que vous avez
acheté, veuillez nous contacter :
AVERTISSEMENTS
Veuillez lire ce mode d’emploi avant d’uliser l’appareil an de
vous familiariser avec ses foncons et de l’uliser comme prévu.
1.
Cet appareil peut être ulisé par des enfants âgés de 8
ans et plus, ainsi que par des personnes dont les capacités
physiques, sensorielles ou mentales sont limitées ou qui
manquent d’expérience et de connaissances, à condion
qu’elles soient supervisées ou qu’elles aient reçu des
instrucons concernant l’ulisaon sûre de l’appareil et
qu’elles comprennent les risques encourus.
2.
Le neoyage et l’entreen de l’appareil ne doivent pas être
eectués par des enfants âgés d’au moins 8 ans et sous
la surveillance d’un adulte. Gardez l’appareil et son câble
hors de portée des enfants de moins de 8 ans.
3. Les enfants ne doivent pas jouer avec l’appareil.
4.
L’appareil est desné à un usage domesque uniquement.
Il ne doit pas être ulisé à d’autres ns incompables avec
l’usage auquel il est desné.
5.
Ne meez pas l’appareil en marche s’il n’est pas rempli
d’eau.
6.
Ne versez pas d’eau au-delà de l’indicateur de niveau
maximum. Cela peut endommager l’appareil, le rendre
instable ou provoquer des fuites d’eau bouillante.
7. Prenez des précauons et évitez de renverser de l’eau sur
la base d’alimentaon.
8. L’appareil ne doit être raccordé qu’à une prise de courant

FR
20
avec mise à la terre dont les caractérisques sont conformes
aux valeurs indiquées sur l’équee de l’appareil.
9. N’ouvrez pas le couvercle pendant que l’eau bout.
10.
N’ajoutez pas d’eau dans l’appareil pendant que vous faites
bouillir de l’eau ou que vous maintenez la température.
11. ATTENTION : Le couvercle doit être fermé de manière à
ce que la vapeur puisse s’échapper par le bec verseur, dans
le sens opposé à la poignée.
12. La bouilloire ne peut être ulisée que sur le socle fourni.
13.
Risque de brûlures : l’appareil génère des températures
élevées. Ne touchez pas les pares chaudes de l’appareil.
L’appareil peut rester chaud après ulisaon.
14. N’immergez pas l’appareil et ses câbles dans l’eau ou tout
autre liquide.
15.
Débranchez toujours l’appareil de la source d’alimentaon
et laissez-le refroidir avant de le neoyer et après l’avoir
ulisé.
16.
N’ulisez pas un appareil endommagé ou présentant un
dysfonconnement, ou dont le cordon d’alimentaon ou
la che est endommagé.
17.
Ne réparez ou modifiez pas l’appareil ou le cordon
d’alimentaon. Ces opéraons ne peuvent être eectuées
que par un centre de service agréé.
18.
N’utilisez que des pièces de rechange d’origine ou
recommandées par le fabricant.
19. Ne rez ou transportez pas l’appareil en tenant le câble.
Ne placez aucun objet dessus. Ne rez pas le cordon
d’alimentaon sur les arêtes vives des murs et des meubles
et ne le laissez pas entrer en contact avec des surfaces
chaudes.
20.
Gardez l’appareil dans un endroit sec, à l’écart des sources
de chaleur, des températures élevées, des surfaces chaudes,
de la lumière directe du soleil, des sources d’éncelles et
des ammes nues.
21. Ulisez le produit placé horizontalement sur une surface
plane et stable.
22.
Pour assurer le fonconnement normal de l’appareil,
Table of contents
Languages: