Zero Appliances GF230IP Manual

Installation, Service and User
INSTRUCTIONS
FOR THE
ZERO MODEL:
GF230IP
SINGLE LID CHEST FREEZER
2-WAY: L.P. Gas & 230V Electric
ZERO APPLIANCES (PTY) LTD
Cat. I3+ (28–30/37) & I3B/P (30)
WARNING: THIS APPLIANCE MUST BE
EARTHED
ENSURE THAT THE GAS SUPPLY HOSE IS NOT IN
CONTACT WITH OR NEAR THE BURNER BOX

2
Author: Rudi Version: 2.1 Revision: 1.2 Revision Date: June 2019
TECHNICAL DATA
Zero Appliances Model GF230IP
Freezer
Category:
I3+ (28-30/37) For use on Butane at 2.8-3.0 kPa
and Propane at 3.7 kPa.
I3 B/P (30) For use on Butane and Propane
mixtures (LPG) at 3.0 kPa
Declared rate: Injector size 0.42mm diameter, marked ‘13’ or 0
Gas consumption: 34.2 g/h
Electrical Supply: 230V (Mains Electricity) 0.360kW
This appliance is a single lid single bin chest type freezer and has
a hanging storage basket.
WARNING: THIS APPLIANCE MUST BE
EARTHED
ENSURE THAT THE GAS SUPPLY HOSE IS
NOT IN CONTACT WITH OR NEAR THE
BURNER BOX
Manufactured in South Africa by:
Zero Appliances (Pty) Ltd.
P.O. Box 426
Edenvale 1610
Gauteng Province
INSTALLATION INSTRUCTIONS:

3
Author: Rudi Version: 2.1 Revision: 1.2 Revision Date: June 2019
IMPORTANT INFORMATION FOR THE USER
Only a registered LP Gas installer may install a gas installation. All registered installers
are issued with a card carrying their registration number. Ask to be shown the card before
allowing the installation work to commence and make a note of the Installer QCC number.
Upon completion of the installation, the installer is required to explain the operational
details of the installation together with the safety instructions. You will be asked to sign
acceptance of the installation and be provided with a completion certificate. You should
only sign for acceptance of the installation when the installation is completed to your
satisfaction.
Note: Your invoice is required in the event that you wish to make a guarantee claim.
WARNING: ENSURE THAT THE GAS SUPPLY HOSE IS NOT IN
CONTACT WITH OR NEAR THE BURNER BOX.
IMPORTANT INFORMATION FOR THE INSTALLER.
Only an LP gas installer registered with the Liquefied Petroleum Gas Association of South
Africa may install a gas installation. The installation must be installed in accordance with
the requirements of SANS 10087-1 and any fire department regulations and/or local bylaws
applicable to the area. If in doubt, check with the relevant authorities before undertaking the
installation. Upon completion of the installation, you are required to fully explain and
demonstrate to the user the operational details and safety practices applicable to the
installation and the appliance.
1. ENSURE THAT THE APPLIANCE IS STANDING LEVEL!
If positioning on uneven or soft ground, place two flat pieces of wood or
suitably hard material (approximately 600mm long and 100mm wide by
20mm thick) under the two feet of the appliance, from front to back, before
attempting to level the appliance.
2. Place the appliance in a cool, well-ventilated area out of direct sunlight and
strong gusts of wind, allow enough space (at least 100mm) around sides
and back of appliance and 700mm above the appliance.
3. Remove all loose items from the appliance
IMPORTANT: There must be adequate space to reach the controls situated at the
side of the appliance.
NOTE: Any gas supply cylinder should have at least 250mm clearance if
placed behind the appliance.

4
Author: Rudi Version: 2.1 Revision: 1.2 Revision Date: June 2019
GAS CONNECTION:
The appliance inlet is to the 8mm plain straight tube, allowing connection by
means of a gas-tight compression fitting to comply with both EC and local
regulations. The freezer is suitable for connection to butane/propane mixtures
(LPG) at 2.8-3.0 kPa and to propane at 3.7 kPa. Means must be provided to turn
off the gas supply. If the supply is common to other appliances a separate tap must
be fitted for the freezer line.
WARNING:ENSURE THAT THE GAS SUPPLY HOSE IS NOT IN
CONTACT WITH OR NEAR THE BURNER BOX
GAS-PRESSURE REGULATOR
This appliance requires an operating pressure of 2.8 kPa at the appliance. A
suitable LPG regulator that complies with the requirements of SANS 1237
must be installed.
OPERATING INSTRUCTIONS FOR FREEZER
It is important to read through these instructions carefully before beginning to use
this appliance.
Retain these instructions for future reference.
LP. GAS OPERATION:
After initial installation, after changing gas cylinder, after servicing, etc., the gas
pipes may contain some air, which should be allowed to escape by briefly pressing
on the safety valve knob (A). This will ensure that the flame lights quickly.
Do not press knob A for more than 15 seconds – see Users note.
BURN-BACK (FIRE IN BURNER TUBE OR CHAMBER)
(REFER PAGE 4 – TO START GAS OPERATION)
In the event of a burn-back, where the flame burns back to the jet, immediately turn
off the gas supply at the control valve on the gas bottle or gas supply . After
ensuring the flame is extinguished, re-open and re-light the appliance in the normal
manner. Should the appliance again burn back, close the control valve and call a
service technician. Do not use the appliance again until the service technician has
declared that it is safe to do so.
WARNING
This appliance consumes air (oxygen). Provide ample ventilation especially when
sleeping. To avoid endangering your life do not use this freezer in unventilated
structures. Provide additional ventilation for any additional fuel burning appliances
and additional occupants. Always ensure nothing is covering or blocking the
flue(chimney).
FOR YOUR SAFETY
If you smell gas:
1. Turn off gas supply at bottle.
2. Extinguish all naked flames
3. Do not operate any electrical appliances.
4. Ventilate the area.

5
Author: Rudi Version: 2.1 Revision: 1.2 Revision Date: June 2019
5. Do not smoke while checking for leaks.
6. Do not check for leaks with an open flame.
7 If the odour persists, contact your dealer or gas supplier immediately.
Do not store or use gasoline or other flammable vapour and liquid in the vicinity of
this or any other appliance.
USER OPERATING INSTRUCTIONS
TO START ELECTRIC OPERATION
1. Insert the element (B1) into the bottom of the chimney (A1).
2. Fasten the retainer screws (B2) to the bottom of the chimney (A1).
3. Insert the plug top into the wall socket and switch on.
A1
B1
B2

6
Author: Rudi Version: 2.1 Revision: 1.2 Revision Date: June 2019
WARNING: ENSURE THAT THE GAS SUPPLY HOSE IS NOT IN
CONTACT WITH OR NEAR THE BURNER BOX.
Note: Appliance cannot be run off two heat sources at the same time.
TO START GAS OPERATION
WARNING: ENSURE THAT THE GAS SUPPLY HOSE IS NOT IN
CONTACT WITH OR NEAR THE BURNER BOX.
1. Make sure that the electrical supply to the appliance is turned off and plugged
out. Leave the element inserted for 2 hours before removal to ensure that the
element cools down completely. Insert the baffle.
2. Loosen the retainer screws (B2) on the element and slide the element out of
bottom the chimney (A1).
3. Insert the burner (C1) onto the bottom of the chimney (A1)
4. Fasten the retainer screws (C2) to the bottom of the chimney (A1)
5. Open the shut-off valve on the gas bottle or gas installation (check that there is
enough gas).
6. Keep the flame failure device knob (A) pressed in for approximately 15
seconds.
7. Release for 10 seconds, strike match and insert into (B). Press (A) again. The
burner will now burn with a blue flame.
8. Keep the knob (A) pressed in for a further 15 seconds then release it. If the
flame goes out, repeat steps 6, and 7 until the flame stays alight.
9. The appliance should be left running for a minimum of 12 hours
C1
C2

7
Author: Rudi Version: 2.1 Revision: 1.2 Revision Date: June 2019
before being loaded with products.
10. To terminate the gas operation turn off the shut-off valve on the gas bottle or
gas installation.
USERS NOTE: The gas safety valve knob (A) should never be depressed for periods
longer than 15 seconds with the burner unlit as this can cause a potentially dangerous build-
up of unburnt gas. If the burner does not ignite, allow sufficient time for any unburnt gas to
disperse, and then repeat the ignition steps.
TROUBLESHOOTING
IF THE APPLIANCE FAILS TO WORK:
Check the following points before calling for service:
1. That the instructions for starting the appliance have been followed.
2. The appliance is level.
3. If it is possible to start the appliance on an alternative energy sources.
4. If the appliance fails to work on gas, check:
a) That the gas bottle is not empty.
b) That the regulator is not faulty.
c) If another appliance is connected to the same supply, check if it works
properly.
5. If the appliance fails to work on 230V (Mains Electricity), check:
a) That the 230V supply is connected to the unit.
b) That there are no loose connections.
c) That the heating element has not burnt out.
d) Check if electric supply is on by feeling if hot air comes out of the top of the
flue (chimney .This will take about 1 hour after switching on).
IF THE APPLIANCE IS NOT COLD ENOUGH IT MAY BE BECAUSE:
1. The ventilation of the absorption unit is inadequate. Allow at least 100mm
around Back, sides, and 600mm above.
2. The evaporator is frosted up – see Defrosting page 8.
3 The gas pressure is incorrect – check the pressure regulator at the gas cylinder
or at the jet (4) of the burner. (Page 10 – Gas burner parts list).
4 If the jet (4) is blocked, remove the jet, clean with alcohol or other solvent and
blow through with compressed air. Never use a piece of wire or a pin to clean
the jet. (Page 10 – Gas burner parts list).
5 Check that you have the correct regulator for the cylinder and gas type that you
are using.
6 You have run out of gas.
7. The ambient temperature is too high.

8
Author: Rudi Version: 2.1 Revision: 1.2 Revision Date: June 2019
8. Too many products are loaded into the freezer at one time – air must be able to
circulate freely.
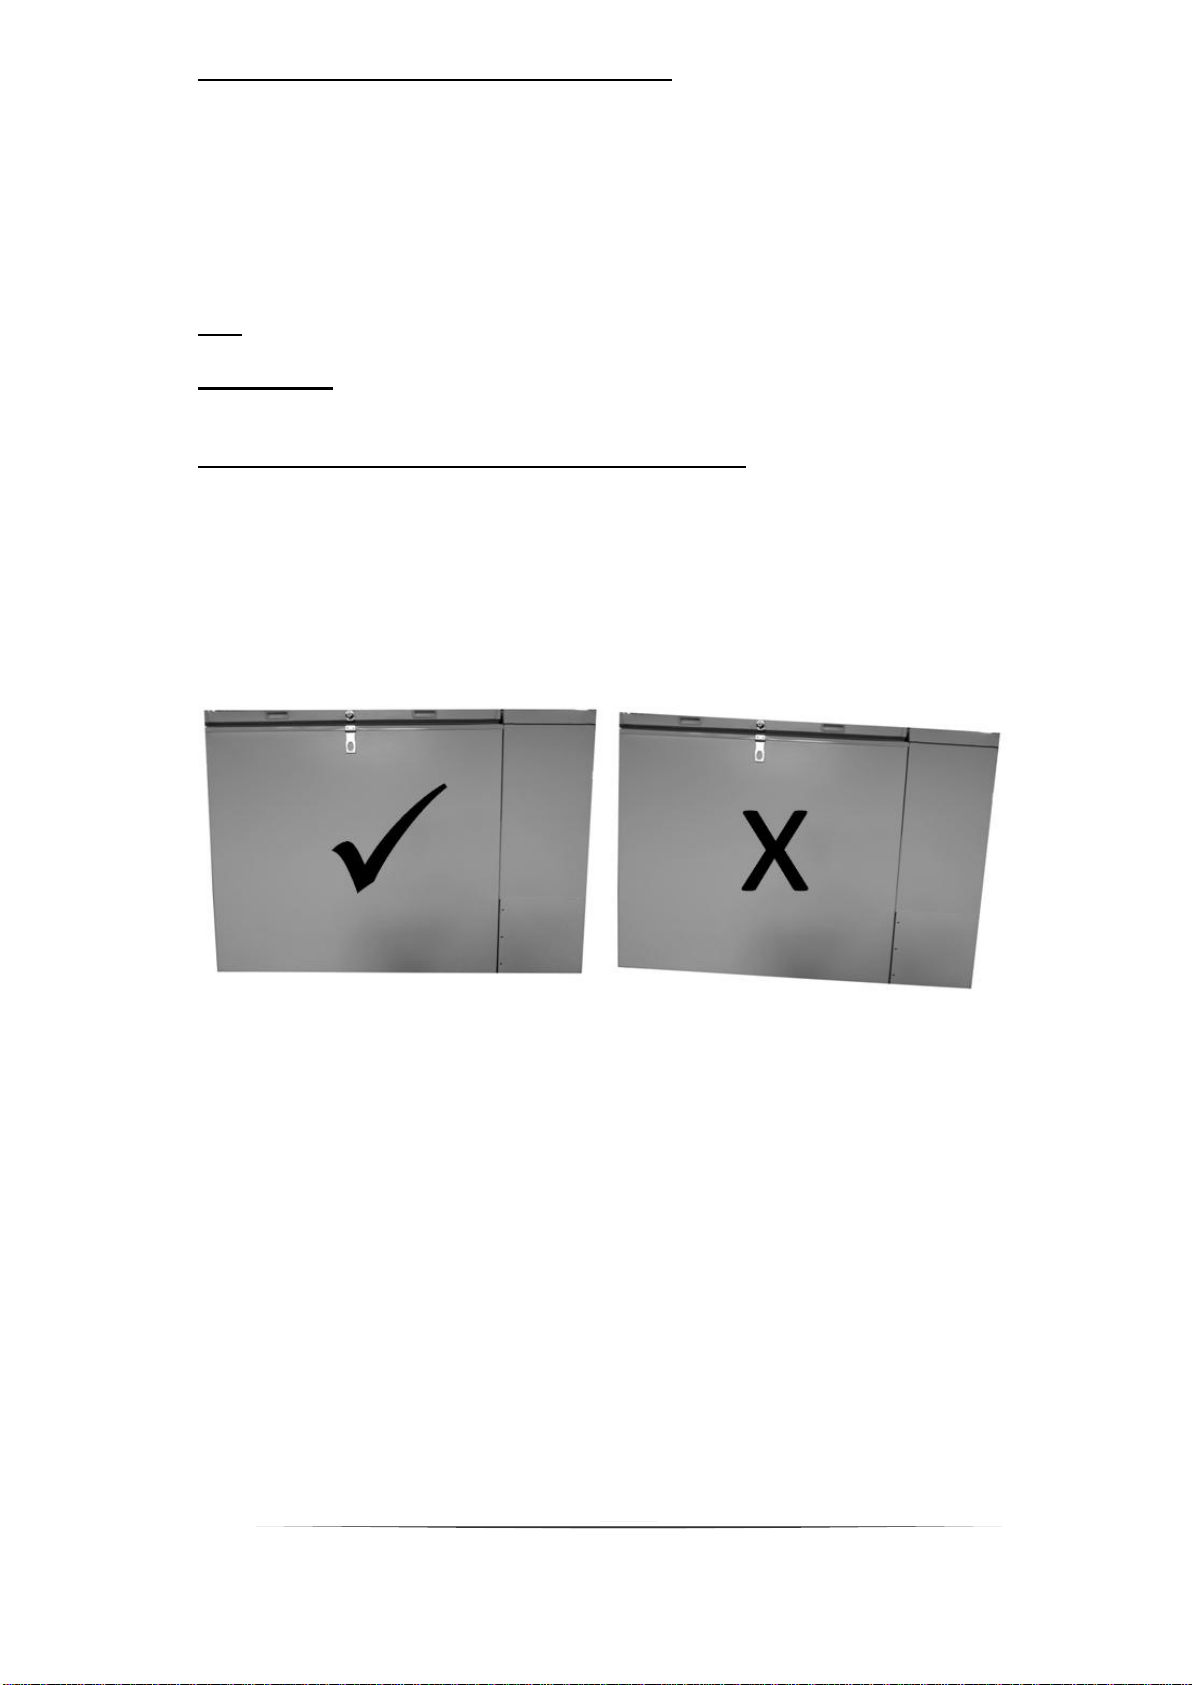
9. The lid is not properly closed or the lid seal is defective.
10. The baffle has not been inserted into the chimney.
11. The absorption unit is leaking. In the case of a visible leak, there will be traces
of a yellow deposit at the point where the ammonia is escaping. If there is a
leak on the evaporator inside the cabinet, a smell of ammonia may be
noticeable inside the bin. If a leak is detected, under NO circumstances should
you try to repair it, as the unit is pressurized with hydrogen and may explode if
welding is attempted on the unit. Call a qualified service technician. Turn off
the gas or electric supply, and then empty the appliance. If it is in a small room
or in sleeping quarters and the smell of ammonia persist remove the appliance
to a well ventilated area. Do not try to use it.
12 There may be a drop in supply voltage, electric function only.
13. If the flame is not burning after releasing the fail-safe valve knob according to
the instructions, there may be two faults, these being:
a) The magnet in the flame failure device (3) is faulty.
b) The thermocouple feeler point (6) may not be in the flame properly.
To rectify this, loosen the thermocouple nuts (7) and adjust the thermocouple
until the point is over the second row of the small holes in the burner and re-
tighten the nuts on the thermocouple. Repeat the starting instructions and
lighting procedure as laid out on page 5. (USER OPERATING INSTRUCTIONS
–TO START GAS OPERATION)
14. If the appliance is still not working properly, call a qualified service technician to
repair it.
SOME USEFUL HINTS
Make sure that:
1. Defrosting is carried out periodically.
2. The appliance is clean and dry with the lid open when it is not to be used for
some time. If the appliance is fitted with a locking device – remove key to
prevent accidental locking.
3. Liquids or items with strong odours are well packaged.
4. The ventilation of the absorption unit is not obstructed.
5. You do not touch the absorption unit while it is in operation as parts of it will be
extremely hot.
6. You check the condition of the gas supply tube regularly:
a) End fitting in good condition.
b) Overall appearance etc.

9
Author: Rudi Version: 2.1 Revision: 1.2 Revision Date: June 2019
7. You have switched on the appliance for approximately 12 hours prior to loading
it with products. Avoid packing products in too tightly – air must be able to
circulate freely
8. You never put bottles or cans of fizzy drinks in the freezer compartment as they
may burst when freezing. Also, do not give children ice-lollies straight from the
freezer compartment as they may cause frost burns.
9. Hot liquids and food are not introduced directly into the freezer, allow them to
cool down first.
10. You are aware that the temperature inside the appliance can vary
according to the ambient temperature, the location of the freezer, the frequency
with which the lid is opened, and the volume and concentration of products
stored in it.
11. You avoid packing products in too tightly – air must be able to circulate freely.
12. For the safety of children keep the key out of children’s reach at all times.
13. It is recommended that a suitably qualified person carry out a yearly service
check.
CLEANING YOUR FREEZER
Clean the bin of the appliance using ½ a litre of warm water and a tablespoon
of bicarbonate of soda.
Soak a soft cloth in the solution, wring it out, and use it to clean out the interior
of the freezer compartment and its fittings.
Do not use wax polish, scouring powder, strong scented products or household
cleaners and detergent to clean the interior of the appliance as they may
damage the surface and leave a strong odour.
The exterior of the appliance should be wiped clean periodically using a damp
cloth and a small quantity of household detergent. The lid seal should only be
cleaned with soap and water and then thoroughly dried. The absorption unit at
the side of the appliance should be cleaned with a brush or feather duster from
time to time, but make sure that the appliance is switched off and has cooled
down when doing this.
DEFROSTING
WARNING:
Normally the temperature of items would rise during defrosting and so, they
should be consumed within 24 hours or discarded.
Do not try to accelerate defrosting by using any kind of heating appliance, as this
may damage the internal surfaces of the freezer.
No sharp object to be used to scrape off the ice as this may damage the internal
surfaces of the freezer.
Frost will gradually accumulate on the freezer surface. It must not be allowed
to grow thick as it acts as an insulator and adversely affects freezer
performance.

10
Author: Rudi Version: 2.1 Revision: 1.2 Revision Date: June 2019
Check the formation of frost regularly and when it gets around 5mm thick,
defrost the appliance.
To defrost the appliance, turn it off and remove all food items.
Once defrosting is complete, clean the interior thoroughly.
IMPORTANT:
Before using the freezer again, ensure that no foreign bodies are present in the flue
chimney, or the burner (dust, insect, nests, waste paper etc.)
WARNING:
The needle valve screw used for admitting the ammonia / hydrogen filling charge to
an absorption unit is fitted to the unit’s reservoir. It is a strictly applied provision of
the guarantee extended on the unit to the customer, that any interference with the
filling valve screw will automatically void the guarantee. The absorption unit must
not be opened, since it contains corroding chemicals under high pressure.
SERVICE NOTES
ROUTINE MAINTENANCE
It is recommended that a suitably qualified person service this
appliance at least once a year.
-Inspect the gas hose for cracks and chafing marks. Test all
connections with a suitable solution, do not use an open flame.
-Check there is no smell of ammonia or any signs of green/yellow
crystal-like deposits on the cooling unit tubes. Smell or deposits
indicate a leaking unit – see User instructions.
-Check the functioning of the flame failure device (3) – adjust if
necessary.
-Check that the flame failure device (3) button moves in and out
correctly
-Examine the burner flame – ensure that it is burning with a sharp
blue flame and no yellow tipping or sooting is observed
-Check the door/lid seals are in good condition.
IN THE EVENT OF FAILURE
If the burner will not light:
-Check adequate gas supply – From the cylinder through to the
burner.
-Depress flame failure device for 15sec and try lighting with a match.
This must be done in a well ventilated area!
-Check injector is clean – if not, clean with solvent and blow dry. Do
not try to clean with pin or similar object.

11
Author: Rudi Version: 2.1 Revision: 1.2 Revision Date: June 2019
14
-If the burner will not stay alight, check position of the thermocouple
(6) point, and the functioning of the flame failure device (3).
If not cold enough:
-Check through points listed under Troubleshooting.
-In the unlikely event of cooling unit failure, contact the national
distributor without delay.
IMPORTANT NOTE
If there is a smell of ammonia, it is advised that the user turn off the
appliance, clear out all the food and remove the appliance from dwelling
areas.
GAS BURNER PARTS LIST
1. SANS BRASS HOSE TAIL.
2. M10 NUTS.
3. FLAME FAILURE DEVICE.
4. JET.
5. MIXING TUBE.
6. THERMOCOUPLE.
7. THERMOCOUPLE NUTS.
8. RETAINER SCREW.

12
Author: Rudi Version: 2.1 Revision: 1.2 Revision Date: June 2019
ENSURE THAT THE GAS SUPPLY HOSE IS
NOT IN CONTACT WITH OR NEAR THE
BURNER BOX.
Made in South Africa
(Pty) Ltd
Table of contents
Other Zero Appliances Freezer manuals

Zero Appliances
Zero Appliances GF180IP Manual

Zero Appliances
Zero Appliances GF250D Manual

Zero Appliances
Zero Appliances ECF220AC User manual

Zero Appliances
Zero Appliances ECF220 DC Manual

Zero Appliances
Zero Appliances GF120 Manual

Zero Appliances
Zero Appliances GEV60 Manual

Zero Appliances
Zero Appliances GR265G Manual